Introducción

Solo como requisito previo, afloja la batería de la carcasa trasera.

  1. smfOLc6Iw1nMcIFL
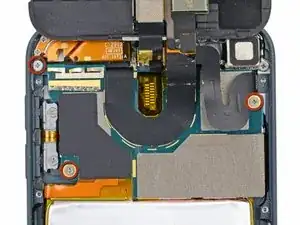
    • Retira los tres tornillos Phillips n.º 000 de 1,6 mm que sujetan la placa lógica a la carcasa trasera.

    Hi, the MPN on that WiFi flex confirms this is not an iPod Touch 6th gen, it is 5th Gen. I am trying to source a 6th Gen WiFi Flex.

    Ricky Pohlman -

  2. DNBptMRXPLGdbc3U
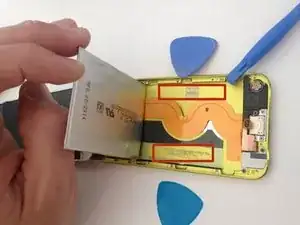
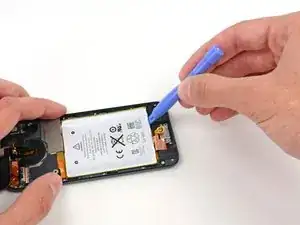
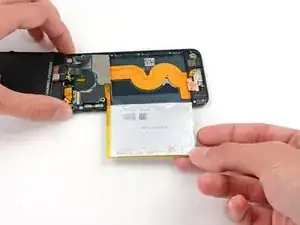
    • Hay dos tiras de adhesivo que mantienen la batería en su lugar.

    • Voltea el iPod y caliente la PARTE POSTERIOR de la carcasa de aluminio del iPod. No calientes la batería.

    • La caja de aluminio no tiene por qué estar caliente; siempre debes poder tocar las partes calientes con los dedos en todo momento sin que sea incómodo.

    Instead of a heat gun or hair dryer, I used a rice sock (http://www.wikihow.com/Make-a-Rice-Sock) to apply heat evenly across the entire back of the case while the case still sat upright for me to work on getting the battery loose. It was a lot easier than trying to heat the back of the case, then flip the case over and work feverishly before it cooled.

    Eric -

    I'm sure this works, but it doesn't seem like the proper way to do this. I didn't like the feeling of prying on a flimsy battery at all. That's not practical. Instead get some molybdenum wire start it underneath the corners, then wrap the ends of the wire on like 2 pencils then tape them so u dont have to wrap the wire around your fingers because it will hurt lol. then apply heat, i went about 130 degrees is what my infrared gun said. I used a geat gun on low and a good distance away. Then just work the wire down the adhesive obviously lol. This worked out very easily for me and I felt safe and more confident about what I was doing. Good luck.

    taylor craig -

    First of all, one of the strips is accessible with a pair of angled tweezers (bottom right of device). Second, where can we get replacement adhesive strips for the battery?

    Ian Bogue -

    If you really don’t want to remove the battery, you may lift the mainboard slightly instead and disonnect display, back camera flexes and antenna connector. Then gently pull back camera module out of the seat. This gives you enough room to connect new display and back camera flexes. Back cam module would be hanging while you connect everything that got disconnected. Screw back the mainboard and push camera module to its seat.

    Slava Belkov -

    Removing the battery is absolutely unnecessary. Its very likely the battery would be damaged during the removal… Similar to Slava up above, just lift the freaking motherboard up, disconnect the cables, and install the new display, easy.

    Conrad -

  3. 5EZPQfvQNDxuKVrv
    5EZPQfvQNDxuKVrv
    VTJe4GUuiSk5CRRC
    • Hay tres muescas a cada lado de la batería. En los próximos pasos, usarás estas muescas para sacar gradualmente la batería de la carcasa trasera.

    • La batería está asegurada con grandes cantidades de adhesivo, por lo que deberás hacerlo despacio y con cuidado para evitar perforar o arrugar la batería.

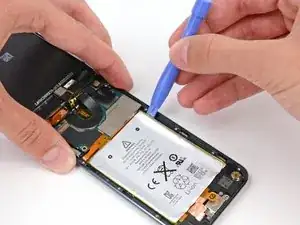
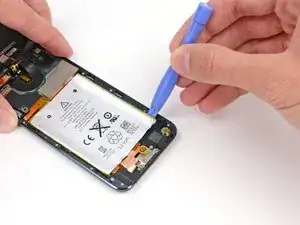
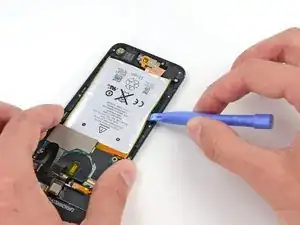
    • Inserta una herramienta de apertura de plástico en la muesca superior derecha y levanta suavemente la batería.

    • No intentes levantar toda la batería en este momento; solo deseas comenzar a aflojar el adhesivo en cada uno de los puntos de palanca, a l mismo tiempo.

  4. BVCuXxHoZC5CLVUA
    BVCuXxHoZC5CLVUA
    tCG5cZKiDQFDoat2
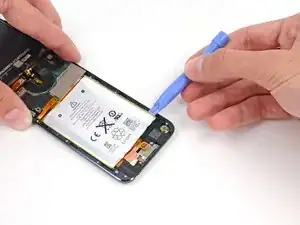
    • Continúa con la muesca inferior derecha. Inserta la herramienta de apertura de plástico en la muesca y levanta suavemente el costado de la batería.

  5. DxfMBArClCbEpWOn
    DxfMBArClCbEpWOn
    MJk5dHvtrWYZQMKP
    • Continúa levantando la batería desde la parte inferior.

    • Al hacer palanca en la parte inferior, ten cuidado de no presionar demasiado fuerte contra el altavoz o el conector para auriculares.

  6. qoajNaoATRCxOBx1
    qoajNaoATRCxOBx1
    pRQ2yExWXFWeOrEh
    • Haz palanca a lo largo del lado izquierdo también.

    • Es posible que debas moverte hacia adelante y hacia atrás entre los lados y la parte inferior de la batería, levantando una pequeña cantidad a la vez hasta que la batería esté completamente libre del adhesivo.

  7. gcHWYZefXHQW4qmp
    gcHWYZefXHQW4qmp
    OYHfhEVnFxuEajMj
    YFu1IqKh16cu2GPk
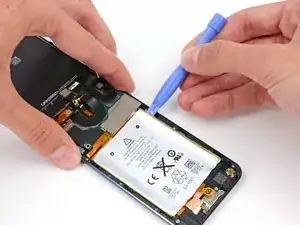
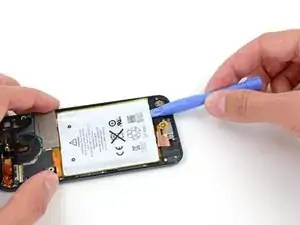
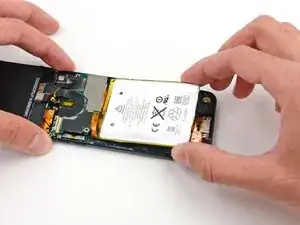
    • Una vez que se haya aflojado todo el adhesivo, levanta la batería desde la parte inferior y gírala sobre el lado izquierdo de la carcasa trasera.

    • Asegúrate de no sacarlo, ya que está soldado a la placa lógica.

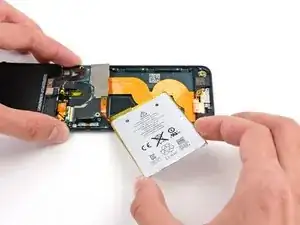
    • Voltea la batería para enderezar su cable y colócala.

Conclusión

Para volver a armar tu dispositivo, sigue estas instrucciones en orden inverso.

Andrew Optimus Goldheart

Miembro Desde 17/10/09

494141 Reputación

3 comentarios

You skipped steps.

Nick -

This isn't even half of the procedure - the battery isn't even completely removed, much less replaced! Helpful but nowhere near complete.

Paul Pearah -

Yeah, you might have skipped the most critical steps, like glass and bezel removal, desoldering, soldering etc..

dominic benavente -