Introducción

  1. KxWZNmqSHCNSWYbs
    • Usa la herramienta de palanca y apertura IFixit para no dañar el teléfono como lo hice yo.

    • La línea roja indica la apertura, síguela alrededor del teléfono.

    • Usa un secador de pelo o una pistola de aire caliente para ablandar el pegamento si es necesario.

    Mine was super glued down! It took a lot of patience to get the case open. Didn't break anything. Hope there is still enough 'stick' to hold it back together again. Would be nice if it had clips too.

    Jim Thorne -

  2. 5EFFj5JtvExWp5vo
    • Despega la pequeña pestaña amarilla con un destornillador pequeño de cabeza plana.

    • Desliza el protector de metal hacia abajo para desbloquearlo y quitarlo.

    I was a bit confused by the description "peel away the yellow tab". It was more of little plastic brick thingy that has to be completely yanked out, then you can slide the metal shield.

    gottfried -

  3. ej3aHtG3UUYGJOXR
    • Quita todos los tornillos de la cubierta superior.

    I had one 'hidden' screw. The screw beside the cameras on the inside was under tape. If not for this picture I would never have found it. I sliced a slot in the tape to access the screw and just put it back over when I was done. Thank you for the pictures!!!

    Jim Thorne -

  4. LgWa5OgFgJZbLL5w
    • Usa una pequeña cabeza plana para aflojar la cubierta.

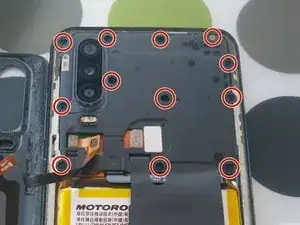
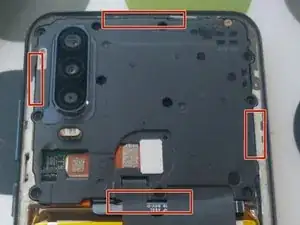
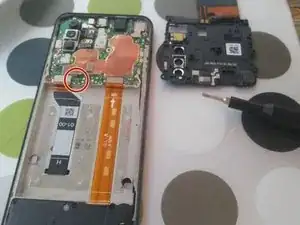
    • Alrededor de los marcadores rojos hay pequeños clips que lo mantienen en su lugar.

  5. brPjsJ6wHnKqcGDE
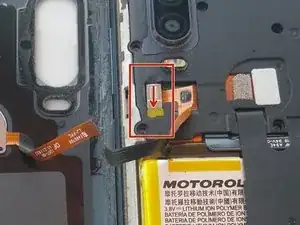
    • Dentro del marcador rojo, desconecta el cable de la batería y saca la batería con cuidado.

    • Usa una herramienta de palanca que no sea de metal para levantar las esquinas y aplique calor para ablandar el pegamento en el proceso.

    • Ten cuidado y asegúrate de que la batería no se doble demasiado ni se rompa.

    For me it wasn't quite as simple as "pull the battery out". The battery was glued down rather well and I ended up piercing the battery trying to pry it off. THIS IS VERY DANGEROUS! THE BATTERY CAN EXPLODE!

    My advice: Get a non-metal prying tool to pull up one of the battery corners then start applying heat (e.g. heat gun or blow dryer). Don't stick the tool farther in, just pry up the edge a bit more every 5 mins or so. You don't want to pierce the battery or scratch up the cable underneath. This part requires patience.

    Martin K -

    Mine wasn't really glued down that hard, but thanks for the heads-up, I will update the guide

    Ferre Vekemans -

    In case it helps:

    My phone Motorola One Action stopped charging. On connecting the charger nothing happened. On pressing the power button a 0% charge sign appeared.

    I just opened the case, disconnected the battery, and connected it back. It works again, without replacing the part.

    Thanks for the tutorial, very useful to open the case and do the thing :)

    Cheers.

    Salva -

    It was more like 30 to 45 minutes for me, but I'm no pro. Just be very, very careful. Better to take a half hour longer and not break anything. Thank you so much for the tutorial!

    Jim Thorne -

    Thanks very much for the tutorial. Like Jim said took about 30 minutes. Have to be very very careful with the battery and take your time.

    Bill Garms -

    I also was getting 0% and not able to charge.

    Opened it up and the battery connector was loose. Reconnected and now working fine.

    Thanks for the disassembly steps

    Richard Lacasse -

    No worries guys, glad I could help ;)

    Ferre Vekemans -

Conclusión

Para volver a armar su dispositivo, sigue estas instrucciones en orden inverso.

Ferre Vekemans

Miembro Desde 14/08/20

248 Reputación

0 comentarios