
Introducción
Usa esta guía para reemplazar una batería gastada o defectuosa y revitaliza tu MacBook Pro. Si tu batería está hinchada, tome precauciones apropiadas.
-
-
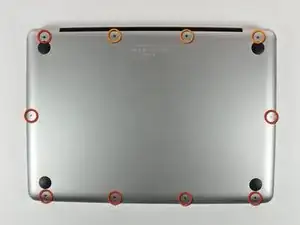
Retira los siguientes 10 tornillos que sujetan la tapa inferior del MacBook Pro 13 "Unibody:
-
Siete tornillos Phillips de 3 mm.
-
Tres tornillos Phillips de 13,5 mm.
-
-
-
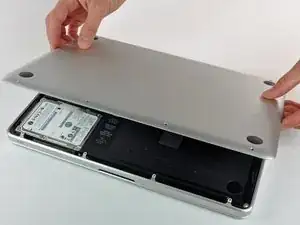
Levanta ligeramente la tapa inferior y empuja hacia la parte posterior para liberarlo de las pestañas que lo sujetan
-
-
-
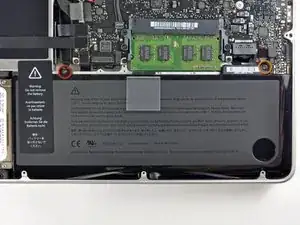
Retira los siguientes tornillos de tres puntos que sujetan la batería a la carcasa superior:
-
Un tornillo de tres puntos de 5.5 mm.
-
Un tornillo de tres puntos de 13.5 mm.
-
-
-
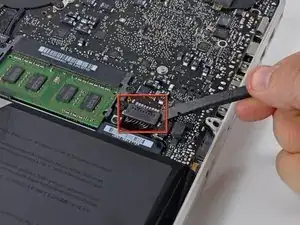
Utilizar el extremo plano de un spudger para levantar el conector de la batería de su zócalo en la placa lógica.
-
-
-
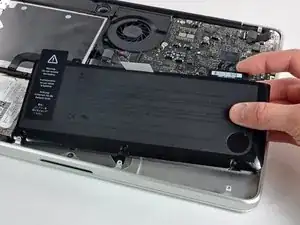
Levanta la batería fuera de la caja superior.
-
Cárgala hasta el 100% y luego sigue cargándola durante al menos 2 horas más. Luego, desenchúfala y úsala normalmente para drenar la batería. Cuando veas la advertencia de batería baja, guarda tu trabajo y mantén tu laptop encendida hasta que se duerma. Espera al menos 5 horas, luego cárgala de forma ininterrumpida hasta 100%.
-
Si notas alguna conducta o problema inusual luego de instalar tu batería nueva, podrías necesitar restablecer el SMC de tu MacBook Pro.
-
Para volver a ensamblar tu dispositivo, sigue estas instrucciones en orden inverso.

48 comentarios
My laptop wouldn't believe the battery was new until I reset the SMC as well ( http://support.apple.com/kb/HT3964 ).
Perfect! I didn't want to wait for the Tri-wing screwdriver to ship, so I gave it a try by wedging a FH 1 in between two of the wings. It worked well to unscrew, but you must be very careful when resetting the screws that hold the battery. If you get them started with your finger (a little pressure with your thumb pushing straight down will get the job done) then you can do a few final turns with the FH 1. If you try to start resetting the screws with the off-center-FH1-workaround, you will strip the screw! Keep the screws centered and don't force anything.
worked like a charm. my old battery had bulged and made it so that the track pad would not click :-( replacing the battery did the trick.
statprof -
Compare the short screws carefully before reinstalling them. The shouldered screws go in the holes on the front edge.
David Kilbridge -
Before I started removing any screws I took a piece of paper and drew the bottom of the laptop and put a piece of double-sided tape in the spot where each screw goes. That way when I took out the screws, I could put them on the tape so I knew exactly which screw went in which spot. I did the same thing for dismantling the inside on another sheet of paper, then a third sheet for the screen after getting the front glass off.
mastover -
I use a similar technique: I print out the iFixit manual for the job, and Scotch-tape down the screws/brackets/cables I remove at each step next to the component descriptions. That way, when I'm reassembling, the bits are taped right next to the photo of where they came from.
adlerpe -
That's exactly what I do for all my repairs! It's the best way to keep track of all of the parts ' original location and to make sure that you don't miss any parts during reassembly.
joyitsjennie -
Great idea and one I use often
Thomas Overstreet -
Excellent idea! Thanks for sharing it here.
Laura Sharkey -
I used a 00 that fit but the screws were very tight so I used a tiny paintbrush with some wd40 on it and put it around the edges of the screws. Worked like a charm
valentinedhdh -
I use a magnetic mat and place the screws in order on that :)
Cary B -