Introducción
Usa esta guía para reemplazar la cámara trasera en tu Nexus 5.
Partes
-
-
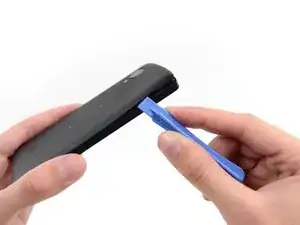
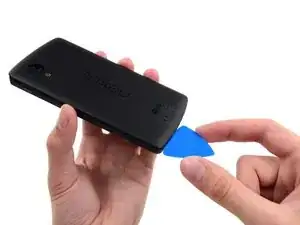
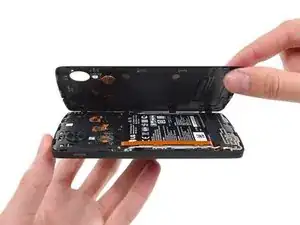
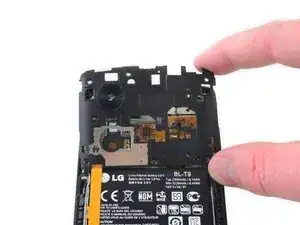
Usa una herramienta de apertura de plástico para liberar los clips en la parte superior de cada lado de la tapa trasera.
-
-
-
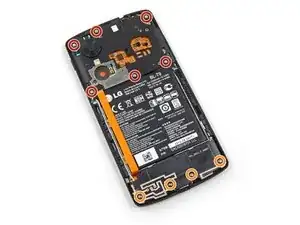
Remueve los seis tornillos Phillips #00 de 4.0 mm que sujetan el marco medio al teléfono.
-
Para reemplazar la pantalla LCD y digitalizador, remueve los cuatro tornillos adicionales de 4.00 mm de la tapa de la placa hija con el mismo destornillador.
-
-
-
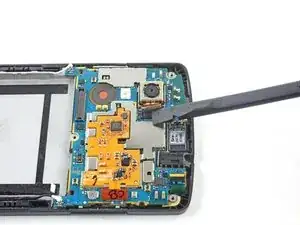
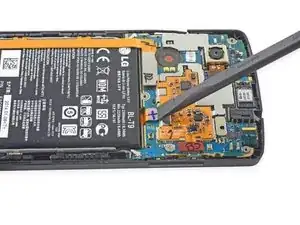
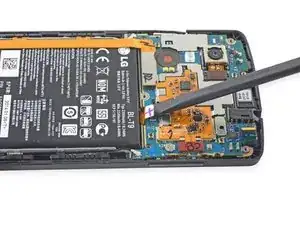
Usa un spudger para hacer palanca en la cámara trasera para sacarla de su adhesivo.
-
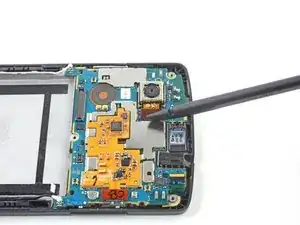
Jala la cámara lateralmente hacia su cable plano para revelar la placa de circuito que se esconde debajo de la placa madre.
-
Una vez que puedas ver el dispositivo de cámara, puedes jalar hacia arriba y remuévelo.
-


Para volver a ensamblar tu dispositivo, sigue estas instrucciones en orden inverso.
Un comentario
In case anyone else was confused about the end like I was: you don't have to remove the old adhesive, just leave it and put the replacement directly on top of it. It worked just fine for me!
Wireless QI and NFC.
Once I have put everything together with the new battery in place, I have as last replaced the plastic back cover, snapping all the clips back around the edges of the phone. Alas, I was quick to realise the QI Wireless charging has ceased to work.
I almost blamed the battery, or worse, me.
QUICK TIP: there is actually another clip in the middle of the plastic back cover - just press with your thumb just above the 'S' in NEXUS emblem and, voila! Snaps back in.
Wireless charge and NFC - works, once again.
cwioro -
you just saved me like 30 bucks. thank you so much.
Robert Nolan -
+ 1, had the same issue and pressing just near the S fixed it! Thanks a lot!
nicco82 -
Just a me too, I had to press above the S and it was quite a snap
Erik Karlin -
There seems to be two contacts that snap into place. One is in line with the led pretty much in the middle of the phone and the second one in line with the camera lens on the opposite side to the lens. The middle one for me snapped pretty lightly, but the side one required a bit more pressure. After that the nfc started working again. Thanks for posting this!
Dennis Millner -
Is it hard to remove the battery door? Worried I might damage it.
Ash -
When I openend the back cover I damaged two clips. One about 2.5cm (1 inch) below the volume controls and one on the other side about same height. The cover fits good without those two but on one side there is a small gap where the clip broke. But I have a hard cover protector on my phone so it's not that bad.
simonlwheeler -
The case around the sim slot is pretty thin and easy to break, best to avoid using the pry tool at this point.
Aled Morris -
Excellent tip, should be included in the main guide.
fprades -
Hey Author, i need to ur expert advice...i replaced my nexus 5's back cover. since the new one did not have the vibrators battery i had to take it from the old one and connect it to the new one...on removing i noticed that it was stuck to the cover by a glue
Question: what glue to use to hold the battery to the cover?
suwaid akbar -
Any adhesive will do. I used a hot glue gun. You shouldn't need expert advice to figure that out. Use your head.
tjt263 -
The case around the volume control is also pretty thin.... I broke mine prying so avoid the pry there too.
Also my back had glue at the bottom and I haven't seen mentioned
kornerson -