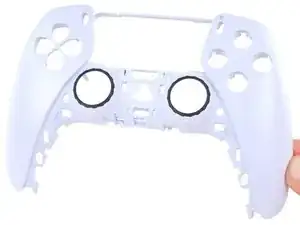
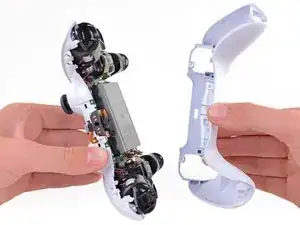
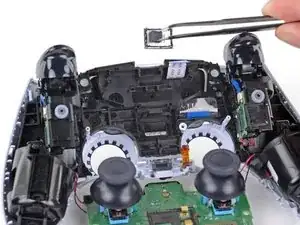
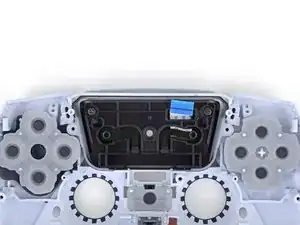
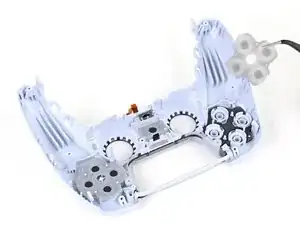
Introducción

Sigue esta guía para reemplazar la carcasa frontal en un controlador Sony PlayStation 5 DualSense.

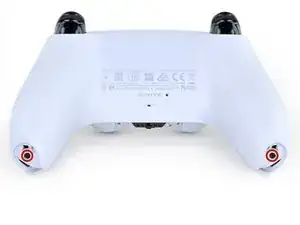
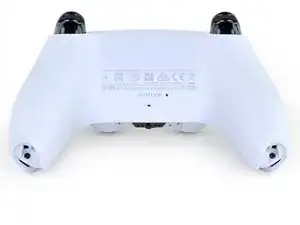
Nota: Esta guía es para los controladores DualSense con un ID de la FCC que termina en 1. Verifica la parte posterior de tu controlador para verificar tu modelo. Si el tuyo termina en A, habrá diferencias en el diseño interno.

  1. GTfsKVIR12U1WTFu
    GTfsKVIR12U1WTFu
    ePrmMhAFKkXiSkSe
    • Desconecta y apaga tu mando antes de empezar.

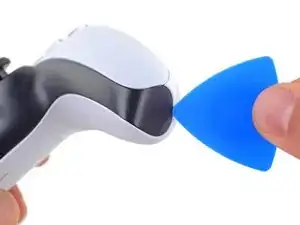
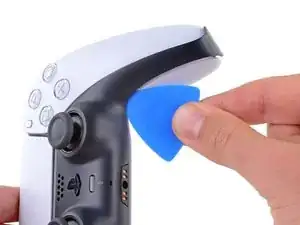
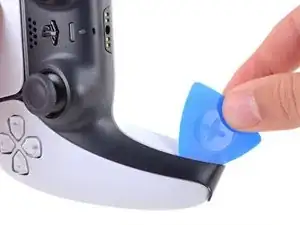
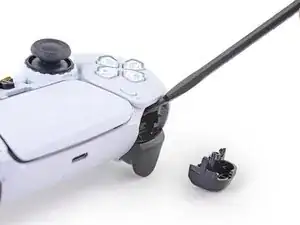
    • Inserta una púa de apertura por debajo del reborde central de la esquina inferior derecha del mando para liberar los clips que lo sujetan a la carcasa.

  2. Rjcu3KDZixCT6wVc
    Rjcu3KDZixCT6wVc
    PTiPbZOkfusF5DVG
    TciAM3EXVAG6wM3E
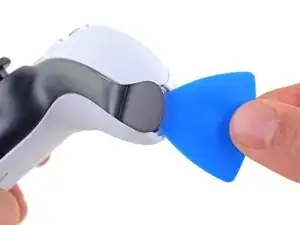
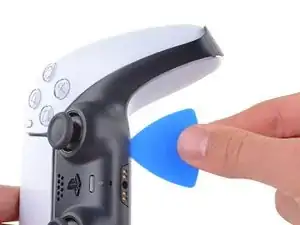
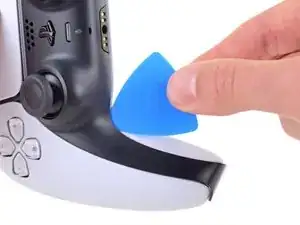
    • Desliza la púa de apertura a lo largo del borde inferior derecho del embellecedor central para liberar los clips que lo fijan a la carcasa.

  3. d5bIXVWhYD6NuHtO
    d5bIXVWhYD6NuHtO
    VnUyqAC2gatYKPwY
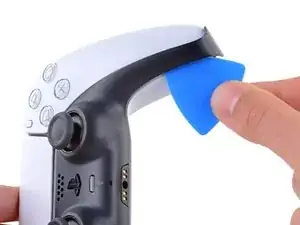
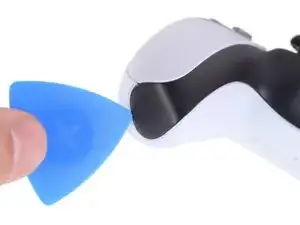
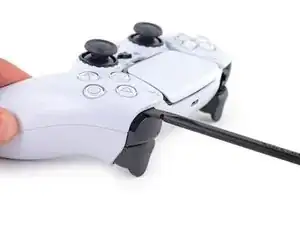
    • Inserta una púa de apertura por debajo del reborde central de la esquina inferior izquierda del mando para liberar los clips que lo sujetan a la carcasa.

  4. e5VLpDCSJZrCTHZr
    e5VLpDCSJZrCTHZr
    Vmn4XCtKxVVpYw1i
    uGRXgEGmKq2IKNvT
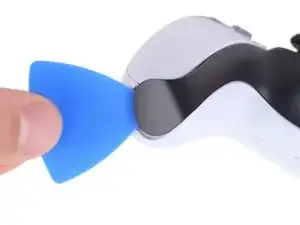
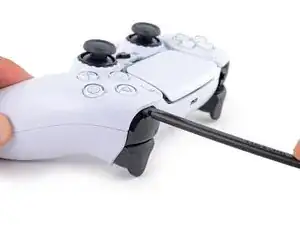
    • Desliza la púa de apertura a lo largo del borde inferior izquierdo del embellecedor central para liberar los clips que lo fijan a la carcasa.

  5. bQYOnlI5CkoEepwG
    bQYOnlI5CkoEepwG
    FnfBCacKEAvKripH
    MIN3JWiK5kicsBCd
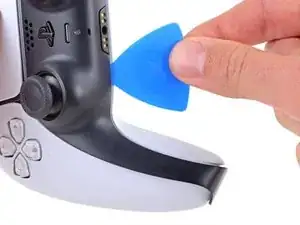
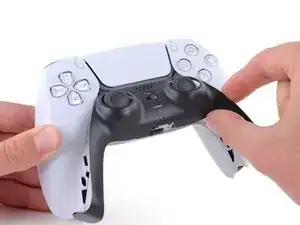
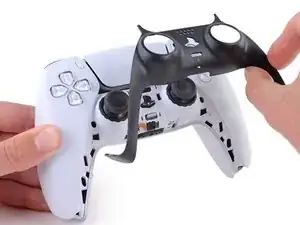
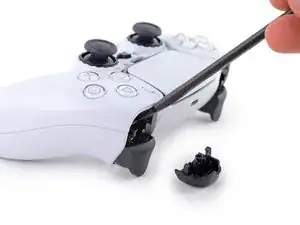
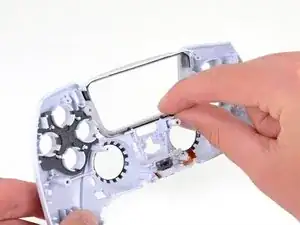
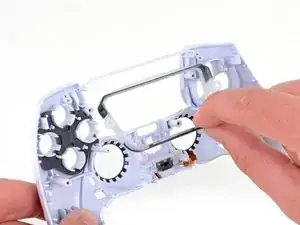
    • Levanta con los dedos el borde inferior del reborde central para liberar el clip restante.

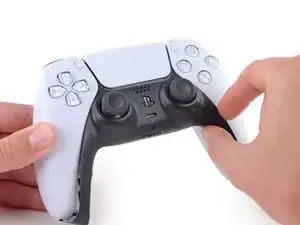
    • Levanta el reborde central sobre los joysticks para retirarlo.

  6. 5ReUfeCrCvT1oJRI
    5ReUfeCrCvT1oJRI
    3WpjIcSsYp21SxKj
    gHDW61gAMVPVZgHk
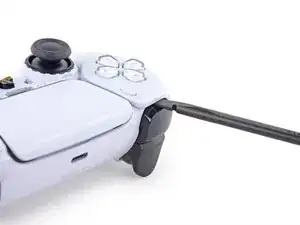
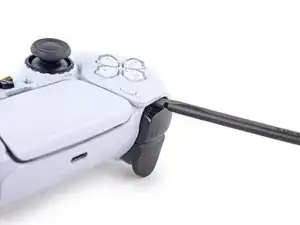
    • Introduce el extremo plano de un spudger en el hueco que hay sobre el botón L1.

    • Cubra el botón con el pulgar para evitar que salga despedido por la habitación.

    • Haz palanca hacia arriba para retirar el botón L1.

  7. HCYXqmKm54w4y6aL
    HCYXqmKm54w4y6aL
    pXUHXLrS3R1rQahC
    NOocJ2nMtBXZlsgH
    • Introduce el extremo plano de un spudger en el hueco que hay sobre el botón R1.

    • Cubre el botón con el pulgar para evitar que salga despedido por la habitación.

    • Haz palanca hacia arriba para retirar el botón R1.

    to save a few bucks, the L1 and R1 buttons can be removed without the use of the spudger tool by using any thin prying tool and just pry the buttons from the bottom instead of the top

    Alan Peng -

    What I didn't see addressed anywhere (here or in other similar articles) is that replacement R1 / L1 buttons can be differ enough to be un-usable depending on which model your ps5 controller is. The ones I ordered don't fit and now I can't find a way to be sure I get the right ones because few know there's even a difference.

    Walt Mather -

  8. RTMdTIsvXlDMMLCE
    RTMdTIsvXlDMMLCE
    3xBGQ3AXp52YbXKM
    • Utiliza un destornillador Phillips para retirar los dos tornillos de 6.4 mm que sujetan las esquinas inferiores de la carcasa inferior.

  9. rkti2BnvDAh1TREh
    rkti2BnvDAh1TREh
    YyonYJBpMSo32LBL
    • Utiliza un destornillador Phillips para retirar los dos tornillos de 6.4 mm situados detrás de los botones L1 y R1.

  10. Xc1l4aJ6u6BGp5RP
    Xc1l4aJ6u6BGp5RP
    LjguKaIMMeWPUAgo
    dItxRHYBJkALcAlp
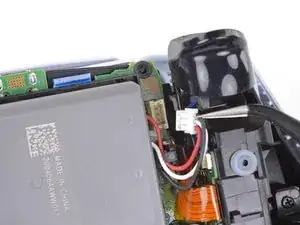
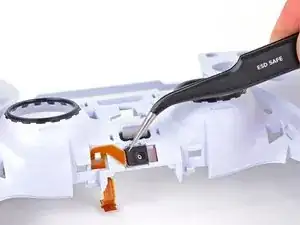
    • Usa el borde puntiagudo de un spudger para desenganchar los dos clips situados a ambos lados de la toma de auriculares.

    If these are similar in nature to the DS4’s clips, don’t use too much force so you don’t end up breaking them

    Strings Cat -

    there is a clip that holds the rear cover in place located in R1 and L1

    Zargruzski nakamura -

  11. VZLGleYqNCLAPnRD
    VZLGleYqNCLAPnRD
    OVo1ia2tIbXUTgfA
    • Retira la caja trasera.

    There are four more clips/hooks hidden in the seams along the outer sides of the handles. If you pull open the controller as shown in this step, then you will shear off the two tiny clips which are right next to the R1 and L1 buttons.

    Therefore, you should first release those clips by prying the seams open sideways.

    I noticed this with the updated design of the controller, not sure whether the hooks are present on the first version.

    The hooks are not critical for the integrity of the controller as the two halves are held together by the screws hidden under the buttons. The damage does show that the controller has been taken apart.

    Nick -

    Thought I'd clarify: The clips next to the L1 and R1 are on the outer side from the L1 and R1 buttons, I'd suggest zooming in on the picture to see them. They're quite easy to break, but also easy to remove using the plastic spudger along the seam, bending the bottom cover outwards

    Franz Rolfsvaag -

    I am still strugling to find the clips. Could someone point them out in the image with a screen shot or something like that.

    aGingerThing -

    I keep getting stuck at this step too with the new DualSense CFI-ZCT1WA revision. The top and bottom shells seem like they are fused together next to L1/R1 but I can't seem to be able to find where these hidden clips are located. My controller is still in warranty so I don't want to break them in case I can't fix my issue.

    but also easy to remove using the plastic spudger along the seam, bending the bottom cover outwards

    I tried this but it seems that the you need a lot of force and I ended up bending the tip of my spudger. Are you sure it's not the top cover that you need to pry away? The bottom cover has a ridge to make sure it's under the top cover so it's not easy to bend outwards.

    @samomio I think there needs to be a step added for these new clips.

    robplease -

  12. y641KJMcsYBEboOS
    y641KJMcsYBEboOS
    E6YeMuX4VK4rKsAg
    • Usa un par de pinzas o tus dedos para desconectar la batería de la placa base.

    • Sujeta el conector, no los cables, cuando lo desconectes.

    Tweezers aren't gonna grip that the way you need.

    Leif DeWolf -

  13. ONKEXniLxYyiAMwP
    ONKEXniLxYyiAMwP
    OU1aauS5WB3RXnNv
    • Levanta la batería directamente del soporte de la batería.

  14. sVsceB4EJJN4igAW
    sVsceB4EJJN4igAW
    LWv3kRdOD3MyIOxA
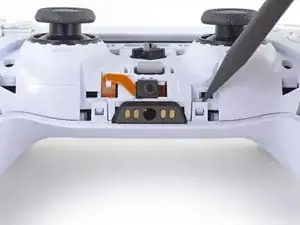
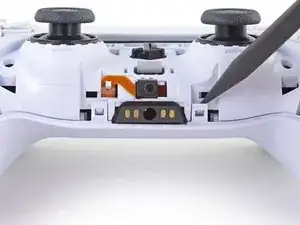
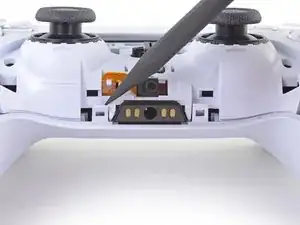
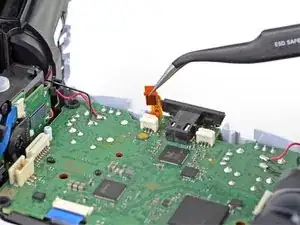
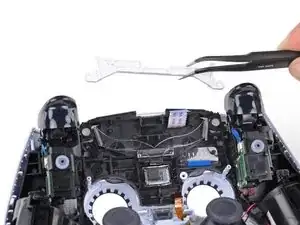
    • Toma la lengüeta inferior del cable de cinta del micrófono con los dedos o con unas pinzas y desconéctalo de la placa madre.

    These ribbon cables have small tabs on either side you can use to help pull out the cable. You can slightly pull up, alternating between the two sides, to slowly wiggle the connector out.

    Tran Anh Nguyen -

  15. 1sbxrgZE212ACjfZ
    1sbxrgZE212ACjfZ
    WHQWFFeIquSFVPFh
    • Grasp the bottom tab of the microphone ribbon cable with your fingers or tweezers and disconnect it from the motherboard.

  16. MVqtcLTeGaGZO6Lw
    MVqtcLTeGaGZO6Lw
    eaAKIGVAOolyyZ5Q
    • Levanta el soporte de la batería fuera de la placa base.

    Black and red wires fit neatly under the lower left and lower right arms of the battery bracket, to avoid potential damage when reconnecting the rear case.

    Sean Gonzales -

    This needs to be noted. Thanks!

    Nick Gatti -

  17. vysKPAMs3LmOUmiY
    vysKPAMs3LmOUmiY
    QLbCmreHvepGMkOB
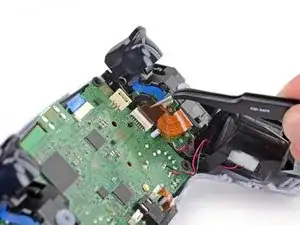
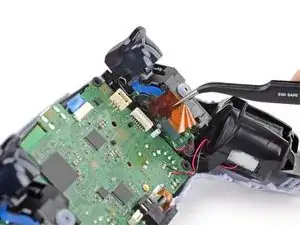
    • Toma la lengüeta del cable de cinta del ensamblaje del gatillo derecho con unas pinzas o con los dedos y tira hacia arriba para desconectarlo de la placa madre.

    • No retires todavía por completo el cable plano.

  18. BgY2EFxlGP1qu1JF
    BgY2EFxlGP1qu1JF
    UEM6rxfOxTPtriIO
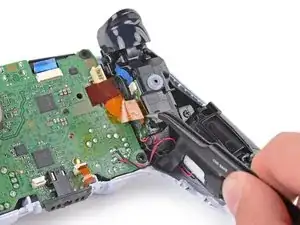
    • Agarra la lengüeta del cable de cinta del ensamblaje del gatillo derecho con unas pinzas o con los dedos, y tira hacia arriba para desconectarlo del ensamblaje del gatillo.

    • Retira el cable plano.

  19. DNCfVqeUwEBVL5vx
    DNCfVqeUwEBVL5vx
    fkYnkZICbnGNYmlL
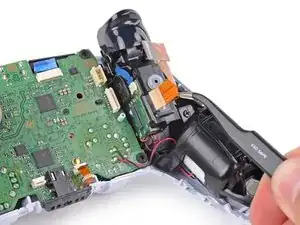
    • Toma la lengüeta del cable de cinta del ensamblaje del gatillo izquierdo con unas pinzas o con los dedos y tira hacia arriba para desconectarlo de la placa madre.

    • No retires todavía por completo el cable plano.

  20. 1mamEpkmIUfdBkY2
    1mamEpkmIUfdBkY2
    rRFlFNnP2UoIL3ad
    • Agarra la lengüeta del cable plano del ensamblaje del gatillo izquierdo con unas pinzas o con los dedos, y tira hacia arriba para desconectarlo del ensamblaje del gatillo.

    • Retira el cable plano.

  21. pG1fDWglZbP4iL5N
    pG1fDWglZbP4iL5N
    Hp2VFaarDEOKof3P
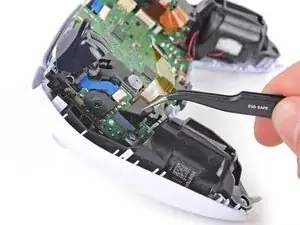
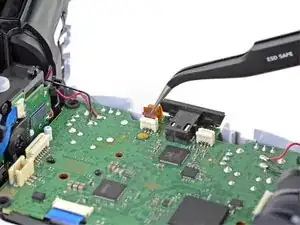
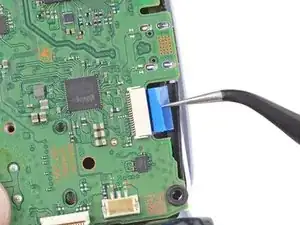
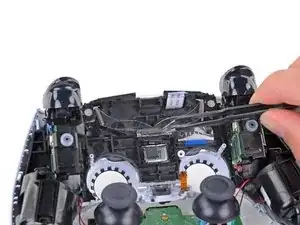
    • Utiliza unas pinzas o tus dedos para agarrar la lengüeta superior del cable plano del micrófono y tira hacia arriba para desconectarlo de la placa madre.

    what is the white thing soldered to the motherboard called where the mic ribbon cable plugs and where can i find the part?

    Abhi K -

  22. HcN3WXjBdpXKafMs
    HcN3WXjBdpXKafMs
    eYVKcU6OsxOKcb1S
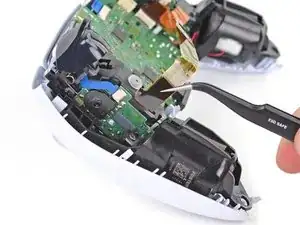
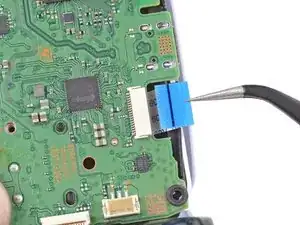
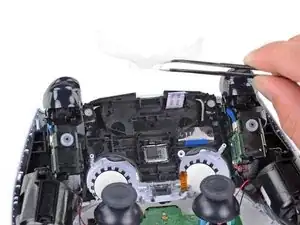
    • Utiliza unas pinzas o tus dedos para agarrar la lengüeta de tracción del cable plano del panel táctil y sácalo directamente del conector de la placa madre.

  23. GqsGfFE6VFsbGvhX
    GqsGfFE6VFsbGvhX
    4IvPQ2aVt4oyB4MS
    iI24ALvZsMEZZMRI
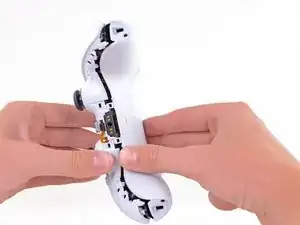
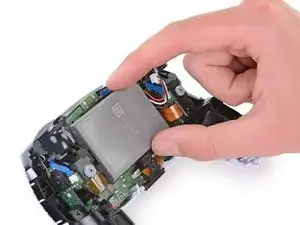
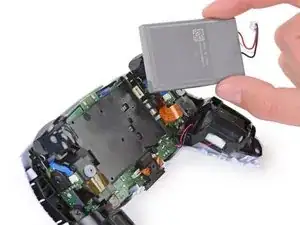
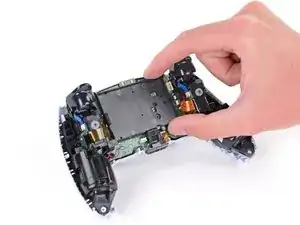
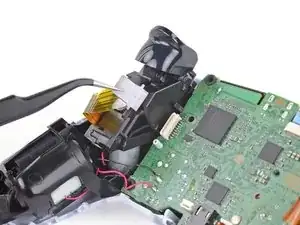
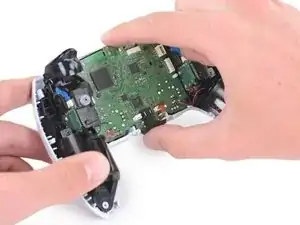
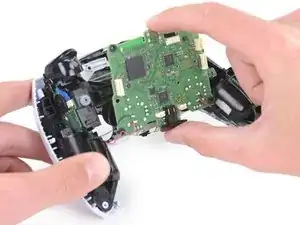
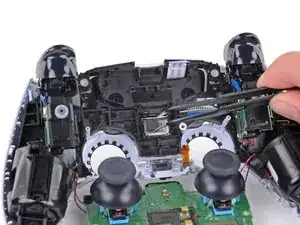
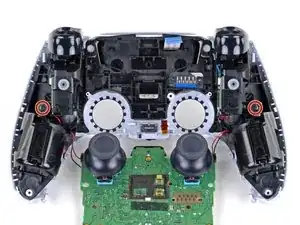
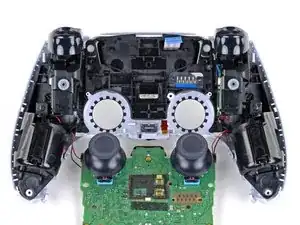
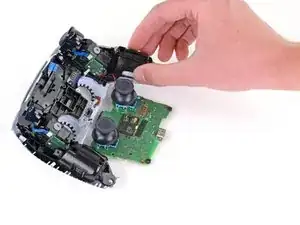
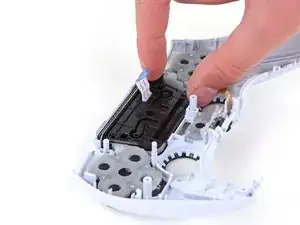
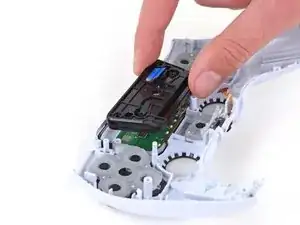
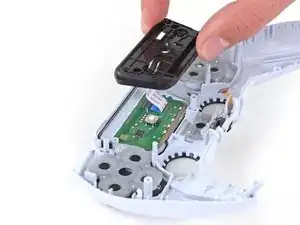
    • Guía con cuidado los joysticks a través de la carcasa frontal y levanta la placa madre para sacarla.

    • No retires completamente la placa madre. Hay cuatro cables soldados que unen la placa madre a los motores vibradores.

    Pushing on the joysticks makes this much easier.

    zidek22 -

    My motherboard wouldn't just lift right out. So I noticed there's also a pair of barely visible small black clips, one on each side of the motherboard, holding it down. One is right beside the battery connector and the other's directly across on the opposite side of the motherboard right beside the ribbon cable connector.

    Jason Mulholland -

    Such a good observation!

    zidek22 -

    Just push on the sticks. Pops out like a charm, zero effort.

    Italian Retro Guy -

  24. AU6OhyHnBwRu2KD3
    AU6OhyHnBwRu2KD3
    CdW4rvBcxL2UvbYI
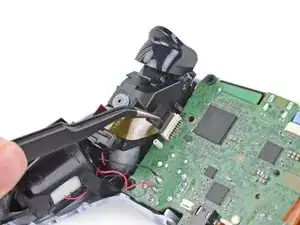
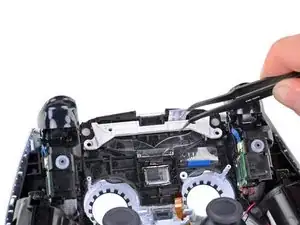
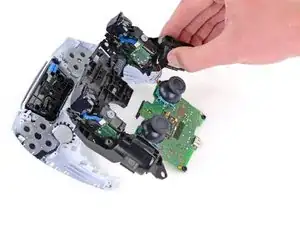
    • Utiliza un destornillador Phillips para quitar los dos tornillos de 8,5 mm que sujetan la guía de luz.

    Mine didn't have this piece

    John -

  25. xS1lKesTTDIMvXCD
    xS1lKesTTDIMvXCD
    BWeYjBPGvkeqTKKU
    • Usa un par de pinzas o tus dedos para quitar el soporte de la guía de luz.

  26. EH3SvVX64QTlRu2U
    EH3SvVX64QTlRu2U
    AfwNQBhb1wWEVwAa
    • Usa un par de pinzas o tus dedos para quitar la guía de luz.

    Where do i buy a new light guide?

    Jasper Nuyts -

  27. SqQlmDvpBSK5keCh
    SqQlmDvpBSK5keCh
    6WQuYGUFG2GKIkkX
    FnGWKjbKPWiVDcTA
    • Usa un par de pinzas para quitar el altavoz del marco medio.

    • Asegúrate de volver a instalar el altavoz en la orientación correcta con la almohadilla de espuma en el lado izquierdo y los puntos de contacto dorados en el derecho.

    Speaker may be attached to the motherboard via the foam pad.

    Daniel Geppert -

  28. VBKmKNsbEoIZTKjB
    VBKmKNsbEoIZTKjB
    LCLyXFwsjlSEtOpP
    • Usa un destornillador Phillips para quitar los dos tornillos de 6,4 mm que sujetan el marco medio a la carcasa frontal.

  29. hAqjUM6KYJDUeUxH
    hAqjUM6KYJDUeUxH
    vTIvfgtLVEn1jsij
    RTGiqRow5MHkDdmx
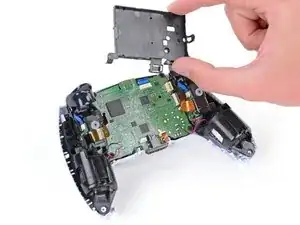
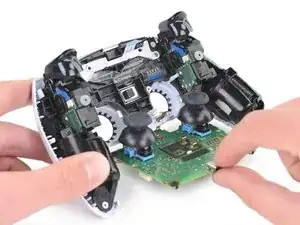
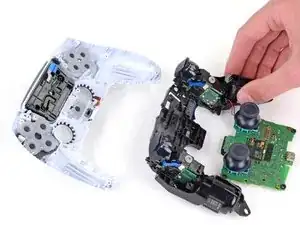
    • Levanta con cuidado el marco medio y la placa base hacia arriba y hacia afuera de la carcasa frontal.

    • Ten cuidado de no forzar los cables del motor vibrador.

    • Durante el reensamblaje, pasa el cable de cinta del panel táctil nuevamente a través de su abertura rectangular en el marco medio.

    Feed the ribbon cable back through the rectangular slot in the midframe during reassembly.

    Sean Gonzales -

    Thank you for catching this!

    Sam Omiotek -

  30. 1iQl5QDHJES1Fnad
    1iQl5QDHJES1Fnad
    LUBVHYQYeRmvfGdO
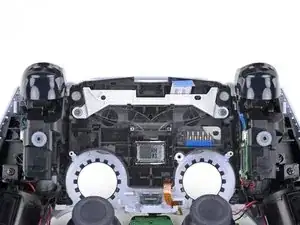
    • Usa un destornillador Phillips para quitar los dos tornillos de 6,4 mm que sujetan el soporte del panel táctil al panel táctil.

    On my early 2022 controller it only had one screw, the other side was a hook, i was able to separate them but pulling the touch pad up slightly away from the top of the controller and pushing towards the side the one screw was on.

    Ryan Hynes -

  31. emOQLetAHDmBYKje
    emOQLetAHDmBYKje
    mKGcIgFCbaAhVCqA
    bDcYNHtQUvhhOeSC
    • Levanta el soporte del panel táctil hacia arriba de la carcasa frontal.

    • Pasa el cable plano nuevamente a través de la ranura rectangular en el soporte durante el reensamblaje.

  32. snCaVJ2GPwOkLVgi
    • Levanta la carcasa frontal del panel táctil.

    Has anyone found a replacement logic board for trackpads?

    Bob -

  33. woubZjTtDBirbJst
    woubZjTtDBirbJst
    ihLATlZMjawiG1Wn
    EDQmAaWSayQhn4R1
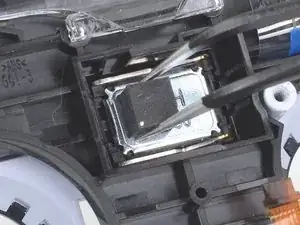
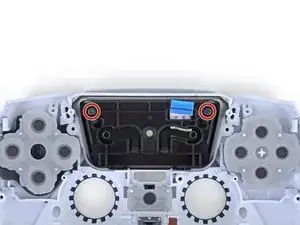
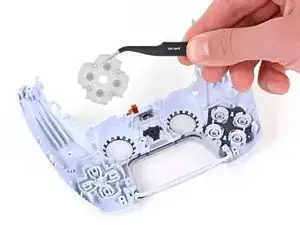
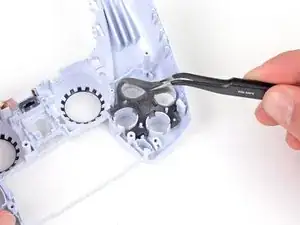
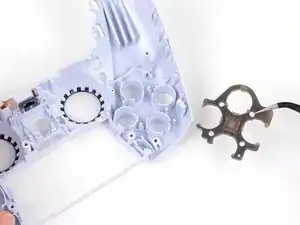
    • Usa un par de pinzas o tus dedos para quitar las tres almohadillas de goma de silicona conductora del interior de la carcasa frontal.

    • Los botones están sueltos en la carcasa frontal.

  34. 5jLplC1LlEIVV4PR
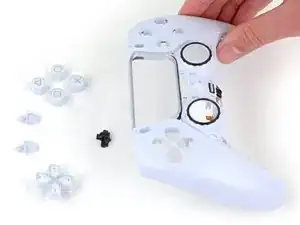
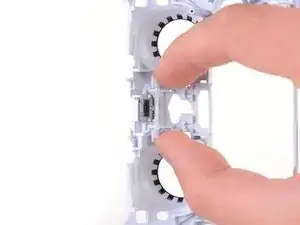
    • Sostén la carcasa frontal cerca de la superficie de la mesa y gírala lentamente para que se caigan los botones.

  35. WK42vsXH6sES1H6v
    WK42vsXH6sES1H6v
    YqcdlrjBZ4QiZTlZ
    • Usa tus dedos para quitar el bisel del panel táctil de la carcasa frontal.

  36. KP5hZeOABEIB2LsF
    KP5hZeOABEIB2LsF
    Z1DqCjLSjsg36VsF
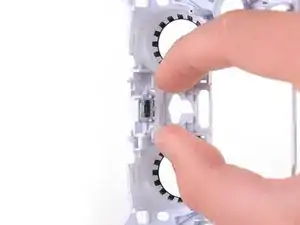
    • Usa un par de pinzas o tus dedos para quitar la almohadilla aislante de goma de la carcasa frontal.

  37. MKNSEvhQ2bPmogWA
    MKNSEvhQ2bPmogWA
    IgWYZNpHYEpJx1QY
    • Usa un par de pinzas o tus dedos para quitar el micrófono superior de la carcasa frontal.

    • Saca el cable de cinta del micrófono con cuidado; la lengüeta de tiro puede engancharse en la carcasa frontal.

  38. 5x2jhQxN2nBVLMJV
    5x2jhQxN2nBVLMJV
    xcT4wTGOep6pCYcu
    BHxE5VlXJul1b5UK
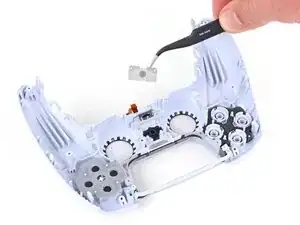
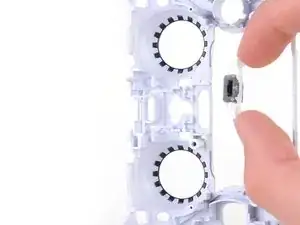
    • Usa tus dedos para pellizcar ligeramente el clip de plástico que sujeta el botón de silencio del micrófono a la carcasa frontal y retíralo.

  39. fXcq2NsYSFdysEVb
    • Solo queda la carcasa delantera.

Conclusión

Para volver a armar tu dispositivo, sigue los pasos anteriores en orden inverso.

Lleva tus desechos electrónicos a un Reciclador certificado R2 o e-Stewards.

¿La reparación no salió según lo planeado? Prueba algunas soluciones de problemas básicos, o solicite ayuda a nuestra Comunidad de respuestas.

Sam Omiotek

Miembro Desde 25/02/19

59803 Reputación

Un comentario

need an update for the “a” variant (cfi-zct1w a)

this guide works for it up until a point (the touchpad), the a variant only has 1 screw instead of two and i couldn’t get the touchpad itself removed from it’s bracket (steps 30/31)

also the “a” variant is missing the light guide bracket (step 25)

name nameson -