Introducción

Esta guía de reparación fue creada por el personal de iFixit y no ha sido respaldada por Google. Obtén más información sobre nuestras guías de reparación aquí.

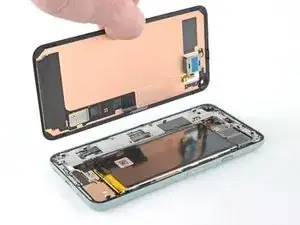
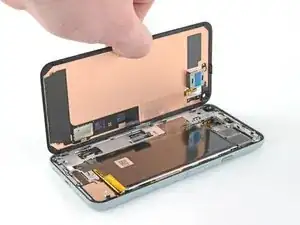
Sigue esta guía para remplazar una pantalla rota o agrietada de un Google Pixel 5.

A diferencia de modelos anteriores de Google Pixel, la pantalla del Pixel 5 esta reforzada con un marco de metal. El altavoz del auricular esta pegado en la parte de atrás de la pantalla.

  1. QQGLSFPODbK54uDM
    • Calienta un iOpener y aplícalo en el borde inferior de la pantalla durante un minuto

    • También se puede utilizar un secador de pelo, una pistola de calor o una placa calefactora, pero hay que tener cuidado de no sobrecalentar el teléfono- la pantalla y la batería interna son susceptibles al daño por el calor.

    It would be helpful to know for how long ally the heated pad

    Yuri Deglin -

  2. XB15jHbG4YWAkvHj
    XB15jHbG4YWAkvHj
    idLGWGUERlrSUErg
    FsdxJwViyOclRRRc
    • Mientras esperas que el adhesivo se afloje, toma nota de lo siguiente:

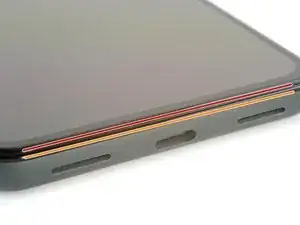
    • Costura de la pantalla: esta costura separa la pantalla del resto del teléfono. No hagas palanca en esta costura.

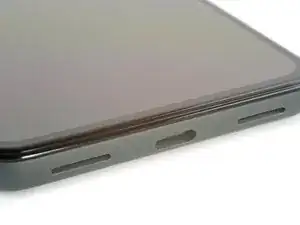
    • Costura del bisel: aquí es donde el bisel de plástico diseñado para proteger la pantalla se encuentra con el marco. Se mantiene en su lugar mediante clips de plástico. Aquí es donde debes hacer palanca.

  3. 23sHH3BUSbtCbtOh
    23sHH3BUSbtCbtOh
    wIVYR4w6CPIbpvc1
    Pi3qHdWqZra6AUCg
    • Los siguientes dos pasos muestran el Anti-Clamp, una herramienta que diseñamos para facilitar el procedimiento de apertura. Si no está utilizando Anti-Clamp, salta dos pasos hacia abajo para obtener un método alternativo.

    • Para obtener instrucciones completas sobre cómo usar Anti-Clamp, consulta esta guía.

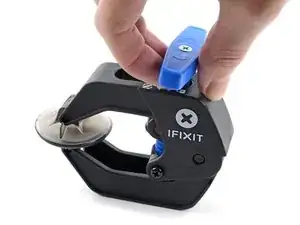
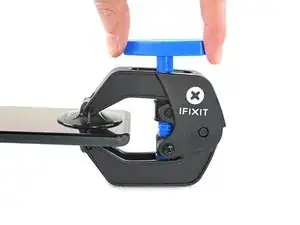
    • Tira de la manija azul hacia la bisagra para desactivar el modo de apertura.

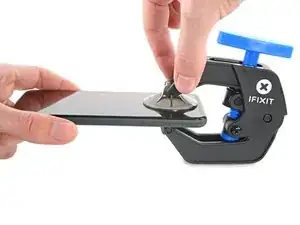
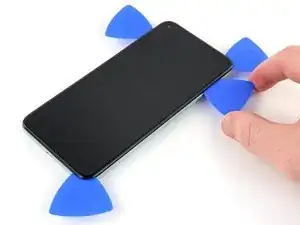
    • Coloca las ventosas cerca del borde inferior de la pantalla, una en el frente y otra en la parte posterior.

    • Empuja hacia abajo las copas para aplicar succión en el área deseada.

    • Si encuentras que la superficie de tu dispositivo es demasiado resbaladiza para que el Anti-Clamp la sujete, puedes usar cinta de embalaje para crear una superficie más adherente.

  4. LHErCKT1C5tQ23UD
    LHErCKT1C5tQ23UD
    ffUX41QYpsWEufib
    WJrFDynE3AHciwdH
    • Empuja la manija azul lejos de la bisagra para activar el modo de apertura.

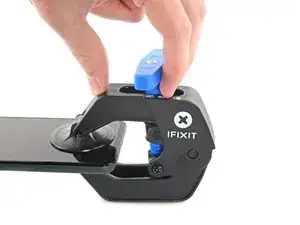
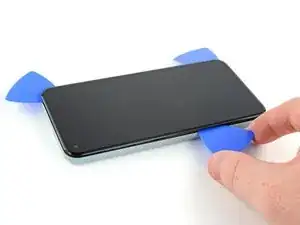
    • Gira el mango en el sentido de las agujas del reloj hasta que veas que las copas comienzan a estirarse.

    • Asegúrate de que las ventosas permanezcan alineadas entre sí. Si comienzan a salirse de la alineación, afloja ligeramente las ventosas y vuelve a alinear los brazos.

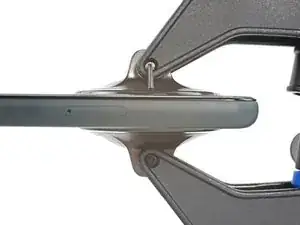
    • Espera un minuto para que el adhesivo tenga la oportunidad de soltarse y presentar un espacio de apertura.

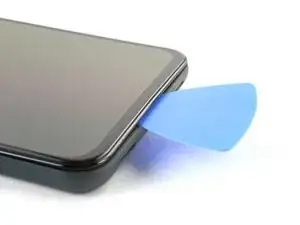
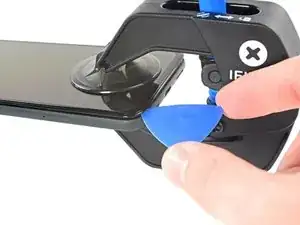
    • Inserta una púa de apertura debajo de la pantalla y su marco biselado cuando Anti-Clamp cree un espacio lo suficientemente grande.

    • Si el Anti-Clamp no crea un espacio suficiente, aplica más calor al área y gira la manija en el sentido de las agujas del reloj media vuelta.

    • No des más de media vuelta a la vez y espera un minuto entre vueltas. Deja que el Anti-Clamp y el tiempo hagan el trabajo por ti.

    • Omite el siguiente paso.

  5. Z6keo3lUlisS6PiX
    Z6keo3lUlisS6PiX
    r3JOcDoYsjpYSPFJ
    TNkpv1vbVMDOwwPO
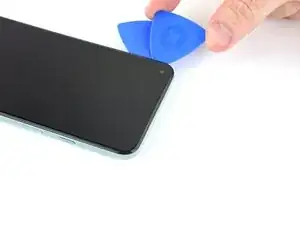
    • Con una ventosa en la pantalla, lo más cerca posible del borde calentado.

    • Si tu pantalla está muy quebrada, sigue esta guía para colocar cinta adhesiva sobre la pantalla rota. Si todo lo demás falla, puedes pegar la ventosa con un pegamento instantáneo a la pantalla rota.

    • Tira hacia arriba de la ventosa fuerte y constante para crear un espacio.

    • Dependiendo de la antigüedad de su dispositivo, esto puede resultar difícil. Si tienes problemas, aplica más calor y vuelve a intentarlo.

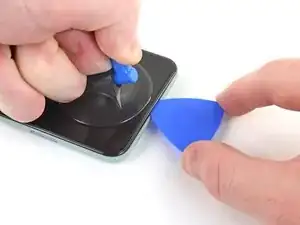
    • Inserta la púa de apertura.

    "Insert the opening pick into the gap." NOT the gap under the glass, the second gap... If not you will probably break your screen, at least I did. Especially important if your pixel 5 shipped with the screen gap :(

    Alex Beaven (Nevbox) -

  6. JR3ablPZImMYsdPw
    JR3ablPZImMYsdPw
    16NeY1RIgBr4ALBD
    eHki2SVKH3c4LedP
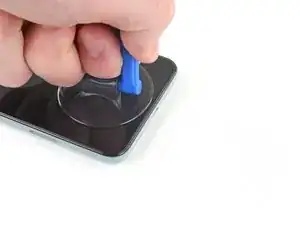
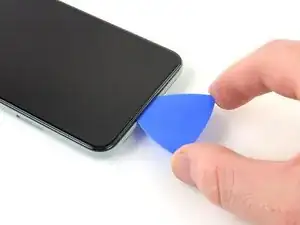
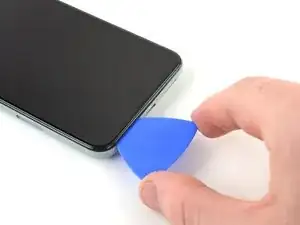
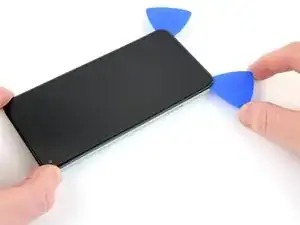
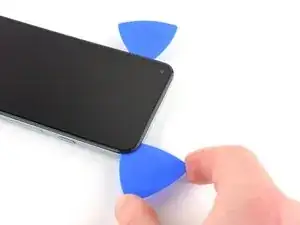
    • Desliza la púa de apertura hacia adelante y hacia atrás a lo largo de la parte inferior de la pantalla para cortar el adhesivo.

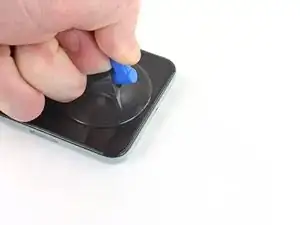
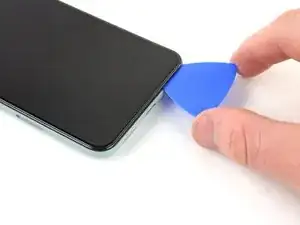
    • Deja la púa o uñeta insertada en la esquina inferior derecha para prevenir que el adhesivo se selle nuevamente

  7. YYBV6DBqqFtaUCfr
    • Utiliza un iOpener precalentado en el borde izquierdo de la pantalla por un minuto.

  8. PkwPMyUxTWxYtfMG
    PkwPMyUxTWxYtfMG
    t1IgSk2tcCpnLXL1
    m4ZVwT1q3UtyNBso
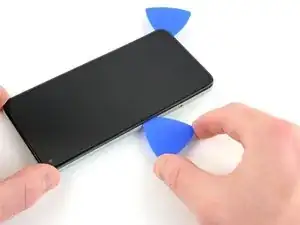
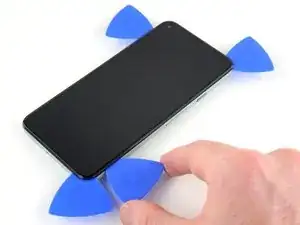
    • Inserta otra púa o uñeta en la esquina inferior izquierda de la pantalla.

    • Desliza la púa o uñeta alrededor de la esquina izquierda.

    • No insertes la púa más de 6 mm , se puede dañar el cable flexible de la pantalla ubicado en el medio del borde izquierdo.

    • Continúa deslizando la púa o uñeta hacia la cámara frontal para cortar el adhesivo en el borde izquierdo de la pantalla.

    • Deja la púa o uñeta insertada para evitar que el adhesivo se vuelva a sellar.

  9. oEPA4kQQ5fVdHWvt
    oEPA4kQQ5fVdHWvt
    XhJQ6tagwvAhEmpG
    RKsZYcUGPiGcP3sF
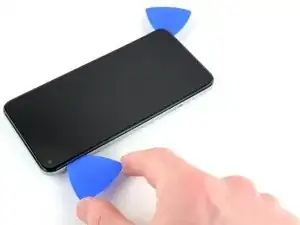
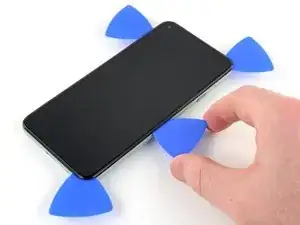
    • Inserta otra púa de apertura en la esquina superior izquierda de la pantalla.

    • Desliza la púa de apertura alrededor de la cámara frontal y por el borde superior del teléfono.

    • Si el adhesivo esta difícil de cortar, aplica calor al área durante un minuto y vuelva a intentarlo.

    • Desliza la púa hacia la esquina superior derecha del teléfono y deja la púa insertada.

  10. 1QnGhC4UIh3IUk1d
    1QnGhC4UIh3IUk1d
    HkkaPbXOq1RfD2hL
    eAIALPreGV2eXEBQ
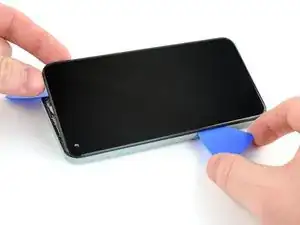
    • Inserta otra púa de apertura en la esquina inferior derecha de la pantalla.

    • Desliza la púa de apertura hacia la esquina superior derecha para cortar el ultimo borde de adhesivo

    • Es posible que debas deslizar nuevamente una púa o alrededor de los bordes para asegurarse de que se corte todo el adhesivo. El adhesivo más grueso se aplica en las cuatro esquinas.

  11. lNM4JsPdVK4M1MxG
    lNM4JsPdVK4M1MxG
    O1oOFnIGMGbAJoAG
    • Usa la púa de apertura desde la esquina superior izquierda para levantar el borde izquierdo de la pantalla unos milímetros. Esto evitará que los clips se vuelvan a encajar en la carcasa.

    • Levanta el lado derecho de la pantalla y abre el teléfono como si fuese un libro.

    • No abras la pantalla más de 90 grados para evitar dañar el cable flexible de la pantalla.

  12. Fy2oOr21rAtW4q2W
    Fy2oOr21rAtW4q2W
    OVUGNVxv23M3tSAM
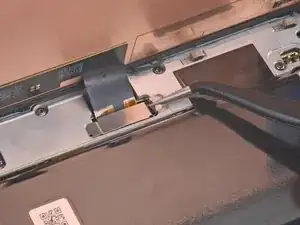
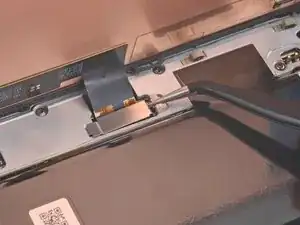
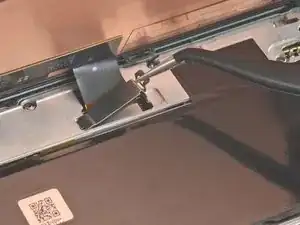
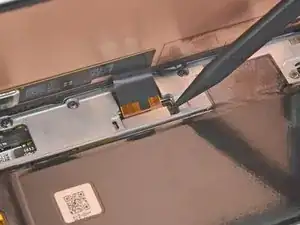
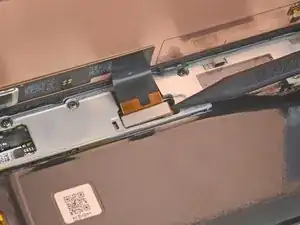
    • Utiliza unas pinzas para sujetar la cubierta del conector de la pantalla que asegura el cable flexible de la pantalla.

    • Empuja el clip hacia el conector para desbloquearlo.

    I found it easier to use the spudger here rather than the tweezers (which have sharp ends that could damage something if you happen to slip).

    tristanwaddington -

    some 5a models will have a screw instead of clip , here's a photo https://imgur.com/a/9dZG5pQ


    Daniel Gonzales -

  13. YHjY6XJvlJjJ5tLY
    YHjY6XJvlJjJ5tLY
    bWD4NvY5CfksGydP
    • Retira la cubierta del conector de la pantalla.

    • Asegúrate de conservar este componente para volver a instalarlo durante el montaje.

  14. cCDA2hvJgjXGYnJM
    cCDA2hvJgjXGYnJM
    3tLAI2OIwSxJUEYL
    • Usa la punta del spudger para levantar y desconectar el cable flexible de la pantalla.

    • Para volver a colocar los conectores de presión como el que se muestra, alinea con cuidado y presiona hacia abajo en un lado hasta que este encaje en su lugar, luego repite en el otro lado. No presiones hacia abajo en el medio. Si el conector está desalineado, las clavijas se pueden doblar y causar daños permanentes

    The curved ends of the blue iFixit Opening Tool helped me reseat the connector when installing the new screen.

    tristanwaddington -

  15. ZMAy1r2nNBMo5WNf
    ZMAy1r2nNBMo5WNf
    t5oZvVG2wXnsOAxs
    • Quita la pantalla

    • Usa unas pinzas para quitar el adhesivo restante en la carcasa

    • Si el cable de la pantalla de la pantalla de reemplazo está sujetado con cinta, retira la cinta antes de la instalación.

    • Si estás utilizando un adhesivo de corte personalizado, sigue esta guía para aplicar correctamente el nuevo adhesivo de pantalla.

    • Si estás utilizando cinta Tesa para volver a colocar la pantalla, sigue esta guía.

    • Durante el proceso de arranque después del reensamblaje, la pantalla pasará por una secuencia de calibración. No toques la pantalla durante este proceso, ya que podría provocar una calibración táctil incorrecta y crear problemas táctiles.

    • Si usas alcohol isopropílico para limpiar el adhesivo de la pantalla, asegúrate de no dejar que salpique ningún componente no deseado, ya que esto puede debilitar la unión adhesiva.

    Where from we can buy the screen. Thanks

    Ajay Sharma -

    the screen does not fit

    Joel Kelly -

Conclusión

Compara tu nueva pieza de repuesto con la pieza original

—puedes necesitar transferir los componentes restantes o quitar los soportes adhesivos de la nueva parte después de instalarlo.

Para rearmar tu dispositivo, sigue los pasos anteriores en el orden contrario.

Lleva tu basura electrónica a R2 o reciclador certificado por e-Stewards.

¿La reparación no fue como planeabas? Intenta solucionar algunos problemas básicos, o pide ayuda a nuestra Comunidad de Respuestas.

Robert Boyd

Miembro Desde 01/02/21

22283 Reputación

26 comentarios

if i want only screen (lcd display) of pixel 5 from where can i get the screen. sudhri@gmail.com my mail address

Digvijay Engineers -

Hello! This tutorial is well explained and seems ok to realize, but the problem i’m facing is to find the right spare part… Once contacted, google assistance said the only option is to send it back to them for 138€ and 7-10 days… Can you recommand a trustworsthy website for that?

Aurelien Malot -

Usually i look on amazon (sent by amazon) to get the warranty if i got any problem.

Daniele Carminati -

Check out the iFixit store. We stock some parts for the Pixel 5, including the screen and battery.

Zac Hall -

The screen that I ordered has a cable that runs the wrong way. It would need to be twisted to make it fit my Pixel 5. Any suggestions?

Gordon Stephenson -

Get a refund and send it back and order a different display.

Josh Cook -

Do order the replacement with or without frame?

Marc H -

unless you’re a super pro, better with frame, It is not easy to glue up to the frame, and if that frame is damaged or gets damaged during tear down, can be a problem.

Manuel López -

Hi,

I just replaced the screen with a new one, but now I have problems with the proximity sensor, When i press on one side of the screen it works, so I guess it is because it may be not glued strongly wnough? wich glue do you recommend?

Manuel López -

I had the same problem -- the proximity sensor was unreliable after replacing the screen, and pressing down on the top of the screen helped. In my case, I used pre-cut adhesive both between the screen and the thin plastic frame and between the frame and the lower case. With this adhesive, the screen sat a little further away from the sensor and it's likely that the original calibration of the sensor was no longer correct.

I fixed it by heating the top of the phone, firmly clamping it, and leaving it overnight. The top of the screen sits flush now and the proximity sensor works reliably.

Cyrus Behroozi -

There is no info here about transferring the speaker. How is that done? Is adhesive needed? If so, what type?

Mike K -

I just use one or two strips of adhesive tape if I need to use new adhesive. Not much, though. If possible, get the earpiece speaker nice and warm to soften the adhesive. Apply lots of heat to the old display on the touchscreen side, not heating the earpiece directly. If you can heat it up enough, it should come off pretty cleanly. Then warm it up again and seat it well onto the new display with the original adhesive still attached the the earpiece speaker.

Mark Student -

Hello! Just foolishly cracked my Google Pixel 5 screen and have no idea where to get the replacement. Based on your experience, could you please suggest where to order Pixel 5 screen replacement so that it would be as sharp and bright as the original? Ideally – THE original. Thank you in advance!

Taisia Osipova -

i bought a screen on ebay. supposedly oem. it seems just the same as the original.

Mike K -

Rounded.com expensive but 100% new and original parts straight from manufacturer

Simon -

I have to say I found this to be one of the easiest repairs I've ever done, I bought the complete original screen assembly from rounded.com and the manufacturer adhesive tape which gives the phone its IP rating seal back. Cost me about £160 all in. But I learnt skills at the same time. I used my nails and a guitar plectrum working from bottom end of the phone up. As good as new, well chuffed

Simon -

Thanks ifixit. my pixel 5 lives again. screen replacement kit surprised me with some excellent tools provided. adhesive i thought would be the tricky part but you guys made it very easy to put on. cheers

Cameron Neville -

My Google Pixel screen was replaced because it was accidentally broken while replacing another part. The screen put on it worked just fine until we tried to put the case back on the phone. Now I can't use the phone. Is there any way I can fix it myself without having to get a whole new screen or phone?

Claire Burkhalter -

replacement screen works but has a green tint on low brightness? how can I fix this? (old screen works fine color wise, 2 other replacements also have green tint )

Benjamin Beckmann -

some 5a models will have a screw instead of clip , here's a photo https://imgur.com/a/9dZG5pQ


Daniel Gonzales -

make sure you have the right model number in there its in the about section under regulatory labels, model number will be at top, search for screen using model number to be sure

esin8785 -

Ok for those that do not know, The pixel 5 you need the model number from it to be sure the part you get is for that phone, you can find the model number in about section, regulatory labels, yes it's a pixel 5 but it still has a model number for it and they a different from carrier to carrier and what not so be sure you got the right model of your pixel 5 that will solve most of your problems getting wrong parts

esin8785 -

I completed the screen replacement, but when I turned the smartphone on, the selfie camera showed a black screen. I had to take the screen off the phone all over again to figure out what was wrong. Turns out there was a protective thin black film covering the lens hole. This wasn't mentioned in the guide.

Seems like there should be a step added where one powers the phone on and tests that the screen and front camera are working before pressing down the adhesive to seal the phone. Now I have to buy another adhesive template to seal the phone again. Grrr...

Also, the holding tabs for the adhesive are on the clear disposed film (contrary to the adhesive installation guide), which is peeled off first. Once peeled off, there are no longer tabs to use to hold the adhesive film, so it's awkward to position it without bending the colored adhesive film, distorting its shape, or inadvertantly touching adhesive.

Cómo aplicar tiras adhesivas cortadas a medida

Good guide, otherwise.

cosmo lee -

Good morning...
Replaced my cracked screen with the genuine google replacement part. The issue is the replacement adhesive sucks. It's terrible and worthless. The screen doesn't stay connected to the case. Does anyone have any recommendations for how to keep the screen adhered to the case?

Mark Sidwell -

An issue I had was that when I took off the old screen, the bezel was still stuck to the phone and came off the screen. I didn't understand it was supposed to come off as well and it was not well documented here. I would suggest adding it to this tutorial.

sean weiss -

As other comments have mentioned, the genuine part comes with a black sticker over the front camera, and a blue transparent sheet that covers at least the proximity sensor. Test both the front facing camera and the proximity sensor (The knock knock to wake relies on the proximity sensor) in addition to your other checks before fixing the screen on permanently.

Daniel Watson -