Introducción

Usa esta guía para reemplazar la pantalla en una MacBook Air de principios de 2020.

  1. 4a1VSQBgdQXAZah2
    • Antes de iniciar este procedimiento, debe desactivar la función de arranque automático de su Mac. El arranque automático enciende el Mac cuando se abre la tapa y puede activarse accidentalmente durante el desmontaje. Utiliza esta guía para desactivar el arranque automático.

    • Si tu MacBook está ejecutando Big Sur v11.1 o posterior, es posible que la desactivación del arranque automático no funcione. Puedes proceder normalmente, pero asegúrate de desconectar la batería en cuanto estés dentro.

    • Apaga y desenchufa completamente tu MacBook Air antes de empezar. Cierra la pantalla y dale la vuelta a todo la MacBook.

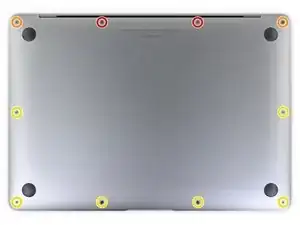
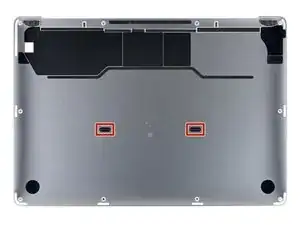
    • Utiliza un destornillador P5 para retirar los siguientes tornillos:

    • Dos tornillos de 7.9 mm

    • Dos tornillos de 7.1 mm

    • Seis tornillos de 2.6 mm

    • A lo largo de esta reparación, mantén un registro de cada tornillo y asegúrate de que vuelva exactamente al lugar de donde salió para evitar dañar tu MacBook.

  2. 4Kra6VLGEa3eGmd6
    4Kra6VLGEa3eGmd6
    n2KBoBfiUOZCO63H
    t3JGRsWcjgyPKFRl
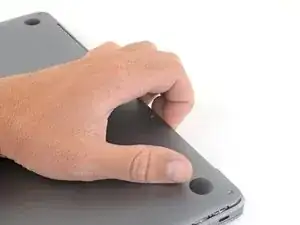
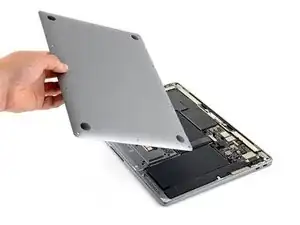
    • Coloca tus dedos entre la pantalla y la carcasa inferior y tira hacia arriba para sacar la carcasa inferior de la computadora portátil.

    • Remueve la caja inferior.

    • Para volver a instalar la caja inferior:

    • Colócala en tu sitio y presiona firmemente para encajar los dos clips ocultos que hay debajo. Deberías sentir y oír cómo encajan en tu sitio.

    When reassembling, the “snaps” are in the middle of the laptop (from top to bottom), and just to the left and right of center. I assumed it was near the hinge so it took a bit for me to hear the snaps.

    Laurie McCall -

    Laurie, the two clips are outlined in the third photo of step two. Hope this helps—happy fixing!

    Carsten Frauenheim -

    What tool kit should I use for this?

    Lucas Lee -

  3. xVJrmDjjKX3L1VEp
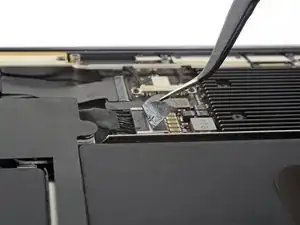
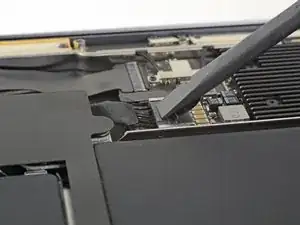
    • Despega la cinta adhesiva que cubre el conector de la batería lo suficiente como para ver el conector que hay debajo.

    This image is incorrect correct for the A2179 EMC 3302 model, also doesn’t match the next image in this guide

    Steven Friar -

    There is other guide for the model you reffer to, I was using that one until i realize it was different, this is the one you are looking for: MacBook Air 13" Retina Late 2020 Repair

    Marco Rojas -

    How do you find out if you have a Retina Late or Retina Early model?

    Inji E -

  4. NZT3TL4hoGyeLE6L
    NZT3TL4hoGyeLE6L
    XZ2jGZmJoO1c5OHn
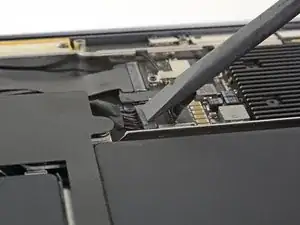
    • Utiliza un spudger para deslizar el conector de la batería en paralelo a la placa lógica y fuera de su zócalo en la placa lógica.

  5. sPMaxtOw2WyUAkLJ
    sPMaxtOw2WyUAkLJ
    UAqlIW6N1ZcCF4sn
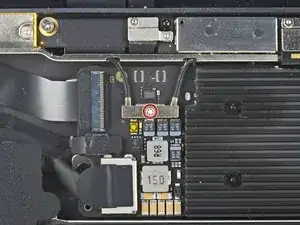
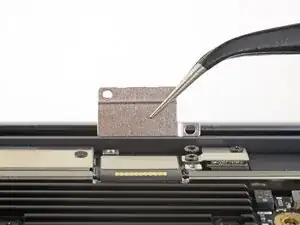
    • Usa un destornillador T4 Torx para remover el tornillo de 1.4 mm que sujetan la tapa del cable de antena.

    • Remueve la tapa del cable de antena.

    • Cuando vuelvas a colocar la cubierta del cable de la antena, asegúrate de que el lado atornillado vaya hacia el borde de la bisagra del MacBook Air.

  6. xn1bKmJEKwpKRucN
    xn1bKmJEKwpKRucN
    onEtmvaZaKRJbxQ6
    LOaatsvsILVfNXCB
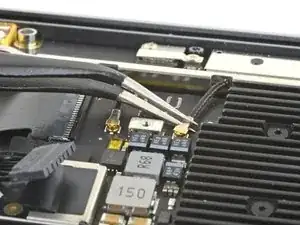
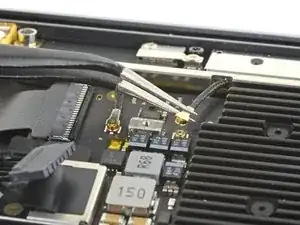
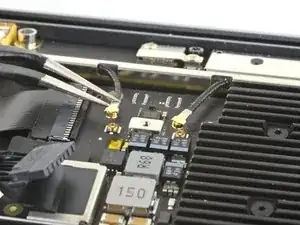
    • Usa un para de pinzar para agarrar el conector de la antena cerca de su base.

    • Tira hacia arriba para desconectar el cable.

    • Repita con el segundo cable de antena.

    This connector is extremely fragile! I always apply a very fine flat screwdriver head to the connector on the system board so it does not pull out!

    Ross Elkins -

  7. xjnRX6OhBQATPKTU
    xjnRX6OhBQATPKTU
    QWyBte2qiFdXNLew
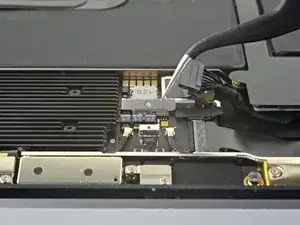
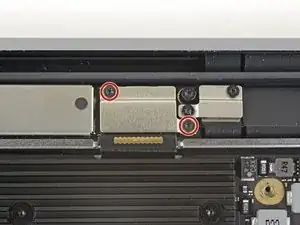
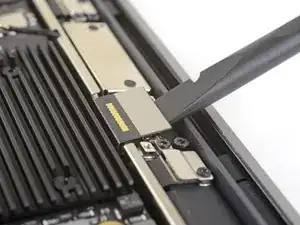
    • Utiliza un destornillador Torx T3 para retirar los dos tornillos de 1.5 mm que sujetan la tapa del conector del cable de la pantalla.

    • Retira la cubierta del conector del cable de la pantalla.

    There are two smaller connector covers that cover a narrow ribbon connector. (One of them is visible in the Step 7 photo to the right of the display cable connector cover.) These covers don't have to be removed for disassembly. But my replacement display didn't include them, so I salvaged the covers from the broken display when I reassembled.

    Jeff Sharman -

  8. PwAbDmRWJxP3iIl2
    PwAbDmRWJxP3iIl2
    ifpZWLODTMm2PVVY
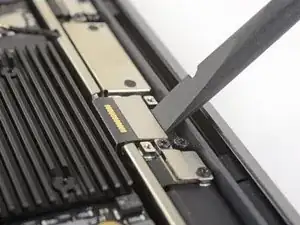
    • Usa el extremo plano de un spudger para hacer palanca en el conector del cable de la pantalla directamente fuera de la placa de la antena para desconectarlo.

    • Para volver a colocar los conectores a presión como éste, alinea con cuidado y presione hacia abajo en un lado hasta que encaje en su lugar, luego repita en el otro lado. No presiones hacia abajo en el centro. Si el conector está mal alineado, los pines pueden doblarse, causando un daño permanente.

    I have noticed that replacement assemblies from Ifixit and perhaps other suppliers do not have the smaller covers for the side cables to the left and right of the main display cable installed! Remember to transfer them from your old display to the new or you will have a POF waiting to happen!

    Ross Elkins -

    Thank you for you advisory on the connector covers. Please tell me what POF stands for?

    Macrepair SF -

  9. WscuOwGYhTc6FOKb
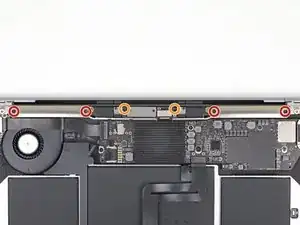
    • Usa un destornillador T5 Torx para remover los seis tornillos que sujetan la barra de antena.

    • Cuatro tornillos de 7.4 mm

    • Dos tornillos de 4.5 mm

  10. nNt5gOXerED1xWDx
    nNt5gOXerED1xWDx
    hAwiWWs2jcMEAW1h
    sJ3uc4pq6kjqrkpG
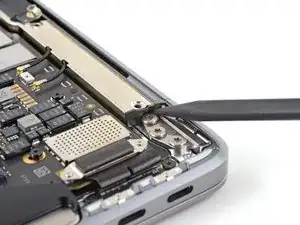
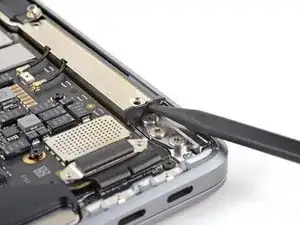
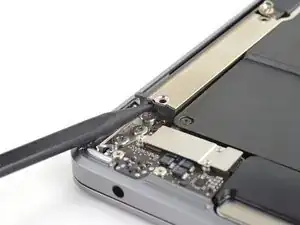
    • Introduce el extremo puntiagudo de un spudger en el hueco entre la barra de la antena y la bisagra de la pantalla.

    • Gira el spudger contra la bisagra para hacer palanca en el extremo de la barra de la antena.

    • Repite la operación con el otro extremo de la barra de la antena.

  11. GlVOqgcgTgW4rFKY
    GlVOqgcgTgW4rFKY
    VuSbX6GpXdw4FBhh
    DHHmwBUxMYBMOgL3
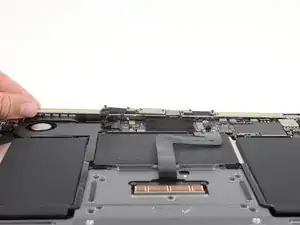
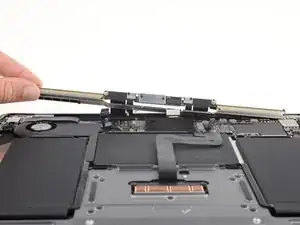
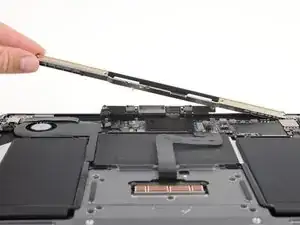
    • Usa tus dedos para hacer palanca en la barra de la antena hacia arriba y separarla de la carcasa.

    • La barra de la antena está asegurada con un ligero adhesivo y puede requerir algo de fuerza para desprenderse.

    • Pasa la placa de la antena a través de la abertura en el centro de la barra de la antena.

    • Trata de no tensar los cables planos de la barra de antena.

    • Retir la barra de antena.

    • Durante el montaje, asegúrate de que el cable de la pantalla no quede atrapado debajo de la barra de la antena.

    this is a bit tricky - the last one i worked on was held tight by a thin black tape, similar to the stretchy tape underneath batteries. this tape is near the motherboard underneath the path of the ribbon cables to the lcd. underneath this tape is a groove cut that the antenna slips into. actually 3 grooves, the 2 underneath the black tape and a longer channel in between. this channel grabs onto a thin part of the antenna that slips into these channels and some bumps help to “wedge” it into place by a pressure type fitting. kind of reminds me of edge of the shield on some ipads and older iphones. the bumps fit into areas and “grab” onto the area next to them. trying to create a word picture. maybe ifixit can add a real picture. definitely slows you down when you encounter resistance - don’t want to force anything. saw some dude on youtube yanking and pulling and i started yelling at him.

    greg -

    Thanks for your advisory, Greg. I can confirm the sticky tape about 1/2" long. It's to the left of the LVDS cable and attached to board. Looks like antennae wall sticks on vertically. Gentle prodding with spudgers from all angles finally frees it. Be patient with it.

    Macrepair SF -

  12. IQMF1bYKVAMUHDXb
    IQMF1bYKVAMUHDXb
    qZ2hJtol3uRV3BrI
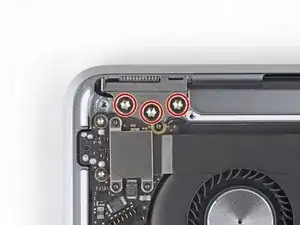
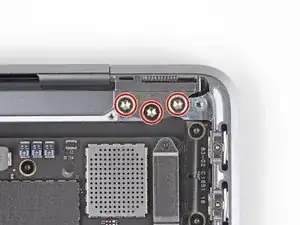
    • Utiliza un destornillador Torx T8 para retirar los tres tornillos de 4.9 mm de cada bisagra (seis tornillos en total).

    The hinge screws were a T9 on mine

    Kirk Heppe -

  13. Rrp3iIicGIY56UTd
    Rrp3iIicGIY56UTd
    bG5ejcLlEpyFu4Qy
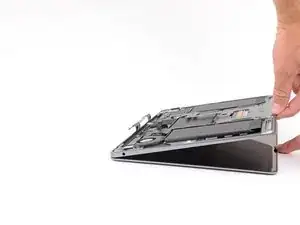
    • Con la MacBook todavía con la pantalla hacia abajo, levante con cuidado la carcasa superior para abrir la MacBook lo máximo posible.

  14. FYWQSMJclkdRg24l
    FYWQSMJclkdRg24l
    tODp1pxAKTwNijZP
    XgGRF6EZMIs5WNfN
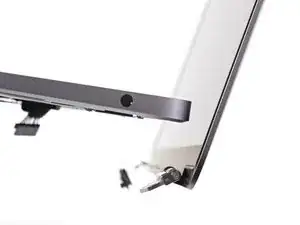
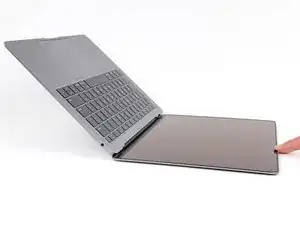
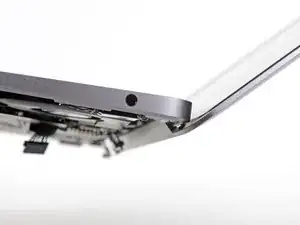
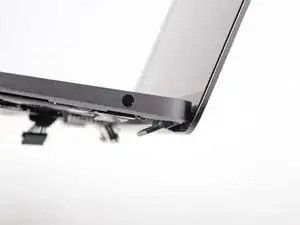
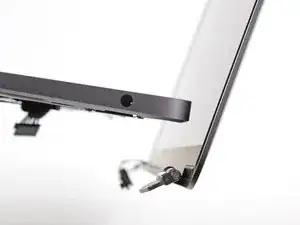
    • Levanta el MacBook y empieza a cerrar la pantalla con cuidado hasta que esté en un ángulo de unos 90 grados con la carcasa superior.

    • Las bisagras deberían salirse ligeramente de la carcasa a medida que la pantalla se acerque a la misma.

    • Manteniendo la pantalla en un ángulo de 90 grados con la carcasa, mueve la pantalla en línea recta hacia abajo mientras mantienes la carcasa quieta, de modo que las bisagras se deslicen fuera de la parte inferior de la carcasa.

    • Retira la pantalla.

Conclusión

Compara tu nueva pieza de repuesto con la original: es posible que tengas que transferir los componentes restantes o retirar los adhesivos de la nueva pieza antes de instalarla.

Para volver a montar el dispositivo, sigue los pasos anteriores en orden inverso.

Lleva tus residuos electrónicos a un centro de reciclaje certificador.

¿La reparación no ha ido como estaba previsto? Consulta nuestra [enlace|https://www.ifixit.com/Answers/Device/Ma...|comunidad de respuestas] para obtener ayuda en la resolución de problemas.

Carsten Frauenheim

Miembro Desde 10/03/20

88878 Reputación

10 comentarios

Thank you so much for this awesome walkthrough! I can’t believe how much I saved doing this myself. Works beautifully! If I could only suggest a more comprehensive “reassembly” page. There are a couple of missteps I made (eg. trying to install the antenna bar and accidentally leaving the display cable connector under it) that would have helped. In any event, thank you so much!

Laurie McCall -

Thanks for the tip! I’ve added a reminder to that step.

Carsten Frauenheim -

when starting the process of installation, make sure that at least the inside hinge screw is installed and mostly tightened. once the antenna is installed, there is almost no room for that screw to be inserted without a tight scrape against the end of the antenna. a very tight fit. i sometimes only install one hinge screw, usually the center ones, and then align the lid before adding the others and tightening everything up. in this case, would save you some concern to address this beforehand.

greg -

Is that instruction can be used for Macbookpro 2010 with touch bar?

Aung Min -

Definitely not. Also, there is no such thing, perhaps you meant 2020? Also no.

maccentric -

Have never needed to repair a Mac, but when a pen was slammed in the lid of my wife’s MBA, the screen was completely gone. So I decided to have a go myself, having followed iFixit for a number of years. So a massive thank you for a simple, clear guide, with tool specs that I can’t fault. (I bought your magnetic pad, excellent!)

The new screen is in place, the system functions perfectly. You saved me money and I had real fun and confidence doing the geeking!

Tom Wiersma -

Thank you for this guide. I was able to complete things as described. One thing to note: I didn't see any sign of adhesive holding down the antenna bar, but there are metal ridges/dimples on a portion of the folded edge that have to be pressed into the top case in order to prevent the antenna bar from simply springing back up. I found it fiddly to find a suitable tool and generate enough force to push this folded edge fully home, but eventually managed it with careful use of a flathead screwdriver.

Stuart R -

Screen turns on but only Apple logo loads, nothing else happens. Thoughts?

Fred Sciascia -

Also how to I get the 2 small metal plates on each side of antenna? Thanks

Fred Sciascia -

The What you need section mentions T4 and TR8 screwdrivers, but I don't see any mention of these in the instruction steps. Are they really needed?

Conversely, Step 12 requires a T8 screwdriver (not TR8), but this is not mentioned in the What you need section.

Can these be clarified?

jrwwallis -