Introducción

Sigue esta guía para reemplazar una pantalla Pixel 3a XL agrietada o rota, o para entrar al teléfono y reemplazar un componente diferente.

La pantalla OLED bajo el cristal de la pantalla 3a XL es frágil, si planeas reutilizar tu pantalla después de sacarla de tu teléfono, ten especial cuidado y sigue las instrucciones de esta guía.

  1. u3SnHpQnrNdIFUWH
    u3SnHpQnrNdIFUWH
    UMCgGvuxs1T4NRKu
    iaT1FVIiXf5JnVcc
    • En los siguientes pasos removerás la pantalla del Pixel 3a cortando el adhesivo que lo sujeta en su lugar.

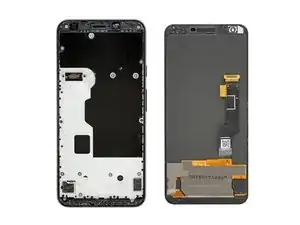
    • Como referencia, se muestra la parte trasera de la pantalla en este paso.

    • Observa el estrecho espacio libre entre el borde de la pantalla y el panel OLED bajo el vidrio. Si planeas reutilizar tu pantalla, asegúrate de seguir las instrucciones que se indican a continuación.

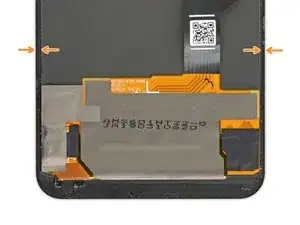
    • Observa también las dos costuras diferentes entre el cuerpo del teléfono y la pantalla.

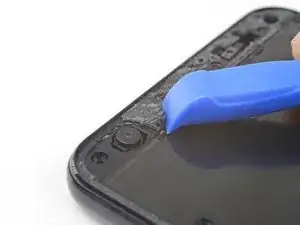
    • El reborde de la pantalla: donde la pantalla se encuentra con el resto del teléfono. Aquí es donde la pantalla se separará, y donde debes hacer palanca.

    • El reborde del marco medio: donde el marco medio se une con el cuerpo del teléfono. Esta parte se sujeta con tornillos. No hagas palanca en este reborde.

  2. 1RAPLZRHtcJ3CKEj
    1RAPLZRHtcJ3CKEj
    lVEywlA5shMRqK4s
    • Coloca una ventosa en el borde derecho en la pantalla justo debajo del botón del volumen.

    My screen was SUPER shattered right in this spot — just below the volume button to the bottom right corner and with another shatter diagonal toward the bottom center. You can place the suction cup in a different location and start the prying, as long as you’re not trying to start it at the top or bottom edge. I started above the volume button but below the top edge.

    EMC -

  3. RTR5vuyQ2N6uQlas
    RTR5vuyQ2N6uQlas
    W35N54jnN6Fxsbmf
    • En el siguiente paso, insertarás una púa de apertura entre la pantalla y el cuerpo plástico del teléfono.

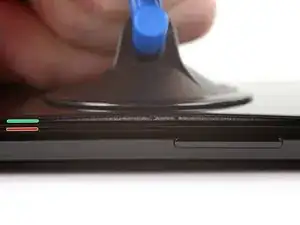
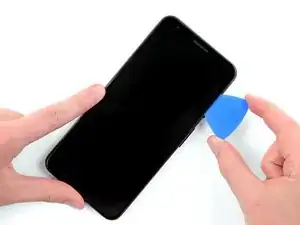
    • Si no tienes cuidado, la herramienta de apertura de plástico puede dañar el frágil panel de visualización OLED que se encuentra debajo del vidrio.

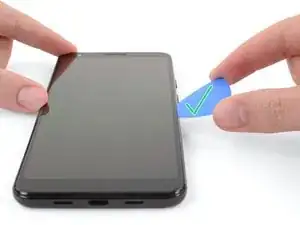
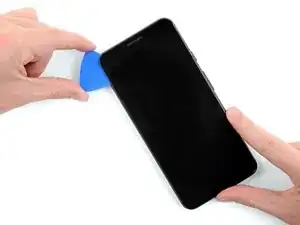
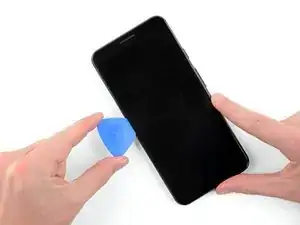
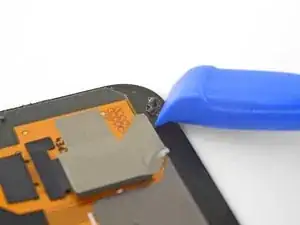
    • Si deseas volver a utilizar la pantalla de tu teléfono, asegúrese de insertar la selección en un ángulo hacia abajo, como se muestra en la segunda foto de este paso.

    • Esto asegurará que la apertura de la púa se deslice bajo el panel OLED en lugar de entre el vidrio y el panel, lo que arruinará la pantalla.

  4. DYNSh4oOWvfYCnSv
    DYNSh4oOWvfYCnSv
    pFyqeEQdCFBZPyOI
    Ey15dYZcLKqByLUF
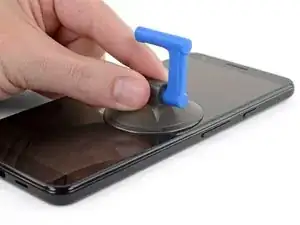
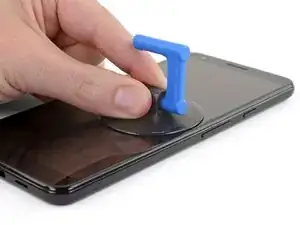
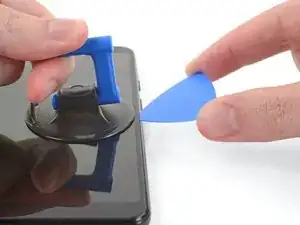
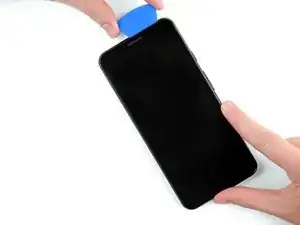
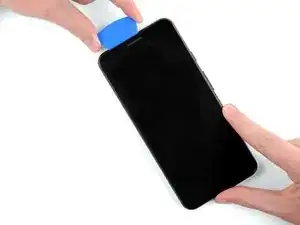
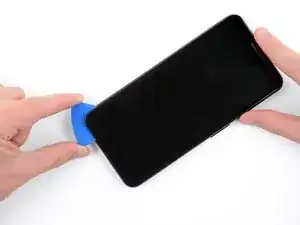
    • Tira de la ventosa con una fuerza fuerte y constante para crear un espacio entre la pantalla y el teléfono.

    • Inserta tu púa de apertura en el espacio.

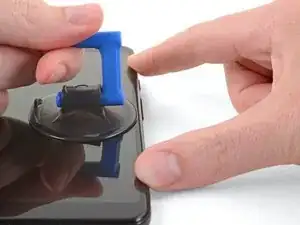
    • Deténte si sientes que la punta de la púa golpea contra algo. La púa puede estar presionando contra el borde del panel OLED. Inclina la púa hacia abajo e inténtalo de nuevo.

    • Una vez que hayas insertado la púa de apertura, puedes remover la ventosa.

    The suction cup won’t work if you’re trying to place it over a shattered area.

    EMC -

  5. dQyINTDcu4i5wTYE
    dQyINTDcu4i5wTYE
    eCDfGJrPXiEZoPw5
    LxscKqkQWFtFUKGs
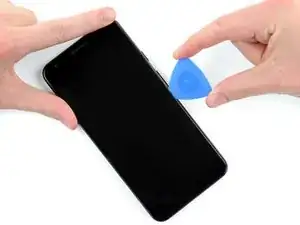
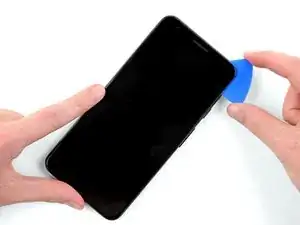
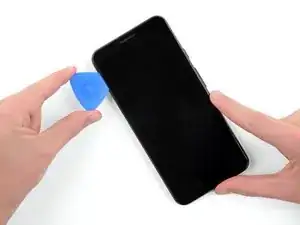
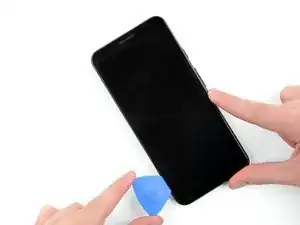
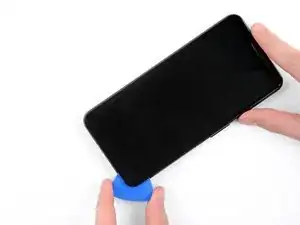
    • Una vez insertada la púa, deslízala hacia arriba y hacia abajo a lo largo del borde derecho del teléfono para cortar a través del adhesivo que mantiene la pantalla en su lugar.

    The kit comes with 5 picks, you can use multiple picks to prop the screen up as you go so you don’t lose your progress.

    EMC -

  6. kTXPABPB6bbijvh1
    • El adhesivo que mantiene los bordes superior e inferior de la pantalla en su lugar es más grueso y considerablemente más fuerte que las tiras delgadas que mantienen los lados en su lugar.

    • Si planeas reutilizar tu pantalla, calienta el borde superior del teléfono con un iOpener,una pistola de calor o un secador de pelo para aflojar el adhesivo antes de comenzar a cortar.

    It takes a minute or two to work. I was too impatient and made the job harder on myself by not waiting long enough.

    EMC -

  7. dI6QLLyZyCGAHf6i
    dI6QLLyZyCGAHf6i
    4rWwVuK4xMXmvpex
    6J5YlMLS66sZU5Vk
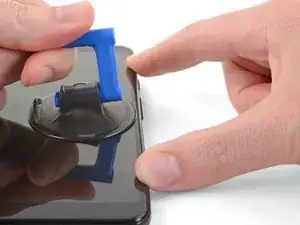
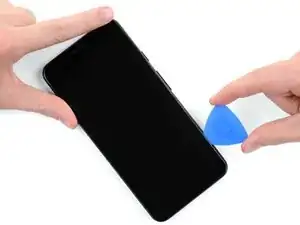
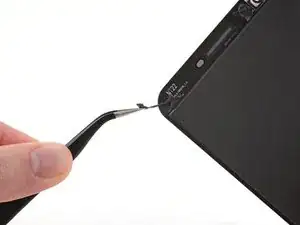
    • Desliza cuidadosamente tu púa de apertura alrededor de la esquina superior derecha de la pantalla.

    • Como se muestra en el primer paso, el espacio entre la pantalla y el borde de la pantalla de vidrio es mayor aquí que en los lados.

    • Si planeas reutilizar tu pantalla, ten especial cuidado en este paso para mantener tu púa en lo profundo del teléfono debajo de la pantalla OLED (como se muestra en las fotos de este paso), o insertarla sólo 5 mm en el dispositivo para evitar entrar en contacto con la pantalla debajo del cristal.

  8. 2D5Wht3ssEZ2O2pH
    2D5Wht3ssEZ2O2pH
    AXLFBaFCmJRIqRNb
    dI3eHPSBofY5srTT
    • Continúa separando el adhesivo a lo largo del borde superior de la pantalla.

    • Al cortar a lo largo de este borde, puedea chocar con la cámara y el sensor de proximidad alojados aquí. No hagas palanca agresivamente, sólo trabaja alrededor de ellos.

    For me, there were multiple cracks/shatters around the bottom edge and bottom right edge. It was a huge pain to get the screen off—I eventually pulled most of the screen off and then had a bunch of shattered pieces still stuck to the bottom edge that I had to take off with the tweezers. If you’ve got some really bad shattering around the TOP edge, you’ll have to be extremely careful here.

    EMC -

  9. kEG12rEeKaJBGsyc
    kEG12rEeKaJBGsyc
    VZ4OAKIEoDSjFoJU
    SLRpanHNUWDTLcmb
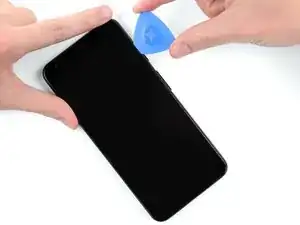
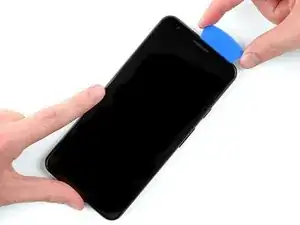
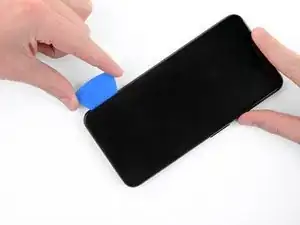
    • Desliza la púa de apertura hacia abajo del lado izquierdo del teléfono para separar el adhesivo.

  10. UQA6BAottXDI5fEM
    • El adhesivo que sostiene el borde inferior de la pantalla en su lugar es más grueso y considerablemente más fuerte que las tiras delgadas que mantienen los lados en su lugar.

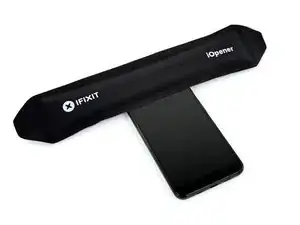
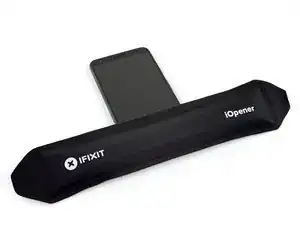
    • Si planeas reutilizar su pantalla, calienta el borde inferior del teléfono con un iOpener, una pistola de calor o un secador de pelo para aflojar el adhesivo antes de comenzar a cortar.

  11. ENLGQsN1oT1SSMXp
    ENLGQsN1oT1SSMXp
    lZrdCX5BskkQTtoM
    PVvX1a2vFwiNlmHD
    • Desliza tu púa de apertura a lo largo del borde inferior del teléfono para separar la última parte del adhesivo que sostiene la pantalla en su lugar.

    • Como se muestra en el primer paso, el espacio entre la pantalla y el borde de la pantalla es mayor aquí que en los lados.

    • Si planeas reutilizar tu pantalla, ten especial cuidado en este paso para mantener tu púa en lo profundo del teléfono debajo de la pantalla OLED (como se muestra en las fotos de este paso), o insertarla sólo 5 mm en el dispositivo para evitar entrar en contacto con la pantalla debajo del cristal.

    • ¡No intentes quitar la pantalla todavía! Sigue conectado al teléfono mediante un cable de visualización.

  12. VDEeXZAlcEvZAGpi
    VDEeXZAlcEvZAGpi
    ANZRqmBaNhJPFpTB
    HWSNaqsSJJjY1WlF
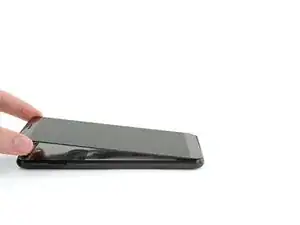
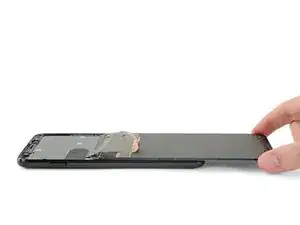
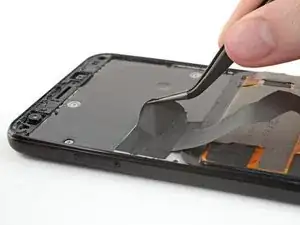
    • Levanta la pantalla por su borde superior (donde está la cámara mirando hacia adelante) y gírala con cuidado 180° para que la pantalla descanse boca abajo sobre el teléfono.

    • Si planeas reutilizar tu pantalla, ten cuidado de no tensar el cable de la pantalla durante este paso.

  13. jMKsxyX4tpXAmjUt
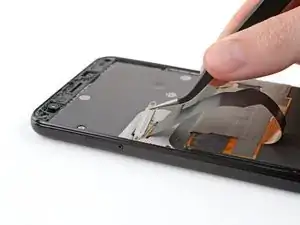
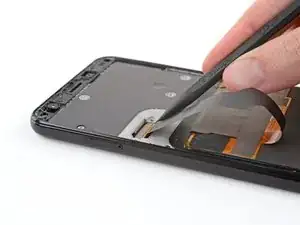
    • Utiliza pinzas para quitar la etiqueta adhesiva negra que cubre el soporte del cable de la pantalla.

    • Si la etiqueta adhesiva está en buenas condiciones, puedes volver a utilizarlo durante el reensamblaje. De lo contrario, puedse reemplazarlo con un trozo de cinta eléctrica.

    Make sure the tweezers are oriented as shown in the picture. I had them upside down and tore the tape partially.

    EMC -

  14. 3CqOAAslvq5naw1G
    • Remueve los dos tornillos T3 que sujetan el soporte de cable de la pantalla en su lugar.

    • Estos tornillos tienen una longitud de 4.3 mm, pero sigue siendo una buena idea llevar un registro de los mismos y asegurarse de que cada uno de ellos entre en sus respectivos orificios durante el reensamblaje.

    T3 was small for these screws. I had to use T4 to remove the screws

    SiddB -

  15. YZNGAeWTBFaiJUgP
    YZNGAeWTBFaiJUgP
    EQUbevQFqWdeOQlk
    FrFDTZLIuLaQmrnb
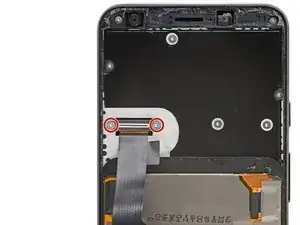
    • Remueve el soporte de cable de la pantalla.

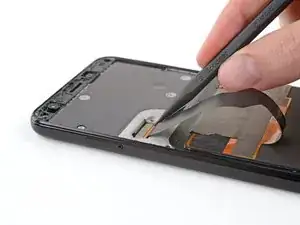
    • Haz palanca en el conector del cable con el extremo puntiagudo de un spudger para desconectar la pantalla del teléfono.

    • Cuando desconectes conectores como estos, ten cuidado de no desalojar los pequeños componentes montados en la superficie que rodean el zócalo.

    • Para volver a colocar los conectores de presión como éste, alinea y presiona con cuidado en un lado hasta que encaje en su lugar, luego repite en el otro lado. No presiones sobre el centro. Si el conector está desalineado, los pines pueden doblarse, causando daños permanentes.

  16. XKF141kGdKfD5FSa
    • Remueve la pantalla del teléfono.

    Keep your broken screen! Your replacement screen may be missing two pieces - the top speaker grill and the grey plastic camera surround. You’ll need to salvage these carefully from your old screen. Heat the glue to soften it before removing, if you’re lucky it will still be attached to the pieces and you can simply stick them onto the new screen.

    J Wilson -

    Good point! I will add a note to point this out.

    Arthur Shi -

  17. QGniymdsnAX5NcJR
    QGniymdsnAX5NcJR
    MukLiMhhbbAZDtms
    NQjJquJWIXm2bOmO
    • Para reinstalar la pantalla:

    • Usa pinzas o una herramienta de apertura para quitar todos los rastros de adhesivo del marco del teléfono. Se puede utilizar alcohol isopropílico de alta concentración para ayudar con la limpieza.

    • Si planeas reutilizar la malla, asegúrate de eliminar todos los residuos de adhesivo de la pantalla. Hay que tener cuidado con las herramientas metálicas para evitar rayar la pantalla.

    • Aplica adhesivo precortado o cinta adhesiva de doble cara (como la cinta Tesa) para volver a fijar la pantalla al marco.

    Maybe it’s because I didn’t heat my adhesive enough but it took me FOREVER to get it fully off. I was scraping with the flat side of the black spudger but it would have been better to use the blue scraper, which is in this kit but never mentioned. The kit also includes a single 70% isopropyl alcohol wipe but I needed at least 3. You can buy boxes of hundreds of the little pads at any drugstore—they’re good to have on hand for first aid kits, too. Be sure to get the adhesive off the narrow edges along the sides, I used the pointy end of the black spudger for that.

    EMC -

    When you go to apply the pre-cut adhesive, it will be harder than correctly applying screen protectors. Although it’s awkward, align it from the top first without taking the backing off, make sure it’s flush all the way down. fix it in place at the top with your hand and then remove the backing. Hopefully that will help apply it evenly. I started from the bottom and it was a huge mistake. If you mess it up and try to peel it up, the narrow adhesive on the sides will stretch a lot and you’ll have to break it and then sort of carefully nudge it into place millimeter by millimeter. I had to do this and used the pointy black spudger end. Even so, I was able to get it relatively flat and the screen seems pretty flush with the body.

    EMC -

    I did all thoses steps but didn’t glued the screen yet and it’s not working do I need to glue it to make it function or is there another problem?

    toto lerigolo -

    Sealing your phone after a repair won’t interfere with its function. Good choice to test the phone before installing replacement adhesive, though! Sounds like it will need more troubleshooting. Head on over to our Answers community if you get stuck!

    Carsten Frauenheim -

Conclusión

Si tu dispositivo Pixel no vuelve a encenderse después de sustituir la pantalla, existe la posibilidad de que el teléfono se haya encendido silenciosamente cuando has reconectado la batería. Mantén pulsado el botón de encendido durante unos segundos hasta que el teléfono vibre. Cuando esto ocurra, reconecta la pantalla y prueba de nuevo.

Para volver a ensamblar tu dispositivo, sigue estas instrucciones en orden inverso.

Lleva tus desechos electrónicos a un centro de reciclaje certificado.

¿La reparación no salió como la planificaste? Consulta nuestra comunidad de respuestas de Google Pixel 3a XL Answers community para ayuda en la resolución de problemas.

Taylor Dixon

Miembro Desde 26/06/18

63258 Reputación

21 comentarios

I replaced the display and when it is turned on for the first time, everything works, but when it goes on standby when I switch it on again the touchscreen doesn't work anymore.

rensan -

Rensan that is very weird! I would try resetting the phone, if you can? Sometimes that helps smooth out weird bugs with new Pixel displays.

Taylor Dixon -

I had the exact same issue, it was really weird. Turns out to be a hardware fault in the display, so I returned it and the new display works fine.

Eric Coco -

I'm having the same issue, gonna send the replacement screen in for a replacement. I got it from gadgetfix on eBay.

Arnie Jonassen -

The screens got recalled for a period of time due to this exact issue. i only know about it because my screen had broken, and absolutely no parts supplier online or here locally in Los Angeles could even order the display assembly.

Marie Irwin -

In system settings go to gestures and turn off active edge. That worked for me.

Miles Thornton -

Everything worked fine!

Thank you very much for this work!

Arno Reinhofer -

Does this apply if I just want to replace the glass, rather than the whole panel?

Conor Lane -

I got the pre-cut adhesive and I guess I’m a little confused about how to apply it ?

Christopher Petrolino -

Hi Christopher,

Check this guide for some tips on how to apply the adhesive.

Arthur Shi -

I've done this, but the screen isn't working. When pressing the power button, it vibrates as normal, but the screen doesn't light up. I've disconnected and reconnected the screen several times, but still the same issue. Any ideas?

Emily -

Emily, that is the worst! I’m so sorry. There are two possible scenarios here. 1: The phone isn’t recognizing the new screen and needs some sort of reset. Try a soft reset—hold the power button down for 30 seconds until the phone power cycles a couple times. If that doesn’t work, reattach your old display and make sure that one is still working. If it is, reconnect the new one and try a factory reset over USB (there are instructions all over, here’s one link you can try). Sometimes it takes a factory reset to get the phone to accept the new display. 2: the second, more unfortunate scenario is you may have damaged your display connector, or perhaps the replacement display is a dud. Again you can find out by reconnecting your old display to see if that one is still working. If it’s a faulty display and we sold it to you, you can reach out to our customer service team and they should be able to get you a working one in no time! Best of luck, I hope this helps.

Taylor Dixon -

Excellent guide, Taylor. My phone survived a fall from the top of a roller coaster (my fault, came out of my pocket), screen shattered but mb and frame survived. First screen was a lemon and surprise, the seller is no longer around. Second screen works perfectly, thanks for the great guide!

Kevin Prom -

Also try the full reboot. volume down and power switch for 30 seconds or so, gets you to bootloader screen..

Kevin Prom -

I have some relatively old electronics repair experience (2009-2010 hardware repair for laptops, iMacs, desktops). I’ve done many very similar steps on larger devices, so I wasn’t intimidated. That being said, it still took me 1.5 hours to do—but it did work by the end! I added many comments above at each step that will hopefully help others not spend so much time and not make my same mistakes.

EMC -

Thanks for leaving comments and feedback! I’m sure they’ll be helpful for future fixers!

Arthur Shi -

Guide worked for replacing my smashed screen.

It took a lot longer than the 30 mins quoted because my screen was very damaged (glass smashed into bits). The screen failed to peel off cleanly and the tops and bottoms still had glass clinging to them as it broke at the cracked areas. I didn’t use heat as suggested since I was worried about potentially overheating it by accident, this might have helped reduce the time.

Overall, the guide was pretty accurate, and the iFixIt part + repair tools I bought provided all the items I needed which is great.

Jack Guo -

I just finished repairing mine and noticed a bit of plastic sticking out of the side of the phone. It’s probably from the backside of the new screen. Do I have to take it off?

Ayan Barua -

Very Helpful, Thank-you!!

Would like to point out, after reading all the steps and doing a “dry run” in my head. After removing the old screen (especially if damaged and have many fragments of glass) to remove glue, clean off back. Then apply the new glue or tape strips. Once done then attach new screen.

The hardest part which took the most time was getting off ALL the old glue and fragments of the broken glass. Applying the tape and removing the second side also took a bit, think with the new glass attached would have much more of a chance of damaging the new cablle.

Thanks again, Great tutorial

Worked perfectly!!

Tess Lew -

Touch screen isn't working after replacement with a brand new OEM screen. Any ideas?

Scott Stewart -

so i have a question im thinking of fixing my brothers pixle 3a xl and the full oled display is dead because he cracked the glass and then spilt ice cream into it and the oled lair died with turning into purple slowly in the next few days until fully dyeing and i am thinking of fixing it but none of them are answering my question would it be fixable?

Julian Moran -