Introducción

Esta guía de reparación ha sido redactada por el personal de iFixit y no cuenta con el respaldo oficial de Google. Consulta más información sobre nuestras guías de reparación here].

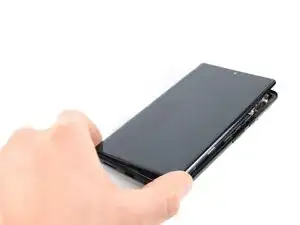
Usa esta guía para sustituir una pantalla rota o agrietada en tu Google Pixel 6 Pro.

Tu nueva pantalla de repuesto vendrá con el lector de huellas dactilares ya conectado. De lo contrario, deberás volver a instalar el lector de huellas dactilares original en tu nueva pantalla de reemplazo y. Si estás reemplazando el lector de huellas dactilares, deberás [enlace|https://pixelrepair.withgoogle.com/udfps|recalibrar el lector] para mantener su funcionalidad.

Si el marco está deformado, es importante que lo sustituyas para asegurarte de poder montar la pantalla correctamente y de que no sufra daños por una presión desigual.

Si tu batería está hinchada, considera una serie de precauciones. Antes de desarmar tu dispositivo, descarga tu batería por debajo del 25 %. Esto reducirá el riesgo de calentamiento si la batería se ve dañada accidentalmente durante la reparación.

Aviso: el Pixel 6 Pro contiene láseres de clase 1. Si desmontas el equipo, te expondrás a emisiones láser invisibles de infrarrojos.

La retención de la impermeabilidad del sistema tras la reparación dependerá de tu capacidad para reaplicar

el adhesivo. Sin embargo, independientemente de lo bien que hagas tu trabajo, tu equipo perderá su puntuación de grado de protección IP.

Antes de comenzar con este procedimiento, asegúrate de tener un juego de adhesivos de repuesto tanto para el cristal trasero como para la pantalla.

  1. AJglnb3TZlAVMd2O
    • Antes de comenzar, apaga tu teléfono. Mantén presionados los botones de encendido y de subir volumen durante unos segundos, luego toca "apagar" en tu pantalla.

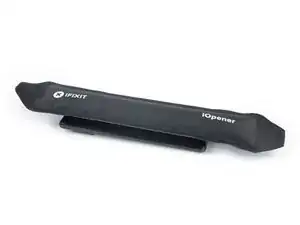
    • Aplica un iOpener caliente a la pantalla para aflojar el adhesivo debajo. Aplica el iOpener durante al menos 3 minutos.

    • También se puede usar un secador de pelo, una pistola de aire caliente o una placa caliente, pero ten cuidado de no sobrecalentar el dispositivo.

    Do you think that removing the SIM card, also will be a wise step? I'm pretty sure that heating the SIM card is not a good idea.

    Emil Teofanov -

    The SIM is probably no more sensitive than the rest of the phone.

    ScottMcNay -

    What does "be sure to have replacement adhesives for both the rear glass and the screen." I only had one it didn't mention another one?

    alberte -

    I didn't have the replacement adhesive for rear glass nor the 2 sided tape they talk about when putting it back together. It's Sunday, so I don't expect an answer. I decided to go ahead and work up until that point

    StlrFan -

  2. pYtLJZEF5B2LvWeB
    pYtLJZEF5B2LvWeB
    f5mSlIZsRCZpfB3b
    cCKQKbXroK5BDbLE
    • Los siguientes dos pasos demuestran el Anti-Clamp, una herramienta que diseñamos para facilitar el procedimiento de apertura. Si no estás utilizando Anti-Clamp, salta dos pasos hacia abajo para obtener un método alternativo.

    • Para obtener instrucciones completas sobre cómo usar Anti-Clamp, consulta esta guía.

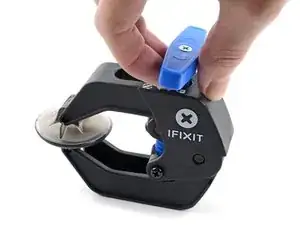
    • Tira de la manija azul hacia la bisagra para desactivar el modo de apertura.

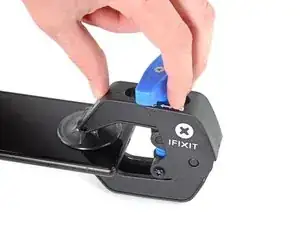
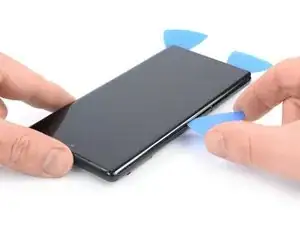
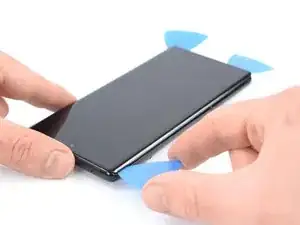
    • Coloca las ventosas justo encima del botón de inicio del teléfono, una en el frente y otra en la parte posterior.

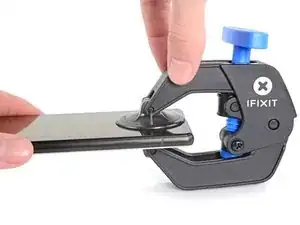
    • Coloca las ventosas justo encima del botón de inicio en la pantalla, una en el frente y otra en la parte posterior.

    • Si encuentras que la superficie de tu dispositivo es demasiado resbaladiza para que el Anti-Clamp la sujete, puedes usar cinta de embalaje para crear una superficie más adherente.

  3. YJqTCUlpDDspdIu2
    YJqTCUlpDDspdIu2
    NL1GxvPnIrqBJIFP
    DJNLaSYoMdcxJgRa
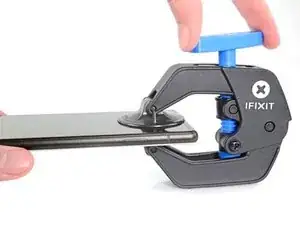
    • Empuja la manija azul lejos de la bisagra para activar el modo de apertura.

    • Gira el mango en el sentido de las agujas del reloj hasta que veas que las copas comienzan a estirarse.

    • Asegúrate de que las ventosas permanezcan alineadas entre sí. Si comienzan a salirse de la alineación, afloje ligeramente las ventosas y vuelve a alinear los brazos.

    • Espera un minuto para que el adhesivo se suelte y se abra la parte inferior de la pantalla.

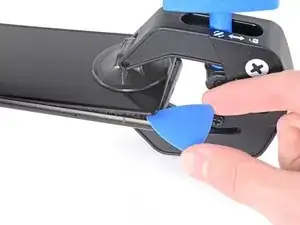
    • Inserta una púa de apertura en el borde inferior cuando Anti-Clamp cree un espacio lo suficientemente grande.

    • Si el Anti-Clamp no crea un espacio suficiente, aplica más calor al área y gira la manija en el sentido de las agujas del reloj media vuelta.

    • No des más de media vuelta a la vez y espera un minuto entre vueltas. Deja que el Anti-Clamp y el tiempo hagan el trabajo por ti.

    • Omite los siguientes dos pasos.

  4. 5qT1kECvRkyOwMdj
    5qT1kECvRkyOwMdj
    yNlUPqlWLhUnqwEa
    622Y1IVXYBVVFD2s
    • Una vez que la pantalla esté caliente al tacto, aplica una ventosa en el borde inferior de la pantalla.

    • Si la pantalla está muy rota, cubrirla con una capa de cinta de embalaje transparente puede permitir que se adhiera la manija de succión. Alternativamente, se puede usar una cinta muy fuerte en lugar del mango de succión. Si todo lo demás falla, puede usar super glue para pegar la ventosa a la pantalla.

    • Levanta la pantalla, incluido su marco de seguridad, con la ventosa para crear un pequeño espacio entre la pantalla y el ensamblaje del teléfono.

    • Inserta una púa de apertura en el espacio entre el marco de la pantalla y el ensamblaje del teléfono.

    • Asegúrate de insertar tu púa de apertura enla posición correcta para evitar separar la pantalla de su marco de seguridad en lugar del ensamblaje del teléfono.

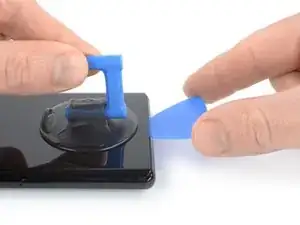
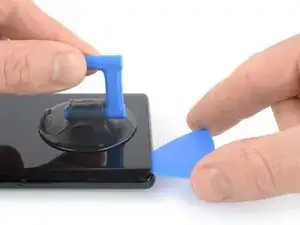
    • Desliza la púa de apertura hacia la esquina inferior izquierda de la pantalla para cortar su adhesivo.

    • Deja la púa de apertura en su lugar para evitar que el adhesivo se vuelva a sellar.

  5. 3iBpMQeeYQZd1N6W
    3iBpMQeeYQZd1N6W
    EF4cafwMyVbQyFeA
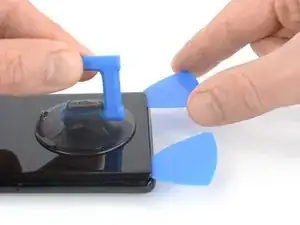
    • Inserta una segunda púa de apertura en el borde inferior y deslízala hacia la esquina inferior derecha de la pantalla para cortar el adhesivo.

    • Deja la púa de apertura en su lugar para evitar que el adhesivo se vuelva a sellar.

  6. H2V6FPgYSgyNiaXT
    H2V6FPgYSgyNiaXT
    3kcnIWolap1s53OI
    15PB5ccyfLlKWefn
    • La pantalla del Google Pixel 6 Pro no solo se mantiene en su lugar con adhesivo, sino también con pequeños pasadores de plástico. En caso de que tu púa de apertura se bloquee durante el procedimiento de eliminación de la pantalla, significa que insertaste tu púa demasiado debajo de la pantalla.

    • Solo inserta la punta de la púa de apertura (~ 3-4 mm) al cortar el adhesivo de la pantalla.

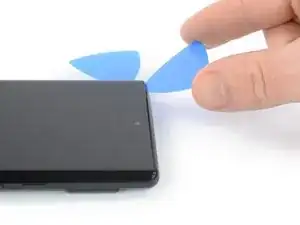
    • Inserta una tercera púa de apertura debajo de la esquina inferior izquierda de la pantalla.

    • Desliza la púa de apertura a lo largo del borde izquierdo de la pantalla para cortar el adhesivo.''

    • Deja la púa de apertura en la esquina superior izquierda para evitar que el adhesivo se vuelva a sellar.

  7. qWybciuriiWRatwM
    qWybciuriiWRatwM
    jIYEmbfvICMX6LXF
    • Si el adhesivo se vuelve difícil de cortar, lo más probable es que se haya enfriado.Usa tu iOpener o pistola de calor durante 1-2 minutos para recalentarlo.

    • Cuando cortes cerca de la cámara frontal, inserta solo la punta de la púa de apertura (~2-3 mm) para evitar dañar o manchar la cámara.

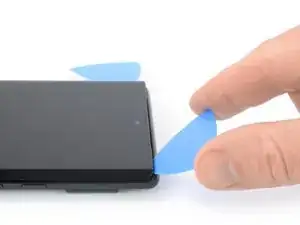
    • Inserta una cuarta púa de apertura en la esquina superior izquierda de la pantalla.

    • Desliza la púa de apertura a lo largo del borde superior del teléfono para cortar el adhesivo.

    • Deja la púa de apertura en la esquina superior derecha para evitar que el adhesivo se vuelva a sellar.

  8. 3u2GucwUJXcX36ik
    3u2GucwUJXcX36ik
    WSpdGRMJq215fHVl
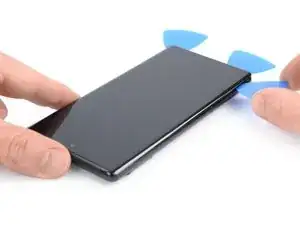
    • Inserta una quinta púa de apertura y deslízala a lo largo del borde derecho del teléfono para cortar el adhesivo restante.

    • No intentes quitar la pantalla por completo todavía, la pantalla aún está conectada al ensamblaje del teléfono.

  9. kRiqlurRKwtCBmRE
    kRiqlurRKwtCBmRE
    PtmBApHIHu6ANKT3
    fJXI1KaKDwVhdnnH
    • Evita tensar el cable de la pantalla durante el siguiente procedimiento.

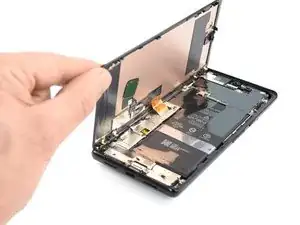
    • Dobla con cuidado la pantalla hacia el lado izquierdo del ensamblaje del teléfono como si abriera la portada de un libro.

    I don't know if it's an earlier or later design, but I am combining 2 phones (1 crushed glass but operational into the casing of one that quit functioning but has good glass) and on both, the ribbon cable for the LCD is a tiny bit too short to fold out flat like this. If you are working on one like mine, extreme care must be taken while holding the LCD up while simultaneously trying to plug the cable back into that very small recessed socket. Almost like you need 3 hands or robot fingers...

    Stephen P. Thurman -

  10. aDmeySbuHVHuNPqR
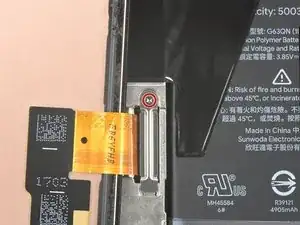
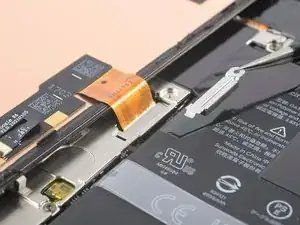
    • Utiliza un destornillador Torx T3 para quitar el tornillo de 2,0 mm de largo que sujeta el soporte de metal del cable de la pantalla.

    • Mientras reproduzcas este paso, asegúrate de tener controlados todos los tornillos para poder colocarlos de nuevo en su posición original.

    I don't know if it's an earlier or later design, but I am combining 2 phones (1 crushed glass but operational into the casing of one that quit functioning but has good glass), and on both, the metal holder plate shown here is simply spring connected and that 2mm screw is instead slightly off to the side as part of the aluminum bracket's screws.

    Stephen P. Thurman -

  11. TXCDyVZdVyVArY4w
    TXCDyVZdVyVArY4w
    Wfb1v1Wns3GQc6eP
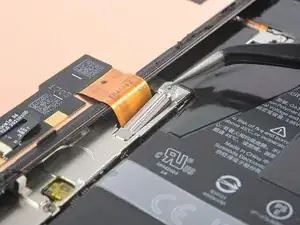
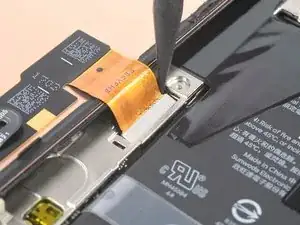
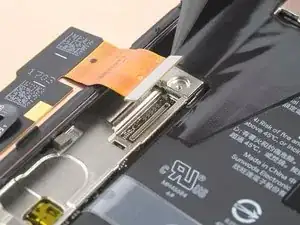
    • Usa un par de pinzas para quitar el soporte de metal que se encuentra en la parte superior del conector del cable de la pantalla.

    • Asegúrate de guardar este componente para reinstalarlo cuando termines la reparación.

  12. XAfcloCj3jgvnZXD
    XAfcloCj3jgvnZXD
    KmYqCLHysrBxjLya
    • Usa un spudger para desconectar el cable flexible de la pantalla levantando el conector de su zócalo.
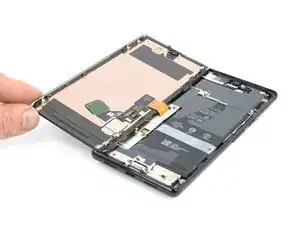
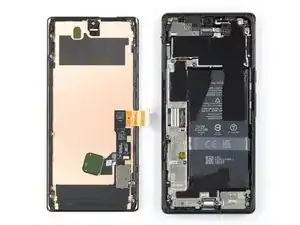
  13. EuFbD1VbsDijAW6O
    • Quita la pantalla

    • Durante la reinstalación, aplica adhesivo nuevo donde sea necesario después de limpiar las áreas correspondientes con alcohol isopropílico (>90 %).

    • Sigue esta guía si estás utilizando una tarjeta adhesiva precortada.

    • Sigue esta guía en caso de que estés utilizando una tarjeta adhesiva pre cortada.

    • Si el cable de la pantalla de repuesto está sujetado con cinta, retira la cinta antes de la instalación.

    • Asegúrate de quitar todos los revestimientos adhesivos de tu pantalla de reemplazo. Verifica el hueco de la cámara selfie y asegúrate de haber quitado el forro allí.

    • Durante el reinicio tras rearmar el dispositivo, la pantalla tendrá que recalibrarse. No toques la pantalla durante este proceso, ya que podría dar lugar a una calibración dactilar incorrecta y generar problemas táctiles.

    • Si instalas un lector de huellas dactilares diferente, deberás volver a calibrar el lector antes de que funcione.

    Before reassembly, clean around the edge of where the screen was, to remove any debris that may have been captured.

    ScottMcNay -

    After reassembly, the fingerprint sensor appears to be a common issue with new screens:

    * Go to https://pixelrepair.withgoogle.com/udfps on a computer.

    * If using Windows, click the help link to install the USB software. After installing, restart the computer and return to https://pixelrepair.withgoogle.com/udfps.

    * Follow the steps given to install the fingerprint calibration software.

    * Restart the phone.

    ScottMcNay -

    "Be sure to remove all adhesive liners from your replacement screen. Check the selfie camera recess and make sure you've removed the liner there."

    A photo with blue highlight square would've been helpful here...also it's very easy to miss this instruction as you'd be on the adhesive page...

    alberte -

    I did take the selfie camera liner this is a bad problem

    Austin Curtis -

Conclusión

Si es posible, enciende tu dispositivo y prueba tu reparación antes de instalar adhesivo nuevo y volver a sellar.

Para volver a armar tu dispositivo, sigue estas instrucciones en orden inverso.

La mejor manera de asegurar la pantalla nueva es aplicar una hoja de cinta adhesiva de doble cara cortada a la medida en la parte posterior de la pantalla.

Lleva tus desechos electrónicos a un punto de reciclaje certificado

¿La reparación no salió según lo planeado? Prueba algunas soluciones de problemas básicos, o solicita ayuda a nuestra Comunidad de respuestas.

Dominik Schnabelrauch

Miembro Desde 23/11/16

169012 Reputación

34 comentarios

Est-ce possible de changer que e verre brisé

Leroy -

Really wish this had instructions on how to put the screen back on. "reverse order" is not accurate.

Ed Word -

The fingerprint scanner doesn't work. I get a message that I need to visit, but the website doesn't exist. Google has a fingerprint repair tool where you connect your phone and boot into rescue mode, but the program says I can't use it as my phone's firmware is newer than the tool's firmware.


Do a google search to see, there are many others with this issue and a few Google support threads where google acknowledged the issue for over two years but doesn't address the issue other than to say it should be fixed in the future firmware update.


So, now I'm stuck without a fingerprint scanner that I used for all security and banking apps.

kimsballs -

Did you transfer your existing fingerprint scanner from your original screen to the new one ?

Alan Sears -

See my note below; I found a solution for this.

Matt Montero -

These instructions neglect a key point: there is a protective cover over the holepunch camera opening (with the OEM part), and if you don't remove that before installing the screen, you will not be able to take selfies. Some people will consider that a positive, but I'd prefer it not be there.

I was having the same problem that kimsballs mentioned above, but I've solved this for my Pixel 6 Pro, so here's a quick guide... or links to other people's solutions, really.

First, you need to go here, and download the Google USB driver: https://developer.android.com/studio/run...; just get the Zip file and extract it.

CRITICAL: do not use Device Manager to install the file. Locate the .inf file within the extracted folder (mine was titled android_winusb.inf), then right click and select Install. If the Install option is not listed (Win11 doesn't show it at first), click More Options at the bottom of the menu.

Then, go here (MUST use Chrome browser) and follow instructions: https://pixelrepair.withgoogle.com/udfps

Matt Montero -

I tried your method but the but the finger print repair tool doesn't connect to my phone when i enter fast boot mode. I have the USB driver installed, even downloaded Android Studio to make sure I had it, but still no luck.

Cyril Chen -

I also didn't get the finger print repair tool to connect with my phone in fast boot mode. I followed the trouble shooting guild and ended up at this link. I guess I didn't install the driver correctly.

https://developer.android.com/studio/run...

Thomas Elliott -

friends I need help, I bought the original screen that includes the fingerprint reader but when I try to see if it works I get a message saying that: The registration was not completed, the fingerprint sensor cannot be used, consult a repair provider

Diego Rueda -

Diego, I just did this repair. You'll have to download the Android USB driver to a computer https://developer.android.com/studio/run...

CRITICAL: do not use Device Manager to install the file. Locate the .inf file within the extracted folder (mine was titled android_winusb.inf), then right click and select Install. If the Install option is not listed (Win11 doesn't show it at first), click More Options at the bottom of the menu.

Then, go here (MUST use Chrome browser) and follow instructions: https://pixelrepair.withgoogle.com/udfps

I had to reboot my phone twice.

Hope this helps!

Ted Ostrowski -

(1/2) Hello everyone:

The instructions are great until they stop.

1st hurdle: Applying the adhesive. It is simply a thin ring around the entire device. Not patches. I placed it on the phone (not the screen and then carefully peeled back the plastic using the tweezers and then used the spudger to reapproximate any adhesive that got stretched or moved. I then reattached the screen via the cable and replaced the metal piece and screw, then folded the screen over the phone and ran something firm along the entire edge of the phone. I thought I was messing it up, but it all worked out...

Second hurdle: As discussed the fingerprint reader does not work when you first boot up the phone. However, as others mentioned there is a fix. At first I was worried as I only read about this after purchasing the replacement screen, but it was actually very painless. I am not saying anything new that was not mentioned by Matt Montero and Ted Ostrowski. Just confirming that this works.

Bryan Roller -

(2/2)

Download ZIP: https://developer.android.com/studio/run...

Extract All

locate the android_winusb.inf file

Right click --> Install

Then proceed to https://pixelrepair.withgoogle.com/udfps in chrome.

Follow instructions (very clear and fast).

And you will have to reboot the phone (not computer) twice.

The entire process was ~ 75 minutes.

Seems to be working great!

Bryan Roller -

I also want to add - I think my fingerprint reader is working better than originally. It may be a bias from sub-par operation while living with a very damaged screen for 2 weeks, but my biggest overall complaint with the pixel 6 pro is the fingerprint reader failing. I am not sure if it is the hardware, the calibration, or a combination, but I think it works better than it used to.

Bryan Roller -

Hi Everyone I just wanted to give my experience with the finger print sensor recalibration. I just replaced my screen. I was having zero luck on my windows computer even after installing USB driver and then tried on my old Macbook. Neither detected my phone. I then used the USB-C to USB-C cable (that came with my pixel 6 Pro) and connected to my wife's newer macbook (using Chrome - https://pixelrepair.withgoogle.com/udfps ) and it worked immediately, took like 10 seconds and no fussing with drivers. I spent like an hour before I thought to try using another device. If this is an option for you and you are having issues, i'd definitely recommend using a legit cable and attempting the process on an IOS device (using Chrome).

Best of luck.

arialz -

This one worked a treat! Thanks for posting :)

alberte -

A quick extra note about the adhesive. The precut adhesive was a bit of a confusing experience for me, i'd personally recommend ordering an extra or a small tube of adhesive in case you need to patch a spot. I found it was best to place the adhesive down on the phone itself before connecting the screen. I had a few spots where the adhesive didn't line up so I used the spudger to push it into place... So far no problems and everything is working fine now. I placed some books on it for about an hour with the phone off just to try to avoid any separation issues in the future. Overall the process was pretty easy and definitely worth the approx. $120 i saved not taking it into a ubreakifix.

arialz -

Followed these exact instructions with iFixit OEM screen replacement, and the front facing camera no longer works. @mattmontero explained the reason (above):

"These instructions neglect a key point: there is a protective cover over the holepunch camera opening (with the OEM part), and if you don't remove that before installing the screen, you will not be able to take selfies."

It sure would've been nice to have that detail included in the instructions. Now I've got a Pixel 6 Pro with no front-facing camera.

Capt@inKrunk -

I had the same issue...a photo with blue box highlight would be helpful - I have to order another adhesive and do it over :|

alberte -

I followed these instructions and now my phone will not even turn on.

Cheryl -

if I do the fingerprint sensor calibration I will lose my data??

ADEL -

Thank you Diego!!! Your instructions saved me hours of frustration. I would have never figured out the below step as I went right into device manager. Appreciate your help!!!

CRITICAL: do not use Device Manager to install the file. Locate the .inf file within the extracted folder (mine was titled android_winusb.inf), then right click and select Install.

I agree the install instructions should be included. If I didn't read the comments from users, I would be tearing the phone down to remove the cover on the selfie camera and would have wasted the cut out adhesive I paid for.

Jay -

The repair went quite well. Take your time and read the instructions a couple of times before you start AND most importantly the comments. The comments were most helpful in restoring the fingerprint sensor. Thank you @bryanroller

Make sure you take off the protective cover over the front facing camera hole! My kit did have a note on the screen to do that now thankfully.

I used a heat gun to heat up the adhesive. Seemed to work very well. Getting the first opening pick in is a bit tricky - I ended up cracking the screen even further. Once you get that first one started though it goes quite well.

The pre cut adhesive was intimidating at first. It's actually quite easy and forgiving. Set it in place on the phone and use your spudger to move it around and it's all good.

This is the first time I've attempted a repair like this and I must say the kit was well put together and the instructions were pretty good. Someone else mentioned that it would be nice to see the steps on how to put everything back together.

Thanks!

Benjaman Walter -

What do you do if the new screen doesn't turn on?

I can fell the phone vibrating when the power button is pressed, but the screen remains blank.

Christopher Turner -

same thing happened to me, and I had to reseat the cable connecting the screen to the phone. The first time, the phone vibrated but the screen stayed black.

The cover and screw went back in even though the cable was not fully seated in the socket, or was possibly off to the side. I was concerned b/c instructions said not to touch screen during first power on, and I thought the screen might turn on when the cable was reconnected, but it did not - maybe the phone turned itself back off since no screen was attached?

Once I reseated the cable the screen turned on when the phone vibrated, then I turned it off and sealed it back up. If you already closed up the phone, you might be able to warm it up, slice the adhesive, and pull the screen back off to get to the cable and reseat it. Not sure if the adhesive would restick, but it is pretty sticky, so worth a shot, or maybe someone can suggest something else besides ordering another OEM adhesive.

John Kalas -

I had the same problem. I then disconnected the battery and reconnected and the phone started.

danielbauer -

I was able to successfully change my screen, but I would not have been able to complete without reading others' comments.

The ribbon cable bounced out of the socket as soon as I removed the torx screw, so be careful not to lose the screw in the process. Be sure to snap the cable back into the socket securely before screwing the cover back on with the torx screw - I thought I had it in place the first time, and the cover and screw went back together, but the screen did not work until I reseated the cable.

I am sure my phone is no longer water resistant b/c I had issues with the adhesive stretching, sticking off center, the plastic getting underneath it, etc, but I still got enough of it in close enough to the right places to keep the screen on, and it looks fine.

Definitely remove the cover on the inside of the screen over the selfie camera before installing the screen. Install the driver to be able to complete the fingerprint calibration, then restart the phone a couple of times for it to start working.

John Kalas -

Thanks everyone for their comments! I've implemented your experiences with the selfie camera cover into the guide.

Arthur Shi -

help i downloaded the google zip file and extracted the usb driver but the android inf file isnt showing up what am i doing wrong

Alexandra Mayoral -

when you have trouble with your fingerprint reader use this https://piunikaweb.com/2022/10/04/pixel-... I spent 3 hours trying to figure this out and it is the only way that I was able to get my fingerprint sensor to work. also, you do not need to reset your phone if you do it this way just restart after installing the software.

David Hedoesit -

Any idea where to get the OEM parts for a reasonable price in EU? The replacemant parts havent been available for a long time here

Cagri Ürkmez -

Ok. So if I were to purchase only the actual screen for my 6 Pro, how do I remove the parts attached to the inner side of the screen? I'm guessing they are one or more of the following... Integrated Fingerprint Reader, Amoled Display, OLED Digitizer, and Display something- looks like I wrote dunes. Because I can buy the screen only, without anything attached to to it, like just a piece of curved glass that is the correct fit, but have zero idea how to remove all that from the old broken piece of glass that is my screen and then reattach all that to a new beautiful uncracked all the heck screen. Thanks!

Karen Holcomb -

After failing to do a battery replacement on my samsung s10+ from ifixit I was worried about trying again but I just did the screen from this guide as well as a battery while I was in there and it seems to have worked great! Thanks so much! The fingerprint reader worked by clicking the link in the last step in this article -- just realize that you have to restart the phone a couple times for it to work.

Sean Roth -

Btw, it sounds like my loadspeaker is malfunctioning after the repair. Has anyone else had this issue? I wonder if it's just some rubbing alcohol that needs to dry up.

Sean Roth -

I have just fixed my phone! I'm so excited about that! I always thought that phone fixing is extremely difficult and I won't manage this before. Well here I am. I'm just having problems with fingerprint scanner calibrating/ In the fast boot mode my phone is locked. Can it be the issue?

Ekaterina Astafeva -