Introducción

Esta guía de reparación fue creada por el personal de iFixit y no ha sido respaldada por Google. Obtén más información sobre nuestras guías de reparación aquí.

Usa esta guía para reemplazar una pantalla agrietada o rota en tu Google Pixel 6.

Tu nueva pantalla de repuesto vendrá con el lector de huellas dactilares ya conectado. De lo contrario, deberás reinstalar el lector de huellas dactilares original en tu nueva pantalla de repuesto. Si estás reemplazando el lector de huellas dactilares, deberás [enlace|https://pixelrepair.withgoogle.com/udfps|recalibrar el lector] para mantener su funcionalidad.

Si el marco está deformado, es importante reemplazarlo para asegurarse de que la nueva pantalla se monte correctamente y no sufra daños por una presión desigual.

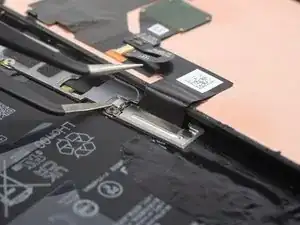
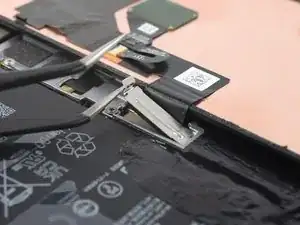
Si tu batería está hinchada, toma las precauciones adecuadas. Antes de desmontar tu dispositivo, descarga la batería por debajo del 25 %. Esto reduce el riesgo de un evento térmico peligroso si la batería se daña accidentalmente durante la reparación.

Precaución: El Pixel 6 contiene láseres de clase 1. El desmontaje podría dar lugar a la exposición a emisiones láser infrarrojas invisibles.

Nota: Esta guía te indica que reemplaces solo la pantalla, incluido su marco de plástico de seguridad. Sin embargo, algunas pantallas de repuesto para este teléfono vienen sin el marco preinstalado (también conocido como chasis), lo que requiere un procedimiento de eliminación diferente. Asegúrate de tener la pieza correcta antes de comenzar esta guía.

Conservar la resistencia al agua después de la reparación dependerá de qué tan bien vuelvas a aplicar el adhesivo, pero tu dispositivo perderá su clasificación IP (Protección de Estanqueidad).

Antes de comenzar este procedimiento, asegúrate de tener un juego de adhesivos de repuesto para la pantalla.

  1. NQKD1XK5SEyZ2pcK
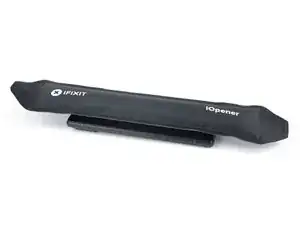
    • Coloca un iOpener caliente sobre la pantalla, para aflojar el adhesivo que hay debajo. Déjalo así durante al menos 3 minutos.

    • También puedes usar un secador de pelo, una pistola de aire caliente o una placa caliente, pero ten cuidado de no sobrecalentar el dispositivo.

    what area of the phone do i apply it to?

    middle, edges, diagonal?

    johnathandoe -

  2. JUojptYOCPfWpKwR
    JUojptYOCPfWpKwR
    cEjg4oaAxWtdSyNK
    mCNbPLvWQcfdwfQA
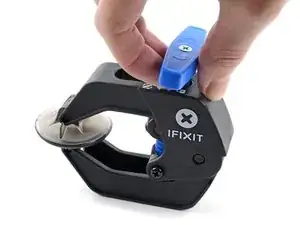
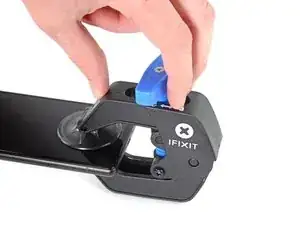
    • Los dos pasos siguientes muestran el Anti-Clamp, una herramienta que hemos diseñado para facilitar el procedimiento de apertura. Si no utiliza el Anti-Clamp, sáltese los dos pasos siguientes para utilizar un método alternativo.

    • Para obtener instrucciones completas sobre cómo utilizar el Anti-Clamp, consulte esta guía.

    • Tire del asa azul hacia la bisagra para desactivar el modo de apertura.

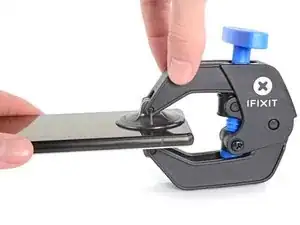
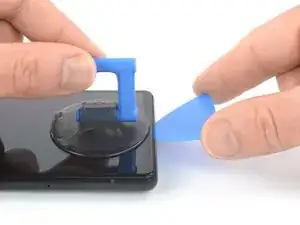
    • Coloca las ventosas cerca del borde inferior del teléfono, una en el frente y otra en la parte posterior.

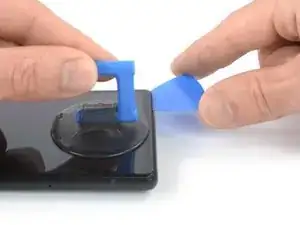
    • Empuje las ventosas hacia abajo para aplicar succión en la zona deseada.

    • Si la superficie de tu dispositivo es demasiado resbaladiza para que el Anti-Clamp se agarre, puedes utilizar cinta de embalar para crear una superficie más adherente.

  3. VwGYDWrrA1dIjBEl
    VwGYDWrrA1dIjBEl
    d5sfAYICGD2KDOsD
    qZXEXv2DvKDkHJsR
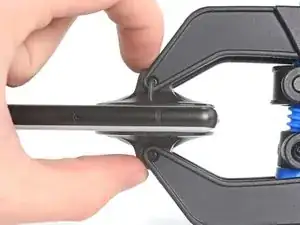
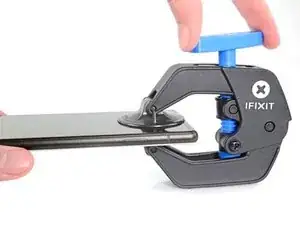
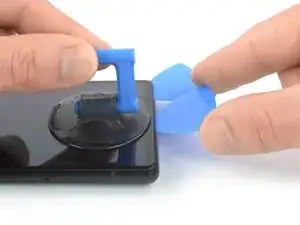
    • Empuje la manilla azul hacia fuera de la bisagra para activar el modo de apertura.

    • Gire la manivela en el sentido de las agujas del reloj hasta que vea que las copas empiezan a estirarse.

    • Asegúrese de que las ventosas permanecen alineadas entre sí. Si empiezan a desalinearse, afloje ligeramente las ventosas y vuelva a alinear los brazos.

    • Espere un minuto para dar al adhesivo la oportunidad de soltarse y presentar un hueco de apertura.

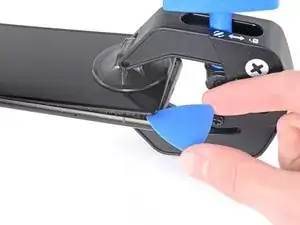
    • Inserte una piqueta de apertura bajo el marco de la mampara cuando el Antipinzamiento cree un hueco lo suficientemente grande.

    • Si el antipinzamiento no crea un hueco suficiente, aplique más calor en la zona y gire el mango media vuelta en el sentido de las agujas del reloj.

    • No des más de media vuelta cada vez y espera un minuto entre vuelta y vuelta. Deja que el Anti-Clamp y el tiempo hagan el trabajo por ti.

    • Sáltese los dos pasos siguientes.

  4. cYyiIKFogElwfati
    cYyiIKFogElwfati
    UW31YPIdylgY3D2H
    TfSLnFsLfwnF1A2V
    • Cuando la pantalla esté caliente al tacto, coloca una ventosa en el borde inferior de la pantalla.

    • Si la pantalla está muy rota, cubrirla con una capa de cinta de embalaje transparente puede permitir que se adhiera la ventosa. También puedes usar una cinta muy fuerte en lugar de la ventosa. Y si todo lo demás falla, puedes pegar con pegamento la ventosa a la pantalla.

    • Levanta la pantalla con la ventosa, incluido el marco de seguridad, para crear un pequeño espacio entre la pantalla y el ensamblaje del teléfono.

    • Introduce una púa de apertura en el espacio entre el marco de la pantalla y el ensamblaje del teléfono.

    • Asegúrate de insertar la púa en la posición correcta, para evitar separar la pantalla de su marco de seguridad, en lugar del ensamblaje del teléfono.

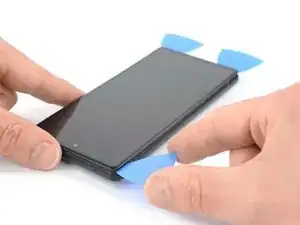
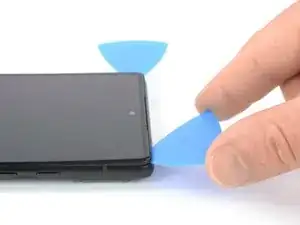
    • Desliza la púa de apertura hacia la esquina inferior derecha de la pantalla, para cortar el adhesivo.

    • Deja ahí la púa de apertura, para evitar que el adhesivo se vuelva a sellar.

  5. VgYxHhOv2ANdZhBj
    VgYxHhOv2ANdZhBj
    T6sO3hSXwWPrGMLR
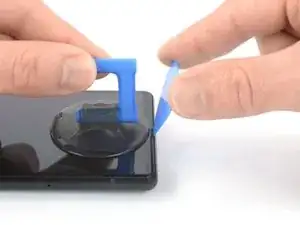
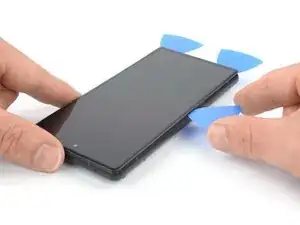
    • Inserta una segunda púa de apertura en el borde inferior, y deslízala hacia la esquina inferior izquierda de la pantalla, para cortar el adhesivo.

    • Deja ahí la púa, para evitar que el adhesivo se vuelva a sellar.

  6. cJwEmdUkAHVMxuGa
    cJwEmdUkAHVMxuGa
    lZvbIkb6yRvLCHNY
    bILZg3nTYhAgEAYD
    • La pantalla del Google Pixel 6 se sujeta no solo con el adhesivo, sino también con pequeños clips de plástico. Si la púa de apertura se bloquea durante el procedimiento de eliminación de la pantalla, significa que la introdujiste demasiado debajo de la pantalla. Introduce solo la punta de la púa (3-4 mm) para cortar el adhesivo de la pantalla.

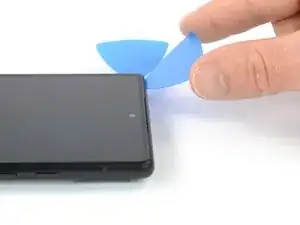
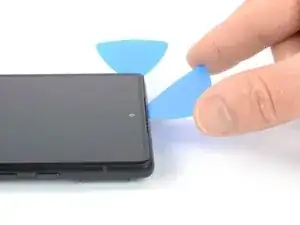
    • Introduce una tercera púa bajo la esquina inferior izquierda de la pantalla.

    • Desliza la púa a lo largo del borde izquierdo de la pantalla, para cortar el adhesivo.

    • Deja la púa de en la esquina superior izquierda, para evitar que el adhesivo se vuelva a sellar.

  7. 1My5XLwo1mBpLmTW
    1My5XLwo1mBpLmTW
    WqGUe6d5wnaAVGDy
    DoXGAU6d5H44FI4b
    • Si el adhesivo resulta difícil de cortar, lo más probable es que se haya enfriado. Usa el iOpener o una pistola de calor durante 1-2 minutos para recalentarlo.

    • Cuando cortes cerca de la cámara frontal, introduce solo la punta de la púa (2-3 mm), para evitar dañar o manchar la cámara.

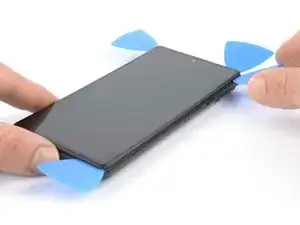
    • Introduce una cuarta púa en la esquina superior izquierda de la pantalla.

    • Desliza la púa a lo largo del borde superior del teléfono, para cortar el adhesivo.

    • Deja la púa en la esquina superior derecha, para evitar que el adhesivo se vuelva a sellar.

  8. oc26Ut2TqOXsSApn
    oc26Ut2TqOXsSApn
    GRRyAxb5PErHCLEj
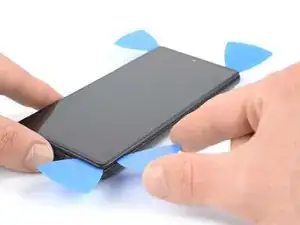
    • Introduce una quinta púa y deslízala a lo largo del borde derecho del teléfono, para cortar el adhesivo restante.

    • No intentes quitar la pantalla por completo todavía, ya que aún está conectada al ensamblaje del teléfono.

  9. RuEUIInW6MLASrru
    RuEUIInW6MLASrru
    banNiywUPAjPnNOY
    r1hEEeZcCNUrSiW3
    • Evita tensar el cable de la pantalla durante el siguiente procedimiento.

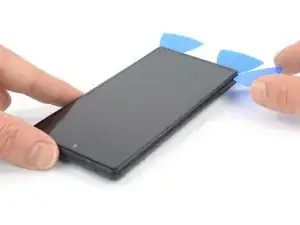
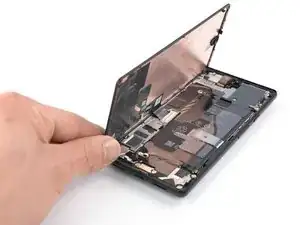
    • Abre con cuidado el lado derecho de la pantalla, hacia el lado izquierdo del ensamblaje del teléfono, como si abrieras un libro.

  10. hvjCSMnSLpvKtTLC
    hvjCSMnSLpvKtTLC
    RHNWK5RKHyUOC4Sy
    uD4WvXdPvX2tNSw3
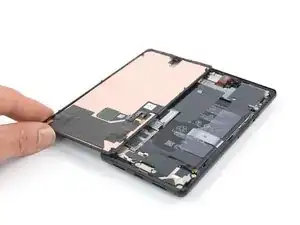
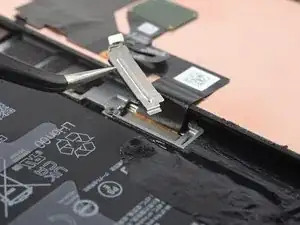
    • Usa un par de pinzas, para desenganchar con cuidado y quitar el soporte de metal, que se encuentra en la parte superior del conector del cable de la pantalla.

    • Asegúrate de conservar este componente, para volver a instalarlo durante el montaje.

  11. Vl25352xbMJOyJf2
    Vl25352xbMJOyJf2
    JlXiF4IOKQTRHBit
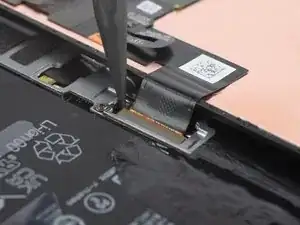
    • Usa un spudger para desconectar el cable flexible de la pantalla, levantando el conector de su encaje.
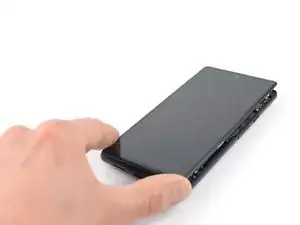
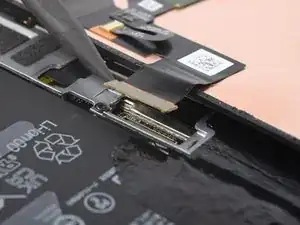
  12. DLLMweSo6ZRPrLYE
    • Quita la pantalla.

    • Durante el montaje, coloca adhesivo nuevo donde sea necesario, tras limpiar las áreas relevantes con alcohol isopropílico (> 90%).

    • Sigue esta guía si estás utilizando adhesivos cortados a medida para tu dispositivo.

    • Sigue esta guía si estás usando una tarjeta adhesiva precortada.

    • Durante el proceso de arranque tras el reensamblaje, la pantalla pasará por una secuencia de calibración. No toques la pantalla durante ese proceso, ya que podrías provocar una calibración táctil incorrecta y crear problemas táctiles.

    • Si instalas un lector de huellas dactilares diferente, deberás volver a calibrar el lector antes de que funcione.

    Has the issue with the fingerprint not working after screen replacement been sorted?

    Nigel -

    I bought the repair kit that included the adhesive & fingerprint module. If that's what you bought as well, you will have to use the google repair tool. https://pixelrepair.withgoogle.com/udfps. I had to manually download the google usb drivers & install them on Windows 11 because the phone wasn't being detected by the pixel repair tool.

    Kwame Bailey -

    Hello, fingerprint does'nt work now.... any tips ? thank !

    willy kedziora -

    I had the screen on my 6A replaced at a U-BreakiFix got home fingerprint reader does not work. It says enrollment not complete. Go to your repair facility. I guess they must have some magic that makes it work again due to security issues

    Lynne Ayers -

    Great directions, would be helpful to have a section on Google Pixel 6 Display Adhesive - Genuine

    Troy O'Connor -

    This guide is clear and easy to follow. The other one where you actually replace the screen and put the new adhesive is much less easy to follow, and takes much more time to complete because you have to remove all traces of the old adhesive. I used GooGone and a 2mm flat head screwdriver as a scraping tool and it worked well.

    The fingerprint reader was not working after the upgrade, but I got it to work by visiting https://pixelrepair.withgoogle.com/udfps and since I'm using Ubuntu, I had to run those two commands:

    sudo usermod -aG plugdev $LOGNAME

    sudo apt-get install android-sdk-platform-tools-common

    And then reboot my computer before my phone could be connected. I rebooted my phone manually after the upgrade and all was working normally. In fact, the new fingerprint sensor works better than the one I got before. The new one is actually usable.

    My Pixel 6 is like new! (except perhaps for the water resistance)

    Francois Lord -

    Great tips! I wish I had thought of Goo Gone. By far the longest part of the procedure was cleaning out the old adhesive, and using alcohol swabs (including a few spares on hand) was slow and not very effective.

    After Chrome on ubuntu was unhappy with recognizing my phone I had to resort to using a Mac, but I would prefer your solution.

    Gary Smith -

    Easy enough and excellent guide! Thank you!

    Jason -

    The guide was very helpful, but could be improved somewhat. I made the mistake of removing the screen without the bracket & didn't realize until I had attached the adhesive & tried to put the new screen on. So I had to remove the adhesive & the bracket before the new screen would fit, since it has it's own bracket. Another tip would be to include the instructions for getting the fingerprint module to work. Including https://pixelrepair.withgoogle.com/udfps & downloading & installing the google usb driver.

    Kwame Bailey -

Conclusión

Si es posible, enciende el dispositivo y prueba si funciona antes de instalar adhesivo nuevo y volver a sellarlo.

Para volver a montar el dispositivo, sigue estas instrucciones en orden inverso.

Lleva los residuos electrónicos a una empresa de reciclaje certificada.

¿La reparación no salió según lo planeado? Prueba alguna [solución de problemas básicos, o pide ayuda a nuestra comunidad de respuestas.

Dominik Schnabelrauch

Miembro Desde 23/11/16

169012 Reputación

31 comentarios

Ordered the official Google Pixel 6 display part from iFixit and followed this guide, which worked well. However, it's probably worth adding that you may need to manually calibrate the display once it's installed if the phone is throwing up fingerprint reader errors (which is what happened to me). You can do that via this tool from Google: https://pixelrepair.withgoogle.com/udfps

Mark Walton -

The guide worked great, thanks! :D

Warning to others though: Careful what you buy! The genuine display was out of stock so I bought from a different source which didn't come with a fingerprint reader or display adhesive. My fault for not paying attention when buying, but fair warning to everyone else to double check. I hadn't even considered the reader being glued to the screen but not included on replacement parts. The adhesive is an easy purchase, but not sure how hard the fingerprint reader will be. I might be back to unlocking with a pin like some kind of caveman!

Jonathan Michaud -

Nvm, found the guide for the fingerprint reader replacement. Hopefully I can just move this one over.

Jonathan Michaud -

Bought the screen with repair kit from iFixit. Be aware, the custom cut adhesive guide they recommend for reattaching the screen is WRONG. It says you hold the tabs to align and place the adhesive strip. That's NOT the case with the one included here. The side with the tabs actually has to be pulled off first. Had to order another one from iFixit. Now without my phone a couple days while waiting for the new part to arrive. Now without my phone for a few days waiting for the new adhesive to arrive. Not great.

Ravi Chopra -

For those who are not able to get the Pixel 6 detected in the "Fast Boot Mode" on the website https://pixelrepair.withgoogle.com/udfps you need to install the Driver. First and foremost on Device Manager you should see Pixel 6 or other device, and then update driver, install the driver from the downloaded w/ instructions from https://developer.android.com/studio/run.... Update Driver and point the driver to this location where you just downloaded the driver. (unzipped version). Once you are done the device gets recognized immmeidately on the Chrome Repair Website.

And one more important steps, make sure this is in Fast Mode (not safe/recovery/rescue). Second after you see successful installation on Chrome, you need to restart the Pixel 6, the automatic first restart does not work, you need to restart manually. And then go to finger print and setup again. This is very important!!

Venu Reddy -

Thanks, useful info Venu.

Bill Tolbert -

Thank you. Your solution worked perfectly. I'm glad I saw it before I started the repair otherwise I would have been stressed out.

Justin Farischon -

Couldn't find the unique calibration software for this deviceCouldn't find the unique calibration software for this device
i get thhis messege
did you know how to fix it ?

giorgos pelekanos -

Soooooo good! Got a dude screen on Monday. Thought I screwed up and was sweating. Tested the broken screen and realised it still worked. Support came back to me in 24 hours and put me on the list for the next part available. Got it today (Thursday) and now I have a working phone again. Very easy and fun fix. Used the heat pack and a hairdryer, Take your time opening it and do as best you can on cleaning out the glue on the edge. Also, recommend using some books or other gentle clamps to close after. Finally, like Mark, I needed to use https://pixelrepair.withgoogle.com/udfps and it worked after I restarted manually.

#RightToRepair #FTW so happy. Saved 45% of the cost to repair in a shop and got a little more comfortable with my phone and own skills.

Denis Hoctor -

So I have two pixel 6 phones with physical damage to one causing the display to have a "black ink spot" eventually overtake the screen, and the other with water damage that initially seemed inconsequential, but within an hour rendered the screen unusable(due to not being able to see what's displayed. Dropped it in a toilet 😑 fully submerged for all of one second).

Both phones work perfectly well otherwise. Will this replacement work(fix the phone), or is this something one cannot determine with certainty? If not, will it likely do so (or more commonly/most often the case)

Theodore Leahy -

Success! I was dubious on the iOpener and after reading the comments, decided to use a heat gun and an instant read thermometer. Slowly got around 150 degrees F and using the suction cup it started opening up. The other tools worked great. I ordered the OEM replacement screen and it included the display adhesive. That wasn't clear to me so I ordered one separately and now I have an extra.


I assumed you would not need to re-calibrate the fingerprint reader since the OEM screen included the reader. But, I did. Note that you don't have to reset the phone to factory settings. Something I read made me think you did. As posted by Venu Reddy above, follow the instructions at https://pixelrepair.withgoogle.com/udfps.

Bill Tolbert -

Fantastic guide. Replaced a Pixel 6 screen that was totally smashed from a face-flat fall outside. Seems to have worked like a charm, and has saved a huge amount of money (and e-waste)! I had to recalibrate the fingerprint reader after installing the new screen (via the tool at https://pixelrepair.withgoogle.com/udfps), and after doing that everything is working as expected. Overall, very satisfied. Thanks to Dominik Schnabelrauch and iFixit!

William Barber -

So fo those struggling to get the pixelrepair tool to recognise there phone. on windows 10/11

Step 1. Try connect using instructions here > https://pixelrepair.withgoogle.com/udfps If it works, Yay! if it doesnt proceed to step 2.

Step 2 > Download the Google USB Driver Zip (https://developer.android.com/studio/run... extract the file to a known location

Step 3 > Go into Fastboot mode and connect your phone

Step 4 > Open Control Panel > Device Manager > Other Devices , Locate the device with the error message , Right click and Update that driver

Step 5 > Browse my computer for Drivers

Step 6 > Browse the location you extracted the Google USB Driver to and Next Next Next

Step 7 > Browse to https://pixelrepair.withgoogle.com/udfps and try again

It should work, the issue is Fast boot appears to use a different driver then the primary OS (which makes sense) the only issue is you cant install the driver until you are in fastboot mode and that isn't mentioned anywhere!

Hope this helps someone :-)

Jim Catelli -

Thank you so so much for taking the time to write out the steps! After an hour of frustration, I found your comment and it worked!!! Appreciate it !!!

Aneta Otylia Siwiec -

The hardest part of this repair is getting the old adhesive out of the track along the edge before putting the new one in. I sprayed some WD-40 into a cup and used the tip of the spudger to apply some to loosen it. I don't know if it helped. Wish I had read the previous comment about using a 2mm jeweler's screwdriver (yes, metal!). That and some Goo Gone or WD-40 should work. I couldn't figure out the coffee filter technique. I used about 15 alcohol prep pads (they include one in the kit). I found a fast scrubbing action with my fingernail jamming the alcohol pad into the track to be effective as a final cleaning. Good luck! Overall, this screen replacement isn't that hard.

Kurt Roskopf -

I purchased this exact screen from iFix-it and the instructions and install were excellent. One major flaw is that fingerprint reader does not even work, almost like it is not even recognized as being present. When the software calls for fingerprint it immediately goes gos to request 4 digit screen lock pin. Very frustrating.

David Blevins -

Pretty straightforwad and P6 is way easier to open than my old P3. One thing to note, when lifting the old broken screen, the small rectangular rubber surround thing which borders the light sensor under the camera stuck to the screen. I didn't pay close attention to this until I was about to install the new one and noticed this part should've stayed with the phone / bottom portion. As others said, cleaning the old adhesive was the hardest bit and I second what Kurt said, 2mm screwdriver + lots of isopropyl alcohol. The bottom frame doesn't seem too scratch easily, seems to be made out of plastic instead of aluminium. Finally thanks to Jim for the UDFPS walkthrough, my Win11 failed to recognise the P6 initially until I followed your instructions :)

L Santoso -

Not good. No good explanation for the blue screens of plastic and how to reassemble. This is half of a guide.

Daniel McKinlay -

Why does this "genuine" screen replacement look so thick to me? It looks like an LCD that belongs on a phone made 10 years ago.

owens87 -

Could you share what 10-year-old phone you refer to?

Davit Zen -

Just finished using this guide alongside the replacement screen and tool kit from iFixit. When I first decided to fix my screen myself, I was worried that I might have struggled along the way, but I can happily say my repair went without issue. Instead of using the included heat pad I used a hair dryer and carefully heated the edges of the phone, I then proceeded to use the suction cup and guitar pick to begin slicing through the adhesive. This part was surprisingly easy and did not take much effort. The hardest part of this repair was adequately cleaning up the old adhesive that comes with the phone, which was more tedious than hard. The new screen fits in perfectly after applying the new adhesive. Just a tip for others looking to take this on, the in-screen fingerprint sensor needs to be calibrated, you can find the tool online by searching for pixel 6 fingerprint calibrator. Overall a very good experience.

Cameron French -

I can see my display but the screen is unresponsive to touch

Daniel Robinson -

Hilfe, mein Bildschirm ist nach der Displayinstallation schwar geblieben. Es kommt aber zu einem klacken, wenn ich die Tasten drücke, d.h. das Telefon hat gebootet. Was kann ich tun?

Stebbke -

Hallo Stebbke, es könnte sein, dass das Display-Kabel nicht fest sitzt oder der Connector verschmutzt ist. Ich würde dir empfehlen, die empfohlenen Schritte zur Problembehebung durchzugehen.

Manuel Haeussermann -

Just want to give my hats off to the IFIXIT team. My wife dropped her phone the day before her phone case showed up. Since she had a history of not dropping her phones....we didn't purchase the add-on warranty. Welp such is life. The last time I had to replace a screen was my HTC DNA way back in the day, and needless to say I really didn't go in prepared with all the truly necessary tools for the job. So in some way's I still somewhat dreaded replacing the screen from past experience. Thankfully the tool kit was mighty impressive and honest to God worth every extra dollar(unless you already have comparable or better tools), and made the screen removal a total breeze, well other then that pesky adhesive remnants. The how-to tutorial was well written and very helpful. The adhesive template was brilliant and well thought out, and worked perfect. The phone is perfect again. Happy Wife Happy Life. Thank you IFIXIT Team!

Joey Rakas -

I learned some things during the process that I wished I knew before I started

1. There are two metal springy things at the bottom corners. You can seen them in figure 12. If your pick slips too far in they can become damaged and they might catch on a sleeve during the adhesive cleaning.

2. The screen connector is hard to reconnect and clip in place. Took me a good 30 minutes of fiddling, applying a suction cup to the back at the start would have made the screen easier to hold.

3. Fingerprint recalibration requires connection to you computer and if you use windows the driver must be installed before hand. Matt M. had a good explanation on how to install the driver. Fingerprint scanner not working after replacing screen. Pixel 6 Pro

Daniel Lutz -

This guide was perfect. Worked as a sharm.

The only note I have is that the guide is not showing you how to reassmble the screen (I see now however, at the bottom of the guide, that one should just follow the guide in reverse order, which makes sense). One thing worth noting though is that there is a "protective" cover over the hole for the front camera, so make sure to remove that before gluing the screen back on the phone (then you wont need to remove the scree a second time and damage the adhesive 😊).

Also, make sure to follow the other posts regarding the fingerprint-reader (install from https://pixelrepair.withgoogle.com/udfps and restart).

Overall, very thorough guide and I couldn't be more pleased with my result.

⭐⭐⭐⭐⭐

Patrik Martinsson -

I installed my new screen, per the instructions above. When I power the phone on, I have no display. Any help would be appreciated. Did I receive a defective screen or do I have more damage beyond the screen? TIA

John C -

Did you find a solution? I'm having the same problem

issa dare -

Touch is unresponsive after replacement

Juan Carlos Iturri -

Good product. Installed and it works fine. BUT, we are missing some crucial steps. Where is the step to reassemble the screen once you have installed the adhesive? Where is the step to show you how to remove all the strips once the screen is connected? Where is the step to show you how to test the screen before removing the strips and clicking in the screen? I searched a long time for these steps and couldnt find them,. so either theyre missing or too hard to find, either way, this is an oversight. I became quite frustrated with it and could have used the help.

Caspar Redgrave -