Introducción

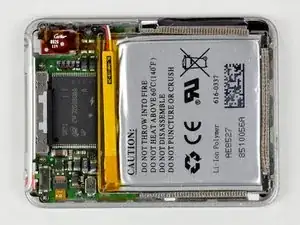
El conjunto de placa base/batería se vende junto

  1. f3VLjUkllASpBsSy
    • Por favor, ten en cuenta que quitar el panel posterior de la parte posterior del iPod causará un daño considerable al panel posterior. Recomendamos encarecidamente comprar un panel trasero adicional para volver a montar correctamente el iPod.

    • Antes de abrir tu iPod, asegúrate de que el interruptor de retención esté en la posición de bloqueo.

    I found removing the back to be very difficult and had to use a mini screwdriver to complete it. While removing the back to replace the clickwheel, I not only destroyed the back, I inadvertently mangled the video cable and so I then had to replace that too.

    gruntso -

  2. SRSp1IEOFyiCabd1
    • El panel posterior está asegurado a la carcasa frontal mediante ocho clips fijados permanentemente al panel posterior. Estos clips se bloquean en pequeñas pestañas mecanizadas en la carcasa frontal.

    • Para liberar las pestañas, se deben empujar hacia el centro del Nano. Ten en cuenta la ubicación de todas las pestañas en el panel posterior. Cuando uses una herramienta de apertura de iPod para liberar el panel trasero, asegúrate de trabajar con la herramienta en la ubicación de estos clips.

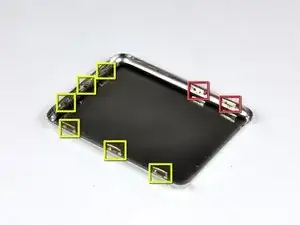
    • Para ayudar en la visualización, los dos clips enmarcados en rojo están ubicados más cerca del conector para auriculares.

    i don't know what genoration my ipod is...but it looks exactly like that on and it doesnt have the clips......what do i do?

    lydija mizell -

    https://www.ifixit.com/info/ID-your-iPod

    Try that first to find what you have

    Kevin Bhasi -

    Given the inherited risks of damaging the components, it would also be important to mention that the area where there are no clips is where the flat cable to the screen resides. So NO deep sticking tools in that area. It’s attractive to do because at that right side the back panel is intruded the easiest way - but dont do it.

    frederik boersma -

  3. B31gu3DJaCWHBfYC
    B31gu3DJaCWHBfYC
    jPqqcbvYKkxQg1ew
    • Abrir el iPod puede ser un desafío. No te desanimes si te toma algunos intentos antes de abrir el iPod.

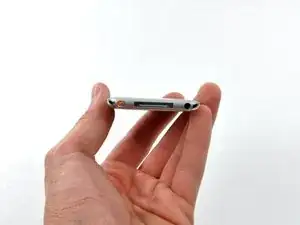
    • Inserta la herramienta grande para abrir el iPod en la costura entre la carcasa frontal y el panel posterior del iPod, sobre el conector de la base. El borde de la herramienta debe apuntar hacia el panel posterior para evitar que se raye accidentalmente la carcasa frontal de aluminio anodizado.

    I don't have a gap big enough to put anything in it what do I do?

    Jayden Gamble -

  4. pcaTvfLghFIo3JAX
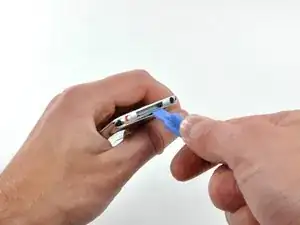
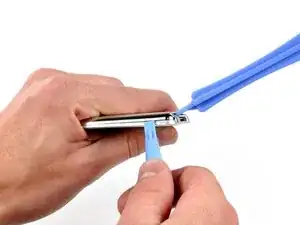
    • Inserta una pequeña herramienta de apertura de iPod en la costura del lado del conector para auriculares del Nano, con el borde de la herramienta apuntando hacia el panel trasero.

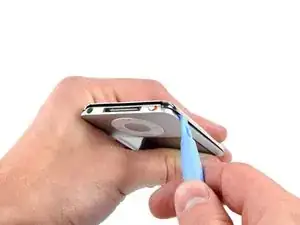
    • Amplía suavemente el espacio existente presionando/moviendo la pequeña herramienta de apertura del iPod en el espacio cerca de cada una de las dos pestañas unidas a la carcasa trasera, empujando los clips hacia el centro del Nano hasta que ambos se hayan liberado.

    the tool i bought because you suggested it to me got inevitably broken like it was butter made, thanks

    Daniele Ciriello -

    This is virtually impossible! I have already cut myself when the stupid tool slipped trying to push in on the clips. Why on earth would anyone design something to impossible to open when they know the battery would need to be replaced at some point?

    Virginia VeDepo -

    Forget the iFixit plastic tools. You need to use steel on steel. I used a heavy duty engravers knife I happened to have, to get it started. Then, a fine chisel and jeweler’s screwdrivers and LOTS of force to pry it off. I messed up the aluminum front case a bit, but I cleaned that up with sandpaper. The back case was bent a bit, but I straightened that, and after replacing the battery I fastened it back on with black electricians tape. It looks quite well, and good enough for me. I will cancel my order for a replacement back. Joe M 2/3/2018

    Joseph Mensch -

    Garbage tutorial, this step was probably scribbled down in 2 minutes off the top of someone’s head for real.

    ᅚᅚMauxie -

    i never needed the large tool i just needed i little flat head screwdriver

    Jaxon Smith -

  5. kMmjUM1XX6UxS6V6
    kMmjUM1XX6UxS6V6
    eirbSDcbFTVfRejN
    • La gran herramienta de apertura del iPod ya no es necesaria para acceder al lado izquierdo del iPod.

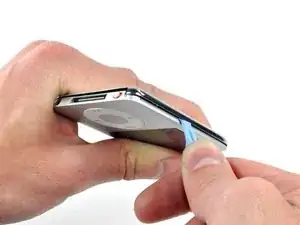
    • Repite el mismo procedimiento enumerado en el paso anterior para liberar los tres clips a lo largo del lado del interruptor de retención del Nano.

    this part is really tough - stuck here

    Mark -

  6. PcCTErdAFnVKwWRb
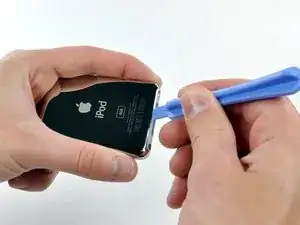
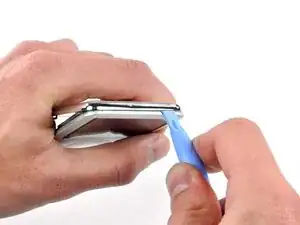
    • Inserta una herramienta de apertura de iPod en el espacio cerca de la esquina superior izquierda del Nano y trabaja para liberar los tres clips a lo largo del borde superior del panel trasero.

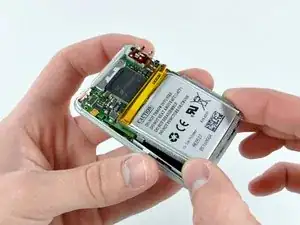
    • Después de asegurarte de que todas las pestañas estén libres, separa las dos mitades del iPod.

    • El panel trasero ahora está libre del iPod.

    thanks you for help

    jeff -

    i gotta say this is some of the worst prying I’ve ever done on a delicate electronic piece. Even with three sides off, that last top wouldn’t budge. I had to ram a thin alumninum tool in there and bend the top lip and it still wouldn’t move.

    Mark -

  7. X2xYM3VEvb4fdJTX
    • Con la carcasa trasera quitada, la parte trasera de su Nano ahora debería verse así.

    At this stage an alternative (and more simple) procedure is to cut the battery wires between the battery and the logic board (one at a time to avoid shorts), remove the old battery, fit the new battery, strip and prepare the ends of the old cut wires, then solder the new battery to these wires again being careful not to short connections. Then sleeve or encapsulate these soldered joints (wax or blu tack will do). This makes it an easier and quicker job.

    viridens -

    Sounds a much better idea to me.


    I was just given some old parts in a box. Scored a decent router, laptop power supply and 2 ipods. Unfortunately, the newer one has half it's power connector snapped off and the other (4GB/A1236), I successfully reset via iTunes but it doesn't hold a charge! %#*@. I might just scout for an old speaker dock at a garage sale or such and put it in the bathroom or something.

    Tracy Fortune -

  8. RN3uheH1pQNenqql
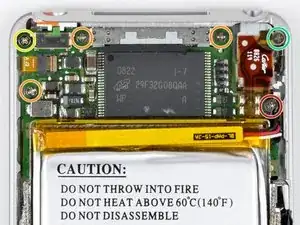
    • Retira los siguientes seis tornillos:

    • Una Phillips de 1,8 mm.

    • Tres Phillips de 1,9 mm.

    • Una Phillips de 2,4 mm.

    • Una Phillips de 2,6 mm.

    If your headphone jack isn't working, note that it is possible to replace just the headphone jack here:

    There are just 4 soldering points that need to be loosened, and then you can put on the new one.

    iTronics Repair -

    One 2.6 mm Phillips. The colour of this screw isn´t blue in the picture, it´s green.

    Daniel -

    I was able to remove the back cover using two think plastic guitar picks and my red cross donor card

    Professor Wagstaff -

    I read some steps further back and it was recommended to NOT remove all the screws and the boards indicated in the following steps, but to go directly to replace the battery. It is no more difficult to go directly to cut the battery leads, or unsolder them. I tried to splice the new battery wires to the cut leads from the board, but it was hard working with the fine wire. I ended up clearing the top of the three battery solder-through holes, but I did not clear the holes. I soldered the battery leads directly to the top of the small round solder dots…first the white, then the black, and finally the red. I fastened the battery in-place with a piece of two-sided carpet tape. I straightened up the back and taped into place with black electricians tape. It is very delicate work, and not for a beginner…I repair family jewelry, which is valuable practice. Joe M 2/3/2018

    Joseph Mensch -

  9. OWvJGtYldhWeSmIM
    OWvJGtYldhWeSmIM
    3NWThcewSac4EBr6
    • Levanta el clip de retención del cable plano de la rueda de clic marrón con un spudger.

    • El clip está articulado en el extremo más cercano al borde de la caja.

  10. 2RB5vXjVfVuArppn
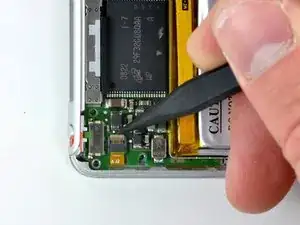
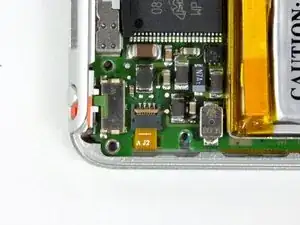
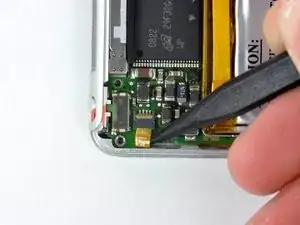
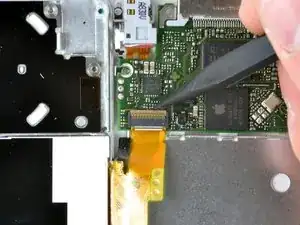
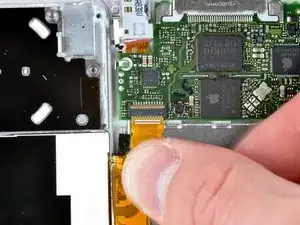
    • Usa la punta de un spudger para deslizar el cable plano de la rueda de clic fuera de su zócalo.

    • La placa lógica todavía está conectada al iPod mediante el cable plano de la pantalla.

  11. JsNeBBJVUryM1GRT
    JsNeBBJVUryM1GRT
    mvVpBKBvvwn3ishs
    • La placa lógica todavía está conectada a la carcasa frontal mediante el cable plano de la pantalla, ubicado en el lado del conector para auriculares de la placa lógica.

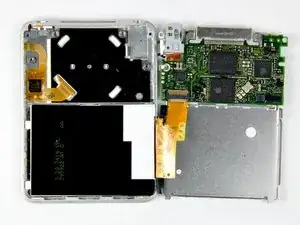
    • Levanta el conjunto de la placa lógica para sacarlo de la carcasa frontal desde el lado del conector de la rueda de clic (el cable que acabas de desconectar). Gira el ensamblaje de la placa lógica sobre el cable plano de la pantalla y colóquelo junto a la carcasa frontal.

    When reassembling the logic board into the case, watch out for the tiny nose of the audio jack that's facing towards the center of the device. This nose has to be inserted first, then the rest of the audio jack followed by the logic board itself.

    Alexander Schwab -

  12. YTcdTAWq1CbAVQYC
    • Usa un spudger para levantar el clip de retención del cable plano de la pantalla.

    • El clip de retención tiene bisagras en el extremo más cercano a la batería.

  13. 4LHrdBXhRRLdn4Hu
    • Desliza el cable plano de la pantalla fuera de su zócalo.

    • La placa lógica ahora está completamente desconectada de la carcasa frontal.

Conclusión

Para volver a armar tu dispositivo, sigue estas instrucciones en orden inverso.

Walter Galan

685928 Reputación

2 comentarios

Your guide worked pefectly. Thank you!

Surfalia -

http://www.ebay.com/itm/251624194311?ssP... some for sale on here that would be great to do this too!

kent -