Introducción

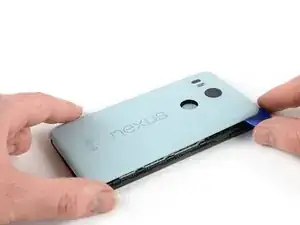
Utiliza esta guía para remover la placa madre en el Nexus 5X.

Algunas imágenes de la guía mostrarán la batería ya retirada del teléfono. No es necesario quitar la batería para este procedimiento.

Necesitarás adhesivo de repuesto para volver a unir los componentes cuando vuelvas a montar el dispositivo.

  1. hZuBjDNMirRpxDPW
    hZuBjDNMirRpxDPW
    JWDcUTTe2RHKb3Aw
    CyV6ZtdsOoQKFIlC
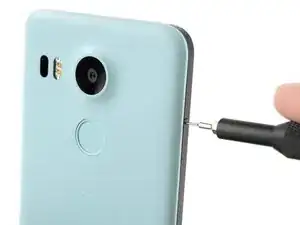
    • Inserta una herramienta de expulsión de la tarjeta SIM en el orificio de la bandeja de la tarjeta SIM, situado en el borde izquierdo del teléfono.

    • Presiona aquí para expulsar la bandeja de la tarjeta SIM.

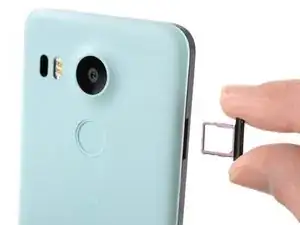
    • Retira la bandeja de la tarjeta SIM.

  2. ICCoMW16jfCrFbcn
    ICCoMW16jfCrFbcn
    sQxCgO3CGWjyHP2m
    MDAUADr5BeVSLDZl
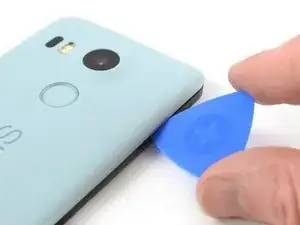
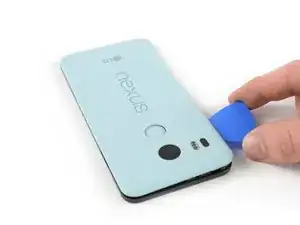
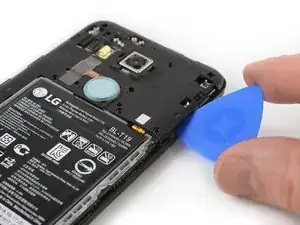
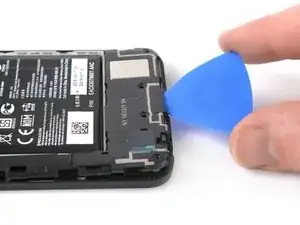
    • Coloca una púa de apertura en la abertura de la ranura de la bandeja de la tarjeta SIM y gírala hacia los lados para soltar el primer clip de plástico que sujeta el panel trasero en su lugar.

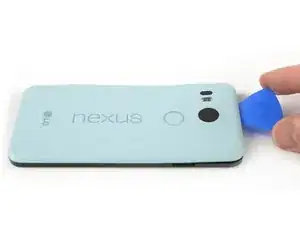
    • Desliza la púa de apertura alrededor del borde superior del teléfono para liberar los clips de plástico que aseguran el panel trasero.

    A guitar pick is a good substitution for the plastic opening tool.

    Sam Sippe -

    Here’s a photo of the location of the 18 tabs that hold the back cover in place

    Steve -

    Twisting sideways didn’t do it for me, but sliding along the edge did. However, at first I didn’t realize that the pick was between the motherboard and midframe, rather than between midframe and back cover like it was supposed to. This led to breaking off a spring-loaded connector on the motherboard, connecting to an antenna (I guess) in the back cover. So far I haven’t noticed any reception issues, but I can’t say for sure.

    In essence: be careful to get the pick towards the back cover, and not “straight in” under the midframe.

    Hampus -

  3. afVYqSRSsfYK5iHi
    afVYqSRSsfYK5iHi
    pIWZAi2MnVlPLqqa
    WCXoRcGIOO46lSW1
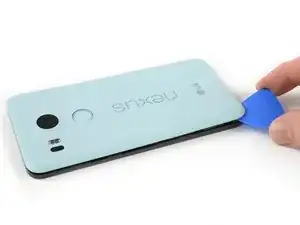
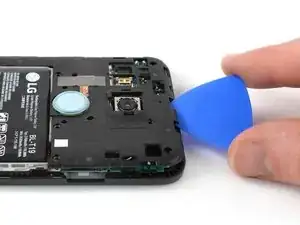
    • Continúa deslizando la púa de apertura alrededor de todos los lados del teléfono para liberar todos los clips que aseguran el panel trasero.

  4. elaUMDhpoLaSyiLC
    elaUMDhpoLaSyiLC
    xC4oPmeXKWyCeJYD
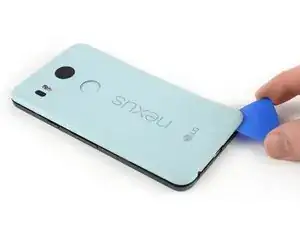
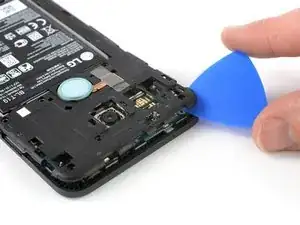
    • Inclina la púa de apertura para levantar un poco el panel trasero.

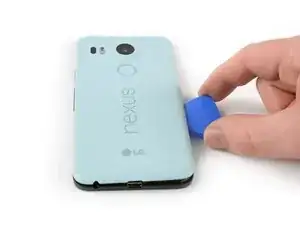
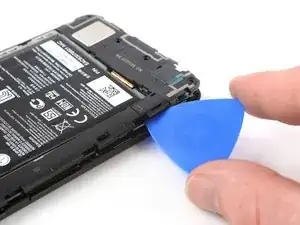
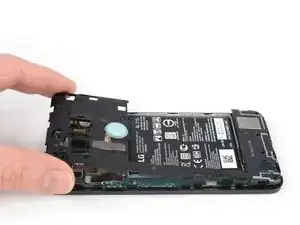
    • Hay dos clips de plástico más junto al sensor de huellas digitales. Suéltalos tirando suavemente del panel trasero.

    • Retira el panel trasero.

  5. SLBb5Cl3QMGTDxxc
    • Remueve los diez tornillos Phillips de 3.6 mm que sujetan el marco medio.

    Some models use a Y1 screw head.

    Kyle Wright -

  6. kbJbMKZvCYpi5Ym1
    kbJbMKZvCYpi5Ym1
    SBDl6Qt1OeRUcuOJ
    • Inserta una púa de apertura en la ranura de la bandeja de la tarjeta SIM y gira la púa de apertura hacia un lado para liberar los clips de plástico.

    The photo seems to show that the person is opening from the top, which is the opposite of your advice. So, just want to be clear.

    Robert Konigsberg -

    yes, open from bottom first... the pic above shows the finished product after reaching top of phone. I found it best to actually start close to the right of the usbC connector. Pushing inbetween the 2 tabs and up will release the shell.. then work clockwise.

    Chris Mayberry -

    Chris, your advice to start to the right of the usbC connector was excellent, thank you!

    Robert Konigsberg -

    I found that my middle panel was already broken at the narrowest part just to the left of the 2-D scan code on the battery, perhaps from some ham-fisted previous repair. This seems of little consequence, there do not seem to be any electrical connections running through this part.

    Wiley Sanders -

    After a long amount of prying, I discoved that, if used gently, a jimmy can really help get the plastic off

    Timothy Owens -

    I could not remove the cover with the opening tool but had success with the opening picks (the triangle parts). Just slide them under the cover and gently bend and twist the pick to release the cover from the locks. By the way: it’s perfectly normal for the bottom cover part to come loose from the top cover part. It’s designed that way (they interlock).

    Marco Miltenburg -

    Here’s a photo of the location of the 20 tabs that hold the middle assembly in place, and the pry angle needed.

    Steve -

    This is the scariest part but it is the same process of taking a bike tire off the rim: lift up one part of the cover then put a wedge under the lifted section to hold it up then continue around the frame lifting it up and holding it up with the blue picks. You’ll find that after you life the bottom you can wriggle free the rest by hand.

    The 10 screws came out quickly using the IFIXIT.com magnetic screwdriver.

    mcguinness.david -

  7. MPaVeGZ53Yant1bX
    MPaVeGZ53Yant1bX
    1EYFK4Jmr4ZkYCXc
    • Continúa deslizando la púa de apertura alrededor de la parte superior del marco medio para soltar los clips de plástico.

  8. UnqADRuHrCdSINRZ
    UnqADRuHrCdSINRZ
    LfjUs6JGfUqrEVjA
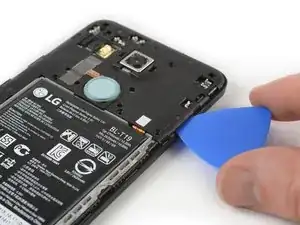
    • Utiliza la púa de plástico para abrir los clips de plástico en el borde largo del marco medio y en el borde inferior.

    • Asegúrate de que los clips en el borde largo estén sueltos. El marco medio es propenso a romperse aquí si no se desconectan correctamente.

  9. A65jPFCZQIiwZlZb
    A65jPFCZQIiwZlZb
    CLJTmiqEsupw21Yg
    • Asegúrate de que todos los clips estén libres.

    • Retira con cuidado el marco medio.

  10. Ifqg6MTxcFQ6GQ2l
    Ifqg6MTxcFQ6GQ2l
    kgXBZmhgQmKKwHKW
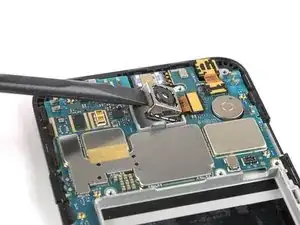
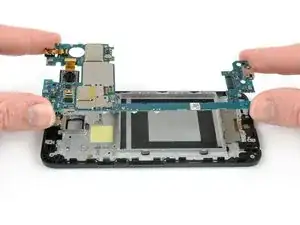
    • Usa el borde de un spudger para hacer palanca y desconectar el cable flexible de la batería ubicado en la parte inferior derecha de la placa madre.

  11. axVqfYD2tec2WXJi
    • Usa un iOpener para aflojar el adhesivo debajo de la cámara trasera. Coloca el iOpener a lo largo de la parte superior del teléfono durante 30 segundos.

  12. BCgJJxYea4AMXryY
    BCgJJxYea4AMXryY
    uTALNjGV5jgM2Pta
    • Aplica el extremo plano de un spudger en el lado izquierdo de la cámara trasera y levántalo con cuidado. Asegúrate de que todo el adhesivo que se encuentra debajo esté suelto.

  13. Q4WSU1CLq6G2ohJO
    Q4WSU1CLq6G2ohJO
    BoBefJarNxGS2uB1
    • Usa el extremo plano de un spudger para levantar el conector flexible de la pantalla.

  14. ELQpctHjOWCeMfBO
    ELQpctHjOWCeMfBO
    VJKB2euByKL26vqW
    lIZMZDbfm4XiVEVD
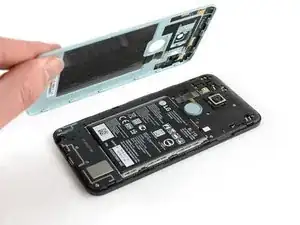
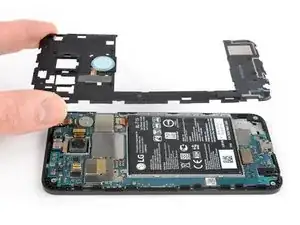
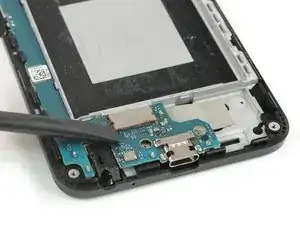
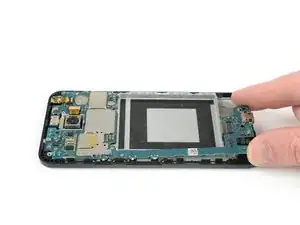
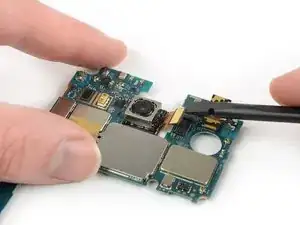
    • Sujeta la parte inferior de la placa madre con los dedos y levántala con cuidado hacia arriba.

    • Hay un pequeño clip de plástico junto a la cámara orientada hacia atrás que mantiene la placa madre en su lugar.

    • Tira suavemente de la placa madre hacia el borde inferior para liberarla del clip de plástico junto a la cámara orientada hacia atrás.

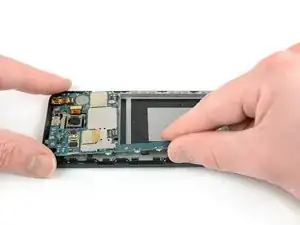
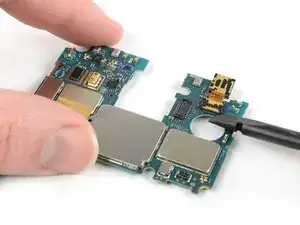
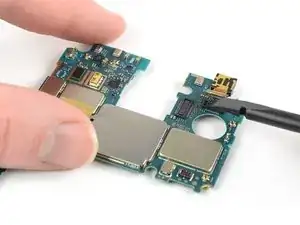
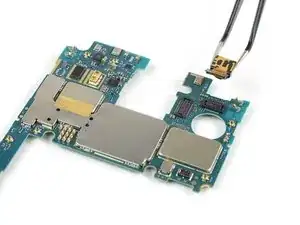
    • Levanta con cuidado la placa madre del marco.

    • Ten cuidado: las dos cámaras siguen conectadas a la tarjeta.

  15. qfeGKjQPJJinmbRV
    qfeGKjQPJJinmbRV
    AaOInUs55kSyjBVw
    TkZGkxVytofY3VNr
    • Procede con los siguientes pasos si necesitas transferir la cámaras frontal y la trasera a la placa madre nueva.

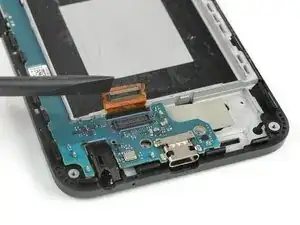
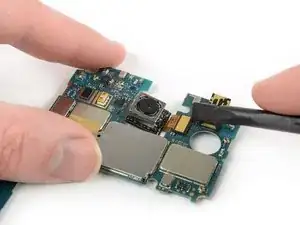
    • Utiliza el extremo plano de un spudger para sacar el conector de la cámara hacia atrás de la placa madre.

    • Retira con cuidado la cámara trasera.

  16. 1NP3jo5E4FAVbG6H
    1NP3jo5E4FAVbG6H
    ZVsXLYsbUmDXDBfn
    LlLm1wVCoOcDaRCc
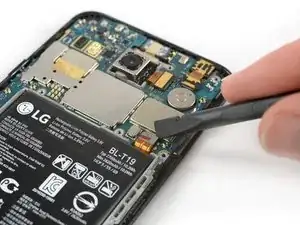
    • Utiliza el extremo plano de un spudger para sacar el conector de la cámara frontal de la placa madre.

    • Retira con cuidado la cámara frontal.

Conclusión

Si es posible, enciende el teléfono y prueba tu reparación antes de instalar el nuevo adhesivo y volver a sellar el teléfono.

Para volver a montar el dispositivo, sigue estas instrucciones en orden inverso. Durante el reensamblaje, aplica nuevo adhesivo donde sea necesario.

¿La reparación no salió según lo planeado? Consulta nuestra comunidad de respuestas de Nexus 5X para obtener ayuda para la resolución de problemas.

Dominik Schnabelrauch

Miembro Desde 23/11/16

168982 Reputación

40 comentarios

Anyone with the bootloop problem has been successful on returning the 5X to life by replacing the motherboard?

Jago MF -

that's a stupid question. new motherboard means new operating system. maybe you should just use fastboot and flash stock firmware on your phone easy

Alek Kels -

where can I get a new motherboard at?????

Alek Kels -

in most 'google image boot' issues, it is a hardware issue, not software. besides, the phone will not allow a bootloader option.

Chris Mayberry -

yes …….and its the only way after bootloop

damneetsingh2000 -

yes…….and its the only way after bootloop

damneetsingh2000 -

same here! if anybody has luck fixing the bootloop problem by replacing the motherboard please let us know

joe -

hello, today my phone came out of service with bootloop problem . they changed the motherboard , now everything is good

Ioan Robicek -

Has the motherboard part been removed from the "Parts" section??? Not available for purchase anymore??? That would render this guide useless

Jago MF -

What do you mean by useless? Mobos from other suppliers require different take apart?

Emil Eriksson -

I had bootloops within the year of buying this phone but because the LG webpage RA system wasn't working I missed out by a couple days and they want to charge me $180 to repair the phone. They won't budge and I will never buy an LG again. Has anyone found replacement motherboards or fixed this phone?

Jacob Burger -

LG offered me free repair as long as there's no physical/cosmetic/liquid damage.

Warranty expired 20 days ago btw.

Riasat Abir -

my phone was 8 months out of warranty and they just fixed as if in warranty.

Tyson Washburn -

Hi Alek Kels - 12/23/2016 - "maybe you should just use fastboot and flash stock firmware on your phone easy"

How do I do this? I'm having the bootloop problem atm.

Thanks!

Sand.

Sando Kainth -

Don't worry about learning, because it is a hardware issue, not software. The phone will not boot proper past the fastboot.

Chris Mayberry -

It is probably a hardware problem. You can try redoing the software. It didn't work for me. You need to cook your phone. Sounds stupid right? But it works. One of the contacts for the ram or cpu is no longer good. Cooking it will melt the solder and fix it for at least a while. At least it worked for me.

I followed the instructions on a blog. Dev Alex - Oven fresh Nexus 5x.

Matt Johnson -

This is an age old fix for crappy solder points connecting to CPUs or GPUs (most notably in HP laptops). Disassemble the phone and heat the snapdragon chip with a heat gun for 10 seconds. The chip is beneath a metal shield that pops up with a flat screwdriver. I am working to complete this now.. .will let you know how it works.

Chris Mayberry -

..alot of work for a little action. Got the phone to boot after heating the CPU for 15sec, stayed on for 4 minutes before rebooting again. ~sigh~

Chris Mayberry -

Found this forum comment re the rebooting sequence fix...

"The LG G4, V10, and the Nexus 5X are all affected by the bonded flipchip substrate breaking off of the BGA package under the CPU, which usually manifests in bootlooping or screen corruption, and eventually a complete brick. It’s not solder related; the only way to fix it is by completely replacing the CPU package with one that isn’t defective. – FrankTheCat"

Chris Mayberry -

Flashing stock image doesn't work for everybody with the bootloop issue. In my​ case, I can reboot into bootloader and have already installed 3 different stock images successfully and am STILL getting stuck on bootloop. From what I've researched it does seem to be a hardware issue.

Thunor Odinson -

Hey my phone is continously restarting and a

Stucking at bootloop and sometimes it starts but gets restart

pranav g -

Trying the oven bake fix now, just started bootlooping. I'm not counting on it working for long, already ordered a pixel. Thanks for the great guide!

Stephen Moist -

Hi, I know is very complicated but, is it possible to get the data from old motherboard memory storage? any type of hack or something...

Manuel Ramirez -

put it in the freezer for about 20 mins

Tyson Washburn -

Where can i buy a new motherboard

Jochen -

How much it cost to replace motherboard of nexus 5x if it is not in warranty? and what is warranty period for newly replaced part?

Manisha Kulthe -

today i have gone to lg service center and they were askin for 12k rs. for mother board replacement but after bargaining they agreed at 6

damneetsingh2000 -

damneetsingh 2000 where is that service centre

uday -

I need a mother boad nexus 5x. From where can i get it

Nityananda Mondal -

Does anyone knows where I can buy the motherboard for my Nexus 5X.

Candy Beato -

Last day I’m using Facebook APPs suddenly phone are freeze with doesn’t work. When are phone restart display Appear in GOOGLE Logo then phone is OFF, that’s means bootloop problem. Now, I need a mother board LG Nexus 5X. Buy with from where can i get it.

Najmul -

STEP 4 photo, second window on the bottom of the phone from right, (between two red circles) there is little opening (there are few on phone) and there a little device looking as a spring or something. By replacing battery this thing felt off.

I was very careful not to damage anything, but still... so careful… Device looks like to be clued there, I would love to know what is it for, can someone help, please? it looks like a senzor or something

Zdenek Otcenasek -

do a websearch on repairing the nexus 5x bootloop… in the oven! I removed the shield from the side facing the screen, put flux all over especially the samsung chip, and baked it at 400F for 6.5 minutes - samsung chip side up, now the phone is working properly again, enough to backup all files. Eventually replacing samsung chip with new one will be necessary to get good solder contacts.

Shawn Foster -

Bootloop problem sorted!! Thanks OP

Robert Huddleston -

Dec 14, 2017:

Encompass Supply Chain Solutions is parts supplier for LG for the US East Coast time zone area.

Went to their parts web page for the Nexus 5x (LGH790) - https://lg.encompass.com/model/LGELGH790

Motherboard (refurbished) costs $270 and ships in 60 days.

mws3d -

Do you know if is it possible to change 16 Gb main board by 32 Gb mainboard?

Aymeric Golliaud -

hello damneetsingh 2000 ,where is that lg service centre.I also want to change my other board

uday -

i need to purchase the motherboard international

Jackson Makinda -

okay mr ifixit.

Jin Long Zheng -