Introducción

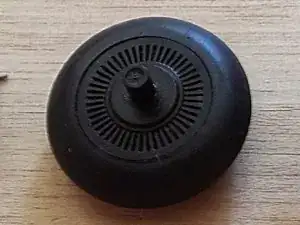
La rueda de desplazamiento de este mouse para juegos tiene orificios que el sensor óptico utiliza para detectar cuándo gira la rueda. Si suciedad u otro material extraño cubre el sensor o los orificios, la rueda de desplazamiento dejará de funcionar o solo funcionará de manera intermitente. Esta guía demostrará cómo abrir el mouse y desarmar el ensamblaje de la rueda para limpiarlo.

  1. FauhhiaIraelqJR3
    FauhhiaIraelqJR3
    A3aHNWKAp2ptyhcX
    wLihcLW5q5VsUgnp
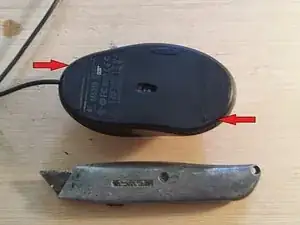
    • Usa una cuchilla delgada para despegar las esquinas y quitar las patas del mouse. Se vuelven a adherir muy bien, así que ten cuidado de no dañarlos o ensuciar el lado adhesivo.

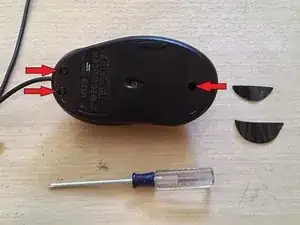
    • Desatornilla los tres tornillos que ahora son visibles.

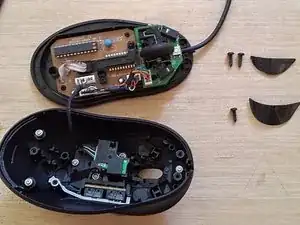
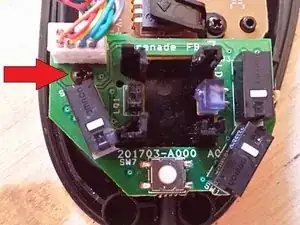
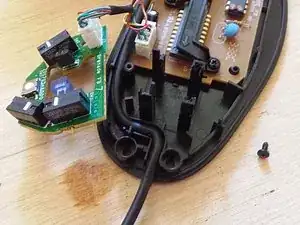
    • Separa suavemente las mitades superior e inferior del mouse. Estarán conectados por un cable.

  2. EdBiZdbjaHGfYgJe
    EdBiZdbjaHGfYgJe
    kbZY1TaWRgmcMgsh
    Yo2q3fLJK5NrWiQk
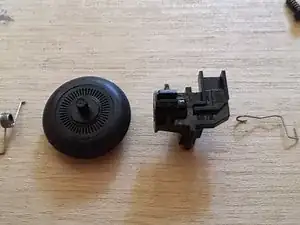
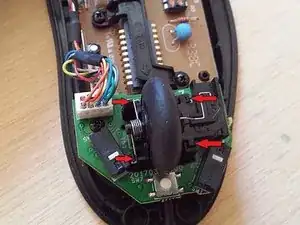
    • Desliza la rueda de desplazamiento hacia arriba y hacia afuera de la carcasa.

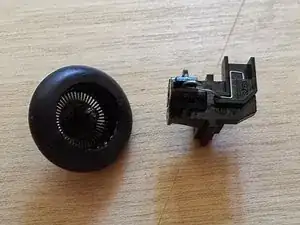
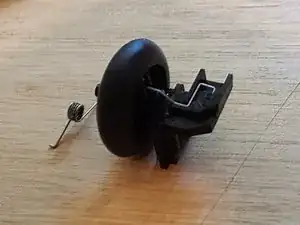
    • Desmonta el conjunto de la rueda de desplazamiento y limpia cualquier residuo evidente.

    • Mira a través de cada uno de los orificios de la rueda de desplazamiento para comprobar si hay residuos que puedan estar obstruyendo el sensor óptico. Usa una aguja para limpiar cualquier obstrucción.

  3. OnDgUx6ndQxAvMTM
    OnDgUx6ndQxAvMTM
    b1SKNJXESV4Fo4kv
    • Opcional: si hay algún material cerca de la base del mouse, debajo de la rueda de desplazamiento, el chip del sensor se puede desatornillar y quitar.

    • Usa un quita polvo de gas para eliminar cualquier resto de polvo del interior del ratón.

  4. qEkOItjbJnFItRZm
    qEkOItjbJnFItRZm
    vWUb6BqEnnU2UYUh
    lwEUNUPSMmimgW2U
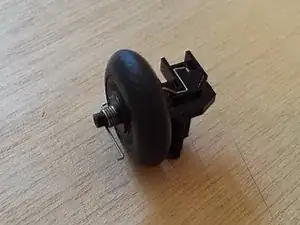
    • Vuelve a montar la rueda de desplazamiento.

    • Si se hace correctamente, la rueda debe hacer clic mientras se desplaza. La rueda no debe girar libremente.

    • Opcional: antes de volver a insertar la clavija de la rueda de desplazamiento, aplica lubricante si es necesario.

  5. nyFwHhfQYwQCOJQH
    • Desliza la rueda de desplazamiento hacia abajo en su alojamiento.

    • Asegúrate de que el resorte esté alineado correctamente.

    • Coloca la mitad superior del ratón nuevamente sobre la mitad inferior y atornilla el ratón .

    • Vuelve a colocar los pies del ratón en sus ubicaciones respectivas.

    Worked, wheel is working extra smooth. But the wheel is extra smooth, but there is no clicking sound that comes are regular steps. I feel like dropped some tiny spare part from the wheel-sensor assembly while taking it part. But I am not complaining! Thanks to the author who helped me get my favourite mouse back. This mouse is atleast 7 years old, and fit my hands very well. A new replacement with same dimensions and design features would cost me a great deal of money here in India.

    Rohan Rydre -

Conclusión

Vuelve a conectar el mouse a una computadora y prueba la capacidad de respuesta. Si la rueda del mouse está limpia pero aún no funciona, comunícate con el soporte de Logitech.

Ben

Miembro Desde 03/09/14

1250 Reputación

26 comentarios

It worked! Thank you so much!

laurieannismorgan -

got my scroll wheel back from just being intermittent. nice guide for the best mouse ever made. All hail the mighty MX518, shotter of many heads, destroyer of Skyrim, Diablo I,II,III and lately bearer of the Witchers mighty blades. HAIL HAIL HAIL MX518!!!

aer0squid -

My mouse went from scrolling just fine to nothing overnight. This helped a lot, but sadly its still not 100%. :(

Jimmy Kupczak -

Worked like a charm. Thanks. I really like this mouse and didn't want to have to get used to another one.

Charles Mercer -

Fantastic!!! I've been really reluctant to replace my MX510 mouse -- your teardown of this one (which the internals appear to be identical anyway) was perfect!

My mouse is running like brand new again!

Raymond Morgan -

Immensely helpful, probably wouldn't have been able to put the mouse back together without this

Dresius -

Great guide! Scrolling was "skipping" on my MX518 after 7 years of use and these instructions helped me reassemble after I cleaned untold amounts of lint and debris from inside. Would have probably given up on the finicky scroll wheel mechanism and discarded a perfectly good mouse if not for this guide...

chstamos -

Same problem here, but i had to change a 150ohm Resistor as well (0805 package). As crazy as it sounds it was cracked and the wheel was completely dead, that's what happens with a +10 year old mouse i guess, all sorts of weird things can occur. Oh and you can salvage parts from certain older Logitech ball mice like micro-switches and wheel mechanism, internally it's the same design !

Seb -

Thanks for your help. Here are some notes on cleaning the MX600 scroll wheel that differ from your instructions:

1. There are 4 pads and 4 screws - lift each the teflon pad and the double-sided tape that's underneath to reach the screws.

2. The scroll wheel design is quite different - best to remove the mounting screw near the front of the mouse to remove the wheel assembly.

3. The wheel can be popped out of the assembly with care - NOTE that the inner hub has a tiny SPRING LOADED BALL BEARING!!!

So open it over a clean space (I lost the ball bearing twice while trying to re-assemble it).

4. To re-assemble the wheel assembly, hold the hub so the ball is sitting on the spring at the very top and then tip and lower the wheel over it.

KaZoom 1618 -

Really nice guide! got my partner in crime MX518 back operational for further scrolling work.

Stijn Deblancq -

Thanks! Clear and easy instructions, and I was able to repair (ie clean) the insides of my mouse and now it scrolls again like new. Thank you!

kelise72 -

Helpful guide. Clarity made it so simple for a beginner like me, and I believe everyone would agree on this. Thanks so much, I was able to fix the scroll wheel of my MX 518 mouse. And it's back on. Mercy!

Update: I have started facing a new problem on my MX 518. Buttons, and scroll wheel are working perfectly fine. However, the cursor does not move. LED light is off too. Any guidance to fix this issue would also be highly appreciated. Thank you! :)

Muhammad Wali -

Nice one Ben, I've been using my mouse for a few years on an Auto CAD workstation. brilliant thing but the scroll was playing around (used for zoom in and out) so I used this guide to clean it. I think I accidentally cleaned the underside so it's a bit quicker now and need to adjust, ha! Brilliant stuff, thank you very much.

Chris -

I’m getting massive disconnections on the mouse and feel there is a cable connection issue but the cable from the USB port to the mouse is in perfect condition. I have to twist the cable at the mouth of the mouse to make it turn back on. It’s random. Can this guide help?

Hassan Gulzar -

Great guide, thanks! My MX518 is about 7 years old and 5 of those are with a dog in the house. There was an unprecedented amount of lint and hair stuck around the wheel inside the mouse. Now my trusty old mouse will get a few more miles in the counter!

Chioda Oridia -

Just a heads up, the pads/skates on this MX518 had me very confused at first because they look like the G400/G400s skates.

My MX518 has different pads on it as shown here https://imgur.com/a/pn7uDTZ

That means the screws were easier to get at though!

I had the same cable issue as Hassan Gulzar, but managed to “fix” it by opening up the mouse and reseating the internal connector for the USB cable. I also gave it about 10mm more slack on the inside than it used to have, just so it doesn’t pull directly on the connector.

Now it seems to work as new again, the disconnect-when-moving issue is gone (for now) :)

Kim Soerensen -

You have an MX-518 v1, the one pictured in the guide is an MX-518 v2.

The MX500, MX510, MX518 v1, MX700, and MX900 share the same skates as each other.

The G400S, G400, and MX518 v2 share the same skates as each other.

(I’ve been thinking of getting a Hyperglide kit for my v2, but they make kits for both versions, so you have to make sure to get the right one.)

The cable thing is likely damage to the internal wires from repeated bending against the edge where they go in. Moving the cable in (to “give it slack”) probably put the damaged part inside the mouse where movement won’t flex it into a “bad” position. I’ve actually replaced the cable in my MX-518 twice over its life, using replacement cables bought cheap on eBay. I’m actually considering upgrading to a “paracord” cloth-covered cord sometime, which is definitely an option to keep in mind. (There are a number of people online who make and sell this type of mouse cord for a variety of mice.)

DiscoPanda -

Thank you so much. Mine had become so very annoying t use, and quite unresponsive to scrolling, but following this guide it now feels near new again, so much better response. many thanks

miraclo -

Just gotta say, I have this page bookmarked. I really don’t want to give up this mouse, and your guide is easy to follow. I’ve cleaned my mouse 4 times now - breathing new life into each time.

suzie.quzie -

This was corrected my issue (MX518 wheel scroll not working / intermittent).

5 min fix, thanks for the detail explainer!

Joshua Hancik -

Logitech mx510 still running strong in 2020 because of this guide. Thanks man!

Brandon Danevicius -

Got the MX518 without the dent design. So far the part for the scroll-wheel is exactly identical, only the connectors to the lower pcb are different. Thanks for the guide! Helped me with the springs, which jumped everywhere upon opening

Dominic Ritter -

My mouse is an RX 1000, and it went from working perfectly to no scroll in one step, so I assumed something weird had happened in software. Luckily, I have an identical spare, and although I expected it also not to work, it worked fine. The RX1000 is similar enough that I could follow this guide and — hey presto! after some crud removal, we’re back to full function.

Thank you so much for this and other wonderfully encouraging guides here!

Chris Pollock -

Woohoo I can scroll again! Many years of fluff & gunk inside! Was apprehensive about opening the mouse up, so I’m glad I found this guide - I didn’t want to give this mouse up! Thank you :)

Helen Wisbey -

Years later, this still works.

Was going to look up buying a new MX518 to replace my ~12 year old one, looked this up, back to working perfectly.

Thanks.

Ramon Luna -

Great guide, and I was able to work through it just fine yesterday. My issue is that the wheel doesn’t seem to be rolling as it should, even after a thorough cleaning. Does anyone have a suggestion for a good lubricant to apply to the scroll peg wheel (Step 4 “Optional”)? I don’t want to put something in there that’s going to get all over everything else or cause any problems. I assume only a very small dab will do.

Michael Millman -