Introducción

Utiliza esta guía para reemplazar la cubierta trasera de tu Steam Deck, o para quitarla para reparaciones posteriores.

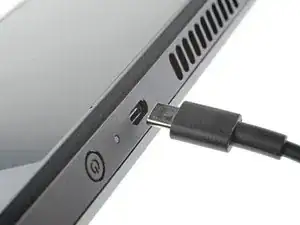
Antes de comenzar, apaga completamente y desconecta todos los cables de tu Steam Deck. Recuerda: seguir [enlace|https://www.ifixit.com/News/4883/esd-is-...|procedimientos de seguridad contra descargas electrostáticas (ESD)] generales mientras reparas el dispositivo.

***Nota: Las caras de los botones traseros (L4, R4, L5 y R5) forman parte de la tapa trasera y no pueden retirarse por separado.

Valve advierte que si se retira la tapa trasera se puede debilitar la integridad estructural del Steam Deck.

  1. vQyR3PAE4HOMSLAZ
    vQyR3PAE4HOMSLAZ
    aIKAs5r3P3bY2iTE
    hD1USYJCkAbkluud
    • Enciende tu Steam Deck y deja que la batería se descargue por debajo del 25 % antes de comenzar las reparaciones, ya que una batería de polímero de iones de litio cargada puede ser peligrosa si se perfora accidentalmente.

    • Como precaución adicional, Valve recomienda poner tu Steam Deck en modo de almacenamiento de batería dentro de la BIOS antes de comenzar cualquier reparación interna. Lee cómo hacerlo aquí.

    • Apaga tu Steam Deck y desconecta todos los cables.

    • Si tienes una tarjeta microSD instalada, asegúrate de quitarla antes de abrir Steam Deck. Si intentas quitar la cubierta posterior con ella aún instalada, podría romperse por la mitad.

    • Durante la reparación, a veces puede ser útil colocar el Steam Deck boca abajo en tu estuche para proteger las palancas de control y evitar que se tambalee.

  2. bpUGGPG32OkLXnC4
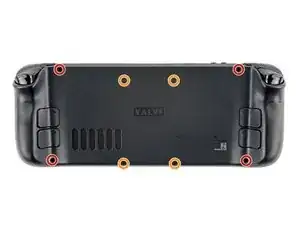
    • Utiliza un destornillador Phillips para retirar los ocho tornillos que sujetan la tapa trasera:

    • Cuatro tornillos de 9,5 mm

    • Cuatro tornillos de 5,8 mm

    • A pesar de los estándares, los destornilladores Phillips pueden variar en tamaño y forma: dos destornilladores etiquetados como del mismo tamaño pueden encajar de manera diferente en el mismo tornillo. Utiliza el tamaño que se ajuste mejor a la cabeza del tornillo.

    • A lo largo de esta reparación, realice un seguimiento de cada tornillo y asegúrese de que vuelva exactamente al lugar de donde vino para evitar dañar su Steam Deck.

    there should be a picture of the SD card slot at the start of every Steam Deck teardown. i know the note is there but i generally use the pictures to guide me and forgetting to remove the SD card is a very critical step

    Nathan Barrow -

    I agree, I just broke mine...

    Camille B -

    What is the the #1 philips used for? Only the #0 is mentioned in the instructions.

    Christopher Martin -

    I wish they would specify which size to use for which screws.

    Mark D -

    I found it easiest to use a PH1 for the red screws, and PH0 for the rest (including the internals.)

    Chris Clawson -

    Be careful you can strip the screws take your time

    I use PH00 bit

    jaybush74 -

    I used the PH1 bit for this. You can use smaller bits but ideally there should be no play of the bit in the screw head.

    Charles Semple -

    are there playstation replacements (circle,square,cross,triangle)

    Deór -

    I used the ifixit tools and used the 00 size for the screws on the back.

    Luis B -

    I've completed the guide and found it very helpful!

    I think somewhere in this part it would be helpful to name the size of the correct Phillips driver to use:

    Use a Phillips driver to remove the eight screws securing the back cover:

    Four 9.5 mm screws

    Four 5.8 mm screws

    Maynard -

    I used the PH1 for the 9.5mm screws and PH00 for the 5.8mm screws. The PH0 wanted to strip one of the small ones.

    Pol Llovet -

  3. 6jtVcFtMGa5ZMqcF
    6jtVcFtMGa5ZMqcF
    Ux5LEj3JfJlkmQMQ
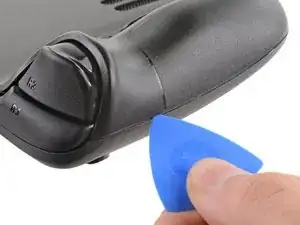
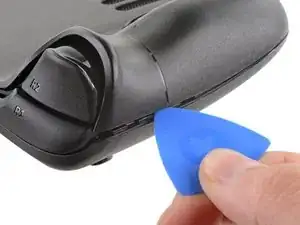
    • Inserta una púa de apertura en el delgado hueco entre la tapa trasera y la carcasa delantera, a lo largo del borde de la empuñadura derecha.

    • Si tienes problemas para insertar la púa en la costura de la empuñadura, intenta comenzar primero por los bordes largos superior o inferior y luego desliza la púa hacia la empuñadura.

    • Haz palanca en la tapa trasera para liberarla de los clips de bloqueo.

    I found it easiest to start this process at the top of the device near the fan exit.

    Peter Lindberg -

    second that and inserting the pick in the bottom middle and sliding the pick to each side

    Sub -

    I also found the top near the fan exit to be easier

    Travis Patton -

    Thank you for this tip, it definitely was easy starting at the top instead of by the bumper/triggers. After I opened the top I did the bottom and then it was way easier to gently open the sides. be very careful and go slowly to make sure that none of the clips are damaged

    Luis B -

    this as suggested above:

    1. open the top

    2. open the bottom

    3.gently open the sides

    austrasier -

    same; i pried from the top of the screen area. I was unable to find an opening on the side

    Dennis Wu -

    I also started from the middle of the deck and worked my way out since I couldn't get a grip with the pick on the deck's side grips. Since this is a common step for pretty much all guides for opening the deck I think it's also worth noting that you should be careful not to bend the trims/seams where the front and back covers meet with the pick. When I first opened my deck you can definitely see where I nudged the pick in between the covers since I was probably using too much force on the pick itself.

    Kaleb McKone -

    It would be useful to note here that if you want to insert the little blue triangular iFixit opening picks into the right side along the edge, there isn't actually a gap as the directions say, at least not on newer Decks. You'll be making the initial gap using the pick. Brace it on something because you will need to use enough downward force that you're flexing the pick a bit and it'll probably be digging into the skin of a bare hand. With enough force suddenly it will make a click and go in just a bit, and then you're in business.

    CaptFrost -

    plastic picks didnt work for me but finger males did the job on prying this open

    jacobbagsic -

    I found it easiest to open starting with R1 or L1 buttons and proceeding to the center of the top edge

    Karol Gro -

  4. 6IvIWWqEXPTqW1XB
    6IvIWWqEXPTqW1XB
    1FxwYDjIGOAOCZT2
    KpIx4YIAZrDH1b5T
    • Una vez desconectados los clips de un borde, el resto se desconecta fácilmente.

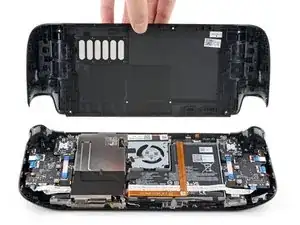
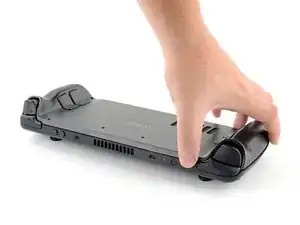
    • Agarra la tapa trasera por la abertura que acabas de crear y tira de ella hacia arriba y lejos del dispositivo para desenganchar los bordes largos.

    • Retira la tapa trasera.

    If you have an SD card, you will want to take it out. I followed the guide and didn't think about the SD card I had inside. When I went to snap the case back on it clapped shut on the exposed SD card, shearing it in half and leaving the bottom half stuck in the SD card slot. I am still endeavoring to get it out.

    Novice -

Conclusión

***Para volver a montar el dispositivo, sigue estas instrucciones en orden inverso.

Lleva tus residuos electrónicos a un centro de reciclaje certificado.

¿La reparación no ha ido como estaba previsto? Intenta con algunas soluciones básicas de problemas, o pide ayuda a nuestra Comunidad de respuestas de Steam Deck.

Carsten Frauenheim

Miembro Desde 10/03/20

88878 Reputación

2 comentarios

Alguien sabe donde puedo comprar los 4 tornillos del medio de la tapa trasera, creo que hacen 1,6x5mm ?

La tapa que venden vienen con los tornillos?

Si pueden ser los originales mejor.

Muchas gracias.

israel manzano -

one of my screws stripped what should I do?

Marco Barnes -