Introducción

Use esta guía para reemplazar un disco duro de estado sólido quemado.

  1. uo5A23aHopMrm6Tb
    • Antes de continuar, cierre la computadora y colóquela sobre una superficie suave con la parte superior hacia abajo.

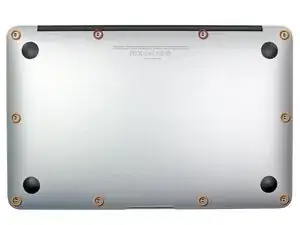
    • Retire los siguientes diez tornillos:

    • Dos tornillos de Pentalobe de 8 puntos y 5 puntos

    • Ocho tornillos Pentalobe de 2.5 mm y 5 puntos

    • El destornillador especial necesario para quitar los ocho tornillos Pentalobe de 5 puntos se puede encontrar aquí.

    I recommend that one of the tools you obtain is a jeweler's loupe that mounts on your glasses. It makes things easier.

    blairweaver -

    This is not correct. You need the pentalobe tool at this point.

    Duane Hellums -

  2. vf5kY5uHWndMVbCQ
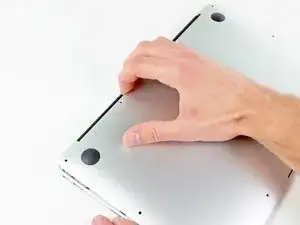
    • Coloque los dedos entre la pantalla y la carcasa inferior y tire hacia arriba para sacar la carcasa inferior del aire.

    • Retire la minúscula y déjela a un lado.

  3. 2Yhu2S2byWGirNAZ
    2Yhu2S2byWGirNAZ
    HUXFqkCjXQfptLGH
    • En este paso, desconectarás la batería para ayudar a evitar cortocircuitos en cualquier componente durante el servicio.

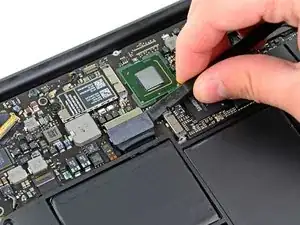
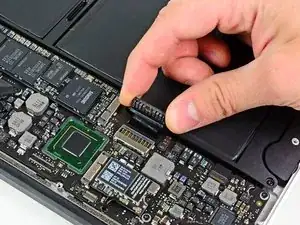
    • Usa el extremo plano de un spudger para hacer palanca en ambos lados cortos del conector de la batería hacia arriba para desconectarlo de su zócalo en la placa lógica.

    • Dobla el cable de la batería ligeramente hacia afuera de la placa lógica para que el conector no entre en contacto accidentalmente con su zócalo.

    My macbook air's configuration (Mid-2011 core i5) has a different battery connector. It slides into a receptacle on the logic board. If your battery connector does not look like the one pictured, use the pointy end of a spudger to depress the small indentation in the middle of the battery connector cable terminal, and pull aft to release the clasp mechanism.

    Ethan Cross -

    Maybe your battery connector doesn't match the picture because these instructions are for the mid-2012 model and yours is mid-2011.

    colleenthompson -

  4. wrQlCGAifjnbAu1U
    • Retire el único tornillo Torx T5 de 2,9 mm que fija el SSD a la placa lógica.

  5. ymYTajCuEgHm321r
    ymYTajCuEgHm321r
    TbYt3QotVUOLGrA6
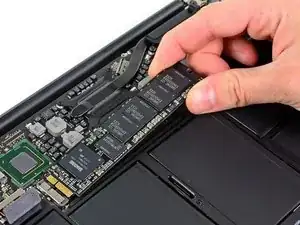
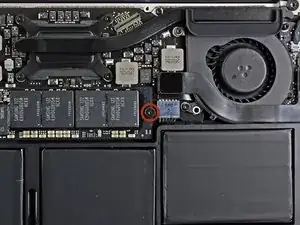
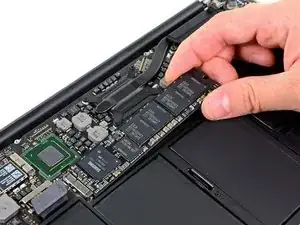
    • Use un spudger para ayudar a levantar el extremo libre de la SSD lo suficiente como para agarrarlo con la otra mano.

    • No levante excesivamente el extremo de la SSD.

    • Extraiga la unidad de su zócalo y retírela de la placa lógica.

    • Al volver a instalar la SSD, asegúrese de que esté bien asentada antes de volver a instalar su tornillo de retención.

    When you've completed all these steps to replace your SSD, don't despair if the MacBook Air shows a flashing folder with a question mark when you first power up the MacBook Air.

    - Power off the machine, then keep the option key (= Alt key) pressed down, power on the machine again, and keep the option key pressed down until a prompt appears.

    - If you've set a firmware password, then type it in at the prompt

    - You should now be prompted for a hard drive to boot from. Select "EFI Boot"

    - The MacBook Air should now boot to a window showing "OS X Utilities"

    - Click on the  at the top left, then select "Startup Disk..."

    - Select your SDD/Hard drive, and restart.

    Michael Welham -

    When replacing the SSD, be careful about the connector orientation. Replacement boards look almost the same if they are upside-down. Note that the connector is not reversible - there is a notch that will only line up if the board is right-side up. If it doesn't seem to line up, flip the board over.

    shamino -

    can i ask some links for some ssd’s that are compatible with that macbook model ?

    giannismistil -

    Hi I completed steps above, but the MacBook Air 2012 doesn’t seem to read the drive, on reboot I get a flashing folder, and upon clicking Control R on reboot it goes to internet recovery mode and then can’t find the drive on disk utility. Any help would be much appreciated! Thanks, Devin

    Devin Patrick Hughes -

    if you’re using an M2 adaptor, be mindful to check the compatibility with the other end. In my specific case my adaptor was only compatible with M2 Sata and not with M2 NVMe.

    Andres Urena -

Conclusión

Para volver a armar su dispositivo, siga estas instrucciones en orden inverso.

Walter Galan

685928 Reputación

15 comentarios

Note: if you're installing a blank SSD, you'll want to format it with Disk Utilities) before the OS X installer will recognize it.

aaronmiller -

Could not have been any easier, with this guide.

Thank you very much!

916sp -

is it possible to replace an 128 GB Solid State Drive with an 240 GB? (MacBook Air, 11", Mid 2011)

zimmermatthias -

Does anyone know if the Samsung 960 pro 512gb m.2 drive is compatible with this machine?

Mark -

No, is not, I just bought a 1TB Samsung 960 EVO m.2 and had to return it, for not being compatible. (is smaller and the pin-out is not the same)

fjlbandeira -

Can anyone suggest SSD that can be use with MacBook Air, 11", Mid 2011. Need at least 256 GB or more.

Chairat

Chairat Usavangkul -

480GB OWC Aura 6G SSD

Bertil von Arx -

Or you use an adapter, you can put in any m.2 SSD in.

Eric -

*any SATA m.2 SSD

craig -

Super clear and helpful, thank you.

eigenhombre -

Is there a way to retrieve data from an old Samsung SDD taken from my Mac Air 2011? The Mac was totally dead after water damage but I want the photos.

alan s. -

Where can I get an adapter? And what’s the right signature ?

Roman Loeser -

What adapter do I need to be able to put a 970 EVO plus, or any NVMe ssd into this machine??

Brick Wall -

Thank you very much - worked like a charm; now….on to the battery…

Kurt Navratil -

Parfait mon macbook air vient de passer de 60 Go à 500 Go !!! Et en plus c’est facile ! Merci pour ce tuto très bien réalisé qui permet de recycler nos vieux macbook qui fonctionnent toujours très bien !

Laurent Durieux -