Introducción

Esta es una guía describiendo cómo reemplazar las patas del MacBook Pro Retina, aplicable a los modelos A1425"","" A1502"","" y A1398. Para una guía entera incluyendo la eliminación de la tapa inferior, vaya a las paginas especificas del MacBook Pro.

  1. RIRDFvMa45YxjgXa
    RIRDFvMa45YxjgXa
    lJxlSYN1HJ1EPEAN
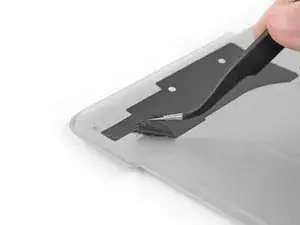
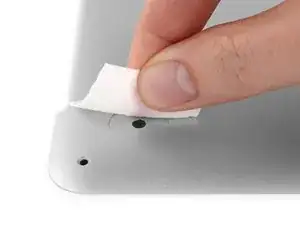
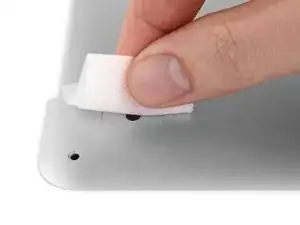
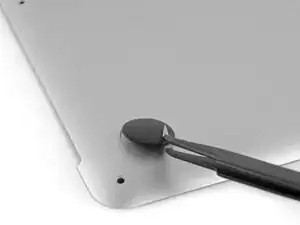
    • Despegue cualquier pegatina de la parte trasera de la tapa trasera cubriendo las patas que haya decidido reemplazar.

    • Cualquier pegatina que quite seguramente sea insalvable para volverlas a usar. Eso esta bien! Tu MacBook no las necesita para funcionar,

    If you take an exact knife or similar and trace out a section around the feet, you can leave the rest of the sticker in tact. I found it easier to remove a small section of the sticker as it was fairly well adhered.

    Stephen Chan -

    @Stephan Chan - Your suggestion was perfect. Cutting away the small section of sticker where the feet go is definitely the way to do it.

    seattlehudson -

    I agree with you @gusto5 (Stephen Chan) - cutting out a small circle in the sticker with a craft knife is much easier. Just to be on the safe side, since it did expose a little of the aluminum of the case, after I’d stuck the replacement foot and held it in place for 30 seconds, I put a small piece of Scotch tape over the hole I’d cut in the sticker on the back.

    Owen Edwards -

    Received a quicker delivery of the feet replacement kit. Followed the suggestion and was quicker and boots (feet) flashed fit on bottom case.

    Albert Evangelista -

    If, like mine, all your feet have sheared off, you may be able to pry the center bit of plastic left in the lid at each foot out with tweezers. Obviously don't go digging deep or forcing things, but if you are lucky like I was then you don't need to remove all the screws and the lid. My new feet went in well and seem really well stuck. Make sure you clean the surface of the aluminium extremely well.

    I didn't find any need to cut the plastic backing. I found that each foot easily came off the backing and I grabbed it with the tweezers.

    I put a pencil mark on the lid showing the position of the little "key" nub and made a mark on the foot too, showing its position. This allowed me to align the "key" nub with it's hole easily.

    frostyfriday -

    After pealing away any feet, be sure to remove the clear film after applying the adhesive remover. I found this easiest to do with my finger name and then double checked that all four feet recessed areas were free of the clear plastic adhesive backing from the prior removed feet.

    Frank Dries -

    The black stickers are for electrical insulation. I patched mine with black insulating electrical tape.

    Steve Lamb -

  2. vClZDXpWhxMDJNIe
    vClZDXpWhxMDJNIe
    X1sYxJb1XmiBnJEG
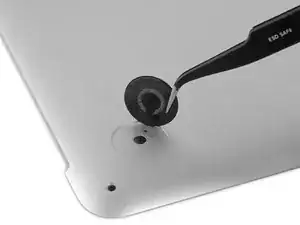
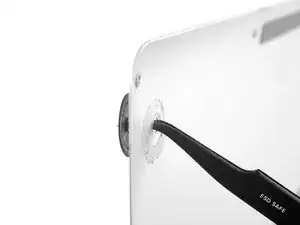
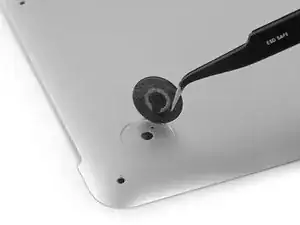
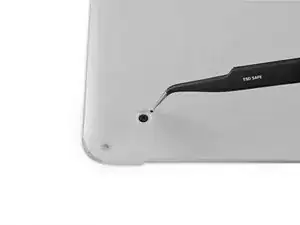
    • Quite cualquier pata que este rota o dañada.

    • Si la pata que estas reemplazando sigue intacta, puedes usar tus pinzas para empujarlas desde el interior.

    • Si la pata antigua es difícil de quitar, use un secador de pelo o una pistola de calor para aplicar un poco de calor al área y despegar el adhesivo.

    There are large black stickers in the way of removing this little piece on my A1502 Early 2015 MBP. How do we proceed from here?

    Jason Protzman -

    Hey Jason! You can remove those stickers entirely, or just peel them back enough to remove the foot and then cut away the peeled part of the sticker.

    Taylor Dixon -

    Is the larger feet shown in picture 1 of this section for the MacBook Pro. I am assuming the second picture refers to the Retina MacBook Pro?

    Khushal Varsani -

    All the pictures and text in this guide refer to the Retina MacBook Pro! The The Unibody MacBook Pro has its own feet replacement guide.

    Taylor Dixon -

    I think what Khushal meant was that picture 1 doesn’t represent the lower case foot hole of the Retina model, the hole left after the removal of the foot is too big. While the 2nd picture seems indeed accurate.

    fbianchife -

    Can the macbook walk? 🤣

    Yanny 57 -

  3. G15X4A5dMSaMfGZw
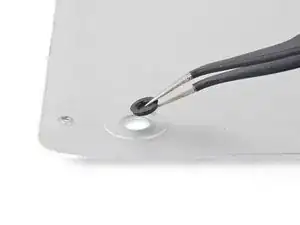
    • Frote la cavidad de la pata con eliminador de adhesivo para eliminar el adhesivo que haya quedado.

    The adhesive is on both sides of a clear plastic sheet that sits in the foot cavity. It is easily missed but appears shiny when holding the case up to light after removing the rubber foot. If you look at the image in Step 9 below you can also see the sheet on the case side of the rubber foot (note this is not the same thing as the plastic sheet that the feet are attached to, this one is very thin and has adhesive on both sides). I applied adhesive remover twice and let it sit for a few minutes to dissolve the adhesive under the pad, then scrubbed with a bit of pressure to get that clear sheet removed from the foot cavity, but am glad I did.

    James -

    For me, the adhesive remover was not strong enough, but I was able to apply acetone nail polish remover to remove the remaining adhesive before wiping it down with alcohol.

    Joseph Wilk -

    Thank you so much, James, for mentioning the clear adhesive! I would’ve completely missed it had I not seen your comment!!

    Tina Nakai -

    My adhesive remover didn't work, but what did work was gently scraping with a knife. This is for the clear adhesive mentioned by James.

    olive long -

  4. awVcxhouY56dJWmT
    • Limpie la cavidad de la pata con una toallita de alcohol isopropilo para remover el residuo del limpiador y preparar la area para el adhesivo en la nueva pata.

    I used a paper towel (or a tissue would work) to mop up the bulk of the adhesive remover first. And then I went back with the alcohol swap to get any remaining adhesive remover and let the area air dry.

    Frank Dries -

  5. Mnb5F3feRRcqjTLa
    • Despegue una pata de reemplazamiento del soporte de plástico.

    • El adhesivo es relativamente fuerte - asegúrese de que esté despegando la pata, no rompiendo el soporte de plástico.

  6. uexDpCgnLZZtrCd3
    uexDpCgnLZZtrCd3
    TXNVHgMvNWanjALH
    FyJkgDrE1tluS12y
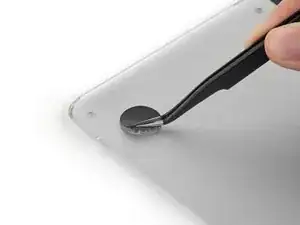
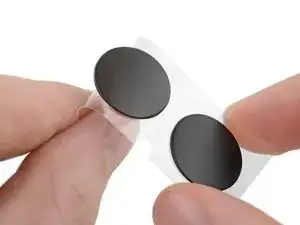
    • Alineé la nueva pata dentro de la cavidad.

    • Asegúrese de que el nudo de alineación este alineado con el pequeño agujero cerca del perímetro de la almohadilla.

    • Es posible que desees usar un lápiz para marcar ligeramente dónde se encuentra la protuberancia de alineación. Ten cuidado de no rayar la caja inferior con su lápiz.

    • Pon el pie abajo mientras lo deja alineado correctamente.

    • Compruebe que la alineación esta correcta desde el interior de la tapa. El nudo de alineación debería de ser visible por el agujero de alineación.

    Matching the alignment nub with the small hole is easier if you align the point of the tweezers with the nub. The tweezer tip then acts as a reference point for matching the nub with its hole.

    Paul Jacobson -

  7. dwZ1hXCiq6bTTI2A
    dwZ1hXCiq6bTTI2A
    DadSFPovI4YwTLHB
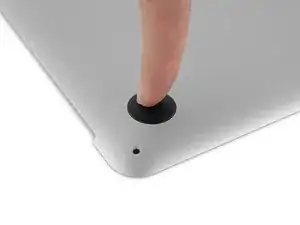
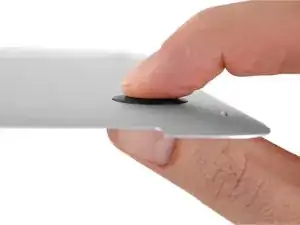
    • Presione la nueva tapa en su sitio firmemente con su dedo, entonces aplique presión apretando la pata de cualquier lado de la tapa con su dedo y su pulgar.

    • Mantenga presión durante 30 segundos para poner el adhesivo.

    • Repita los últimos 7 pasos con cualquier pata rota o usada.

Conclusión

Para volver a montar su dispositivo, siga estas instrucciones en order reverso.

Taylor Dixon

Miembro Desde 26/06/18

63258 Reputación

0 comentarios