Introducción

Usa esta guía para acceder a los motores de vibración en los controladores DualShock 3. Los dos motores de vibración son ligeramente diferentes y, por lo tanto, no son intercambiables.

  1. MnO4C2NgVBnH1meE
    • Remueve los cinco tornillos Phillips de 7.2 mm que aseguran la carcasa trasera a el control.

  2. lvGLlAtXpOWLih6R
    • Presiona en la carcasa trasera entre los sticks analógicos y ligeramente levanta el borde inferior del resto del controlador.

    Es ist nicht ganz eindeutig das zwischen den beiden Analog-Sticks gedrückt werden muss. Der gelbe Punkt fällt kaum auf. Ein Bild mit Daumen an dieser Stelle wäre gut oder soooo…

    Tom -

    it’s not very clear but for this step you need to push where the yellow dot is shown on the picture. it’s rather tough. you kind of have to move the whole back plate a bit for it to work.

    Brandon der Blatter -

    I’m stuck at this step because I can’t for the life of me undo the clip

    IttyBittyGamerVR -

  3. pteSAIrvQBgU3cdM
    pteSAIrvQBgU3cdM
    BnFWDEdOvNaFHOJa
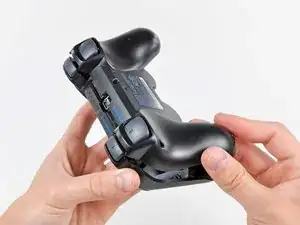
    • Empuja la carcasa trasera ligeramente hacia el borde superior del control para despejar el panel frontal de los 2 gatillos.

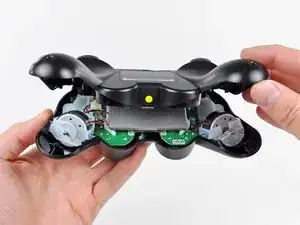
    • Jala la carcasa trasera del control, ten cuidado de que los 2 gatillos no salgan disparados.

    • Si accidentalmente los gatillos salen disparados, tenemos una guía de gatillos para que los vuelvas a colocar.

    the "trigger button guide" link links back to this page :o

    Alexander McMahon -

    I accidentally popped a trigger off, and both L1 and R1, because I skimmed and didn't read this step. Fortunately it's not hard. The tricky part with the triggers is that there's a little spring on them. You have to press the side of the spring that's pointing away from the trigger against the sloped surface of the controller (look at the other trigger for reference, if you only popped one off). Then you just slide the trigger on until the "handlebar" bits near the center click into place.

    briancaraher -

    The reset button – a small mostly-rectangular rubberized piece – fell out as I removed the rear cover. It covers the hole near the middle screw and has a post that presses SW1 on the motherboard.

    Fletcher Stern -

  4. 2HhHt5LZqZkd2X2w
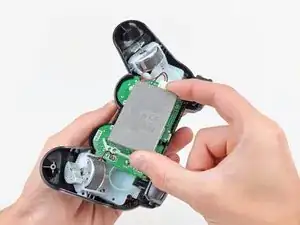
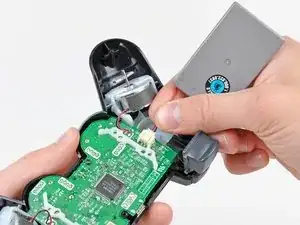
    • Levanta la batería de la tarjeta madre para tener suficiente acceso al conector de la batería.

  5. DVcF4eWKVTS1fJ2A
    • Con cuidado jala el conector de la batería de su socket en la tarjeta madre.

    • Puede ayudar si usas un par de pinzas o alicate para tomar el conector de la batería cuando lo desconectes por la primera vez. Solo jala del conector. No intentes removerlo jalándolo de los cables negro y rojo.

    be careful with the connector, it was hard at the first time to take it away, i was close to break the wire

    Mugen -

    Where can I purchase an Input Board?

    Cody -

    To safely remove the connector, you can slide a thin screwdriver inside two slots that can be found on top of the connctor housing (the beige colored one), which allow you to push on the connector. Do this slowly, prying first through one slot, then through the other, until the connector is out. This will allow you to remove the connector without pulling by accident on the wires.

    Adriana Fulgenzi -

    Thanks Adriana. Good advice. My local battery replacement guy will not touch PS3 controllers.

    Arie van der Winden -

    Hi Adriana,

    I have to say, that tip really saved me. I was pulling on the wires (this is my first time doing this) and wasgoing nowhere.

    Thank you!

    Michael Vichiola -

    I highly, HIGHLY recommend that if anyone bought the protect toolkit, that they use the SIM bit as that is extremely helpful for this step!

    Michael Vichiola -

    Take note: The PS3 remote controller in this guide has some white plastic spacers shaped like ( and ) on the board which keep the battery from touching the chip. The PS3 remote controller I disassembled has no spacers on the board but rather the board has 6 holes - 4 small square corner alignment holes and two rectangular retaining holes. The battery was an LIP1472 but the battery pack casing had 4 alignment pins and 2 retaining tabs to fit into the board and hold the battery away from the chip. Why does it matter? It may or may not matter, however the fact that all designs include separation indicates that it might matter. Possible reasons are that the battery might touch the chip and cause electrostatic damage, the battery might touch the chip and not allow the chip to dissipate heat properly, or the battery might simply rattle a bit. I can not find any replacement batteries with pins and tabs. It may be necessary to create some standoffs from plastic similar to those shown above and attach to board.

    Warp9pnt9 -

    My controllers new battery (ordered from ifixit) doesn’t have connectors on it like my dead battery. Help?

    Michael Vichiola -

    Its literally completely flat (the battery)

    Michael Vichiola -

    What's the battery's voltage?

    Keith Wucherer -

    The battery is 3.7 voltage 610 mAH from Sony's LIP1359 battery. Max charging is 4.2 V and 0.4A, but I found a better one from Digikey. It is still required to modify the battery's connector.

    My new battery for the PS3 controller.

    https://www.digikey.com/en/products/deta...

    Michael Marr -

  6. VaIHKXsEYAtRpevl
    VaIHKXsEYAtRpevl
    UYeAyhwtv43qVsb4
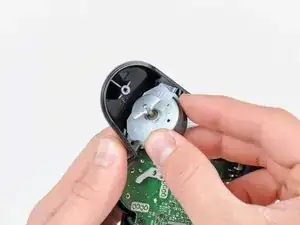
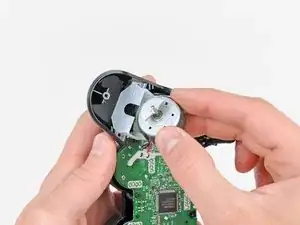
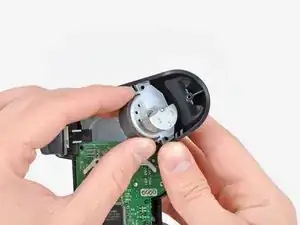
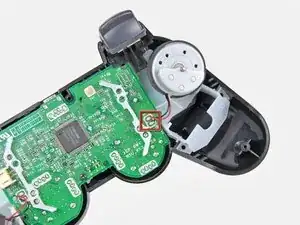
    • Saca el motor de vibración de su marco de plástico, teniendo cuidado de no forzar los cables que lo conectan a la placa base.

  7. eQyuIR1QtNl1bWyd
    • Usa un soldador para desoldar ambos cables del motor de vibración de la placa base.

    • ¿No tienes demasiada experiencia con la soldadura? Consulta nuestra guía de soldadura para obtener instrucciones detalladas.

    • El cable positivo (rojo) se conecta más cerca de la parte superior de la placa base.

    • Cuando sueldes en placas de circuito, asegúrate de no sobrecalentar la conexión, ya que se pueden producir daños permanentes.

  8. 6hEXHdfGodXuEqrH
    6hEXHdfGodXuEqrH
    PhDHFNVQkmrsOqWB
    • Si lo deseas, repite este procedimiento para el otro motor de vibración.

    • Los dos motores de vibración no son intercambiables, ya que el motor izquierdo tiene más contrapesos que el motor derecho.

Conclusión

Para reensamblar tu dispositivo, sigue estas instrucciones en orden inverso.

Andrew Bookholt

578639 Reputación

5 comentarios

That is not how the innards of a European Model DS3 controller are. Wrong guide. Not useful at all

Stathis Kiriakos -

Just because the internals are different and it doesn’t match what you own, it doesn’t mean you need to discredit him…

Davide -

I know this comment is almost a decade old but its still quite sad that you’re giving this guy flack for not showing the differences between the EUR and USA controller models when they’re basically the exact same and it’s a guide that is completely free.

f1pp3r -

My DS3’s rumble motor died out after 8 years of use so i went out and came to know that there’re many such motors available on market,so i wanna know exact specifications of the rumble motors (both left and right ones) on Dualshock 3 controller,like Voltage,RPM,Dimensions,weight and so.

Please can you provide me the required info ?

montgomeryjohnny -

Will my controller still work if I remove the two motors completely?

Paul Wright -