Introducción

Usa esta guía para reemplazar el marco medio de tu Samsung Galaxy S4.

  1. rjhlmKL4roqDcNeD
    rjhlmKL4roqDcNeD
    ySIEOikDPMFCTh6j
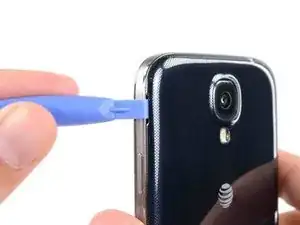
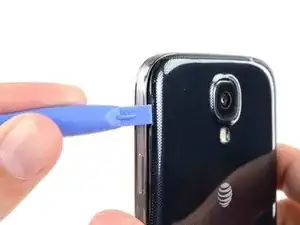
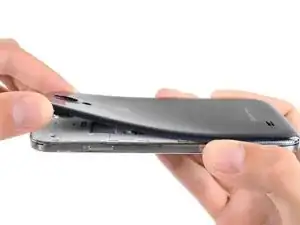
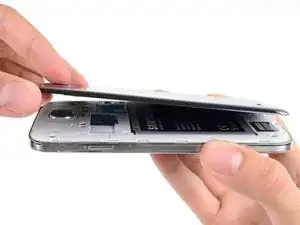
    • Haz palanca con una herramienta de apertura de plástico o tu uña en la ranura a la izquierda de la cámara trasera cerca del botón del encendido.

  2. QoGD1nhUjIK4SYhA
    QoGD1nhUjIK4SYhA
    mYdKICGURgG1VuPm
    EGyVAufYjRnV5oMH
    • Levanta la caja trasera por la esquina más cerca de la ranura y remuévelo del teléfono.

    Where is the divot? Please let me know that

    James -

    I purchased a blue plastic opening tool(AKA: Spudge) like the one used in the above Step 1 rear cover pic and found the divot and was able to take off the rear cover as per the “Step 2 “ instructions.

    Terry Crawford, Jr. -

  3. MDC6e1YyIBLkTSJq
    MDC6e1YyIBLkTSJq
    r4qIuNXi4DRJBNYO
    alOZWSSKuQtAOYyx
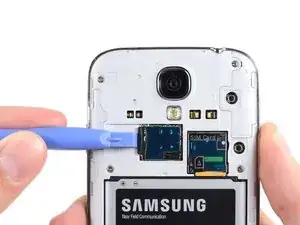
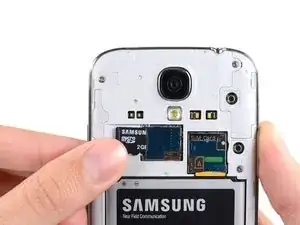
    • Usa el extremo plano de un spudger, o tu uña para presionar la tarjeta microSD un poco más en su ranura hasta que escuches un clic.

    • Luego del clic, libera la tarjeta y saldrá de su ranura.

    • Remueve la tarjeta microSD.

    • Para volver a ensamblar, empuja la tarjeta microSD en la ranura hasta que encaje en su lugar.

    I was able to remove the MicroSD Card as per the Step 3 MicroSD instructions with no problems.

    Terry Crawford, Jr. -

  4. crygJXPQtUYDKNlg
    crygJXPQtUYDKNlg
    qFUmmdiFJSbJncKZ
    24gAbT1EpiKW1ldS
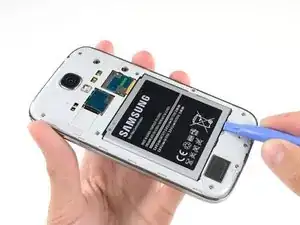
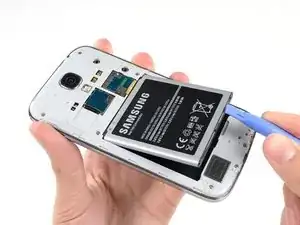
    • Inserta una herramienta de apertura de plástico o un dedo en la muesca del compartimiento de la batería y levanta la batería.

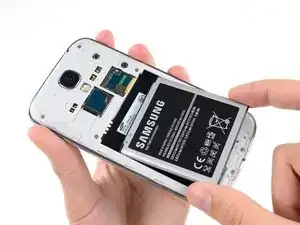
    • Remueve la batería de tu teléfono.

    it worked for me

    John Donovan -

  5. MQ1HoKUOlTYUB2Fl
    MQ1HoKUOlTYUB2Fl
    sHEGGRwOQFo3IeR5
    FldhpEixJL5ycMhU
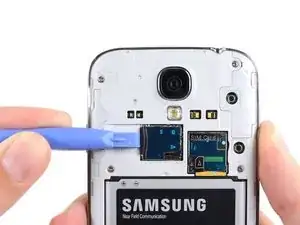
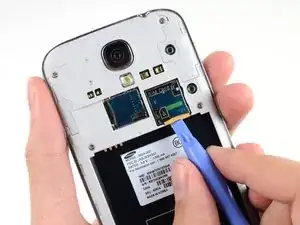
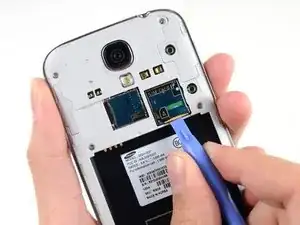
    • Usa esta herramienta de apertura de plástico o tu uña para presionar la tarjeta SIM en su ranura hasta que escuches un clic.

    • Luego del clic, libera la tarjeta y saldrá de su ranura.

    • Remueve la tarjeta SIM.

    • Durante el reensamblaje, empuja la tarjeta SIM en la ranura hasta que encaje en su lugar.

    Looks easy but doesn't work. No one has a plastic opening tool. Using fingernail, you can press SIM card into slot but it does not pop out so you can remove it.

    Laurie McWherter -

    I agree with the comment above

    I also don't have a plastic tool and my finger nail won't pop the card out.

    Grethe Montano. September 22

    Grethe Montano -

  6. EDtlEYuMDEYXrblv
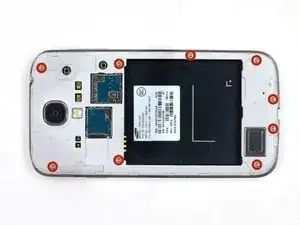
    • Remueve los nueve tornillos Phillips #00 de 4.00 mm que sujetan el marco medio al ensamblaje de pantalla.

    How much it will cost to replace a midframe

    kannan -

    How much cost will be on replace a midframe

    Hiren pedhadiya -

    I'm seeing midframes available on Ebay for around $10.

    Alex -

    I purchased a 1.5x40mm Phillips screw driver and was able to remove all 9 40mm screws from the midframe as per the Step 6 Midframe instructions.

    Terry Crawford, Jr. -

  7. WSuKHwiYL4wEeKPM
    WSuKHwiYL4wEeKPM
    A3gOcQAfyqxkjAeK
    • El marco medio está asegurado al ensamblaje de la pantalla mediante varios clips de plástico detrás del bisel cromado del marco medio. Los siguientes pasos te guiarán a través de la separación de los clips para liberar el marco medio.

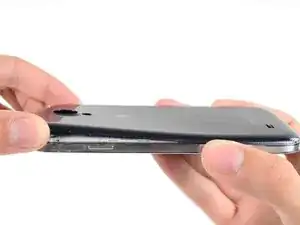
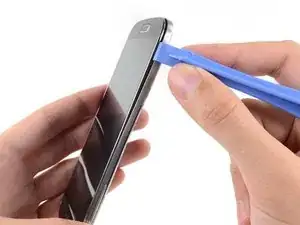
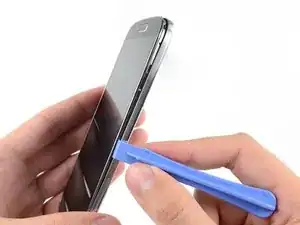
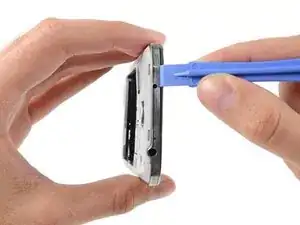
    • Comenzando en el botón de volumen del teléfono, inserta la herramienta de apertura de plástico entre el bisel cromado alrededor del cristal de la pantalla y la pieza de borde cromada más grande. Busca la unión entre los dos.

    • Desliza la herramienta de apertura a lo largo de la unión separando los clips de plástico a medida que avanza.

    • Ten mucho cuidado al hacer palanca, y hazlo lo suficiente para separar los clips de plástico; hay varios puntos finos en el bisel del marco medio que pueden agrietarse si los doblas demasiado.

    I used same tool as in the photo and i broke the display. I think you should use a very thin plastic tool, such as a credit card but even more thin and flexible.

    nicosoranno4gxo -

    I purchased a blue plastic opening tool(AKA: Spudger) and was able to remove the midframe from the display assembly as per the Step 7. I had to hold the cell phone firmly in my left hand while I gently forced the spudger between the chrome bezel and the midframe with my right hand and heard plastics clips separate and saw the midframe start to separate from the display assembly. Don’t be afraid to get that spudger in and just gently go down the side of the phone and you will hear the plastics clips detach and the midframe to separate more and more until you are able to separate them 100%. I started at the volume button side of the phone in Step 7 and ended at the power button side in Step 9.

    Terry Crawford, Jr. -

    This blue Case Opening tool has a less rigid edge that is kinder to trim than the hard black Spudger shown in later steps. I was glad to have the right tool on hand at this step. Use it as a wedge and slide it along the gap.

    Tom Huber -

  8. mlLqgVTFjlULZmXr
    mlLqgVTFjlULZmXr
    xbBRETlSI6ZKDpZJ
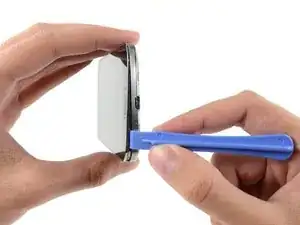
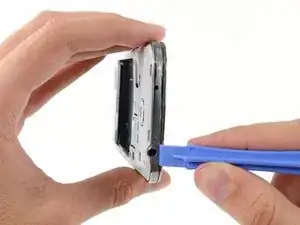
    • Continúa haciendo palanca alrededor de la esquina del teléfono.

    • Desliza la herramienta de apertura a lo largo de la línea entre el marco central y la pantalla a lo largo de la parte inferior del dispositivo, liberando más clips de plástico.

    I purchased a blue plastic opening tool(AKA: Spudger) and was able to remove the midframe from the display assembly as per the Step 7. I had to hold the cell phone firmly in my left hand while I gently forced the spudger between the chrome bezel and the midframe with my right hand and heard plastics clips separate and saw the midframe start to separate from the display assembly. Don’t be afraid to get that spudger in and just gently go down the side of the phone and you will hear the plastics clips detach and the midframe to separate more and more until you are able to separate them 100%. I started at the volume button side of the phone in Step 7 and ended at the power button side in Step 9.

    Terry Crawford, Jr. -

  9. NjGCILVpYvQZSYBN
    NjGCILVpYvQZSYBN
    KTbBqoxDr3GYJkMc
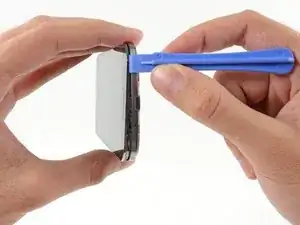
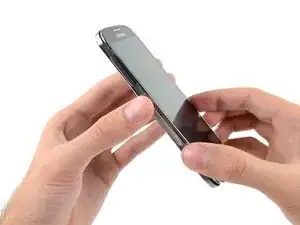
    • Nuevamente, haz palanca alrededor de la esquina hacia el lado del botón de encendido.

    • Desliza la herramienta de la apertura a lo largo de la línea.

  10. YxMui1KI6EfoKuUH
    YxMui1KI6EfoKuUH
    KjQOOeflFdfxLybe
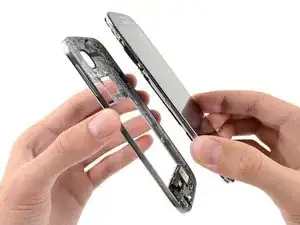
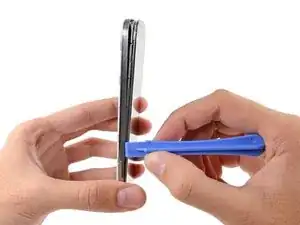
    • Continúa deslizando la herramienta de apertura alrededor de la parte superior del teléfono, liberando el último de los clips y liberando el medio marco del ensamblaje de la pantalla.

    • En este punto, es posible que desees deslizar la herramienta de apertura de plástico a lo largo de todo el perímetro del dispositivo nuevamente, para asegurarte de que hayas soltado todos los clips de plástico.

    On my phone, there was another clip holding the white midframe to the battery compartment, in the middle of the top edge of the battery compartment, near the battery contacts. If you don't release that before removing the midframe, it is easy to break.

    josephoswald -

    I purchased a blue plastic opening tool(AKA: Spudger) and was able to remove the midframe from the display assembly as per the Step 7. I had to hold the cell phone firmly in my left hand while I gently forced the spudger between the chrome bezel and the midframe with my right hand and heard plastics clips separate and saw the midframe start to separate from the display assembly. Don’t be afraid to get that spudger in and just gently go down the side of the phone and you will hear the plastics clips detach and the midframe to separate more and more until you are able to separate them 100%. I started at the volume button side of the phone in Step 7 and ended at the power button side in Step 9. In Step 10 just make sure all the plastic clips are separated from the midframe and the display assembly so you can pull them apart 100% without breaking them.

    Terry Crawford, Jr. -

  11. MDb1XKUptBuYX6Bu
    MDb1XKUptBuYX6Bu
    R6HtRH5JnJXupZRr
    rDyAIYBh3bl6IN2Z
    • Remueve el marco medio del ensamblaje de pantalla.

    here i leave them a video i made doing the work

    https://www.youtube.com/watch?v=85pOvI6O...

    enjoy

    Gabriel Barrandeguy -

    My Sprint S4 was slightly different then the one pictured above but I just completed this repair in under 10 minutes.. It would have been slightly quicker but fooling around with those little screws can be irritating if you have big hands.

    Michael Willis -

    Just did this on my S4. Instructions were extremely helpful, but I had to remove a screw (step 10.5?) to remove the upper display assembly bracket. Other than that, flawless! Thanks!

    JackieME -

    The 3rd image of the 11th step shows that when the midframe is removed, some parts come along with it (at the bottom part of it). What are these parts? should they be removed too and placed in the new midframe? Are they easy to remove?

    Chris -

Conclusión

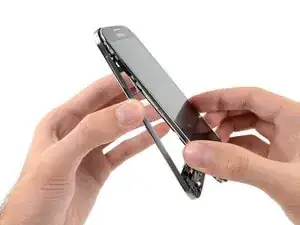
Para volver a ensamblar tu dispositivo, sigue estas instrucciones en orden inverso.

Sam Goldheart

Miembro Desde 19/10/12

457951 Reputación

5 comentarios

I cracked the "front facing" bezel on my phone. I thought buying a new mid frame would replace it, but based on these pictures, it looks like it is attached to the the front glass. Is this correct? Is there any way to replace just that front facing bezel?

Marwan -

i was wondering the same thing. Can you guys please respond.

Rival Archer -

Yes, the bezel is attached to the front glass. Replacing the glass doesnt cost too much (under 15 eur here) but theres a high chance you will break the lcd digitizer in the process. It needs some skill.

Mark Bernstein -

Hi... Is that the whole body is model GT-I9505 and How much it costs me the whole body?

Priya -

Hi.. Is that the whole body is with mirror and how much it costs me??

Priya -