Introducción

Esta guía de reparación ha sido creada por el personal de iFixit, y no está oficialmente respaldada por Google. Consulta más sobre nuestras guías de reparación aquí.

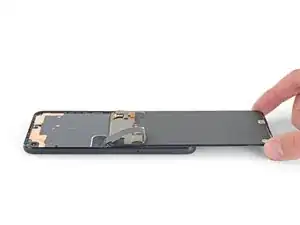
Sigue la siguiente guía para reemplazar una pantalla rota o dañada en un Pixel 4a.

La pantalla sin reforzar del Pixel 4a es frágil. Presta especial atención a las advertencias durante el proceso de apertura si vas a reutilizar la pantalla.

  1. GAtKSCpq6nOLFhJN
    GAtKSCpq6nOLFhJN
    yYyPALgQYGnCFA4X
    qbLJ5OYSRVHREJWu
    • Necesitarás separar la pantalla para separarla del teléfono. Lee las siguientes notas con cuidado antes de proceder.

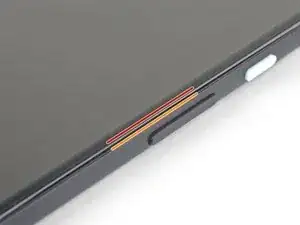
    • Fíjate en las dos juntas en el borde del teléfono:

    • Junta de la pantalla: Esta junta separa la pantalla del resto del teléfono. Por aquí es por dónde debes separar.

    • Junta del marco: Aquí es donde el marco se encuentra con la carcasa trasera. Está enganchada por tornillos. No separes por esta junta.

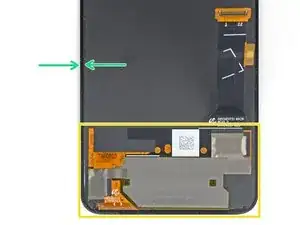
    • Antes de comenzar, fíjate en las siguientes áreas de la pantalla.

    • Cable flexible de la pantalla: No insertes la púa de separación más allá de lo indicado o corres el riesgo de dañar este cable.

    • Ten cuidado con el cable plano naranja que está bajo la esquina inferior derecha de la pantalla, ya que puedes dañarlo si presionas tu púa sobre él. Introduce la púa solo lo necesario para separar el adhesivo de la pantalla.

    • Perímetro adhesivo: Separar más allá de este estrecho perímetro sin poner la púa en ángulo dañará el panel OLED.

    Coll down guys and gals.

    1) go below the Display and not between the backcover/middle (see the other comments)

    2) just take care about the flex/display cable position (which is iirc about on the middle i.e. 2nd 3rd from the bottom ON THE LEFT side dear OP)

    Everything else is just separting the glued on Display from the Phone.

    See the other comments

    Aleksandar Dejanovic -

    Cool down guys and gals.

    1) go below the Display and not between the backcover/middle (see the other comments)

    2) just take care about the flex/display cable position (which is iirc about on the middle i.e. 2nd 3rd from the bottom ON THE LEFT side dear OP)

    Everything else is just separting the glued on Display from the Phone.

    See the other comments

    Aleksandar Dejanovic -

    I've measured it: The cable starts arround 1.4-1.6 cm from the lower half from the bottom on the left side.

    So You can cut the bottom left corner and of course the upper left one but for safety's sake, watch out for the camera.

    You can go up to 5cm down from the upper left side till You're near the cable.

    Aleksandar Dejanovic -

  2. q2iVFP1DNesqap1L
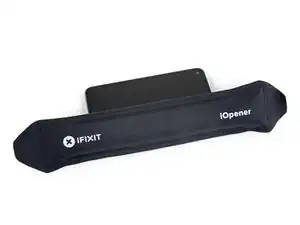
    • Aplique un iOpener caliente en el borde derecho de la pantalla durante un minuto para ablandar el adhesivo.

    • También se puede utilizar un secador de pelo, una pistola de calor o una placa caliente, pero ten cuidado de no sobrecalentar el teléfono, ya que tanto la pantalla como la batería son susceptibles de sufrir daños debido al calor.

  3. EJEIf4Z1AEo3AMWC
    EJEIf4Z1AEo3AMWC
    ScoSymvuqCnKNDcG
    QDwEliHCNFRvCaNt
    • Si tu pantalla está muy agrietada, cubrirla con una capa de cinta de embalar transparente puede permitir que la ventosa se adhiera. También se puede utilizar cinta adhesiva muy resistente en lugar de la ventosa. Si todo lo demás falla, puedes pegar la ventosa a la pantalla rota.

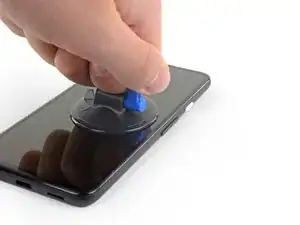
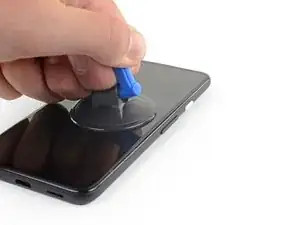
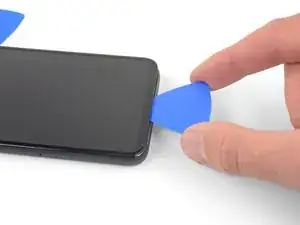
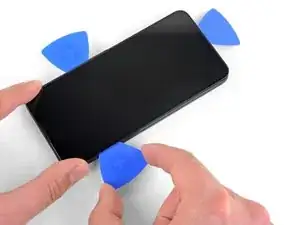
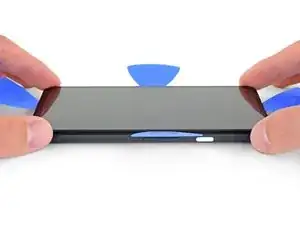
    • Coloca una ventosa lo más cerca posible del borde derecho de la pantalla.

    • Levanta la ventosa fuerte y firmemente.

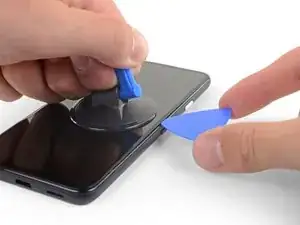
    • Introduce la punta de una herramienta de apertura en la junta entre la pantalla y el chasis no más de 1 mm.

    It's pretty easy. Insert it just below the screen between the Display and the Display “holder” or mold.

    Aleksandar Dejanovic -

  4. xDkhtvTPHTrBtHR6
    xDkhtvTPHTrBtHR6
    AgsUneGcTGB3PV2M
    sPMrxeVQOoANkv3i
    • Este paso muestra cómo insertar la púa sin dañar el panel OLED. Haz esto antes de empezar a cortar el adhesivo.

    • Con la púa 1 mm dentro del hueco, gira la púa hacia arriba en un ángulo pronunciado.

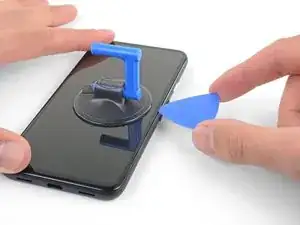
    • Con un ángulo pronunciado, empuja con cuidado la púa en el hueco de unos 6 mm. La púa debe deslizarse por debajo del panel OLED.

    • Deténte si sientes que la punta de la púa golpea un borde. La púa puede estar presionando el borde del panel OLED. Inclina la púa e inténtalo de nuevo.

    This took me a while, I ended up sharpening the tip of the pick with a razor so I could push it through the seam and slicing a few times, heat->sharpen-> slice until I finally got it to move, and once it slid under carefully heated up areas and sliced with ~2mm of the pick.

    Alan Carlson -

    This sounds also harder than it is. Push it in 1mm and just lift the other end in a wider angle like 70° degree from the horinzontal position. There “shouldn't” be much you can do wrong. Because except for the Data cable (flex) at a certain position, I can't remeber anything important but isolating tapes that I have scratched.

    It's just the Screen glued to the mold. That's it.

    Aleksandar Dejanovic -

    Oh, and I wonder here where do You all get such thins plectrums? I have also the flat plastic version and the thin plastic cards but none of them were thin enough for this!!

    I ended up using the backside i.e. the dull side of a Razorblade. I didn't saw any alternatives to this. Did You hear this OP?

    Any!!

    Aleksandar Dejanovic -

  5. J4QMAiSkZffCSgBV
    J4QMAiSkZffCSgBV
    rCRAZWFOTKgxQUYs
    LeRcwOFGsOG2JHfX
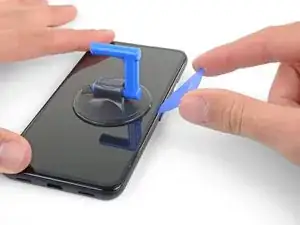
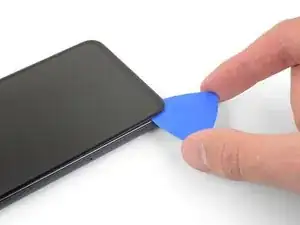
    • Desliza la púa por el borde derecho de la pantalla para cortar el adhesivo.

    • No introduzcas la púa más de 6 mm o podría dañar el cable flex de la pantalla.

    • Deja la púa en la esquina superior derecha para evitar que el adhesivo se vuelva a sellar.

  6. D42ibC2SikIjDNWv
    D42ibC2SikIjDNWv
    1UDYbsxrgPALt626
    JhcXfCMQ1xAfK4aK
    • El adhesivo de la pantalla es muy débil y no debería ser necesario volver a aplicar calor. Si la pantalla resulta difícil de cortar, aplica calor en esa zona durante un minuto y vuelve a intentarlo.

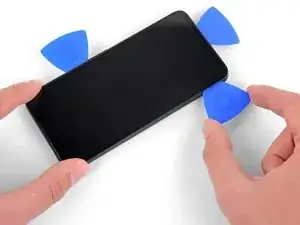
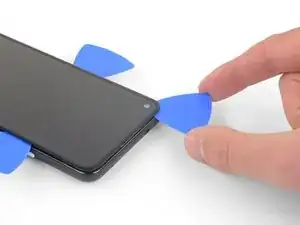
    • Introduce otra púa en el borde derecho del teléfono en un ángulo en el que ya se ha formado un hueco para evitar que se dañe el panel OLED.

    • Desliza la púa alrededor de la parte inferior del teléfono para cortar el adhesivo.

    • Hay un delicado cable bajo la esquina inferior derecha de la pantalla. Si notas que tu púa de apertura se engancha en algo, sácala y vuelve a intentarlo. Asegúrese de que la púa está inclinada hacia abajo y que sólo se introduce lo necesario para separar el adhesivo (no más de 3 mm de profundidad).

    • Deja la púa insertada a lo largo del borde inferior para evitar que el adhesivo se vuelva a sellar.

    Top and bottom edge adhesive were much stronger than this suggests. Corners were very hard to detach. I killed my screen b/c I cracked it at the top. Worked better with heating around whole perimeter like an iPhone.

    Erik Sorensen -

    WARNING: Be very careful prying the bottom left and right corners! In fact do not insert anything there because there is only a 0.8mm clearance between the screen and the edge, and there's a 0.5mm space between the screen and front glass where if you insert a pick between the screen will crack and break! I had to replace the screen after only doing a battery repair...

    bloc -

    Unfortunately I did not properly read the comments here. So for the unafraid people like me:

    DO NOT insert something into the bottom right! Especially not like it is shown in the image at this location!

    Instead I suggest start releasing the screen from right, then left side, then top and as the last step release the bottom, but start with the left corner. Do not pry too much and use a bit more heat as suggested.

    There is a small image of this critical right corner in Step 16 (the part at the top is the display and the left corner at the top is the critical right corner here). You'll see the orange cable in the corner which is easy to damage...

    Peter -

  7. iEnPlXUXUHTZJnpL
    iEnPlXUXUHTZJnpL
    UNTnxRjUZoDHXT4R
    YScDDT4gpOFJOE6j
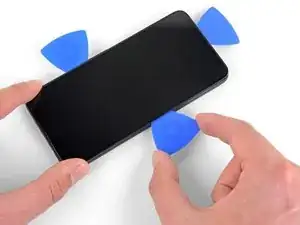
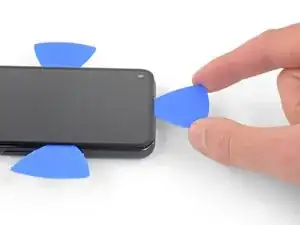
    • Introduce otra púa en el borde inferior en un ángulo en el que ya se ha formado un hueco para evitar que se dañe el panel OLED.

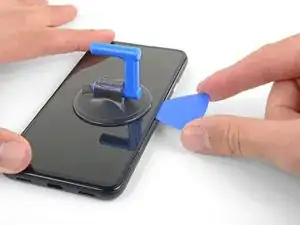
    • Usa la punta de la púa para cortar el borde izquierdo del teléfono.

    • Si resulta difícil cortar el adhesivo, calienta el borde izquierdo durante un minuto y vuelve a intentarlo.

    • Deja la púa insertada a lo largo del borde izquierdo del teléfono para evitar que el adhesivo se vuelva a sellar.

  8. GXSjo5fueaLsoYd5
    GXSjo5fueaLsoYd5
    4mouCGVN3ej3XoXQ
    wLsO4lDvkSNucC6V
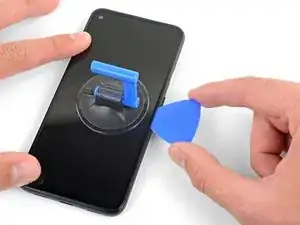
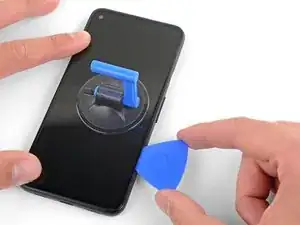
    • Hay una malla que cubre el altavoz del auricular en el borde superior de la pantalla. Si no tienes una malla de repuesto, ten cuidado de no dañar o perder este componente.

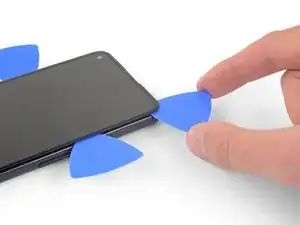
    • Introduce otra púa en el borde izquierdo del teléfono en un ángulo en el que ya se ha formado un hueco para evitar que se dañe el panel OLED.

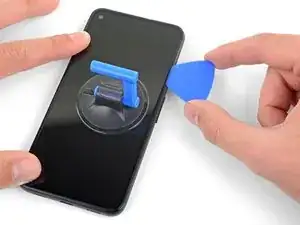
    • Desliza la púa alrededor del borde superior del teléfono para cortar el adhesivo.

    • Si resulta difícil de cortar, calienta el borde superior durante un minuto y vuelve a intentarlo.

  9. BPFrToKqDD62NEeM
    BPFrToKqDD62NEeM
    GlHaHCFlb2AFZhlL
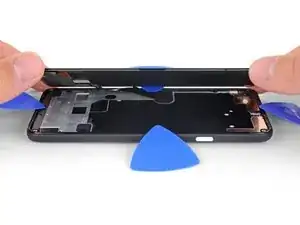
    • Una vez que haya cortado el perímetro del teléfono, levanta con cuidado el borde derecho de la pantalla, abriendo el teléfono como un libro.

    • No retires la pantalla todavía.

    • Utiliza una púa para cortar cuidadosamente los restos de adhesivo.

  10. oUNIGJd3OLSZrEwr
    oUNIGJd3OLSZrEwr
    mlcnfSNcaxRYbOAl
    5IuM1hZd6gUKkGSC
    • Levanta desde el borde superior y gira la pantalla sobre el borde inferior hasta que puedas apoyarla con el lado del cristal hacia abajo.

    • Ten cuidado de no someter a tensión el cable plano conectado.

  11. QDuLoSjuQaZgqGZP
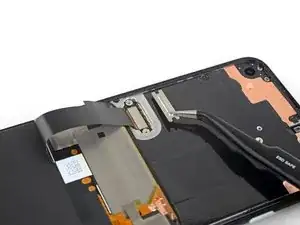
    • Utiliza unas pinzas para despegar con cuidado la cinta negra que cubre el soporte del conector de la pantalla.

    • Si está en buen estado, puedes reutilizar esta misma cinta durante el reensamblaje. En caso contrario, sustitúyela por un trozo de cinta aislante.

    How critical is the tape that covers this connector? I realized upon sealing back up my device that I forgot to re-install it. I imagine it mostly is there to prevent dust and moisture ingress?

    Alex Cook -

  12. 6x5ufTbvB5Q5XCb1
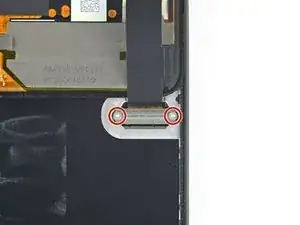
    • Utiliza un destornillador Torx T3 para retirar los dos tornillos de 2,1 mm que fijan el soporte del conector de la pantalla.

    • Durante este paso de la reparación, ten cuidado con todos los tornillos y asegúrate de que los colocas de nuevo en la posición en la que estaban.

    A T4 driver worked for me here.

    Gabe Maayan -

    It is definitely a T4.

    Jarl Friis -

  13. V1CYECKe4EvEHu1J
    • Utiliza unas pinzas para retirar el soporte del conector de la pantalla.

    • Asegúrate de guardar este componente para reinstalarlo cuando termines la reparación.

  14. eSlgWVRJgapeowxZ
    eSlgWVRJgapeowxZ
    LtTmQU1tTfjruuhd
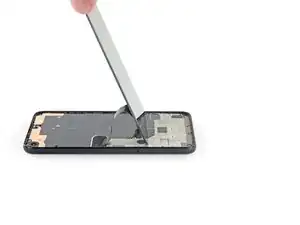
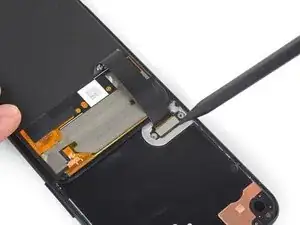
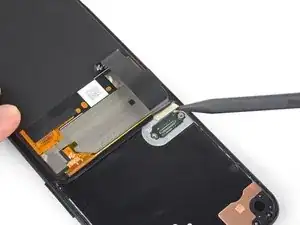
    • Utiliza la punta de un spudger para hacer palanca y desconectar el cable flexible de la pantalla.
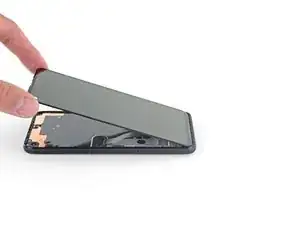
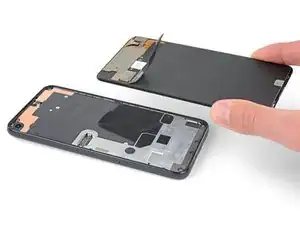
    • Para volver a colocar los conectores a presión como éste, alinea con cuidado y presiona hacia abajo en un lado hasta que encaje en su sitio, y luego repite en el otro lado. No presiones en el centro. Si el conector está mal alineado, las clavijas pueden doblarse y causar daños permanentes.

    No, why the tip? Use the other flat side that doesn't concetrate all the power on one point and Youre doing a propper job.

    Aleksandar Dejanovic -

  15. tOeTcJhTXCIkF2Q6
    • Quita la pantalla.

    • Compara la pantalla de sustitución con la original. Es posible que tengas que transferir componentes adicionales (como la malla del altavoz) a la nueva pieza.

    • Para instalar la pantalla nueva:

    • Raspa los restos de adhesivo del perímetro del marco.

    • Sigue esta guía si utilizas adhesivos cortado a medida.

    • Si utilizas cinta de doble cara, como cinta Tesa, sigue esta guía.

    • Si usas alcohol isopropílico para limpiar el adhesivo de la pantalla, asegúrate de no dejar que salpique ningún componente no deseado, ya que esto puede debilitar la unión adhesiva.

    • Durante el proceso de arranque después del reensamblaje, la pantalla pasará por una secuencia de calibración. No toques la pantalla durante este proceso, ya que podría sprovocar una calibración táctil incorrecta y crear problemas táctiles.

    This step seems to imply that a screen replacement is necessary when replacing the charging port. Is the charging port replaceable without replacing the screen? I understand great care must be taken not to damage the original screen in the procedure, but can it be reinstalled?

    David-Alexandre Tremblay -

    Yes, it can be reinstalled.

    Sam Omiotek -

    How long does the calibration process typically take? What does this process look like?

    phelpsbc -

    Just a heads up: If you are like me and you have accidentally turned on your Pixel 4a at some point while trying to pry the screen, don't worry too much. I was able to just connect my display with the device on. Nothing will happen until you reboot, and then the screen will initialize.

    Alex Cook -

Conclusión

Compara el nuevo reemplazo con la parte original-Posiblemente se requiere transferir ciertos componentes o remover adhesivos del reemplazo antes de instalar.

Para volver a montar tu dispositivo, sigue los pasos en el orden opuesto.

Lleva tus residuos electrónicos a un centro de reciclaje certificado.

¿Tu reparación no salió como fue planeado? Intenta algunas soluciones básicas o pide ayuda en nuestra Comunidad de Respuestas.

Sam Omiotek

Miembro Desde 25/02/19

59803 Reputación

25 comentarios

Really nice repair guide. But no place to buy the screen.

jeffreyjantos -

Yep, still waiting for it to be available.

Paul -

Same, still waiting. I have a broken pixel 4a and I have a right to repair it.

Erik Fry -

Where do you recommend that I purchase the Pixel4a screen replacement from? I found these two with Witrigs being cheaper, but not sure if either are reliable high quality screens.

https://www.witrigs.com/oem-screen-repla...

https://phoneremedies.com/collections/go...

Alejandro Gaytan -

@samomio Where do we install the double-sided tape for the replacement? Any areas we should not cover? I tried UV glue, but it is not holding the display securely.

Paul -

Install the double-sided tape in the space between the outside edge of the glass and the OLED screen, all the way around.

Sam Omiotek -

Question- why does every phone repair shop automatically replace both the glass layer and the lcd layer even if the glass is the only thing that is broken?

T_Thyme -

Good question—because OLED screens are destroyed by the oxygen in the air once their screens are cracked or separated.

Sam Omiotek -

Hey, nice guide!! Do you know if the Pixel 4a and 4a 5G are interchangeable between them? Thanks!!

Eli Pinheiro -

Thank you! The 4a and 4a 5G screens are not interchangeable. The 5G is larger.

Sam Omiotek -

Excellent guide.

I bought this screen from eBay: https://www.ebay.de/itm/402564264411

Already had tools in an iFixit kit.

Also bought some 1mm Tesa Tape from iFixit to glue the screen back on.

Matt Smith -

Got a replacement screen off Amazon, had a major scare tho, I tested it before going deep into the repair process, worked fine, removed all the adhesive, reattached the replacement screen it it was all black. Like dead. Phone was still vibrating, I made sure nothing was covering the proximity sensors or anything, still dead screen. I take a break, come back, dis-attach and reattach and the screen several times and its working again. Weird, but now very scared I delicately put it all back together. Make sure you transfer over the speaker grill on top, it doesn’t come with most replacement screens.

Anthony Ramirez -

Hey guys & Ifixit team… what kit it s better to use for smartphones as a beginner : Essential Electronic or iOpener or Smartphone Repair Kit ?

The big pbl is finding the display…anybody bought form alibaba / alliexpres? Thanks a lot!

Daniel Spatariu -

Water damage all over the screen from about 2 TBs drop of water on it. Picked up the phone and wiped it thinking its nothing . MAN God know I was wrong. The screen literally SIP water from the sides. 3 Days later and the screen is done. WARNING : If ANY water is left for a couple seconds PRAY. Now ALL of the screen is now purple from water stuck inside it. NEVER AGAIN GOOGLE.

Samud 78 -

CAN SOMEONE TELL ME IF IT IS IMPORTANT TO BUY THE CORRECT SCREEN VERSION NUMBER? AS PIXEL 4A 4G G025 /G025N /GA02099.

Because sellers don't specify it, is it really relevant? They just sell as Pixel 4A 4G compatible.

Thanks overall!

Brian Diaz -

Great repair guide, help me a lot! I am totally peaceful now handling my phone open-hearted (with Essentiel Electronics Toolkit). I bought my new screens on piecetelephone.fr, received in 2 weeks. I used B-7000 to glue the new screen back on. Thanks a lot iFixit team :)

Tim -

where do I buy the actual google pixel 4a screen itself? On Amazon? On eBay? Pls answer me

Wei on Huang -

Replacement screens are now available from iFixit here.

Andrew S -

Where do I buy the google pixel 4a screen itself? Which website? And is it cheaper to buy the toolkit bundle or Buy the speelste tools one by one

Wei on Huang -

Phone will not power up after dropping in bowl of water. Can anything be done to recover.

Chris

Chris Lawson -

Be aware that removing a shattered screen will be tedious and you must be patient and careful to remove all of the bits from the glue channel between the screen and the phone body. Removing the old glue is a VERY tedious and time consuming process so be prepared to take considerably longer than the 30-60 minutes shown in the directions. Also be aware that having a magnifiying headset with lights should be a high priority purchase along with this kit. Re-attaching the screen-to-phone connector is also incredibly tedious and frustrating. It took more than 8 hours of work to get ours replaced. At first it all worked fine and 10 minutes later the screen failed. Be prepared to either be delighted that your efforts bring a phone back to life or that it will end in utter failure and frustration... it is NOT as easy as you think. The YouTube videos are all missing this information and make it all look easy...... not so.

D. J. -

If you get the kit that includes the adhesive strips, save yourself the risk and irritation and just get some B-7000 or whatever you see someone using in a YouTube tutorial. They seem to work, but it doesn't seem like they're actually cut for specifically this phone, or in my case none of the shapes really came close to aligning with any cutouts or holes. They only give you exactly what you need, so if you accidentally fail to line it up exactly right, you're stuck trying to maneuver this string of very sticky goop into a precise line or corner.

Otherwise, the tools are exactly what you need in a food way, very little waste and decent packaging. Great value overall, the screen is legit, although now my proximity sensor isn't working for some reason. They're pretty good quality, I'll keep it all around, but will be ordering some better adhesive and maybe redoing it. It really is not fun working with those, and I'd appreciate more for my money in that respect.

Also the picks aren't thin enough, risky using them.

L. T -

That was really useful. Thanks for the info and clear steps. I did end up having to push the middle of the connector when reattaching the screen.

Eanna Ryan -

When the kit is going to be available?

Karna Soneji -