Introducción

Usa esta guía para reemplazar la pantalla de tu Huawei P9 Lite.

  1. TEq5nM4U4sDEDHNx
    TEq5nM4U4sDEDHNx
    l2sFSkJVVUauFbPP
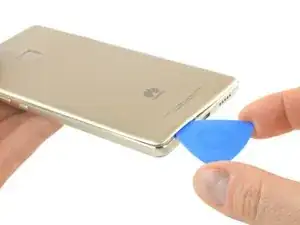
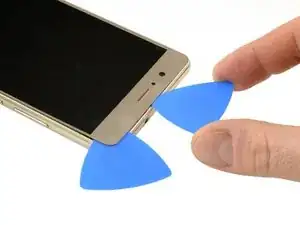
    • Usa una púa de apertura para desenganchar la tapa trasera comenzando en la esquina inferior.

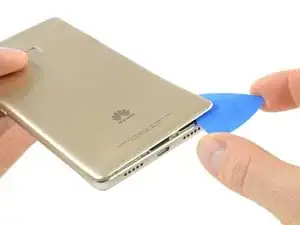
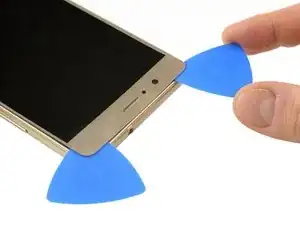
    • Sigue pasando la púa en dirección contraria a la agujas del reloj y con cuidado haz palanca en las lengüetas plásticas para abrirlas una a la vez.

    What could you use instead of an opening pick??

    Alfredo -

    Like, could a guitar pick wor? Or anything else?

    Alfredo -

    A guitar pick will also do.

    Tobias Isakeit -

    what can still be used besides guitar pick

    Tarshia Thompson -

    I had a hard time to open the back cover by opening pick. Then I used little, really little knife at first, and I continue to opening back cover using opening pick.

    Andy B -

    Heating up aroud the finger sensor to loosen the square adhesive tape ..

    Hishamchohan -

    If you do not have any picks, You can also adapt an old credit or utility card by cutting it in to thirds. Then with some fine emery or sand paper, rub a sharp point on the one edge of the card. This will help you get access to the clips that hold the rear cover on. The one i did yesterday had quite a lot of adhesive around the edge & around the finger print sensor. Another tip with an old credit card is to cut it in to narrow strips to insert in to where you have separated the cover from the frame to stop it getting stuck to the adhesive again.

    gazza667 -

  2. HHkVVuLiGxGZQ3JZ
    • Hay un adhesivo por debajo de la tapa trasera que sujeta la batería y la placa de metal en la parte superior.

    • Ten cuidado con el cable flex del lado derecho.

    • Tuerce la púa de apertura para hacer palanca en la tapa trasera y soltarla del adhesivo.

    Most of the adhesive is around the fingerprint cell and on the battery itself. You can slowly pull the back cover from its side but make sure not to break it. Push the mediator or a longer piece of plastic under the back cover to slowly destroy the adhesive.

    Nicolas Combaret -

    Slowly, slowly wins the day. Nicolas is right and comes off a charm. The most nerve wracking part of this longish repair.

    John Nordstrom -

  3. IWjHQtQ5StgPJEIy
    • Cuando la tapa trasera se libera del adhesivo puedas sacar con la mano completamente.

    Hi! Im so sad! At the begginig of the operation i ve broken the white seal/connector that in one side is connected to the board and the other side is "glued" to the battery. Can someone help me? how can i solve this?? There is no image displayed on the screen. but there is vibration, sound, notifications... can someone help me please???

    Diogo -

    What you broke is handling the NFC, and doesn’t have anything to do with the display. You probably damaged the ribbon right below the battery, since that’s what links the display to the motherboard.

    Polaris -

    Oups ! L’antenne NFC était solidement collée à l’intérieur de la coque et j’ai donc déchiré sa nappe en ouvrant la coque. Heureusement, je n’utilise pas les fonctions NFC et, à part cela, tout a l’air de fonctionner normalement.

    Michel Orban -

  4. YkHOhGYJUh6tCuYS
    YkHOhGYJUh6tCuYS
    1faC3OelbUdVZYRO
    iUJfE4DfWyUTQuZw
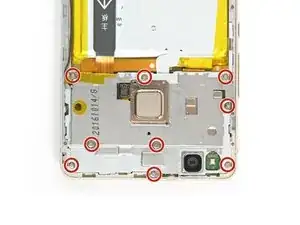
    • En la parte inferior de tu teléfono remueve los tornillos siguientes:

    • Tres tornillos de 2.9 mm Phillips #00

    • Cuatro tornillos de 3.8 mm Phillips #00

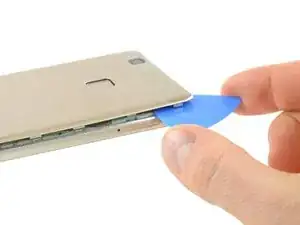
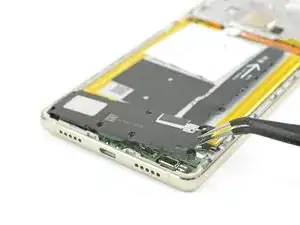
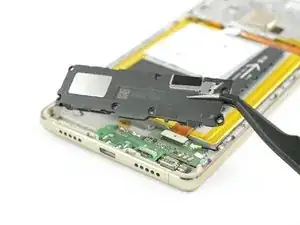
    • Ahora puedes tomar la unidad del altavoz y sacarla.

  5. cEIdkjnxJ2ABeg1m
    • Remueve los nueve tornillos Phillips #00 que sujetan la placa de escudo de metal.

    • Algunos tornillos podrían estar cubiertos con pegatinas a prueba de manipulaciones. Remuévelas para asegurarte de que tu controlador encaje bien.

    Qu’est ce qu’un “indicateur d’eau”?

    chevaliernoir -

    Une petite pastille qui change de couleur au contact de l’eau. Les fabricants s’en servent pour nullifier la garantie : si ta pastille indique que de l’eau s’est infiltré, tu devra payer ta réparation.

    Polaris -

    Are all the screws the same size ?

    Hishamchohan -

    yes they are

    Adam M -

  6. MterKwicy2L12yfj
    MterKwicy2L12yfj
    tZRxJIr3qNvXpXLj
    • No remuevas la placa de escudo aun ya que está sujeta por un conector y un cable adherido.

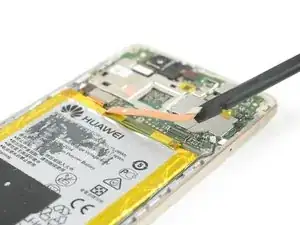
    • Usa un spudger para desconectar el sensor de huella digital de su placa madre.

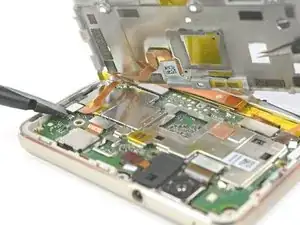
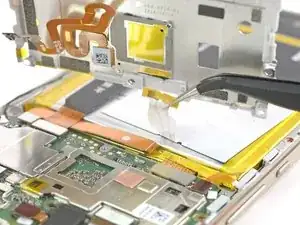
    • Despega el cable de antena NFC de la placa de metal.

    can we just remove NFC antenna and dont want to install int back?

    Mohd Danial Bin Harun -

    Note there are two plastic tabs at the top of the shield plate. Unlock them with a mediator, the plate will come easily after that.

    Nicolas Combaret -

    Buongiorno,

    va sostituita l'intera piastra metallica contenente il sensore impronte e la fotocamera, oppure il sensore é estraibile dalla piastra?

    Grazie

    LUIGI

    GI GI -

    Yes, it is possible to remove just the fingerprint sensor from the motherboard shield. Remove the small metal plate on the inside of the shield covering the sensor and push the fingerprint sensor through from the other side.

    Tobias Isakeit -

    Grazie mille.

    GI GI -

  7. AqGI52cRiqLhMWHm
    AqGI52cRiqLhMWHm
    ykIbMsOT3E2MrwjY
    cTOFAgwqU2ECbvLM
    • Desconecta el cable flex de la placa madre en ambos extremos y sácalo.

  8. rjFLSyZDPSGAAETp
    rjFLSyZDPSGAAETp
    3QUK3wOoMBToHUig
    • Despega la antena NFC de la batería.

    • Ten cuidado de no arrancar o arrugar la antena.

    • Si estás removiendo la batería para llegar a la pantalla, puedes dejar la antena NFC en la batería.

    • Desenchufa el conector de la batería.

    The NFC Antenna is delicate. If you are just replacing the batter then i had to use a bit of heat to soften the adhesive before gently peeling it away from the battery. The adhesive is quite stubborn.

    gazza667 -

  9. 2HNcNE6A4oojisLq
    2HNcNE6A4oojisLq
    VRoanFSZAVRPaXFR
    jdEa1lbcvSxsAFwD
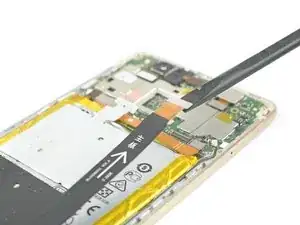
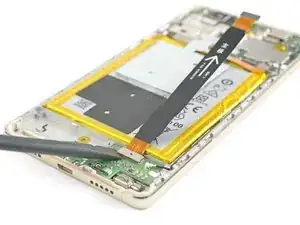
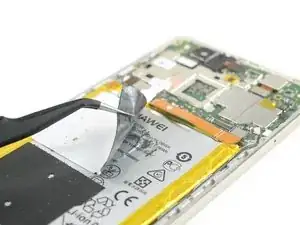
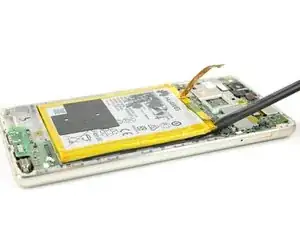
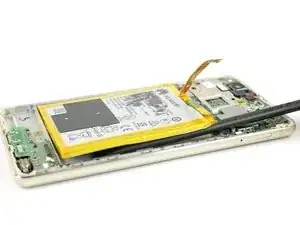
    • Desliza el spudger por debajo de la batería en el lugar que se muestra en la foto y suéltalo lentamente.

    • Evita doblar la batería y volver a calentar si es necesario.

    • Ten cuidado de no dañar el cable flex de pantalla que va por debajo de la batería en el centro.

    • Cuando vuelvas a montar el teléfono, reemplaza el adhesivo viejo con cinta adhesiva de doble cara o con tiras adhesivas precortadas.

    Bonjour j'ai réalisé toutes les etapes mais mon telephone ne se charge plus.que faire ?

    Amenis -

    Bonjour ! Alors deux options sont possibles :

    1) la batterie était complètement vide et cela prend du temps avant que le téléphone s’allume et affiche que la batterie est en train de charger.

    2) vérifiez que les connexions des nappes à l’intérieur, surtout celle de cette étape. Cette nappe relie en effet le circuit inférieur au supérieur, fait donc le lien entre la batterie et le port de recharge.

    Bonne chance !

    Claire (iFixit EU)

    Claire Miesch -

    Super !

    J’ai réussi. Le plus pénible sont les différents endroits collés.

    Particulièrement sous la batterie… et l’antenne NFC ! Qu’on ne peut pas recoller ! (jai mis du scotch, j’espère que ça ira…)

    A priori, le sèche-cheveux aide un peu pour ramollir la colle sous la batterie.

    J’ai pu aussi enlever de la colle en soulevant l’autre côté (doucement). Prendre son temps est essentiel ^^

    Par contre pas remis de l’adhésif dessous comme indiqué.

    ChtiClem -

    The battery i removed yesterday had way more adhesive on the under side than in the above pic. I ended up having to get the old battery fairly warm before the adhesive would release. A tip if you are doing this is to use an old credit card cut in to narrow strips and insert them in to the gap where the adhesive release. That way the battery shouldn’t re-stick before you remove it.

    gazza667 -

  10. WHP2PUSOuANE6Drv
    WHP2PUSOuANE6Drv
    BKmleZH2Qw3E1eCP
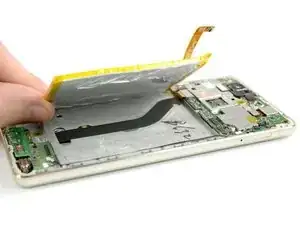
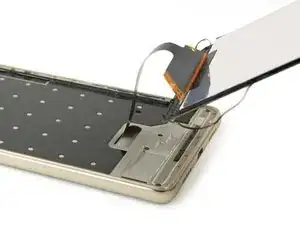
    • Toma el extremo plano de un spudger para desconectar el cable flex de pantalla.

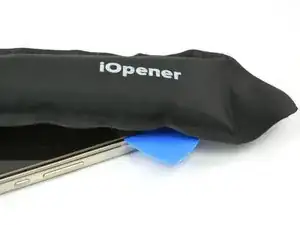
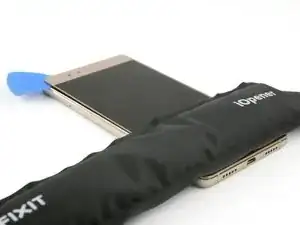
    • Voltea el teléfono y usa un iOpener para ablandar el adhesivo en el borde de la pantalla.

  11. kjyRTUF4cceFifHw
    kjyRTUF4cceFifHw
    6ihpfRHaXkCvBymk
    44VDFKsw3mAnthJL
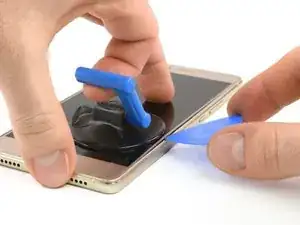
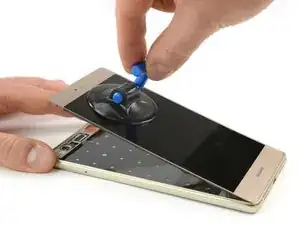
    • Con una ventosa con mango puedes levantar la pantalla solo un poco para crear un espacio.

    • Inserta solo la punta de una púa de apertura en el espacio y desliza constantemente a lo largo del borde hacia la parte superior. Quizá tendrás que hacerlo unas pocas veces.

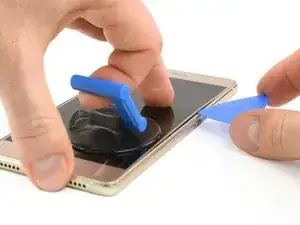
    • Intenta de llegar alrededor de la esquina y detrás de la parte superior de la pantalla. Reposiciona la ventosa si es necesario.

    • Deja la púa de apertura detrás de la pantalla para evitar que se vuelva a sellar el adhesivo.

  12. lY4ijfw3RhCFtaKr
    lY4ijfw3RhCFtaKr
    rI1XJMOwrQRAIuvl
    yw6ke1jsBDGuVvCa
    • Calienta el iOpener una vez más y colócalo en la pantalla para ablandar el adhesivo en la parte superior.

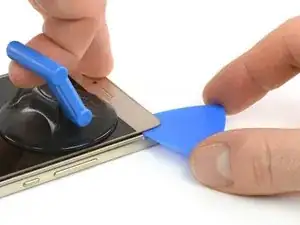
    • Usa una segunda púa de apertura para deslizar a lo largo del borde superior hacia la próxima esquina.

  13. atmBV5pgV6QkTsyO
    atmBV5pgV6QkTsyO
    lB2BcMMeSDpOlC5k
    46alkCfwIfaKRPs2
    • Mientras el adhesivo siga caliente, intenta de continuar separando la pantalla a lo largo del lado hacia la parte inferior. Vuelve a calentar el iOpener si es necesario.

    • No sobrecalientes el iOpener. Sigue las instrucciones del iOpener.

    • También calienta la parte inferior de la pantalla para los siguientes pasos.

  14. FATXRT6BSKffUGjj
    FATXRT6BSKffUGjj
    OeUjve2xKMwfmUXk
    4Z5Z6VlhHuo1yEOd
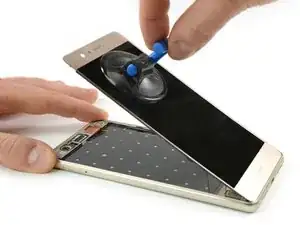
    • Cuando hayas cubierto todo el perímetro de la pantalla, toma una ventosa con mango y levanta la parte superior de la pantalla apartándola del marco.

    • Con cuidado pero de manera constante abre la parte inferior de la pantalla separando el adhesivo.

    • Ahora puedes pasar el cable flex de pantalla a través del espacio libre en el marco.

    • Al instalar la pantalla nueva, asegúrate de volver a aplicar el adhesivo donde sea necesario.

    割れがある場合はかなり剥がしにくい。画面を温め、マイナスドライバーの極細で抉った所、フレーム周りの白い枠ごと剥がそうとしたたため枠が折れてしまった。ここは注意して欲しい。特に撮影レンズ付近は接着が強めにしてあるため最後に剥がすのが良いと思う。順番はサイド→下→上部がベストと感じた。はがした後にきづいたが、撮影レンズ裏、ディスプレイフレックスケーブル等の穴から押せばディスプレイが浮きやすいのではないかと感じた。

    ヒデトシ -

    アドバイス、ありがとうございました!

    Midori Doi -

Conclusión

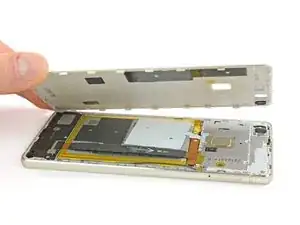
Para volver a ensamblar tu dispositivo, sigue estas instrucciones en orden inverso.

Tobias Isakeit

Miembro Desde 31/03/14

108306 Reputación

3 comentarios

About release battery ... fishing braided line works better :) battery taken without any destruction.

Slawomir Z. -

Grazie a questa guida ho potuto sostituire batteria e schermo da me. Grazie!

themafiakiller1967 -

Non si può sostituire solo il vetro? X forza anche lcd?

feliciemanuele -