Introducción
Usa esta guía para reemplazar un conjunto de pantalla roto.
Herramientas
Partes
-
-
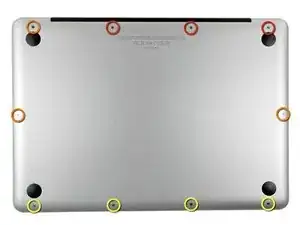
Extrae los siguientes diez tornillos:
-
Tres tornillos Phillips #00 de 14.4 mm
-
Tres tornillos Phillips #00 de 3.5 mm
-
Cuatro tornillos de resalto Phillips #00 de 3.5 mm
-
-
-
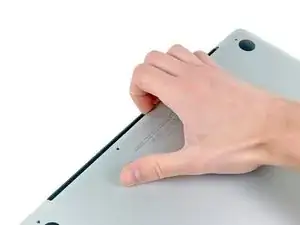
Usa tus dedos a modo de palanca para levantar la tapa inferior del cuerpo del MacBook por la zona del ventilador.
-
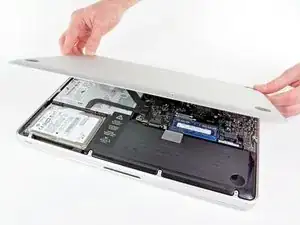
Extrae la tapa inferior.
-
-
-
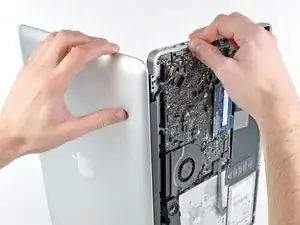
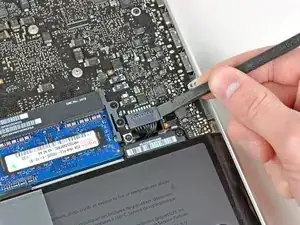
Usa el borde de un spudger para levantar el conector de la batería haciendo palanca para extraer su toma de corriente de la placa madre.
-
-
-
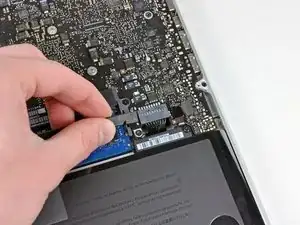
Dobla el cabre de la batería ligeramente para alejarlo de su conexión en la placa madre para evitar que se conecte accidentalmente mientras trabajas.
-
-
-
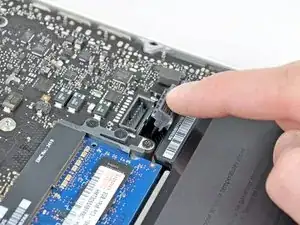
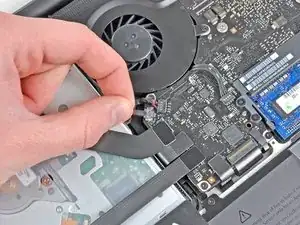
Usa el borde de un spudger para levantar el conector del cable de cinta del AirPort/Bluetooth de su zócalo en la placa lógica.
-
-
-
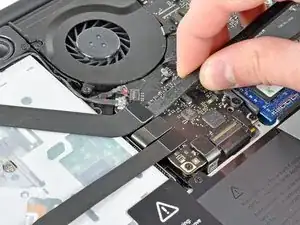
Mueve con cuidado el cable de cinta AirPort/Bluetooth fuera del camino cuando despegas el adhesivo que sujeta el cable de la cámara al subwoofer y al soporte del AirPort/Bluetooth.
-
Desvía el cable de la cámara desde debajo del dedo de retención moldeado en el soporte AirPort/Bluetooth.
-
-
-
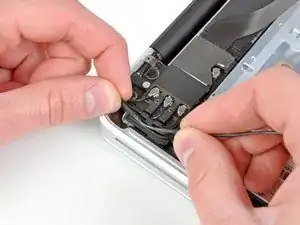
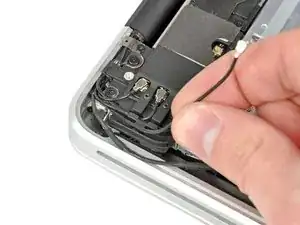
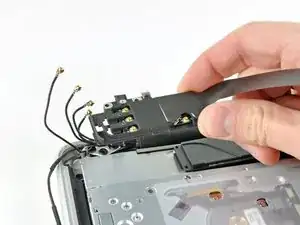
Usa la punta de una espátula para levantar y desconectar el cable de la antena de su zócalo en la placa del AirPort/Bluetooth.
-
Deruta el cable de la antena y sácalo de debajo del dedo moldeado en el soporte del AirPort/Bluetooth.
-
-
-
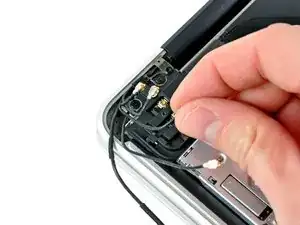
Usando el método descrito en el último paso, desconecta los tres conectores restantes de la antena.
-
Desvíe sus cables de las ranuras cortadas en el soporte AirPort/Bluetooth.
-
-
-
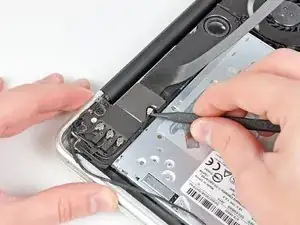
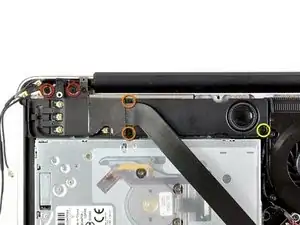
Quita los siguientes cinco tornillos:
-
Dos tornillos Philips de 10.3 mm
-
Dos tornillos Philips de 3.1 mm
-
Un tornillo Philips de 5 mm
-
-
-
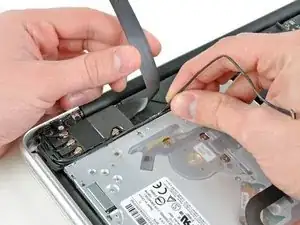
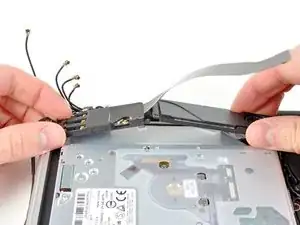
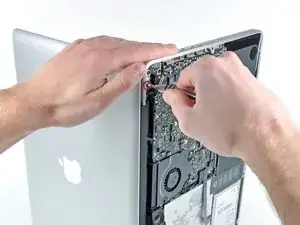
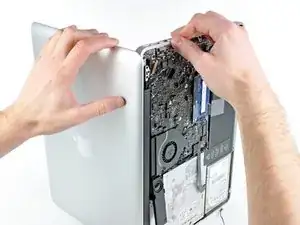
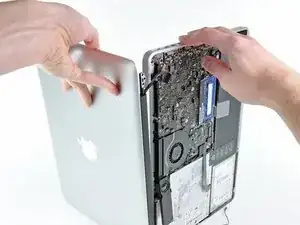
Tira del montaje del AirPort/Bluetooth y del Subwoofer hacia arriba cerca del centro del lado de la unidad óptica hasta que ambos se separen.
-
-
-
Quita el montaje del AirPort/Bluetooth, teniendo en cuenta el frágil contacto de la antena cerca de la esquina de la carcasa superior.
-
-
-
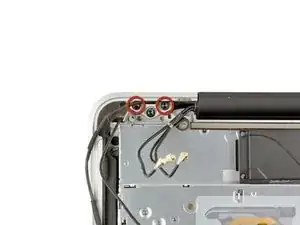
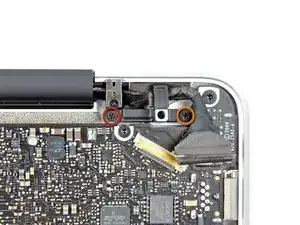
Quita dos de los tres tornillos Torx T8 de 6 mm que sujetan el lado derecho de la pantalla a la carcasa superior.
-
-
-
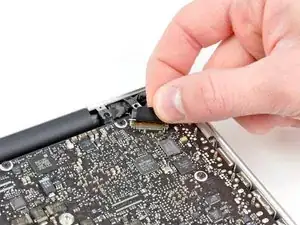
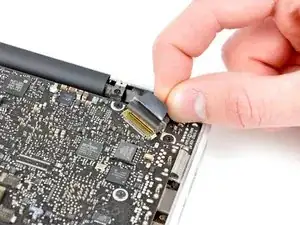
Agarra la pestaña de tiro de plástico sujeta al seguro del cable de datos de la pantalla y gíralo hacia el lado del conector DC-In del ordenador.
-
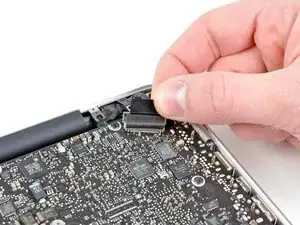
Tira del cable de datos de la pantalla de manera recta fuera de su zócalo en la placa lógica.
-
-
-
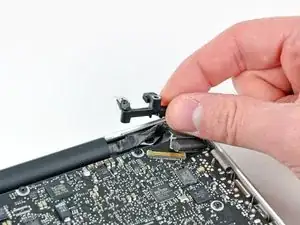
Quita los siguientes dos tornillos:
-
Un tornillo Philips de 8.6 mm
-
Un tornillo Philips de 5.5 mm
-
Quita el retén del cable de datos de la pantalla de la carcasa superior.
-
-
-
Quita la pieza de cinta de espuma que cubre los tornillos de la pantalla cerca de la placa DC-In MagSafe.
-
-
-
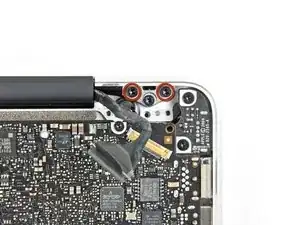
Quita dos de los tres tornillos Torx T8 de 6 mm que sujetan el lado izquierdo de la pantalla a la carcasa superior.
-
-
-
Abre tu MacBook Pro dejando la pantalla en perpendicular con la carcasa superior.
-
Coloca tu MacBook Pro en una mesa como se indica en la foto.
-
Mientras sujetas la pantalla y la carcasa superior juntas con tu mano izquierda, quita el tornillo Torx T8 restante del soporte inferior de la pantalla.
-
-
-
Agarra la caja superior con la mano derecha y gírala ligeramente hacia la parte superior de la pantalla para que el soporte de la pantalla superior pueda salir del borde de la caja superior.
-
Gira la pantalla un poco alejándola de la caja superior.
-
Saca la pantalla hacia arriba de la caja superior, teniendo en cuenta los soportes o cables que puedan quedar atrapados.
-


Para reensamblar tu dispositivo, sigue estas instrucciones en orden inverso.

8 comentarios
Step 18 and 19 is easier if you place the bottom keyboard down, with the display hanging over the edge of a table. This stabilizes the bottom assembly, making teardown and reassembly easier for one person
Fantastic tip - I placed it in front of me so the display rested on my thighs while the base was flat on the table - very safe, no fear of dropping/slipping.
Annette -
Thank you Phillip for providing this Guide. I used it to replace a bad LCD assembly after a water spill damaged it. The last Step 20 is very difficult. I had the worst time trying to separate the two parts after I removed the final Torex screw. It took a while, trying different angles, but I finally got it. Putting in the new one was a trivial exercise...
fasthans -
Phillip, thank you so much for this excellent guide. I have no technical background at all but I found it very easy to use - and it saved me hundreds of dollars on a professional repair job. Keep up the good work!
How much weight can I save by removing the optical drive?
gunes314 -
You can save a lot of weight if lets say your installing a solid state drive or putting in a second hard drive but if you know that you use the CD/DVD disc drive a lot then you might just want to leave the drive alone.
Marshall WahlstromHelgren -
Tip: Use one of those weekday pill holders to have a cheep way to store screws you remove and each day of the week can be for different sizes or parts. It has been handy to have (much less expensive than the magnetic mat.
Robert Wacker -
Hello, where can I buy the screws I need in case I lose one of them?
taylornya -
iFixit sells a kit: MacBook Pro Unibody Lower Case Screw Set
Darrell Johnson -
I have one stripped screw... How opening without drill it?! Any suggestions please?
rodrigosady -
I also stripped a couple screws. I wasn’t able to open it up without drilling. After drilling the heads and removing the cover it was easy to hacksaw the tip and unscrew with a standard driver.
Michael Wilkens -
We have a guide for that!
Cómo quitar un tornillo barrido
Sam Omiotek -
My top tip - make sure you buy good quality Phillips screwdrivers and a magnetic holder. Cheap screwdrivers won’t get the screws undone safely. Without a magnetic holder you have no chance of getting the tiny crews in and out safely.
jeremyyoung -
A good Phillips 00 is your friend here. Also, when reinserting the screws, gently start anticlockwise and you wil feel a click at the start of the thread. This tells you you’re in the right place and less likely to cross-thread through force in the wrong place.
Iain Boyd -
I feel like these are 000 screws. Amazon sales describe them as such and my 000 screwdriver fits better
cam2000deluxe -
Before ordering a new Trackpad remove the existing battery and try clicking the Trackpad. If it clicks OK with the battery out the source of problem is likely a swollen battery, which should to be replaced even if it still works to some degree. From the side of the battery you will likely see the soft part of the battery bulging beyond the hard case.
Patrick Langvardt -
That’s absolutely correct as I can testify. With the battery removed I also adjusted the T6 set screw that adjusts the sensitivity of the trackpad click, evidently someone had cranked mine down tighter than the factory setting.
Gary Register -
Le quatrième paragraphe dans les instructions en français n’est pas correct : ce ne sont pas les 2 petites vis, mais les 7 petites vis qui sont inclinées. Et les 3 grandes sont bien verticales.
Degeorges -
Bonjour ! Merci de votre observation. J’ai corrigé la traduction. iFixit étant un wiki, n’hésitez pas à modifiez si vous remarquez une erreur :) Encore merci de votre attention et à bientôt !
Claire Miesch -
Tip: if you have a magnetic screw mat or similar, lay the macbook over the mat to make sure it catches any screws that may decide to fall of and hide under your table
Moritz -
Funny, it's not her hands that are doing the close ups. :)
Cinemated Man -
What's the difference between the shouldered and non shouldered screws? They look exactly the same to me.
MLNLRD -