Introducción

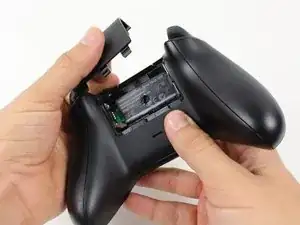
Hay varios tornillos ubicados en la parte posterior del mando que debe quitar, para quitar la placa frontal.

  1. nCPWIVIPPnPioQek
    • Retira la cubierta del paquete de baterías.

    • Retira las baterías.

  2. BCoOrGwESawovJpX
    BCoOrGwESawovJpX
    CYTch3arFkuHOaol
    • Recomendamos el uso de un spudger de nylon para este paso. Se muestra un spudger de metal.

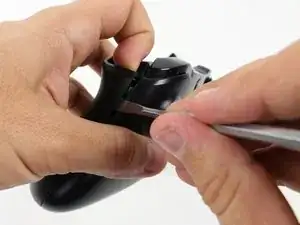
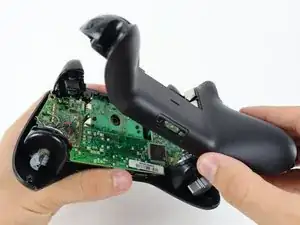
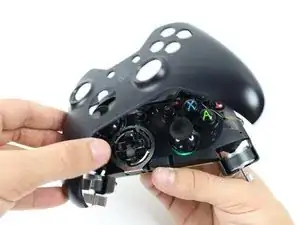
    • Sujeta el controlador firmemente para quitar las asas laterales, encajando un spudger en la costura entre la parte delantera y las placas del mango.

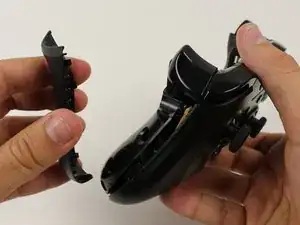
    • Levanta la placa lateral alejándola de la placa frontal moviendo el spudger hacia adelante y hacia atrás. Tendrás que hacer esto en toda la costura de la placa lateral.

    Start prying the side plate off underneath the trigger, this makes it easier to disconnect the other clips connecting the side plate to the backplate.

    Brandon -

    One you take it off, is it possible to click it back in?

    Aiden Bear -

    As long as you don’t exceed the couple tons you need to take it off you should be able to put it back.

    Brandon -

    I don’t have a squdger

    TimidFerret4982 Gaming -

    getting those handles back on seems impossible, they just dont fit as well, a gap remains even after snapping into place.

    Dont think ill be doing this in the future

    Spoutin Wyze -

    edit: wiggled the bo9ttom middlewith the handles off and somethign finally “clicked” into place for that extra 1/4 mm for the down arrow on my D-Pad to click back up into place!.

    Spoutin Wyze -

  3. NIQhMF4yRuvR3EOl
    NIQhMF4yRuvR3EOl
    JPprWqFDRTUcXoCS
    • Hay un tornillo escondido en la parte central trasera del mando

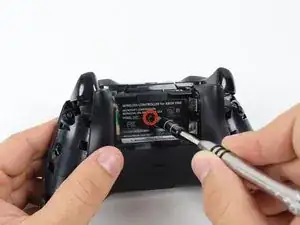
    • Utiliza el destornillador para hacer un agujero en el centro, y poder así, quitar el tornillo

    • También puedes quitar la etiqueta si no deseas hacer un agujero en ella

    • Quita los 5 tornillos de 10mm que están en la parte trasera del mando utilizando el "T8 Security Torx Screwdriver"

    i damaged my screws. how do i get the screws out?

    tenzin -

    wait. i just watched a video guide on ifixit's youtube channel about damaged screws. i'll try those methods.

    tenzin -

    It's a t8 or t9 security bit btw, I got the top two out with a regular T8, but the bottom two and middle needed a T9 Security bit.

    David Loper -

    All five faceplate/backplate screws in the controller I disassembled were T8 security fasteners.

    John Dziedzic -

    Am I doing something wrong because I got the tool it said I needed and got the middle screw out but the others have a bump or something in the center of the screw and it won't fit.

    kolton77 -

    The T8 is only good for the middle screw on my One S controller. The others require something bigger

    Matej Skelo -

    These requires SECURITY Torx bits (they have a cannulated hole in the driver). I don't believe the iFixIt branded driver is cannulated but you can buy a set of bits from DeWalt DWAX200 which is overkill but has what you need.

    jhighsmith -

    The driver that iFixIt sells is cannulated.

    jhighsmith -

    where do you get this dumb ass screw driver

    Jake Zweier -

    iFixit Store #IF145-027-3

    VauWeh -

    You can bypass it with a 1.5mm flathead.

    Marianne Sandling -

    thank you for this. worked for me

    Mr Anderson (Evolluisionist) -

    These screws required a T10, not T8.

    Armand -

    TR9. A $10 kit from Walmart has the bit/driver in it and extra goodies to make life simple.

    Matt Martin -

    As weird as it sounds, the top 2 came out for me with a flathead- but the bottom two and the middle one wont

    macybrooksevans -

    If you damage the middle part of the screws you can still take it out with the same screwdriver.

    Kev God -

    Thank-You :)

    Isaiah -

    needed a T8H, not easy to see.

    on a grey green xbox one controller

    Michael -

    You need a T8 and the kit is not $10 it’s $13.88 Hyper Tough Electronic Kit. In the hardware section at WalMart it a T8 because I tried everything and only a T8 fit it like a magnet. And the dumbass that wrote the article there is only 1 freaking screw.

    Bear Darazs -

  4. CN1rEMvQC3myRLyq
    • Retira la placa posterior.

  5. hWBUR3YZiAAiU3As
    • Retire la placa frontal.

Conclusión

Para volver a ensamblar tu dispositivo, sigue estas instrucciones en el orden inverso.

Tommy

Miembro Desde 22/01/15

1867 Reputación

10 comentarios

It was a good tutorial, but i have two plastic rings that stay after my instervention... Anyone knows where are-they ?

Matis Begot -

Note before starting. You need a T8 security bit (with a hole in the middle), not a standard T8 bit.

Fraser Currie -

I took mine a part because it was looking dirty, gave it a good clean, putting it back together was easy but it wont work with the batteries anymore just the power core, there is nothing broken or cracked, any ideas?

Lee -

Maybe you forced the battery contact on the wrong side of the case?

Alexandre Foley -

Alex is probably right. It's easy to let the two battery contacts on one side get covered by the bottom plate. Take battery cover off and compare the metal bits you see to a known good one.

Brandon Reiser -

Are the steps the same with the Xbox One Elite Controller as well?

Zac Dubits -

This is a great tutorial for people wanting to replace the boring black or white faceplate with one with a skin. It’s a shame they didn’t make the controllers easily customizable. They could’ve done a lot more with this console.

Liam Melkix -

Is this for the standard Xbox One controller or the Xbox One S Controller, or does the same exact steps apply to both?

Aaron Strain -

RB wasn't making contact unless I pushed really hard. Destructed as shown then pulled off the xbox button faceplate, and the offending button. Cleaned around the tact switch with isopropyl and it's responsive again!

Jeb Beard -

I did this only using a glasses repair kit

William Canu -