Introducción

Usa esta guía para reemplazar el altavoz derecho.

  1. QMqfyRTWUxyD6PaN
    QMqfyRTWUxyD6PaN
    mphdji2lKIR3CwWS
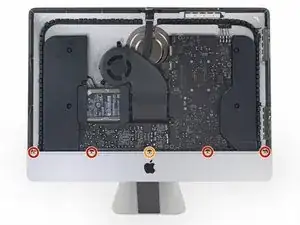
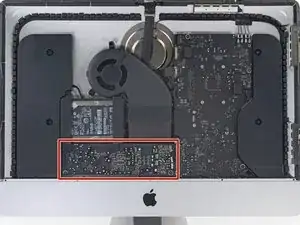
    • Remueve los siguientes cinco tornillos Philips que mantienen la ménsula de soporte inferior en su lugar:

    • Cuatro tornillos de 3.2 mm

    • Un tornillo de 1.7 mm

    • En al menos algunas máquinas con EMC 2544, todos los tornillos son del mismo tamaño.

    • Podrías necesitar quitar el adhesivo de la pantalla que pasa por el borde inferior del marco del iMac para acceder a los tornillos.

    I used the CR-V 4.0 standard screwdriver head to help peel away the adhesive lining. My fingers were too big to grab it, and my fingernails too short to get the removal started. This 4 screw head worked perfectly.

    airshack -

  2. NUQ4YmOm2RlEEAAO
    • Remueve la ménsula de soporte inferior del marco del iMac.

    Of all the parts of this entire procedure, replacing this one piece is the hardest part! The screws are tiny and they just don’t seem to want to grab the support piece. Also it seems to perform no function which is also annoying.

    John M -

    I left mine out. LOL

    jerrid_foiles -

    Line up the screw holes and press on the bracket from the back to help the screws grab. If your fingers are too big, press with the flat side of your spudger. As long as there’s no gap between the bracket and the iMac’s frame, the screws should grab easily.

    Jeff Suovanen -

    I put it in at a slight angle lining up the right hand side holes, screwed in the two screws and gently pressed my finger behind it on the rest

    jmorphett5 -

    If you only want to replace the HD and RAM, take a big shortcut and leave the logic board in, as well as all the parts needed to remove it (speaker, power supply etc). Once the display is removed, just take out the fan and the top two logic board screw. There is than sufficient space to gently remove and insert the two ram modules. HD can easily be replaced with an SSD by just removing the HD mounting brackets...

    diddl14 -

  3. bKJMGPZdOUDLNefO
    • Con la bisagra libre para moverse, el iMac estará desequilibrado y será difícil trabajar con él. Las reparaciones se pueden completar como se muestra, pero son más rápidas y fáciles con una cuña de servicio iMac.

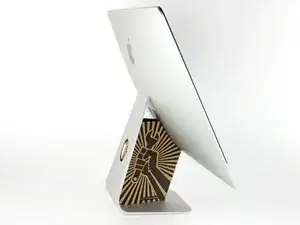
    • Si estás utilizando la cuña de servicio de cartón iFixit, sigue estas instrucciones de ensamblaje para armarla.

    • Antes de comenzar cualquier trabajo en su iMac: Desenchufa la computadora y mantenga presionado el botón de encendido durante diez segundos para descargar los condensadores de la fuente de alimentación.

    • Tenga mucho cuidado de no tocar los cables del condensador o cualquier junta de soldadura expuesta en la parte posterior de la fuente de alimentación. Solo maneja el tablero por los bordes.

    I have (21.5 inch, mid 2017, 2.3 ghz) base model same as this but not 4k. How much max ram can I install in my iMac??

    Narendra Verma -

    This guide contains many extra steps for what should be a straight forward, simple parts replacement without disturbing more than the display, left hand speaker and removal of 4 logic board screws for play. Nothing else except for the left hand speaker wire & iSight cable from logic board, the lower support bracket and loosening the speaker so as to move it around a bit.

    For the ram, I bent a pair of cheap tweezers long ago supplied with these replacement kits to the perfect angle for holding, locating and inserting the ram into the slots under the logic bd after moving each retainer w/spudger and popping out the old. Pay attention to the orientation of the ram when removing/inserting the ram! An automotive mirror is handy along with a small flashlight for closeups. Once the ram is aligned properly substitute your fingers for the tweezers, ease it into the slot, push up & engage! Reinstall screws and all else. I have done this job successfully this way countless times. For a tweezers pic contact me!

    Ross Elkins -

    Additionally, if a blade is present, I install the OSx system on the blade and everything else, apps and home folders on the new SSD. You get the very fast boot off of the blade and the full ssd for all else!

    Ross Elkins -

  4. lLXyIR2flmAoZYtJ
    lLXyIR2flmAoZYtJ
    1VjZxwDRxkZGHBei
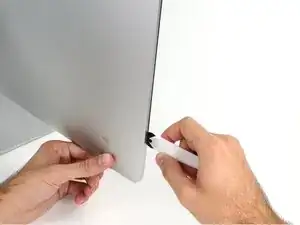
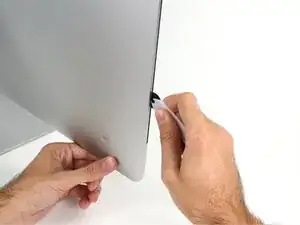
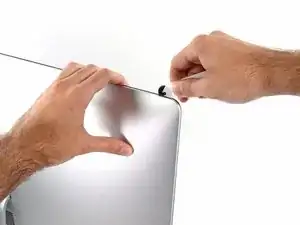
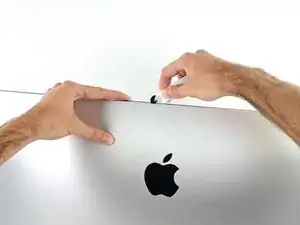
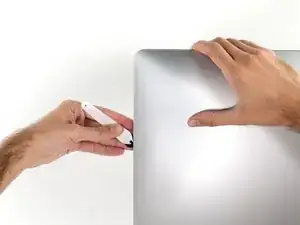
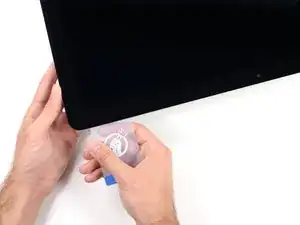
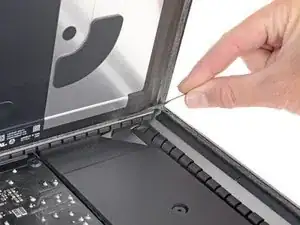
    • Comenzando a la izquierda de la pantalla, cerca del botón de encendido, inserta la herramienta de apertura de iMac en el espacio entre el panel de vidrio y la carcasa trasera.

    • El centro de la herramienta de apertura de iMac evitará que empujes la rueda demasiado lejos. Si usas una herramienta diferente, inserte no más de 3/8 "en la pantalla. De lo contrario, corres el riesgo de cortar los cables de la antena y causar daños graves.

    • ¡Sé gentil! El vidrio puede romperse si se hace palanca demasiado. Usa un secador de pelo para calentar los bordes y afloja la cinta si la temperatura ambiente es baja.

    Always use a hairdryer!! I cracked my glass

    8bit !!! -

  5. q3DRspiqEjuFxgCN
    q3DRspiqEjuFxgCN
    iCIN52QoBl3OSb6Z
    XxXjXdcFgFKcwebo
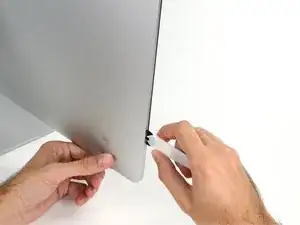
    • Usa la herramienta como un cortador de pizza: enróllala a través del espacio y cortará el adhesivo de espuma por el centro.

    • Asegúrate de empujar siempre con la manija detrás de la rueda de corte. Si tiras, la rueda podría salir del mango.

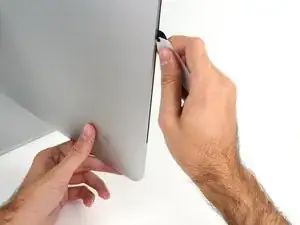
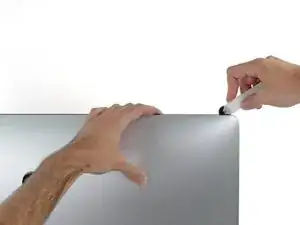
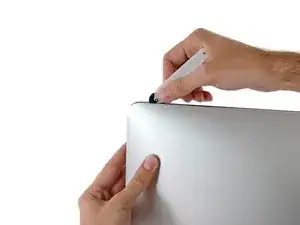
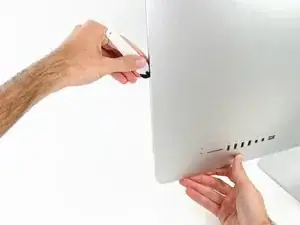
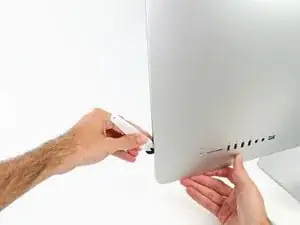
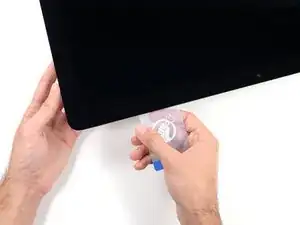
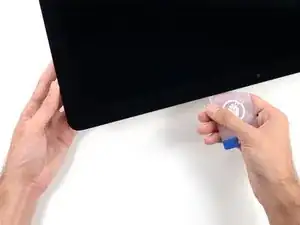
    • Ejecuta la herramienta hacia arriba a lo largo del lado izquierdo de la pantalla.

  6. vxDgcmqUtQlSsP2J
    vxDgcmqUtQlSsP2J
    DclVW5XnhQLHXKLH
    yEeTWsNVKZWwY4wC
    • Continúa ejecutando la herramienta en la esquina superior izquierda.

  7. IGjiVeV2qMlPFjxo
    IGjiVeV2qMlPFjxo
    q2QGyKWGiqL4KJI1
    • Corta el adhesivo a lo largo de la parte superior izquierda de la pantalla.

  8. XADEwykRUWgZNaKi
    XADEwykRUWgZNaKi
    Gy2L2NEQNABHTJKk
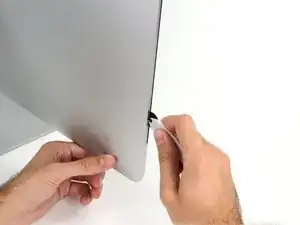
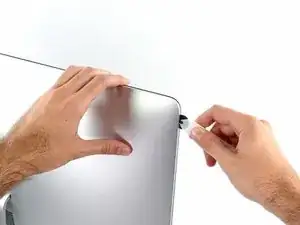
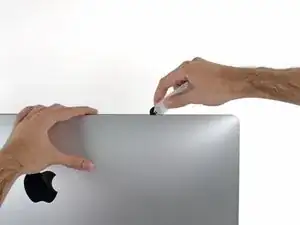
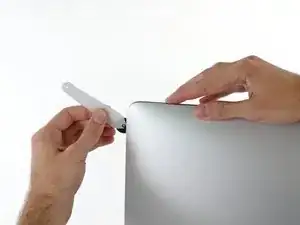
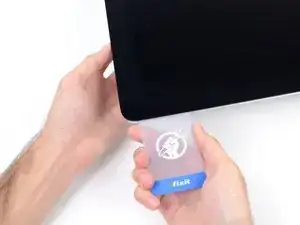
    • Continúa por la parte superior de la pantalla.

    • Es posible que desees ejecutar la herramienta de un lado a otro a través de lo que ya ha cortado varias veces, para asegurarse de separar la mayor cantidad de adhesivo posible.

  9. VIOSQOTIDCMkBXCd
    VIOSQOTIDCMkBXCd
    G6WL6LwKnmU4iroY
    QYGjK5rCFLbXb3Qg
    • Empuja la herramienta alrededor de la esquina superior derecha de la pantalla.

  10. sbN34h2LCe1hAMgV
    sbN34h2LCe1hAMgV
    4jyREp3qpSKjKIIg
    • Mueva la herramienta hacia abajo a lo largo del lado derecho de la pantalla.

  11. sTI1wGwtH1grQmgO
    sTI1wGwtH1grQmgO
    HS5XEQmVYcECrOaG
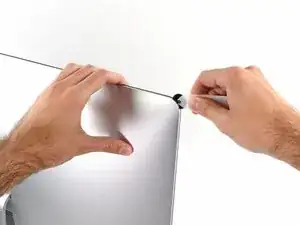
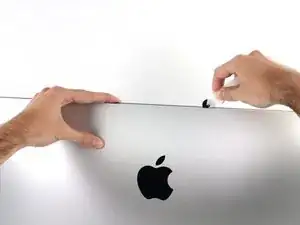
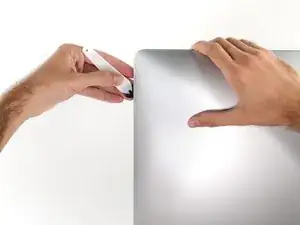
    • Termina de empujar la herramienta de apertura hacia la parte inferior del lado derecho de la pantalla.

    • En este punto, querrás volver a ejecutar la herramienta en toda la pantalla, para asegurarse de cortar la mayor cantidad de adhesivo posible.

  12. RTJ4GtGmMD5uIEJh
    RTJ4GtGmMD5uIEJh
    kt1O3uj3QfiSMPoV
    3LsFsjkUGlXdNkXp
    • Mientras que la herramienta de apertura corta la mayor parte del adhesivo, la pantalla todavía estará ligeramente adherida a la carcasa. Será necesaria una tarjeta de plástico para liberar el último de este adhesivo.

    • Coloca el iMac boca arriba sobre una mesa.

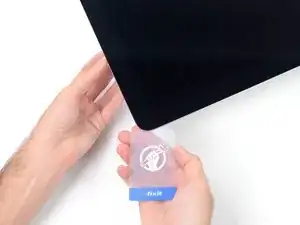
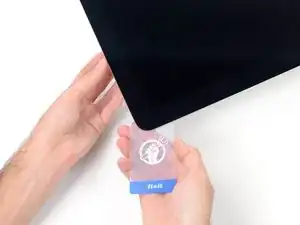
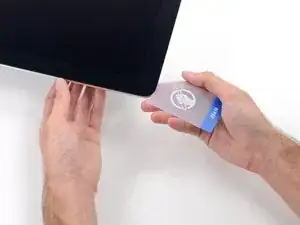
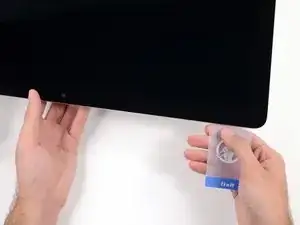
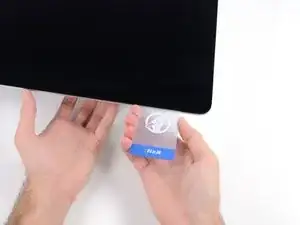
    • Comenzando desde la esquina superior derecha del iMac, coloca una tarjeta de plástico entre la pantalla y el marco.

    • Ten cuidado de no insertar la tarjeta plástica más de 3/8 ", o podrías dañar los componentes internos.

    Don't forget to place the mac face up on the table. Unlike older models, there is no more flap at the bottom holding the display in place. If you do these steps with the Mac upright, the screen will pop out, hit your table, and shatter :( Don't ask me how I know.

    John M -

    So sorry. Thanks for that caution.

    Ted Horodynsky -

    Using suction cups (the ones that were made for removing the magnetic front glass on the 2011 and earlier iMacs) work well too. Place one in each top corner, while the Mac is lying face up on a table, and gently pull and it will separate the display from the main body. You might need to do a little more slicing around the edges if you did not get all the way through the first time with the roller. Then you can lift the display up at an angle to disconnect the cables.

    Peter Hillman -

    This was a great idea, worked well for me. Thanks!

    Florin -

  13. CAOhMNI4p5JGUSxH
    CAOhMNI4p5JGUSxH
    DcZsndbhPJvQEXcN
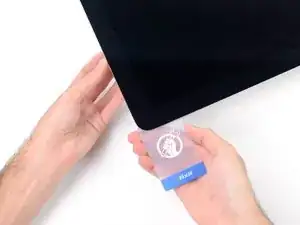
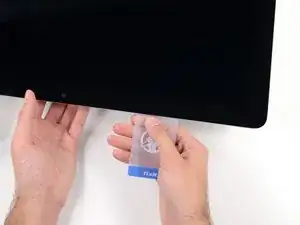
    • Gira suavemente la tarjeta de plástico hacia los lados para crear un espacio entre la pantalla y el marco.

    • Muévete lentamente y ten cuidado de no estresar demasiado el cristal de la pantalla; solo necesitas hacer un espacio de aproximadamente 1/4 ".

  14. 2i6VCJEZEQJjRAe4
    2i6VCJEZEQJjRAe4
    EKq3qJ4K11BdEByb
    T3tacDNMqHrTGNWg
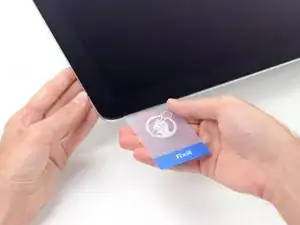
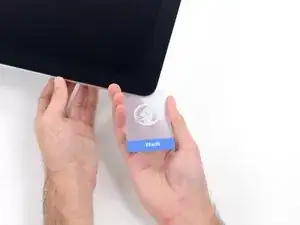
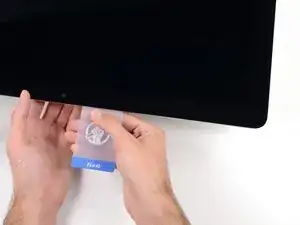
    • Desliza la tarjeta hacia el centro de la pantalla para cortar el adhesivo restante a lo largo de la esquina superior derecha del iMac.

    • Asegúrate de detenerse antes de la cámara iSight, o puedes dañarla.

  15. wQERHWdpfWs1XOgE
    wQERHWdpfWs1XOgE
    5UWkeELY6pQH3NFW
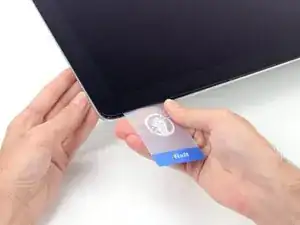
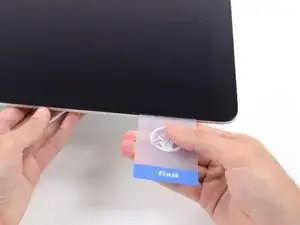
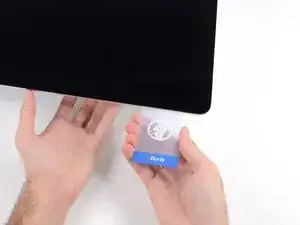
    • Vuelve a colocar la tarjeta de plástico en la esquina superior derecha y deja que permanezca allí para evitar que el adhesivo se vuelva a colocar.

  16. EZXvkfwJOBpSYIGk
    EZXvkfwJOBpSYIGk
    GSZKR1lbwrWhLwOU
    dOKjiA5VvyekxdI2
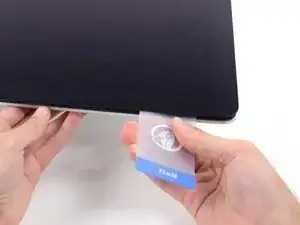
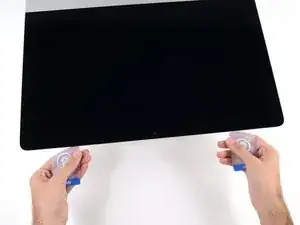
    • Inserta una segunda tarjeta de plástico en el espacio entre la pantalla y el marco ubicado en la esquina superior izquierda del iMac.

  17. qX1qFvFNr6TFKwG4
    qX1qFvFNr6TFKwG4
    FXVtoJOGxtCAlVoQ
    • Gira suavemente la tarjeta hacia arriba, aumentando ligeramente el espacio entre la pantalla y el marco.

    • Al igual que con el otro lado, gira lentamente para permitir que el adhesivo se separe y ten cuidado de no sobrecargar el cristal de la pantalla.

  18. c6X1bJH5UoyVj3JX
    c6X1bJH5UoyVj3JX
    LoDCrDsP2qvnxNSA
    iI6qGV3hZ5mfJmfY
    • Desliza la tarjeta de plástico hacia el centro, deteniéndose nuevamente justo antes de la cámara iSight.

  19. NtIc2CuYM4tYdfVl
    NtIc2CuYM4tYdfVl
    DYKiZ46YtHUNBJpB
    • Vuelve a colocar la tarjeta de plástico en la esquina superior izquierda.

  20. mabnnjap5BGBwNCw
    mabnnjap5BGBwNCw
    2iYBEleZtKBCSqD4
    I2ivlTNZbwtjcNNT
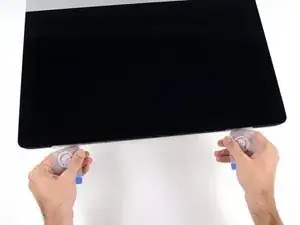
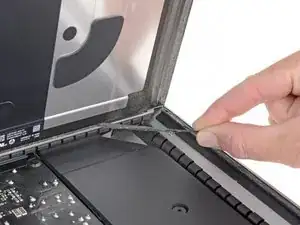
    • Con ambas tarjetas de plástico insertadas como se muestra cerca de las esquinas, gira suavemente las tarjetas hacia los lados para aumentar el espacio entre la pantalla y la caja.

    • Si hay secciones que parecen adherirse y no se separan, deja de torcer y use una de las tarjetas para cortar el adhesivo restante.

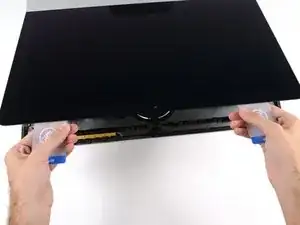
    • Comienza a levantar la parte superior de la pantalla desde el marco.

    • Solo levanta la pantalla unos centímetros: los cables de datos de la pantalla y los cables de alimentación todavía están conectados a la placa lógica.

    Ne forcez surtout pas et soulevez l’écran par les deux extrémités ! Il faut que tous les adhésifs soient bien découpés pour que l’écran se dégage du boitier sans effort. Toute torsion de l’écran peut entraîner une superbe fissure sur le verre :-/

    mf -

  21. Lq3NWNyJjC6ivpoe
    Lq3NWNyJjC6ivpoe
    YW6sgdgvnCF2BTt6
    • Mientras sostienes la pantalla con una mano, usa la otra mano para desconectar el cable de alimentación de la pantalla. Asegúrate de sacar el cable de la lengüeta de plástico y no tirando de los cables de color.

    • Levanta la pantalla lo suficiente como para tener fácil acceso al conector, pero no tanto como para estirar los cables y tensionar sus conexiones (aproximadamente 8 ").

    As seen in photo:

    bottom cable pulls up

    top cable cable pulls right, after safety clip opened

    airshack -

  22. PDABAgqTKP5Sfm6D
    PDABAgqTKP5Sfm6D
    R6ouHGmTXkOGDImj
    LntmZHgb1OOmYq3s
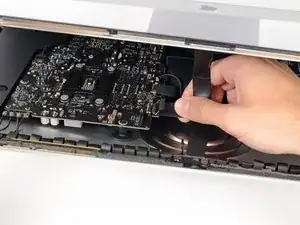
    • Usa la punta de un spudger para voltear el soporte de retención de metal en el cable de datos de la pantalla.

    • Tira con cuidado del cable de datos de la pantalla de su zócalo en la placa lógica.

    • Asegúrate de extraer el conector del cable de datos de la pantalla directamente de su zócalo.

  23. 22yPwf2Vt6ac6vgN
    22yPwf2Vt6ac6vgN
    hiCUZB1J4KJDVbed
    • Levanta la pantalla hasta una posición casi vertical.

    • En este punto, todavía hay una tira de adhesivo a lo largo de la parte inferior de la pantalla, que sujetará la pantalla al marco como una bisagra. Puedes aflojar este adhesivo moviendo la pantalla hacia arriba y hacia abajo varias veces.

    There are pull tabs at each side off the bottom edge to allow easy release of the tape

    DarrenG -

    DarrenG’s observation about the pull tabs saved me a ton of time trying to pry the display as per the original instructions. Thanks!

    lesfam5 -

  24. 6A4EHvapeoMdolHS
    6A4EHvapeoMdolHS
    U2m5h1GFWVElYlqZ
    MbYvBcby3LvdmdUa
    • Ten mucho cuidado de no tocar los cables del condensador o cualquier unión de soldadura expuesta en la parte posterior de la fuente de alimentación (encuadrada en rojo).

    • Toma la lengüeta pequeña al final de una de las tiras adhesivas de la pantalla del borde inferior y tira del adhesivo hacia la parte superior del iMac para quitarlo.

    • Repite este paso con la otra tira adhesiva y retírala.

    • Si cualquiera de las tiras adhesivas se rompe antes de quitarla, usa una tarjeta de plástico para cortar el adhesivo restante.

    The roller tool for slicing open the display works great for this step. Get in there like using the card and roll across the bottom to slice through the remaining adhesive.

    Peter Hillman -

  25. NZoUcXcRjHHrjqib
    NZoUcXcRjHHrjqib
    GyD3PrjUqBoNiCEp
    lU5PpvNXQBkB1Oyk
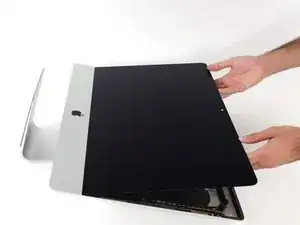
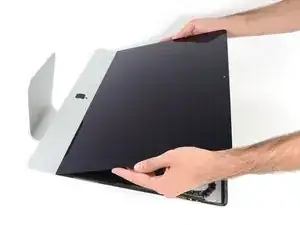
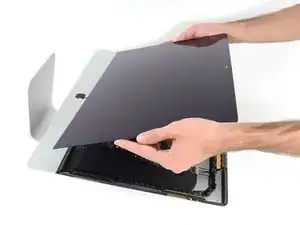
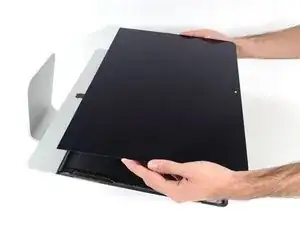
    • Levanta la pantalla del marco y retírala del iMac.

    • Puede ser necesario levantarlo lentamente de un lado para pelarlo contra el adhesivo restante.

    • Ten mucho cuidado al manipular la pantalla - es grande, pesada y está hecha de vidrio.

    • Durante el reensamblaje, dirígete a nuestra guía de adhesivos para pantallas para instalar el nuevo adhesivo.

    After removing the display, I also removed the 3 screws for the processor fan, disconnected the power connector for it and set the fan shroud aside. Disconnecting the remaining cable (similar style to 1 of the cables for the display) that is in the way of the RAM chips is all that's left to do. I was then able to access and quickly remove the two Apple-provided RAM chips, and replace them with 3rd party RAM. Turning the iMac on its side, so that it's in a position where you're physically putting the RAM chips DOWNWARD into their respective slots is the best way to go about uninstalling and reinstalling the chips. Using a narrow but long'ish plastic spudger tool is the best way to defeat the spring-tabs which hold the RAM chips in place. After removing the LCD display, changing the RAM is about a 10 minute process!! And I'd SURE prefer not to remove all the parts and risk damage to the iMac via the standard procedure listed. As per usual, take your time and work gently :-)

    Mitch K -

    Teardown the whole machine just to change RAM? While preparing to comment on this procedure I just noticed the comment made by Mitch K above. I ran pretty much the same procedure that he describes this afternoon (steps 1-23, 43-45, and step 55). Then I swapped out the original 2x4GB RAM chips for 2x8GB chips by reaching behind the logic board, releasing the spring retaining clips one chip at a time (starting with the chip further away from the logic board), pivoting the RAM towards the back of the machine, and then carefully sliding it out of the slot. I easily slid in the new chips and then pivoted them to lock them down. No hassle, no time lost. As Mitch K states above, not only is this “shortcut” method much quicker and easier, but it provides less risk of damaging cables, sockets and other delicate components during a total teardown. Why mess with the power supply board just to change RAM? I do not advise to follow the current iFixit.com procedure written by Sam Lionheart, regardless of user skill-level.

    nycsandor -

    THAT sounds one !&&* of a lot easier than the full tear down. I wonder if there’s a video of the process described by Mitch K? Adding that to these verbal instructions would really help relieve the apprehension and anxiety around the process! I do sometimes find the additional warnings, though appreciated from a “safety first” perspective, are somewhat overstated. It’s been a very long time since I shorted out RAM, or fried a PCB, or broke a connector, regardless of how finicky, fragile or awkwardly designed and positioned. I may have WANTED to break something, and the air might be blue for a few seconds, but inevitably, things go back together, the start button gets pressed, the startup chime sounds, and we’re in business. Practice DOES make as close to perfect we are likely to get.

    bruce -

    Mitch has the exact method that works a treat. You don’t need to follow steps 24-37 and also 40-63. Step 51 is the step to remove the camera cable and is needed. Steps 38 and 39 are for the Fan. That is all that is needed. Done quite a few like this.

    Be careful not to drop the RAM down the back of the logic board!

    By NOT removing all the other stuff you can avoid either damaging it or forgetting to plug in a cable.

    Charlie Nancarrow -

    I just trued this shortcut and it was not successful. I was not able to seat both RAM chips with this shortcut, and managed to slightly damage one of the retainer clips. I simply could not manipulate the chips into and out of the slots effectively without taking everything apart as described in the full set of steps.. I ended up retracing my steps and following the entire procedure, carefully, and that worked without incident. So, bottomline, it is definitely more work to follow all the steps but from my experience, it is decidedly safer. Your mileage may, of course, vary. It was successful in the end, and I swapped out the hard drive with an ssd during the same procedure and my machine is very, very much faster.

    jan -

    I have completed by following the Mitch K post and it is much easier than stripping down the whole thing, just be aware that to remove and replace the ram chips means working in a tight space, you need slim fingers and don’t be tempted to use force, take your time.

    Barrie Price -

    Well, I have slim fingers, but they are 60 years old, and they don’t work like they used to! LOL.

    Jan Hogle -

    Agree with Mitch K’s procedure. The only added tip I would throw in is to use two 45 degree tweezers with their plastic covers still installed to easily pop loose the RAM. I couldn’t get the plastic spudger tool to work myself, but the tweezers easily reach the RAM clips. Just make sure the plastic covers are installed and you won’t be in danger of scratching or shorting anything out.

    charlesnick -

    So thankful I discovered these comments. Saved me a TON of time! Thank you!!

    Adam Roberts -

  26. bpB3vigPkDEJaODx
    bpB3vigPkDEJaODx
    UHTtExuT2rlyLtDU
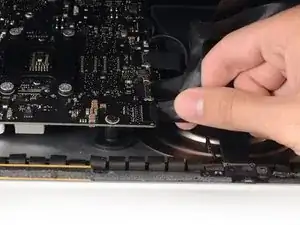
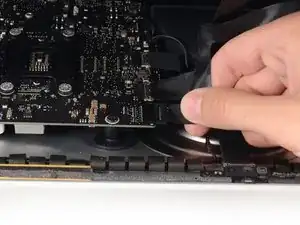
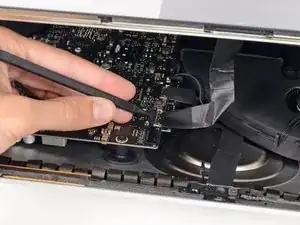
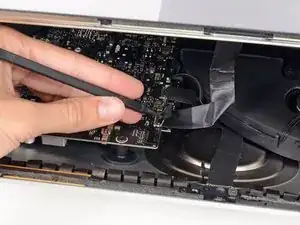
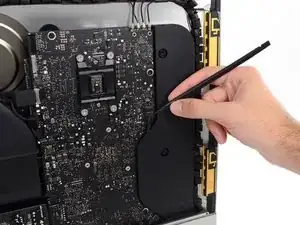
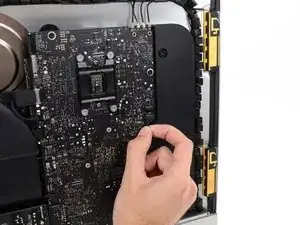
    • Usa un spudger para aflojar el conector del cable del altavoz derecho de su zócalo en la placa lógica.

    • Es útil empujar hacia abajo de a poco en ambos lados del conector para que "camine" fuera de su zócalo. Cuidado con los bordes de los conectores, se rompen con facilidad.

    • Tira del conector hacia abajo para removerlo de su zócalo.

    I highly recommend doing steps 27 and 28 first and then pull out the cable. It will give you more room on the right side of the cable to work with making this step that much easier.

    Eddie de la Rosa -

    The two corners of the connector are latches that need to be pushed toward the center of the connector to release. This is easily done with the pointed end of the spudger. Once the two corner latches are released, the connector comes apart easily.

    Fred Heineman -

  27. eCECFTFAxFIpXI2B
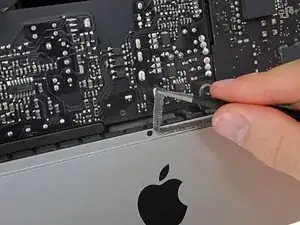
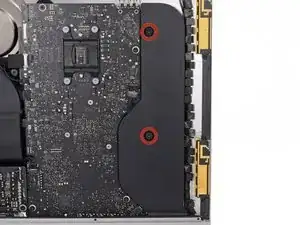
    • Remueve los dos tornillos T10 de 10 mm que aseguran el altavoz derecho a la carcasa posterior.

  28. ZZqU2JxJYESWeUCM
    ZZqU2JxJYESWeUCM
    VVVam54h3KT1T4jP
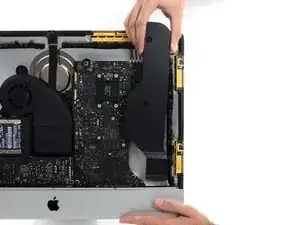
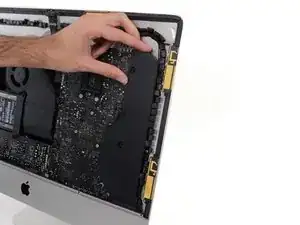
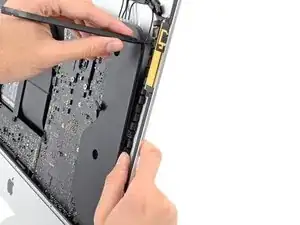
    • Tira de la parte superior del altavoz derecho fuera de la carcasa posterior, aproximadamente una pulgada (2,5 cm), para exponer el cable de la antena que corre por el lado derecho.

  29. 6QcZ5VEKCJgmeRCT
    6QcZ5VEKCJgmeRCT
    ZaV2LVgFyHTlDiiE
    5EQPXsfOcYVgq1pW
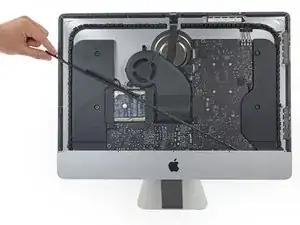
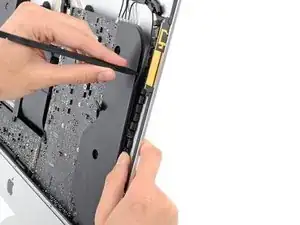
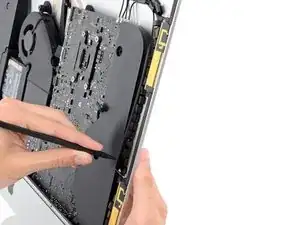
    • Inserta la punta de un spudger entre el altavoz derecho y el cable de la antena que está dentro del lado derecho del altavoz.

    • Corre el spudger hacia abajo por todo el lado derecho del altavoz para quitar el cable de la antena de su ranura en el altavoz derecho.

  30. SUeeAI2YcIEFbu5C
    SUeeAI2YcIEFbu5C
    EIiSYybDS5fUSvRq
    VTDXemYXPxyIVaBw
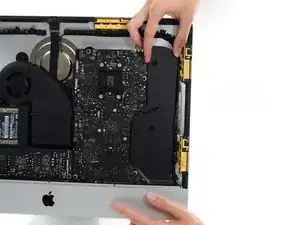
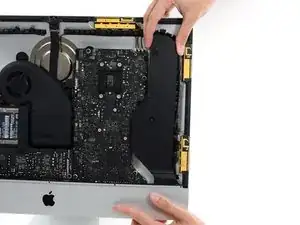
    • Tira el altavoz derecho hacia arriba más o menos una pulgada (2,5 cm), hacia la parte superior del iMac.

    • Levanta el altavoz derecho hacia arriba y quítalo del iMac. Esto puede requerir un poco de fuerza, con ambas manos y meciendo el altavoz hacia la derecha y a la izquierda para que salga.

    Th HP is VERY HARD to take off in this thin place

    bruno -

Conclusión

Para re ensamblar tu dispositivo, sigue estas instrucciones en orden inverso y usa nuestra Guía para tiras adhesivas para volver a pegar el vidrio de la pantalla.

Sam Goldheart

Miembro Desde 19/10/12

457951 Reputación

0 comentarios