Introducción
¿Escuchas algo? ¿No escuchas nada? Usa esta guía para reemplazar el altavoz izquierdo en tu MacBook Pro Retina Mediados de 2015 de 15"
Ten en cuenta que el altavoz izquierdo está a la izquierda de la máquina mientras la utilizas y a la derecha cuando trabajas en ella.
-
-
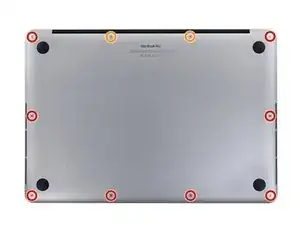
Quitar los siguientes tornillos pentalobe P5 que sujetan la cubierta del MacBook Pro:
-
Ocho 3.1 mm
-
Dos 2.3 mm
-
-
-
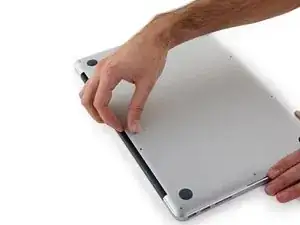
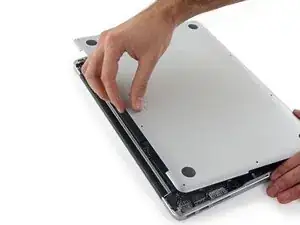
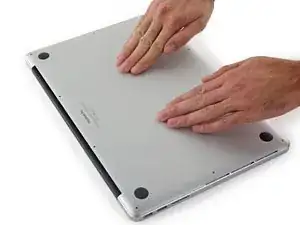
Levantando desde el borde más cercano a la articulación de la tapa, levanta la cubierta del Macbook Pro.
-
-
-
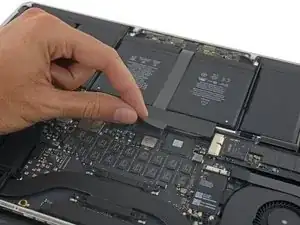
Usando el extremo plano de un spudger, levanta suavemente el conector de la batería directamente fuera de su zócalo en la placa lógica.
-
Dobla los cables de la batería hacia afuera y fuera del camino, asegurándose de que el conector de la batería no entre en contacto accidentalmente con la placa lógica.
-
-
-
Usa una palanca Spudger antiestático o pinzas para desconectar los tres conectores de la antena Airport y doblarlos hacia arriba y quitarlos del camino.
-
-
-
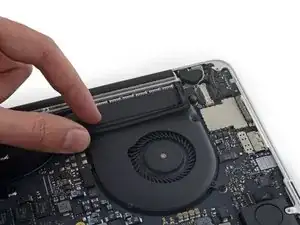
Desprende el cobertor de goma derecha hacia arriba y fuera del ventilador y dóblalo colocándolo hacia un lado.
-
-
-
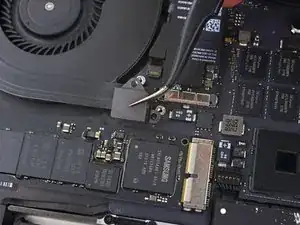
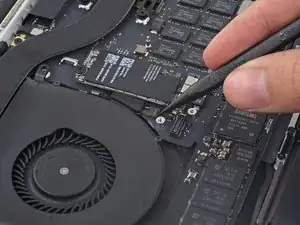
Usa la punta de un spudger para sacar el conector del cable de la cámara de su zócalo en la placa lógica.
-
-
-
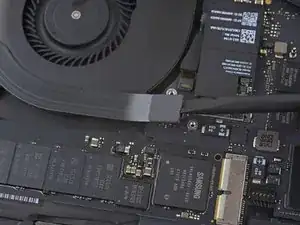
Usa los dedos para sacar los cables AirPort / Camera del ventilador.
-
Desengancha con cuidado los cables de la guía de cables de plástico
-
-
-
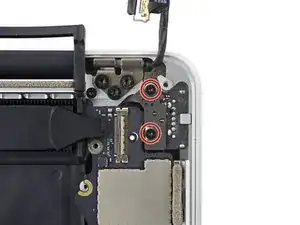
Remueve los cuatro tornillos Torx T5 de 2.2 que sujetan las tapas del conector de cable de placa de E/S.
-
-
-
Remueve la tapa del conector izquierdo.
-
Usa el extremo plano de un spudger para hacer palanca y levantar el extremo izquierdo del cable de placa E/S de su zócalo en la placa lógica.
-
-
-
Remueve la tapa del conector derecho.
-
Usa el extremo plano de un spudger para hacer palanca y levantar el extremo derecho del cable de placa E/S de su zócalo en la placa lógica.
-
-
-
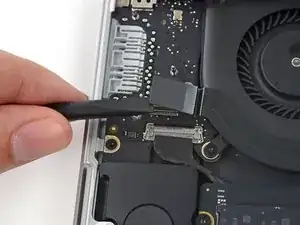
Separa el cable de la placa de E/S del adhesivo que lo sujeta al ventilador.
-
Retira el cable.
-
-
-
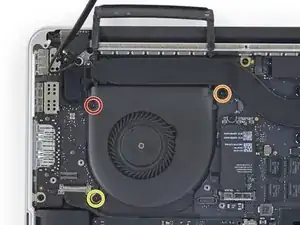
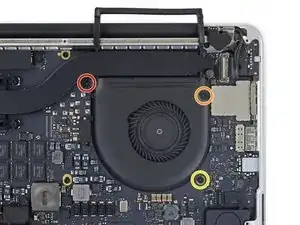
Usa un destornillador Torx T5 para quitar los siguientes tres tornillos que sujetan el ventilador derecho a la placa lógica:
-
Un tornillo de 5,0 mm con un hombro de 2,0 mm de largo
-
Un tornillo de 4,0 mm con cabeza ancha
-
Un tornillo de 4,4 mm
-
-
-
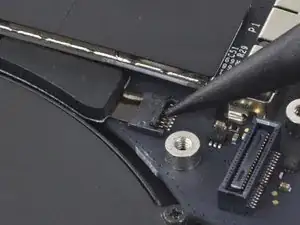
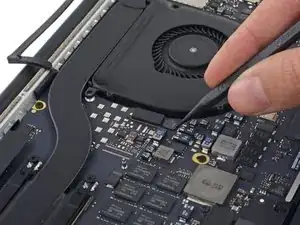
Usa la punta de un spudger para levantar la aleta de retención del zócalo ZIF del cable plano del ventilador derecho.
-
-
-
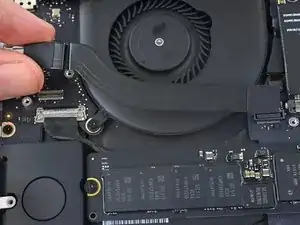
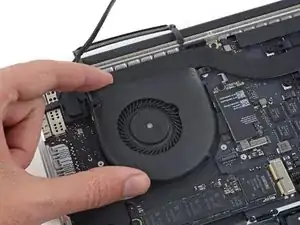
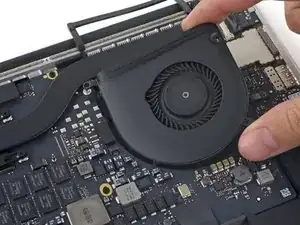
Levanta el ventilador y empújalo suavemente hacia el borde posterior del MacBook para liberar el cable del ventilador de su zócalo.
-
Remueve el ventilador.
-
-
-
Remueve los siguientes tres tornillos que sujetan el ventilador derecho a la placa lógica
-
Un tornillo Torx T5 de 4.0 mm con una cabeza ancha.'
-
Un tornillo Torx T5 de 5.00 mm con un hombro de 2.0 mm de largo
-
Un tornillo Torx T5 de 4.4 mm
-
-
-
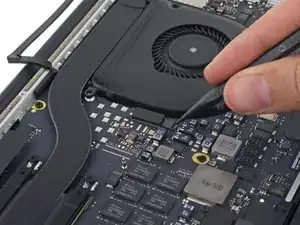
Usa la punta de un spudger para levantar la aleta de retención del zócalo ZIF del cable plano del ventilador izquierdo.
-
-
-
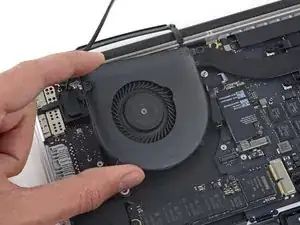
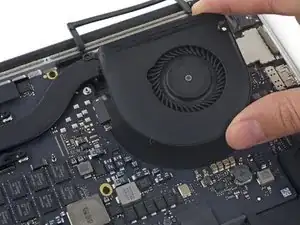
Levanta el ventilador y empújalo suavemente hacia el borde posterior del MacBook para liberar el cable del ventilador de su zócalo.
-
Remueve el ventilador.
-
-
-
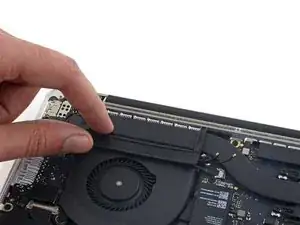
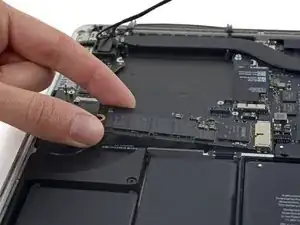
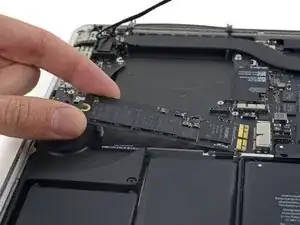
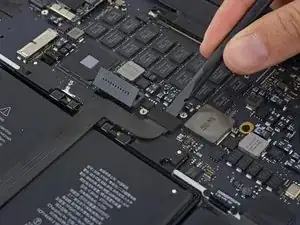
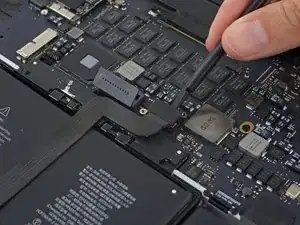
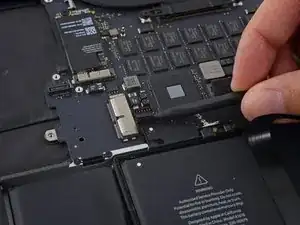
Levanta el extremo del SSD lo suficiente para pasar por encima del altavoz directamente detrás del SSD.
-
Tira del SSD para sacarlo de su zócalo en la placa lógica.
-
-
-
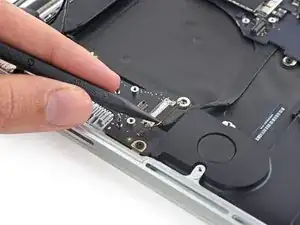
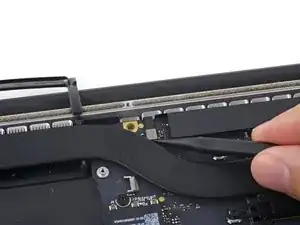
Usa la punta de un spudger para levantar el mecanismo de bloqueo en el conector de la placa de E / S.
-
Voltea el spudger y usa el extremo plano para deslizar el cable E/S fuera del conector.
-
-
-
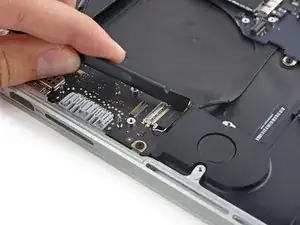
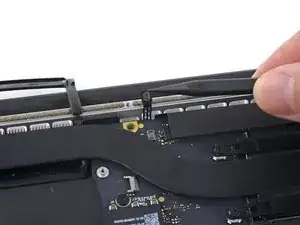
Levanta levemente el borde interior de la placa E/S y jálala hacia el centro de la MacBook, lejos del lado de la caja.
-
Remueve la placa E/S
-
-
-
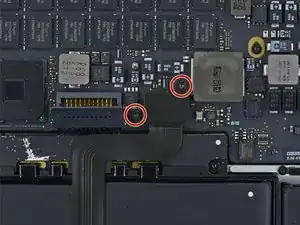
Remueve los dos tornillos Torx T5 de 2.2 mm que sujetan la tapa del conector de cable del panel táctil a la placa lógica.
-
Remueve la tapa.
-
-
-
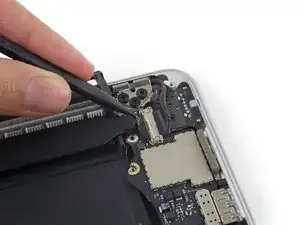
Utiliza el extremo plano de un spudger para desconectar el conector del cable del panel táctil de su zócalo en la placa lógica.
-
-
-
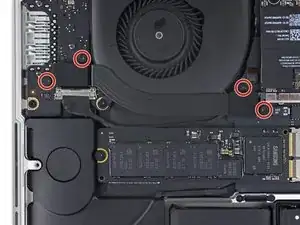
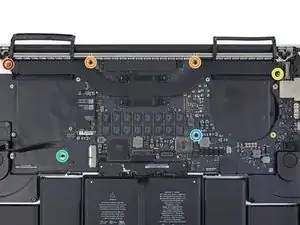
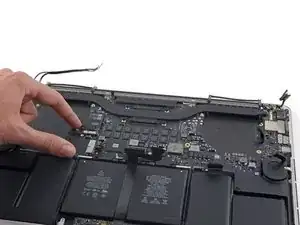
Remueve los siguientes seis tornillos que sujetan el ensamblaje de la placa lógica a la caja superior.
-
Un tornillo Torx T5 de 3.8 mm
-
Dos tornillos Torx T5 de 5.7 mm
-
Un tornillo Torx T5 de 5.6 mm (este es de plata y tiene una cabeza más alta que los otros)
-
Un tornillo Torx T5 de 2.6 mm
-
Un tornillo Torx T5 de 3.2 mm
-
-
-
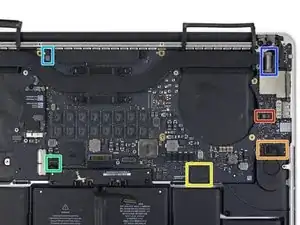
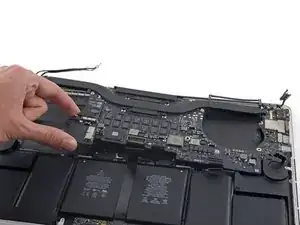
Los siguientes pasos detallarán la desconexión de estos seis conectores. Asegúrate de leer cada paso ya que estos conectores vienen en estilos diferentes que se desconectar de forma diferente.
-
Cable del micrófono
-
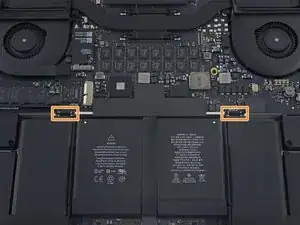
Cable del altavoz izquierdo
-
Cable de datos del teclado
-
Cable del altavoz derecho
-
Cable de luz posterior del teclado
-
Cable de datos de pantalla
-
-
-
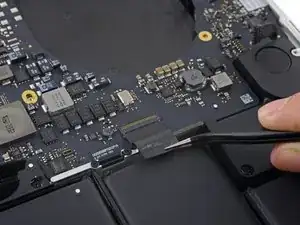
Usa la punta de un spudger para voltear la lengüeta de retención en el zócalo ZIF del cable de cinta del micrófono.
-
Jala y retira de su zócalo el cable de cinta del micrófono, paralelo a la placa lógica.
-
-
-
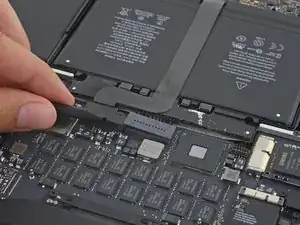
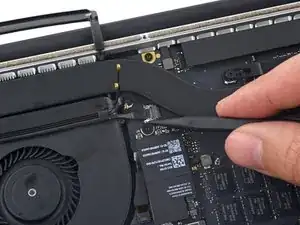
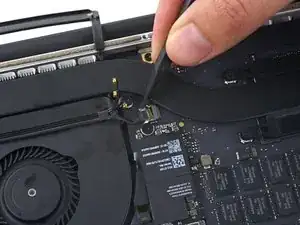
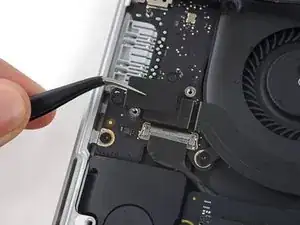
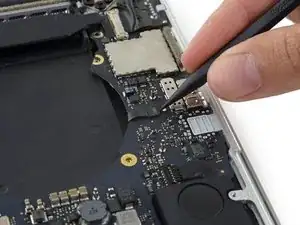
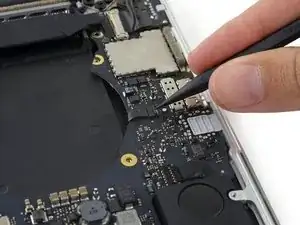
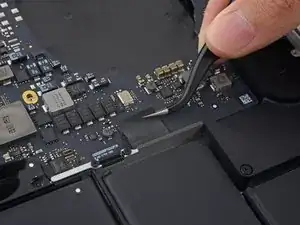
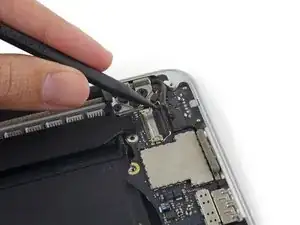
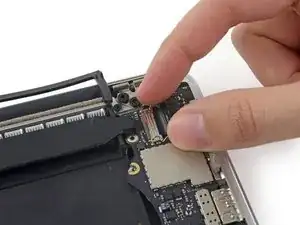
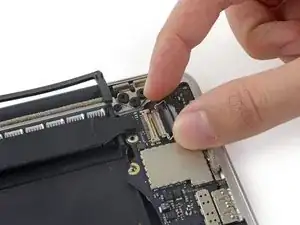
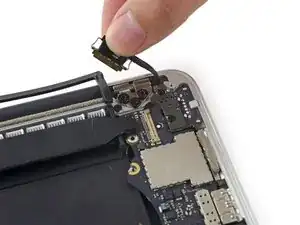
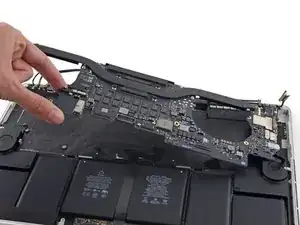
Utiliza el extremo plano de un spudger para levantar el conector de altavoz fuera de su zócal en la placa lógica.
-
Con cuidado dobla el cable hacia arriba y fuera del camino de la placa lógica.
-
-
-
Usa la punta de un spudger para voltear la lengüeta de retención en el zócalo ZIF del cable de datos del teclado.
-
Tira el cable de datos del teclado fuera de su zócalo ZIF. Asegúrate de tirar paralelo a la placa lógica y no directamente hacia arriba.
-
-
-
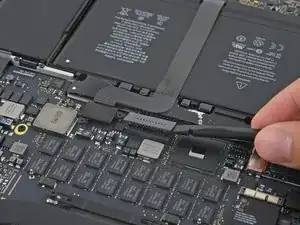
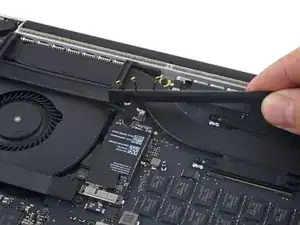
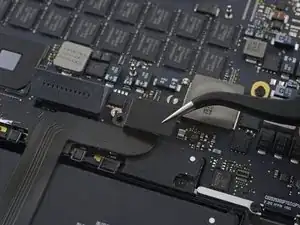
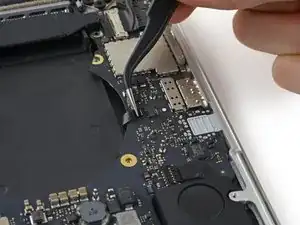
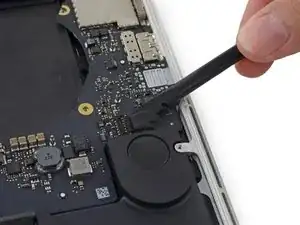
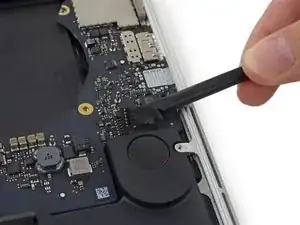
Usa la punta de un spudger para levantar el conector de altavoz derecho de su zócalo en la placa lógica.
-
Con cuidado dobla el cable hacia arriba y fuera del camino de la placa lógica.
-
-
-
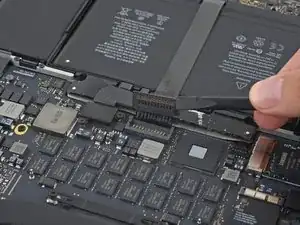
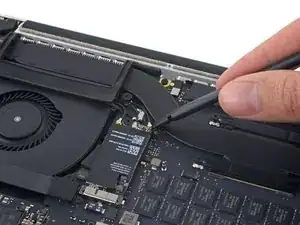
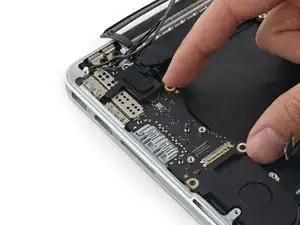
Utiliza la punta de un spudger para levantar el conector de luz posterior del teclado de su zócalo en la placa lógica.
-
-
-
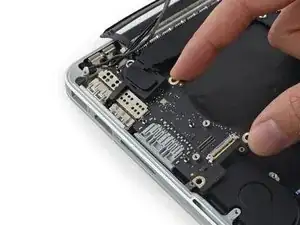
Utiliza la punta de un spudger para voltear el bloqueo de cable de datos de la pantalla y rotarlo hacia el lado del Power Port MagSafe 2 de la computadora.
-
-
-
Saca el cable de datos de la pantalla de su zócalo en la placa lógica.
-
Dobla cuidadosamente el cable de datos de la pantalla hacia la bisagra de la pantalla para exponer los tornillos de la placa MagSafe 2.
-
-
-
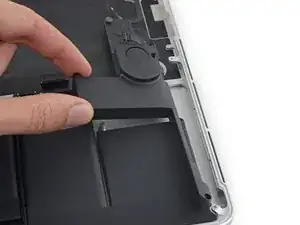
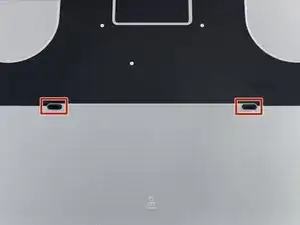
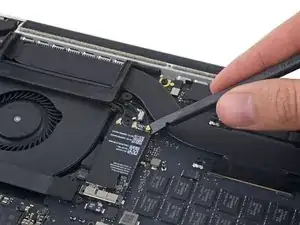
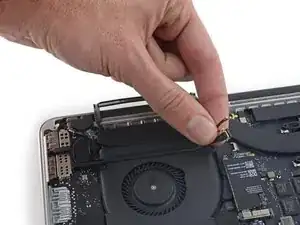
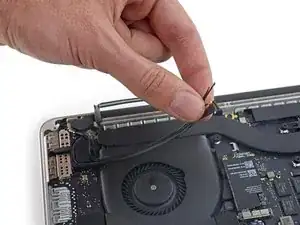
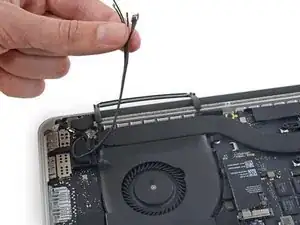
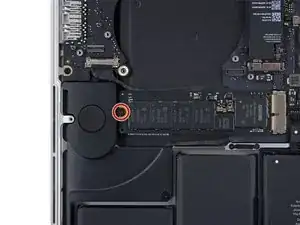
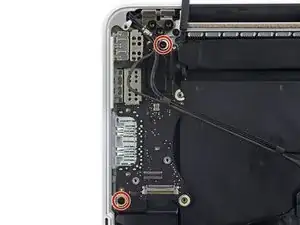
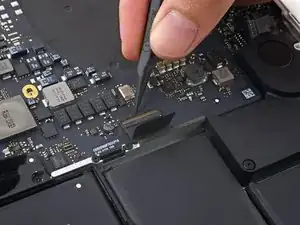
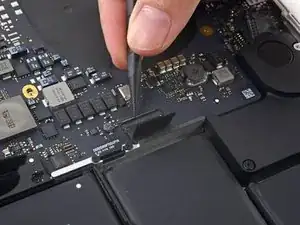
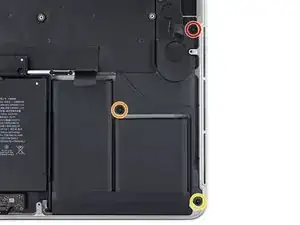
Remueve los siguientes tornillos que sujetan el altavoz izquierdo a la caja superior.
-
tornillo Torx T5 de 2.7 mm
-
Tornillo Torx T5 de 6,9 mm (con hombro de 4,5 mm)
-
tornillo Torx T5 de 5.6 mm
-
-
-
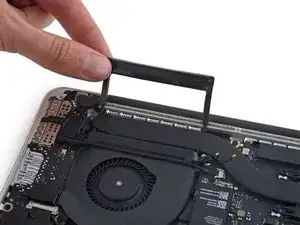
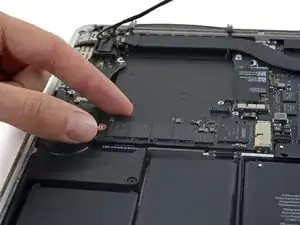
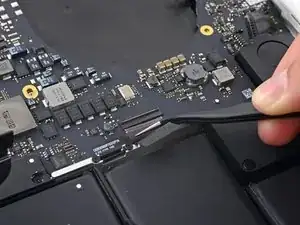
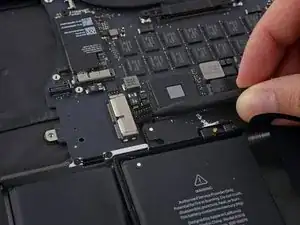
Remueve el altavoz izquierdo tirando ligeramente hacia afuera del lado de la caja superior y fuera desde abajo de la pestaña de aluminio que lo bloquea.
-


Para volver a ensamblar tu dispositivo, sigue estas instrucciones en orden inverso.
17 comentarios
Hi! Such an excellent guide you’ve made. But I wonder, if I want to replace only the speaker, should I disassemble most of the parts or just doing step 41-42? Because I’m too afraid that I’ll break those small wirings and connectors.. while my only problem is the speaker.
Unfortunately, you must disassemble the whole machine - the board is covering a portion of the speaker and therefore it is impossible to remove with the board still on there.
Hi, I just went through replacing the left speaker and the screen. So much more involved to get to the left speaker than changing the screen.
But the replacement speaker is only giving me highs and not bass. Anyone ran into this issue? could it be a faulty speaker? I bought it here on ifixit. I don’t suppose it is from a bad replacement procedure that I could have done. Either the speaker has sound or it doesn’t?
Thanks.
THIERRY -
No, have not noticed a decrease in bass from the replacement speaker. (bought used from eBay) Not that you’d want to disassemble everything again but there does seem to be an air intake opening near the end of the long section of the speaker. Perhaps it’s clogged? Also, the shape of the inner speaker is different on the replacement - original is round and the replacement is hexagon, though they both seem to sound the same.
Same. Replaced 2 speakers— one was low sounding, neither any bass. Returned, replaced again, same issue. At wits end.
Amazing guide that outlined every step off the way both visually and textually. The images really made the difference between other tutorials or videos I’ve followed in the past. Without the specific way each connector releases, I would have definitely broke something along the way. Another outstanding feature of this guide is color-coded keys of both where each screw is as well as it’s dimensions and tool needed.
Thank you for making a daunting task achievable. You saved me from both the expense and time visiting the Apple store entails.
The number of screws listed here is wrong on my model. I had four of the smaller size.
anonymous 1286 -
Just to add to my comment above (I can't edit it because it's anonymous), my MacBook Pro is a mid-2015 15in model 2.8GHz (A1398; EMC2881). For the bottom case it uses six 3.1mm screws, and four 2.3mm screws at the clutch/hinge side of the MacBook Pro. I tried using a 3.1mm screw at the clutch/hinge end, as described in the main article, and they don't fit. It has to be four 2.3mm screws.
anonymous 1286 -
The instructions below have you basically taking ALL of the guts out of case. I’ve been doing my own apple repairs since before ifixit was a thing and this one is a handful. My battery was swelling and I wanted to remove it before it burst or bent the case so I took it out without having a replacement and it occurs to me that aside from using the solvent (liquid) to remove the adhesive, you could probably do this only taking the trackpad ribbon out. I have mine reassembled now and will research the best battery to buy but I think installation will take about 5 minutes. See if you can slip a plastic gift card under the battery and wag/saw the adhesive out without the solvent before you go through all of this. It might work. Note, don’t bend or put too much stress on the battery and certainly don’t puncture it…
br1ansk -
Battery Recall for 15-inch MacBook Pro Retina mid-2015. Check Apple’s site for recalls, and put in your serial number. They replaced my swelling battery for free, regardless of warranty.
Steve -
As we are only replacing the battery, you can safely skip steps 6-26 and 28-48, no need to disassemble the computer to pull out the battery. Use nail polisher remover I was able to pull a super bloated battery out, without disassembling my MacBook.
John Sikking -
I qualified for the recall. These bloated batteries are dangerous! DO NOT, UNDER ANY CIRCUMSTANCES, PUNCTURE THE BATTERIES!
Thanks for the heads-up on the recall.
Datajockeys -
I’m having a problem trying to get the screws off. I have a set of pentalobe screwdriver set. I found one screwdriver that fits perfectly on one set of screws, but I am unable to unscrew it. I tried using some force pushing the screwdriver into the screw, but nothing happens. Any suggestions?
henry_k_wong -
All the screws on mine are the same length for some reason.
ccfman2004 -
I would recommend the first step is: Run the battery down to ZERO before doing any next step. This reduces risk to you, people nearby, to the MBP and greatly reduces the risk of fire. Step 2 should be: Double-check that the battery is at zero.
I like others listed below and on YouTube, disagree with these full tear down 70+ steps being the only focus. I get that I have to be careful not to get the acetone solvent near the speakers. I skipped 25+ steps by: tilting the MBP away from the speakers and using very little acetone solvent. More pressure with the plastic cards and only a few drops of solvent. While giving the full set of instructions is fine it should be very clear that you can (at the user’s own risk) do this.
Kenneth Schleede -
As above—I consider full disassembly to be far riskier to fragile cables and connectors than the risk for solvent spillage. I did steps 1-5 and 46-74. No issues. I HIGHLY recommend the iFixit magnetic Project Mat. It’s a white marker board surface gridded into squares and invaluable for labeling part sizes/steps in disassembly.
philtrit -
As above too. I benefitted from the advice. From step 51 onwards, I found a easier way using tip from China battery seller. Use a 2” width plastic scraper/plastic paint scraper to poke under the battery. Use moderate strength to poke and avoid rough handling of the battery so as not to puncture it. There is no need to pry the battery to avoid stressing it, just use a firm poking action under the battery and the double sided tape adhesive will yield. After 5 min of such poking, the entire battery pack can be removed without the hassle of pouring the adhesive remover from step 51 onwards. Get a scraper with a stronger handle so that it is more comfortable to poke.
https://www.aliexpress.com/item/32889670...
Emma Pn -
Heads up as you go…we (husband/wife team) had a notebook that when screws/covers were removed, we marked the step # and actually taped the screws into the notebook noted by the step number. This was very helpful on reassembly and we knew we would be using the exact screw into the original screw hole.
Ann Brainard -
After replacing the batteries myself, I wouldn’t even consider doing it again. Not that it’s difficult to do—that’s not the issue. The issue is aftermarket batteries. I’ve been using notebooks for well over 30 years, and never had satisfaction with aftermarket batteries.
Modern lithium batteries are an amazing technological feat, but a dangerous one. So even putting aside that I’ve never found any aftermarket batteries with quality anywhere near original, I learned “cheap” aftermarket lithium batteries are downright dangerous.
After doing research into what’s involved with manufacturing lithium batteries, I know there are so many corners to cut, you’ll end up with junk regardless of what you pay.
A week after replacing my batteries with those from iFixit, they showed clear signs of failure. Thank goodness iFixit refunded my money.
After having Apple replace my batteries, everything is back to like-new. For my $199, I got not only excellent batteries, but a new keyboard and trackpad as well. That’s it’s done!!!
AnnoniMoose -
I found an Apple Support link that said MBP battery replacement was $199, but the 2 Apple Stores near my house would not provide any appointments. Instead, I scheduled an appointment with and “Apple Authorized Service Provider” & that repair center quoted about $750 to replace the battery.
I refused, went home, & opened a chat with Apple Support.
After a lengthy & painful chat session where the Apple tech didn’t want to provide a battery replacement quote (he feared other issues with the MBPr), he finally gave me an Apple price of just under $650 to replace the battery.
Did you go into an Apple store, or mail it in? I’m struggling to reconcile a price of $199 to get a battery + keyboard + trackpad against what I was just quoted 2 weeks ago. The new track pad & keyboard might have been due to repair tech error. i.e. they trashed those repairing your batter & had to toss them in.
Bartt.Shelton@gmail.com -
I took mine in after being quoted for a $199 replacement of battery and keyboard, only to have the repair refused as they found a "water sensor" triggered and now I'm left with my AUD$5,000 laptop with messed up keys. Shame on me for not getting this repaired during COVID while under warranty. This is the first time I've truly been disappointed in Apple, but suppose it was bound to happen someday. I was quoted US$ 1479 to replace the battery and keyboard and the sensor (likely the logic board is replaced as well) if I were to send it in to the US repair center. Any chance these sensors can be triggered by humidity?
C0RT -
I 1000% recommend watching this video and performing the battery replacement without all these steps from this guide and without using the acetone solvent. https://www.youtube.com/watch?v=ImonCWcc... (15" inch Retina MacBook Pro A1398 Mid 2015 Disassembly Battery Replacement Repair)
The video is narrated well and the guy goes slow and zooms in where appropriate. Instead of removing all components, he simply removes the track pad cable, battery cable, and unscrews two of the speaker screws on each side. From there, you can lift up the speaker arms where the video guy uses a thin pry tool to push through the sticky tape. No solvent is needed except for residual sticky stuff leftover.
Instead of the thin pry tool, I just used the plastic cards that came with this ifixit kit. It takes a little force and wiggle/jiggle so take your time using the corner of the card to start.
This method makes a difficult 2-3hr job into a much easier 1hr job.
Spencer -
+1 for this approach! I watched the video that Spencer mentioned. It took me a little over an hour, and it was stress-free. https://youtu.be/ImonCWcc1xk
Chris Wicklas -
Another +1 - I followed the video pretty exactly (after having already gone through steps 1-5 here). I'm not sure it's necessary to clean off the adhesive residue as thoroughly as he demonstrates in the video, but the instructions were clear and the end results were good - trackpad still working fine and new battery already charged to 50%.
Jeff Zinn -
Glad I read these comments before plunging into the iFixit instructions.
+1 for skipping the iFixit instructions and using the youtube video linked by Spencer.
I followed the instructions and had my battery replacement done succesfully.
Instead of the metal spatula like thing he used - I used the plastic ifixit credit card things that came with my battery kit.
It took about 15 minutes of wiggling under the battery to free it from the adhesive but it wasn't too bad.
I did remove the residual adhesive as he indicated with isopropyl alcohol - but after finishing my installation I realized it was completely unnecessary. You can install the new battery over the residual gunk and skip that step.
picardo -
Yes! This YouTube tutorial works great and it was really easy to replace the battery. I needed about 75 minutes.
Perform steps 1-5,
Then skip to step 41.
In 41 + 43 do not unscrew the red marked screws.
In 42 an 45 just lift the speakers, do not remove them.
Skip 44
Up from 53, I did not use the glue remover, the plastic cards were enough.
In step 63 watch out to start from the middle. This prevents you from peeling up the lower „platform“.
Great job :-)
weekendiac -