Introducción

Usa esta guía para reemplazar el bisel de la cámara trasera, incluido el cristal de la cámara, en tu Samsung Galaxy S8.

Si tu pieza de repuesto no viene con adhesivo montado, también deberás comprar adhesivo para el bisel de la cámara trasera. Puedes comprar adhesivo precortado o cinta delgada de alta adherencia.

  1. duTdVEZBbUxEgWTJ
    • Abrir el dispositivo pondrá en riesgo tu sellado impermeable. Ten preparado adhesivo de repuesto antes de proceder o trata de evitar exposición a líquidos si vuelves a montar el dispositivo sin sustituir el adhesivo.

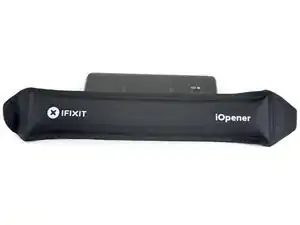
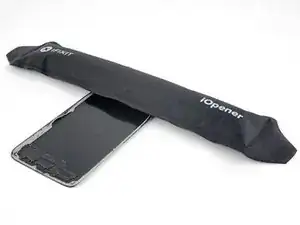
    • Calienta un iOpener y aplicalo a lo largo del borde curvado del S8 durante 2 minutos aproximadamente.

    • Necesitarás volver a calentar y aplicar el iOpener varias veces para alcanzar la temperatura suficiente. Consulta las instrucciones del iOpener para evitar sobrecalentamiento del dispositivo.

    • También se puede utilizar un secador de pelo, pistola de calor, o lámina caliente, pero ten cuidado de no sobre calentar el móvil -la pantalla OLED y la batería interna son susceptibles a daño por calor.

    • Mientras esperas que el adhesivo se ablande, lee el resto de instrucciones para saber dónde ejercer palanca.

    What type of adhesive should be used to seal? Or better said, what would you recommend.

    Ion Ion -

    I’d recommend precut adhesive designed for the rear cover. If that’s not available, thin, hi-bond double sided tape like 1 mm wide Tesa 61395 tape will work well.

    Adam O'Camb -

    Yes, different microwaves have different power levels (e.g., wattage) so one microwave may explode the iOpener after 31 seconds of heating whereas another microwave will barely warm it. It would be helpful to have a more precise target temperature. My microwave is fairly weak so I’m heating it for seven seconds for every two minutes against the phone. In theory, this should slowly add more heat than is dissipated into the phone and surrounding atmosphere.

    Brett Stime -

  2. 5eQKL1LDDUEWN5JH
    5eQKL1LDDUEWN5JH
    Wn66wqWcB1PZWeQV
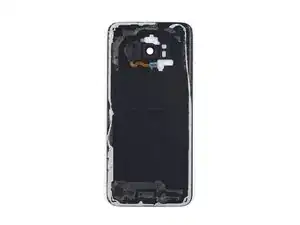
    • En los siguientes pasos irás cortando el adhesivo alrededor del borde del cristal del panel trasero.

    • El adhesivo del panel trasero está situado de la manera en la que aparece en la primera imagen.

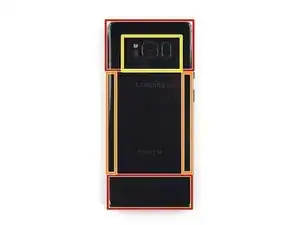
    • El patrón de adhesivo a tener en cuenta para hacer palanca, visto desde fuera es el siguiente:

    • Porción ancha de adhesivo

    • Porción fina de adhesivo

    • Evita hacer palanca aquí, para proteger el sensor de huellas

    Go clockwise (or counter-clockwise) around the border to avoid causing extra stress on the back. The bottom has a lot more adhesive than you think, towards the top-center.

    Michael M -

    Failing completely at this step. I’ve heated the opener like 5 times and the phone is hot to the touch, but I can’t get even the tip of the pick into the opening.

    r torrance andrews -

    Added a hair dryer to the effort and stil making no headway at all.

    r torrance andrews -

    Be careful. Insanely careful. If you think you are careful enough, this means you need to be even more careful. If you think it is not possible to be more careful, then be a little more careful and you might be able to remove the back cover without breaking it. Especially the bottom of the phone.

    pio -

  3. vQVjSJBeUsAvFFRY
    vQVjSJBeUsAvFFRY
    OSXJiDeoZlQkpUhv
    UHDguIARQ1sqnZdt
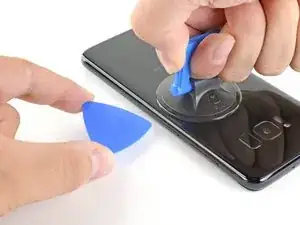
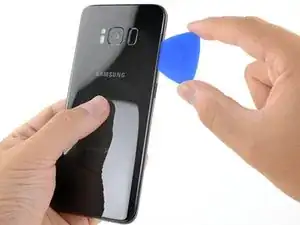
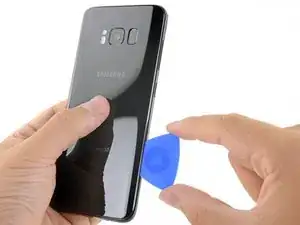
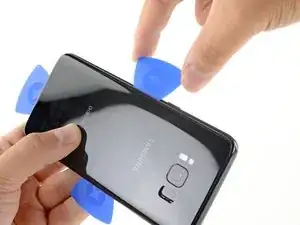
    • Una vez que el panel esté lo suficientemente caliente al tacto, coloca una ventosa lo más cerca posible del borde calentado, evitando la parte curvada.

    • La ventosa no aplica una buena sujeción en la parte curvada del cristal.

    • Si la tapa trasera del teléfono está rasgada, la ventosa no podrá adherirse. Intenta levantarla con una cinta resistente o pega con adhesivo instantáneo la ventosa y permite que se pega así puedes proceder.

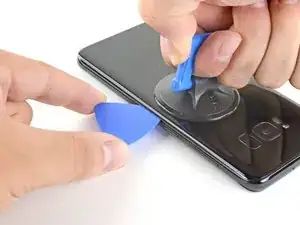
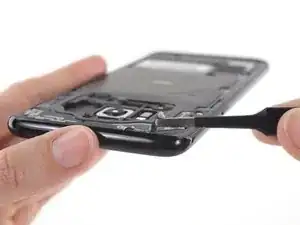
    • Levanta de la ventosa e inserta un spudger Haldberd o púa de apertura debajo del cristal trasero.

    • Debido a la curva del cristal, deberás tirar hacia arriba con la ventosa e introducir la herramienta plástica de forma paralela al plano del teléfono.

    We can't seem to get anything between the edges even after heating the back panel. Any tips?

    Megan Kennington -

    Hi Megan, unfortunately the adhesive is super tough on this one. I’d recommend carefully continuing to apply heat, very gradually so that you don’t accidentally overheat the battery. Eventually you should be able to get a little gap with the suction handle.

    Adam O'Camb -

    I’ve been attempting to get the adhesive to loosen for four hours now. Exactly how much time is this supposed to take? The pictures makes it look like it should be easy. The adhesive still hasn’t budged and I’m beyond frustrated.

    Lori Lucas -

    Hi Lori, sorry to hear the adhesive is being extra stubborn! If reheating and reapplying the iOpener isn’t working, you can try heating the edge with a hairdryer or heat gun. That way you can get more heat onto the edge faster, but be very careful not to overheat the battery inside.

    Adam O'Camb -

    I used a stanley knife - very carefully, after trying for several hours to get the adhesive to loosen. I bought another back cover with adhesive for the assmbley, which is the best option in my opinion. Just be careful not the scratch the case of the phone, and be prepared for the back glass cover to break when removing it.

    James wright -

    The manufacturers really want to make this impossible, huh… I’ve gone 3 years without ever cracking this phone and end up cracking the corner of the back trying to prise it open. Probably should’ve gotten a heat gun too. This is super tight.

    Benjamin Chaim -

    I am currently working on this. I have heated the phone to just barely to hot to hold. No matter how many times I've done this and pulled up with a suction cup I cannot get an edge to lift.

    Being that this is my second phone repair does anyone have advice on this? I've watched several YouTube videos and it looks so easy.

    DAVID LAWRENCE -

    I suggest you try to lift on the middle of an edge using the thinnest spudger you have. also as the edge is curved remember to insert it so to follow the curve. Hopes it helps

    Cajuteq -

    Our issue was that a small gap would open when using the iOpener, but not large enough to get spudger or opening picks in there (also tried hair dryer but same result). Luckily as a guitar player I had some very thin nylon picks that we were able to get in there, which opened up a large enough gap to get the spudger and opening picks in. From there, we were able to heat the other sides and guide the spudger around the entire edge to get the back glass off.

    First we used a Dunlop nylon .38 mm guitar pick, then a .60 mm pick, and that allowed us to get the spudger in.

    Dan Coleman -

    This is by far the hardest part of any tutorial that requires you to open the Samsung. The iOpener is totally useless on my opinion (it doesn’t get warm enough). What I did instead is use a hairdryer but it took me time before I could get the adhesive soft enough. Especially since I was not able to measure the temperature of the phone will warming it. Also I think that the halberd is not thin enough so I used a radiology sheet (don’t know the right word in English) to get into the phone and it was much more effective and time saving. Thank you for the tutorial and good luck !

    Thomas Alliot -

    Use a utility knife blade to work around the edges. Careful not to pry on the blade since you risk cracking the back

    Derek Gibson -

    I bought a back glass replacement kit with the battery kit since mine was cracked already. I used both iOpeners to uniformly heat the whole back along both long edges. I microwaved each pack twice over 10 mins. 5 mins apply, microwave, 5 minutes apply. That worked!

    William Mellema -

    Similar to other posts, this appeared simpler. I have a couple of tube socks filled with rice that we use a lot for a sore back. Put in microwave for 5 minutes and an amazing heat pack. So I thought I would try this instead of the iOpener as it just was not getting the phone warm enough. Wrapped the phone in the riced-filled-tube sock for a couple of minutes, to the point where I could at least pick it up and hold it. Also, I have the full IFIXIT kit, so I pulled out the jimmy. Viola. Got right in and then allowed me to use the halberd and picks to finish it off.

    kendrickcc -

    I was able to do this with the iOpener warming pad by microwaving for the suggested 30secs then leaving it on for 10 mins. repeated this process 2 more times for a total of 3 times @ 30 mins and used the suction tool and the picks to get it open. There is a considerable amount of adhesive on the tops and bottoms of the phone. So consider warming the whole phone before doing it.

    Note: if you already have a cracked back panel (like me) prior to starting the process, consider getting the replacement as the already cracked panel will crack even more as you are cutting away at the adhesive. Goodluck!

    Harry Williams -

    After over an hour of trying to use heat and the suction tool loosen the adhesive and try to get an opening on one of the edges, I used the blue spudger to see if it would slip thru the edge and it did. I was able to loosen the majority of the back glass but ended up getting excited and rushing and cracked the top corner. I was able to complete the battery replacement and use the cracked back glass. I’m going to order a replacement for that and that should be easier. Lesson to be learned, if any part of the back glass is getting a little tougher to loosen, hit it with heat again just to be safe. The rest of the replacement we pretty straight forward.

    MJH -

    The spudger provided in ifixit repair tool kit is not the same as the one used in this guide and can not be used in the same way as the spudger used in this guide. So I am pretty much winging it on the most critical point of this disassembly. This is extremely frustrating.

    Brent Neilson -

    I’ve repaired many iphones but this was my first attempt on a Samsung. I made no headway at all on opening the case and I’ve decided to just live with the battery being kind of weak. Even with a short life, I would much rather use this phone than an Iphone.

    r torrance andrews -

    I've tried 5 times in over the course of 4 hours to loosen the adhesive on this phone, and it won't budge. Unfortunately this kit is useless to me

    Emily Reese -

  4. PNGgVsAfoHFKoGAW
    • Una vez esté firmemente introducida la herramienta plástica vuelve a calentar y aplicar el iOpener para ablandar el adhesivo.

    svmesung is onoff and

    moo rayner -

  5. Ra1HfyL4GLKUMNiv
    Ra1HfyL4GLKUMNiv
    YqA1NY5ZQjWZxjhq
    • Desliza la púa de apertura hacia abajo por el costado del teléfono, separando el adhesivo.

    • Hazlo con cuidado, debes evitar salirte de la hendidura. Si se te dificulta, vuelve a calentar y aplicar el iOpener.

    Cracked my glass multiple times, do this very slowly and with more heat to each new area.

    Gary Mirams -

    Second on cracking the back glass. Go slow and apply heat to each side before trying to pry it open.

    Adam Huber -

  6. OkWBOCRUFBMDlSOt
    OkWBOCRUFBMDlSOt
    UEWtmZmdPuMkc2Ys
    NFji3IRvGGDBQGw1
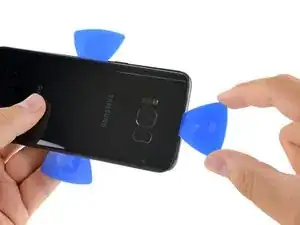
    • Repite el paso previo de calentado y corte del adhesivo en los tres bordes restantes.

    • Deja una púa plástica en cada borde del dispositivo mientras continúas para evitar que se vuelva a unir con el adhesivo.

    Petite erreur: le guide dit iPhone au lieu de S7 :)

    Nicolas Duthilleul -

    Bonjour Nicolas ! Merci pour la remarque ;-) Nous l’avons prise en compte et corrigé la traduction. La prochaine fois, n’hésitez pas à corriger directement en cliquant sur le bouton Traduire en haut à droite de l’étape.

    Claire Miesch -

  7. hUxsLOovT41ViJfH
    hUxsLOovT41ViJfH
    Dqamr2XLMUMVtgvs
    • El cable del sensor de huella conecta al teléfono con el cristal trasero, cerca de la cámara principal. El cable es muy corto y se debería desconectar mientras se retira el cristal trasero.

    • Mientras levantas el cristal trasero, asegúrate de que el cable naranja con el conector azul se ha desconectado.

    • Utiliza las púas para eliminar cualquier resto de adhesivo que haya quedado y abre con cuidado el teléfono.

    • Si el cable del sensor de huella está conectado o trabado, no continúes abriendo el teléfono. Desconecta el conector antes de continuar.

    • Durante el montaje, para reconectar el cable del sensor de huella alinea el cristal trasero hasta que el cable del sensor esté sobre el conector de la placa. Entonces, usa la parte plana del spudger para presionarlo cuidadosamente hacia abajo y conectarlo.

    • Quita el cristal del teléfono.

    For reassembly, if the fingerprint scanner is removed from the back cover: it’s much easier to place the fingerprint scanner in the small compartment on the back of the phone, connect it and then finally put the replacement back cover on. The adhesive on the inside of the back cover will get connect to the fingerprint scanner and hold it tightly.

    Brian Hoffmann -

    I wish I saw this comment earlier because it's absolutely correct. I hope iFixit remedies this because it is incredibly difficult to connect the sensor when it's already adhered to the glass. It took me a good while and I ended up using some tape to keep the back glass aligned while I used the spudger to push blindly until it snapped into place. The only way I knew it worked was because I tested the sensor before fully sealing the glass.

    Preston Steimel -

    The NFC antenna and coil assembly might get stick to the back cover due to adhesive spreads while trying to pry the back cover to open the phone. Take a look inside to ensure the assebly has not got sticked. If so, try using a credit card like plastic to get it peeled of from back cover without breaking the assembly always paying attention to the fingerprint sensor as well.

    dcode -

    Reconnecting this cable seems like it would be very tricky: how can you get the pieces close enough together to make the connection without having the perimeter adhesive start to connect the front and back? It seems like that adhesive could easily get messed up at this point.

    r torrance andrews -

    To remove the akku, high temperature was NOT constructive!! I used ethanol (cc.) instead and it worked in between 2 minutes. I think it´s also better to open the coverage in this way. Instead of heating it.

    Franz Gassner -

  8. litWaKDHCNVRXhyM
    • Para reinstalar la tapa trasera:

    • Usa unas pinzas para pelar algún residuo de adhesivo en el chasis del teléfono. Después limpia las areas de adhesion con alcohol isopropilico de alta concentración (al menos 90%) con una tela libre de pelusa para preparar la superficie para el nuevo adhesivo.

    • Pela el protector del adhesivo en el nuevo cristal trasero, alinea cuidadosamente el borde del cristal en contra del chasis del teléfono, y presiona firmemente el cristal en el teléfono.

    • Sigue esta guía para reinstalar el panel anterior o un panel sin adhesivo preinstalado.

    • Si lo deseas, puedes reinstalar la cubierta sin sustituir el adhesivo. Retira cualquier gran acumulación de adhesivo que pueda impedir que la cubierta esté nivelada. Después de la instalación, calienta la tapa y aplica presión para asegurarla. No resistirá el agua, pero el adhesivo normalmente es lo suficientemente fuerte como para aguantar

    • Puede que también necesites transferir el marco de la cámara hacia tu nueva parte. Si ese es el caso sigue nuestra guia en como remplazar al marco de la camara

    Bonjour,

    Vous parlez d’ajouter de l’adhésif, comment et où le trouve-t-on cet adhésif ?

    Difficile à appliquer ?

    Cordialement,

    Stéphane

    Steph D -

    Mille excuses, je viens de voir les “adhesive strips” :)

    Steph D -

    I broke the rear glass trying to get all the adhesive off! Be very careful!!

    jimhunz -

    Be careful with the NFC Antenna/Charging Coil Assembly. It’s covered in a black wrapping that can look like adhesive. Don’t scratch too hard with the spudger, the wrapping will come off!

    Michael M -

    Hello, I appreciate that tuto, very detailed for a somewhat subtle job . Is it possible to use one of the 7000 or 8000 glues in place of the adhesive Stickers ? Thanks

    Isaac OLEG -

  9. QWqWcMXBaYPWRqZM
    • Prepara un iOpener y aplícalo al bisel de la cámara trasera en la parte superior del cristal trasero durante al menos dos minutos.

    • Es posible que debas recalentar y volver a aplicar el iOpener varias veces para que el teléfono se caliente lo suficiente. Sigue las instrucciones de iOpener para evitar el sobrecalentamiento.

    • También se puede usar un secador de pelo, una pistola de aire caliente o una placa caliente, pero ten cuidado de no sobrecalentar ni derretir los componentes de plástico.

  10. rk3MtUj3MWkYUAlI
    rk3MtUj3MWkYUAlI
    6jGBQ6nOwuvDWwgr
    e56YFGKF3ZnLtiuD
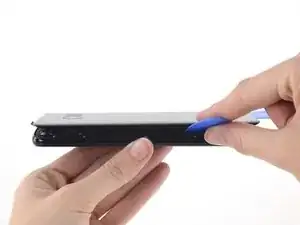
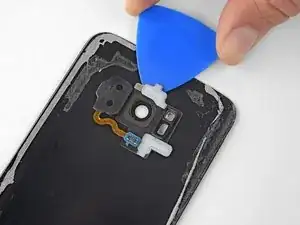
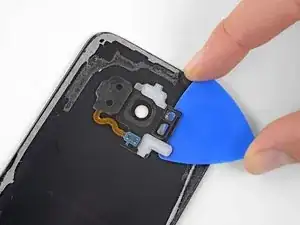
    • Inserta una púa de apertura debajo del borde superior del bisel de la cámara trasera.

    • Desliza la púa de apertura alrededor de los bordes del bisel de la cámara para separar el adhesivo que lo sujeta al cristal trasero.

    • No hagas palanca en el lado que se apoya contra el sensor de huellas dactilares.

  11. KIqVUEmQ52QRuoUB
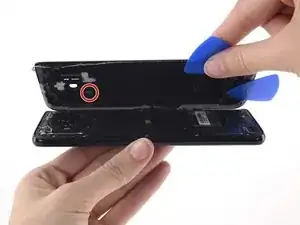
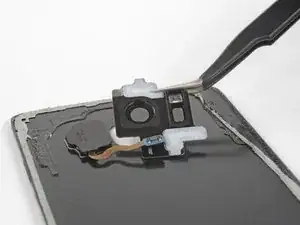
    • Utiliza una púa de apertura o unas pinzas para levantar el bisel de la cámara y separarlo del cristal trasero.

    • Ten cuidado de no enganchar el bisel de la cámara con el cable de huellas dactilares cuando lo retires.

    • Si encuentras resistencia, use una púa de apertura para cortar el adhesivo restante.

  12. SKMsyIyFUbDLyKBS
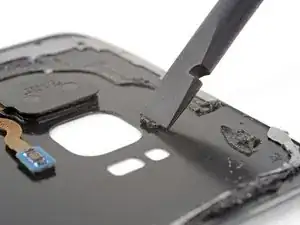
    • Usa un spudger para raspar cualquier adhesivo donde el bisel de la cámara se adhiera al vidrio trasero.

    • Limpia el área de adhesión con alcohol isopropílico de alta concentración (al menos 90%) y un paño sin pelusa. Desliza el dedo en una sola dirección, no de un lado a otro. Esto ayudará a preparar la superficie para el nuevo adhesivo.

  13. mJONbY2ZUIAYjABJ
    mJONbY2ZUIAYjABJ
    KdlyEcfbsKOB2pVK
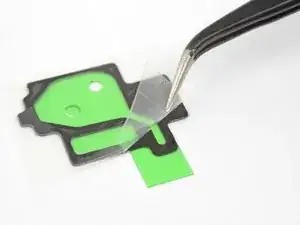
    • Despega la parte posterior transparente de la tira adhesiva del bisel de la cámara y expón el adhesivo por un lado.

    • Con mucho cuidado, alinea los recortes de la cámara trasera y el flash en el interior del vidrio trasero con los mismos recortes en la tira adhesiva.

    • Coloca la tira adhesiva en el cristal trasero y asegúrate de que no se superponga con los bordes de la cámara ni con los recortes del flash.

    • Usa tus dedos o el borde plano de un spudger para presionar el adhesivo hacia abajo para que se adhiera al vidrio.

    • Si tu pieza no vino con adhesivo precortado, usa cinta de doble cara de alta adherencia, como Tesa 61395, o pedazos de una hoja adhesiva precortada para asegurar el bisel de la cámara.

  14. jeNFWL4WmuSLKQok
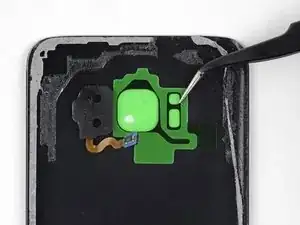
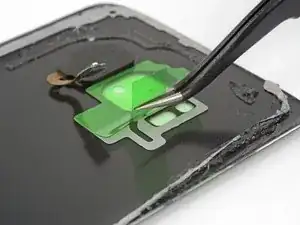
    • Despega el respaldo verde de la tira adhesiva. Asegúrate de que el adhesivo no se desprenda del vidrio con el respaldo.

  15. YPu4F6W255ul5TsM
    YPu4F6W255ul5TsM
    IElDZKUyiG3FKiIY
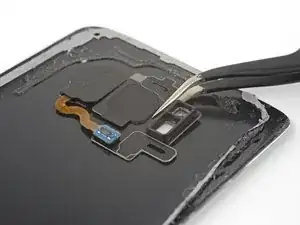
    • Alinea el bisel de la cámara trasera con los cortes en el cristal trasero, luego colócalo sobre el adhesivo. Asegúrate de que el lado que sobresale de la tapa de la lente de la cámara mire hacia el cristal trasero.

    • Asegúrate de que la tapa de la lente de la cámara esté completamente asentada en el recorte de la cámara del vidrio trasero, de modo que el bisel quede plano contra el vidrio.

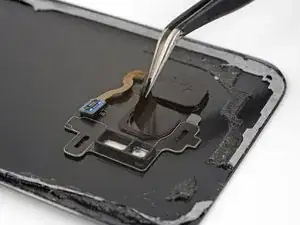
    • Usa tus dedos para aplicar presión uniforme al bisel durante 30 segundos para asegurarte de que el adhesivo se adhiera correctamente.

    • Justo antes de instalar el cristal trasero y sellar el teléfono, retira la parte posterior negra que cubre el cristal de la cámara.

Conclusión

Para volver a armar tu dispositivo, sigue los pasos anteriores en orden inverso.

Una vez que hayas completado la reparación, sigue esta guía para probar tu reparación.

Lleva tus desechos electrónicos a un Reciclador certificado R2 o e-Stewards.

¿La reparación no salió según lo planeado? Consulta nuestro Comunidad de respuestas para obtener ayuda para solucionar problemas.

Adam O'Camb

Miembro Desde 11/04/15

179525 Reputación

0 comentarios