Introducción

Usa esta guía para reemplazar el ensamblaje de la placa lógica de tu Nano.

  1. lqKlCtMsQpYnmwqN
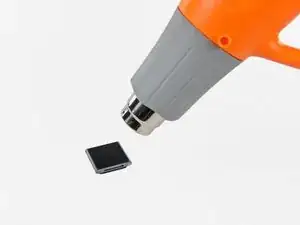
    • Utiliza una pistola de aire caliente o un secador de pelo para ablandar el adhesivo que sujeta el perímetro del conjunto del panel frontal a la carcasa exterior.

    • Ten cuidado de no sobrecalentar el conjunto del panel frontal, ya que podrías dañar la pantalla LCD.

    Do I need new adhesive to reassemble?

    David Wallin -

    Make sure to not break this cable even if your backlight is out, there can be internal corrosion that prevents the backlight from working. It may still work with the old display.

    Matthew Borgholthaus -

  2. QwRPFKaTUfY5wvVe
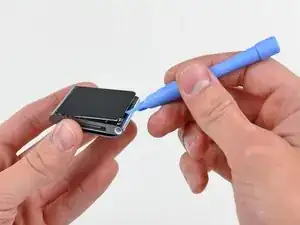
    • Mientras el panel frontal todavía está caliente, usa el borde de una herramienta de apertura de iPod para sacarlo del lado del conector de auriculares del ensamblaje del panel frontal del Nano.

    • No intentes sacar el ensamblaje del panel frontal ni insertar la herramienta de apertura en el lado izquierdo de la pantalla, ya que el cable de datos de la pantalla está justo debajo y puede dañarse en el proceso.

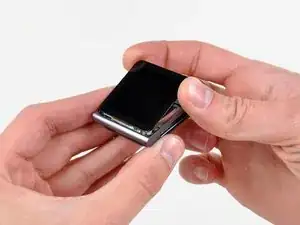
    • Continúa sacando el perímetro del ensamblaje del panel frontal de la carcasa exterior, teniendo cuidado de no dañar el cable de datos de la pantalla que se encuentra debajo del borde izquierdo.

    • Si te resulta excesivamente difícil levantar el panel frontal de la carcasa exterior, vuelve a calentar el área y vuelve a intentarlo.

    I strongly recommend using a Small Suction Cup (IF145-019-1) instead of a plastic opening tool.

    After half an hour of various heating times, trying to use a plastic opening tool, I overheated the LCD, which caused it to discolour. Now I need to buy a new screen. I wish I'd thought to use a suction cup earlier; it seems so obvious in retrospect.

    Peter Burkimsher -

    I used a hot water bottle with towelling cover, resting on it for about 5 minutes. glue softened at 45 degrees. enough to easily lift panel.. Ipod’s working temperate is 55 deg C max according to apple. I used IR heat gun for temperature check.

    Hay rack -

    We have a temperature controlled testing oven at work. I set the oven for 50 degrees C, let it absorb heat for half an hour, then took it out. I had zero luck with either the plastic pry tool or the suction cup, so I carefully pried up the indicated side with the sharp pointed tip of a dental pick until I could get the plastic tool into the crack opening.

    Klieb -

  3. igxGIWdBGjufPoAM
    igxGIWdBGjufPoAM
    Sq3MKLVxjFZfTLsb
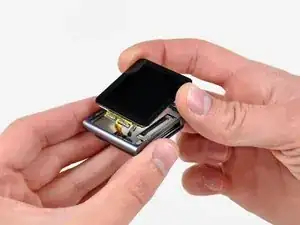
    • Levanta el conjunto del panel frontal del lado del conector para auriculares del Nano.

    • Tira del ensamblaje del panel frontal ligeramente hacia afuera del lado izquierdo del Nano para despejar el cable de datos de la pantalla.

    • El ensamblaje del panel frontal todavía está conectado al Nano por medio de dos cables.

  4. DlZM3DGDlh2Wflu1
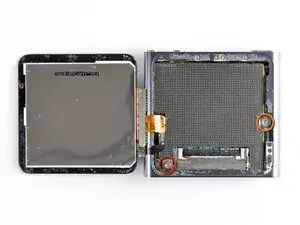
    • Coloca el ensamblaje del panel frontal al lado del Nano.

    • Retira los dos tornillos siguientes:

    • Un tornillo Phillips de 2,3 mm

    • Un tornillo Phillips con reborde de 2,6 mm

  5. dSU3vipUBQDOB2YU
    dSU3vipUBQDOB2YU
    Z462On2RXtRxUblK
    • Usa una herramienta de apertura de iPod para sacar el protector de acero del Nano por la esquina superior derecha.

    • Retira el escudo de acero del Nano.

  6. GT1KwHmNxpJRZpBE
    GT1KwHmNxpJRZpBE
    C6QZWqLdQth2rQhD
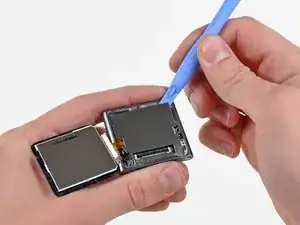
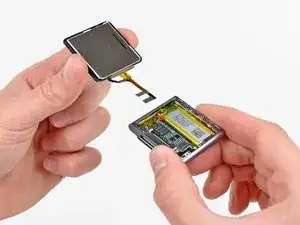
    • Utiliza una herramienta de apertura de iPod para desconectar los datos de la pantalla y los conectores del cable del digitalizador de sus enchufes en la placa lógica.

  7. KKVtRDIuPGSClKGX
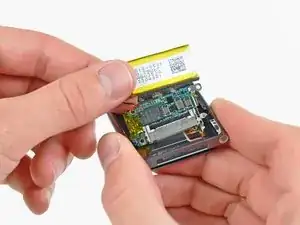
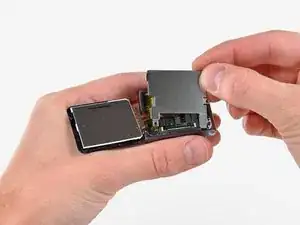
    • Retira el conjunto del panel frontal, teniendo cuidado con sus dos cables que pueden quedar atrapados. Para volver a montar, puedes utilizar la cinta adhesiva de doble cara que se encuentra aquí.

    How come you did not put back the metal plate that goes between the iPod and the display?

    Adam Meyerson -

    You do put the steel shield back in to place and screw it down, but only after you connect the digitizer and display data cable connectors to their sockets on the logic board.

    Lance J -

  8. BhynMUrYy1VXGF1X
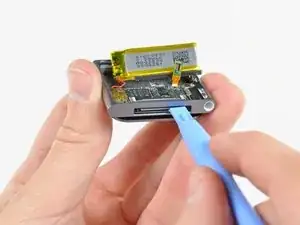
    • Usa una herramienta de apertura de iPod para levantar el conector del conjunto de toma de auriculares y sacarlo de su zócalo en la placa lógica.

    Hello.. I lost my jack connector and it still stay on logic board.. So what will i do? I cant remove it from logic board.. Please help me.. :(

    Emonk -

  9. KRJiY5aAPhHkvdBg
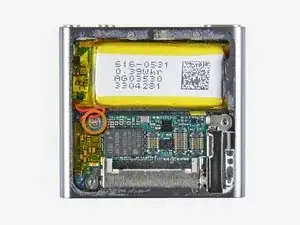
    • Retira el único tornillo Phillips de 1,9 mm que sujeta la placa lógica a la carcasa exterior.

  10. YTYhmvXR1aaPj5KC
    YTYhmvXR1aaPj5KC
    chQhgWJgrILDFaG2
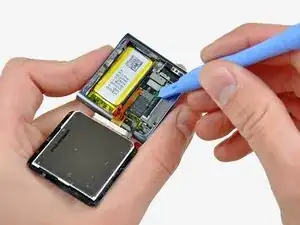
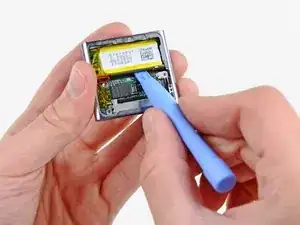
    • Usa una herramienta de apertura de iPod para levantar suavemente la batería del adhesivo que la sujeta a la carcasa exterior.

    • El adhesivo es muy fuerte. Trabaja con cuidado y lentamente, asegurándote de no resbalar ni romper ningún componente frágil.

    • Usa tu pulgar para tirar de la batería hacia el lado izquierdo del Nano mientras sacas el otro borde de la batería de la carcasa exterior.

  11. xI3WTWbTteNxdZhc
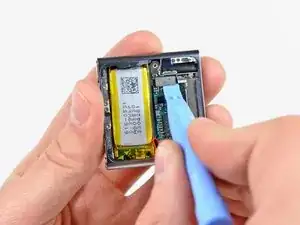
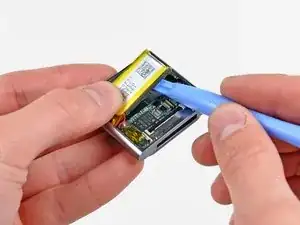
    • Usa una herramienta de apertura de iPod para sacar suavemente la placa lógica del adhesivo que la sujeta contra la carcasa exterior.

    • No hagas palanca excesivamente en la placa lógica hacia arriba.

  12. MNPURT3mXXQAI14r
    MNPURT3mXXQAI14r
    SDgd26UUwP5dy2sX
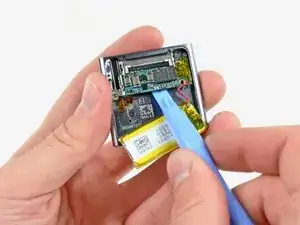
    • Usa la herramienta de apertura de su iPod para empujar suavemente el conector de base hacia el centro del Nano.

    • Retira el ensamblaje de la placa lógica del Nano, teniendo cuidado de no dañar el cable del ensamblaje del conector de los auriculares.

    very good directions. You lead only half way to the push button area. I have to try the rest of the way!

    Good work!

    kcryeung -

Conclusión

Para volver a armar tu dispositivo, sigue estas instrucciones en orden inverso.

Andrew Bookholt

578639 Reputación

9 comentarios

Hi, i wonder if you could help me... I changed my cracked screen (my ipod worked even though the screen was broken) but then when I assembled the ipod ( I did everything you did) it doesn't work, nor does my computer recognize it anymore. Would you happen to know what might be the problem? Have I unintentionally somehow damaged it?

d1k4 -

Thanks for the guide Andrew! I've just replaced my cracked screen and everything works flawlessly.

Cristian Dragos -

Is there any where to send them in and have a professional repair them. I’ve tired some of the things on the site but I think I may have damaged them further? Please advise.

Valerie -

Hi..just to tell u about my ipod. It was accidentaly washed in my washing machine. I want to know..is the ipod still in function if i replace the battery only not the board. Im still hoping that my ipod still can be use. I love my ipod 6th generation. It has sentimental value to me..huhu

madeq 78 -

I did the very same thing, washed my 6th gen in the washer. when i realized what i had done, i immediately put the ipod in a tub of rice. now it works, but only when it’s plugged in. I’m pretty sure it’s the battery that needs replacing. I’ve not replaced the battery as all of the things i need from ifixit are out of stock. If everything on the ipod works except that it won’t hold a charge and stay on unless plugged in, then it’s most likely the battery and replacing it will probably fix the problem.

thefactory01 -

I didn’t see any guide or instruction for replacing the battery. I only see the red and black wires so I’m assuming the battery need to be de-soldered and a new one soldered back on. Does this sound about right?

Civan -

hello i have also a Ipod Nano 6 e generation found in recyclebox ! ,i have put in Iphone charge kabel to see if he work,s no reaction it all, i opent the Enclosure carefully and discover what,s in how compact is it ,what fragile component,s are inside ,i found a kabel from mainboard wich is broken ,i search on Google Ipod Nano 6 e generation kabel and replace the new one and connect it with the little mainboard also the little screen and put it on Iphone charge kabel again ,i press the on button to see if it will start up but no ,it could be the processor is crashed and the Ipod is Crashed ,it is a very compact nice design media player MP 3

Ronald liersen -

I found that my locksmith pinning tweezers are perfect for disconnecting the the various connectors.

Don Jenkins -

any suggestions on how to fix an on/off button on the IPOD Nano Gen 6

Jimmy Selph -