Introducción

Utiliza esta guía para reemplazar el conjunto del conector de los auriculares. El conjunto del conector para auriculares incluye el conector para auriculares y los botones electrónicos de suspensión/volumen.

  1. lqKlCtMsQpYnmwqN
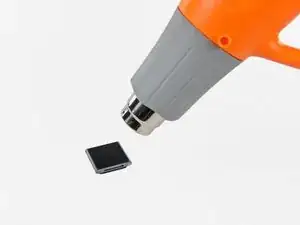
    • Utiliza una pistola de aire caliente o un secador de pelo para ablandar el adhesivo que sujeta el perímetro del conjunto del panel frontal a la carcasa exterior.

    • Ten cuidado de no sobrecalentar el conjunto del panel frontal, ya que podrías dañar la pantalla LCD.

    Do I need new adhesive to reassemble?

    David Wallin -

    Make sure to not break this cable even if your backlight is out, there can be internal corrosion that prevents the backlight from working. It may still work with the old display.

    Matthew Borgholthaus -

  2. QwRPFKaTUfY5wvVe
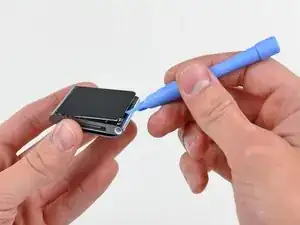
    • Mientras el panel frontal todavía está caliente, usa el borde de una herramienta de apertura de iPod para sacarlo del lado del conector de auriculares del ensamblaje del panel frontal del Nano.

    • No intentes sacar el ensamblaje del panel frontal ni insertar la herramienta de apertura en el lado izquierdo de la pantalla, ya que el cable de datos de la pantalla está justo debajo y puede dañarse en el proceso.

    • Continúa sacando el perímetro del ensamblaje del panel frontal de la carcasa exterior, teniendo cuidado de no dañar el cable de datos de la pantalla que se encuentra debajo del borde izquierdo.

    • Si te resulta excesivamente difícil levantar el panel frontal de la carcasa exterior, vuelve a calentar el área y vuelve a intentarlo.

    I strongly recommend using a Small Suction Cup (IF145-019-1) instead of a plastic opening tool.

    After half an hour of various heating times, trying to use a plastic opening tool, I overheated the LCD, which caused it to discolour. Now I need to buy a new screen. I wish I'd thought to use a suction cup earlier; it seems so obvious in retrospect.

    Peter Burkimsher -

    I used a hot water bottle with towelling cover, resting on it for about 5 minutes. glue softened at 45 degrees. enough to easily lift panel.. Ipod’s working temperate is 55 deg C max according to apple. I used IR heat gun for temperature check.

    Hay rack -

    We have a temperature controlled testing oven at work. I set the oven for 50 degrees C, let it absorb heat for half an hour, then took it out. I had zero luck with either the plastic pry tool or the suction cup, so I carefully pried up the indicated side with the sharp pointed tip of a dental pick until I could get the plastic tool into the crack opening.

    Klieb -

  3. igxGIWdBGjufPoAM
    igxGIWdBGjufPoAM
    Sq3MKLVxjFZfTLsb
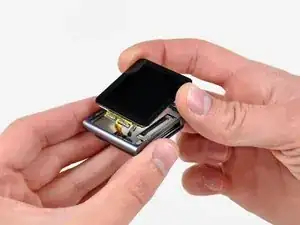
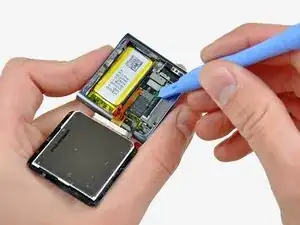
    • Levanta el conjunto del panel frontal del lado del conector para auriculares del Nano.

    • Tira del ensamblaje del panel frontal ligeramente hacia afuera del lado izquierdo del Nano para despejar el cable de datos de la pantalla.

    • El ensamblaje del panel frontal todavía está conectado al Nano por medio de dos cables.

  4. DlZM3DGDlh2Wflu1
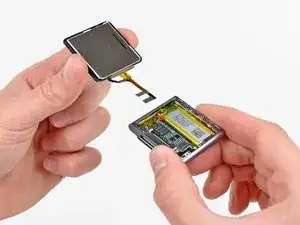
    • Coloca el ensamblaje del panel frontal al lado del Nano.

    • Retira los dos tornillos siguientes:

    • Un tornillo Phillips de 2,3 mm

    • Un tornillo Phillips con reborde de 2,6 mm

  5. dSU3vipUBQDOB2YU
    dSU3vipUBQDOB2YU
    Z462On2RXtRxUblK
    • Usa una herramienta de apertura de iPod para sacar el protector de acero del Nano por la esquina superior derecha.

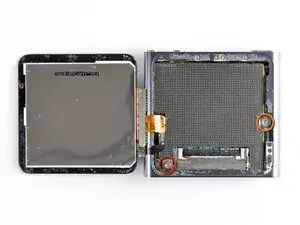
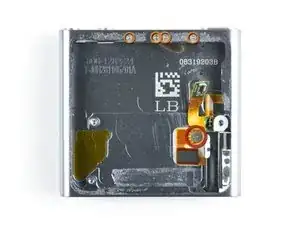
    • Retira el escudo de acero del Nano.

  6. GT1KwHmNxpJRZpBE
    GT1KwHmNxpJRZpBE
    C6QZWqLdQth2rQhD
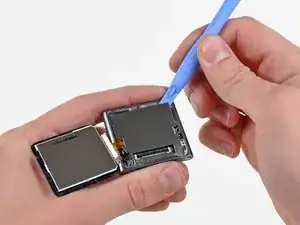
    • Utiliza una herramienta de apertura de iPod para desconectar los datos de la pantalla y los conectores del cable del digitalizador de sus enchufes en la placa lógica.

  7. KKVtRDIuPGSClKGX
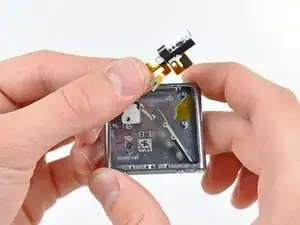
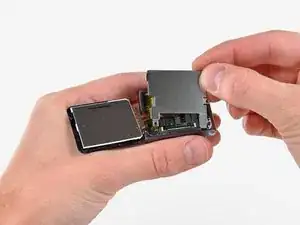
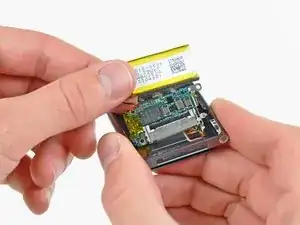
    • Retira el conjunto del panel frontal, teniendo cuidado con sus dos cables que pueden quedar atrapados. Para volver a montar, puedes utilizar la cinta adhesiva de doble cara que se encuentra aquí.

    How come you did not put back the metal plate that goes between the iPod and the display?

    Adam Meyerson -

    You do put the steel shield back in to place and screw it down, but only after you connect the digitizer and display data cable connectors to their sockets on the logic board.

    Lance J -

  8. BhynMUrYy1VXGF1X
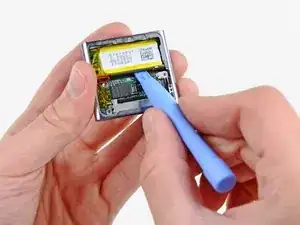
    • Usa una herramienta de apertura de iPod para levantar el conector del conjunto de toma de auriculares y sacarlo de su zócalo en la placa lógica.

    Hello.. I lost my jack connector and it still stay on logic board.. So what will i do? I cant remove it from logic board.. Please help me.. :(

    Emonk -

  9. KRJiY5aAPhHkvdBg
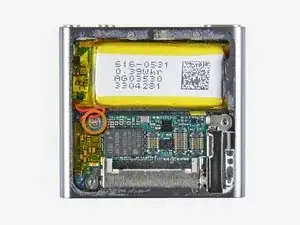
    • Retira el único tornillo Phillips de 1,9 mm que sujeta la placa lógica a la carcasa exterior.

  10. YTYhmvXR1aaPj5KC
    YTYhmvXR1aaPj5KC
    chQhgWJgrILDFaG2
    • Usa una herramienta de apertura de iPod para levantar suavemente la batería del adhesivo que la sujeta a la carcasa exterior.

    • El adhesivo es muy fuerte. Trabaja con cuidado y lentamente, asegurándote de no resbalar ni romper ningún componente frágil.

    • Usa tu pulgar para tirar de la batería hacia el lado izquierdo del Nano mientras sacas el otro borde de la batería de la carcasa exterior.

  11. xI3WTWbTteNxdZhc
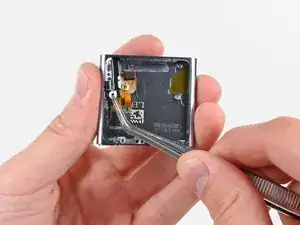
    • Usa una herramienta de apertura de iPod para sacar suavemente la placa lógica del adhesivo que la sujeta contra la carcasa exterior.

    • No hagas palanca excesivamente en la placa lógica hacia arriba.

  12. MNPURT3mXXQAI14r
    MNPURT3mXXQAI14r
    SDgd26UUwP5dy2sX
    • Usa la herramienta de apertura de su iPod para empujar suavemente el conector de base hacia el centro del Nano.

    • Retira el ensamblaje de la placa lógica del Nano, teniendo cuidado de no dañar el cable del ensamblaje del conector de los auriculares.

    very good directions. You lead only half way to the push button area. I have to try the rest of the way!

    Good work!

    kcryeung -

  13. OYSNTANPqaxG1OZR
    • Retira los cinco tornillos siguientes:

    • Un tornillo Phillips de 1,7 mm

    • Cuatro tornillos Phillips de 3,9 mm.

  14. YUBBLsTBZurVJNOV
    YUBBLsTBZurVJNOV
    dKTnWJUEAbyhycVD
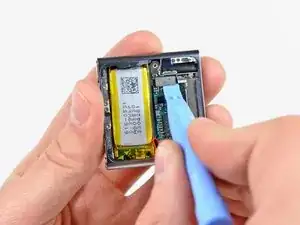
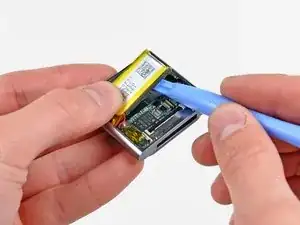
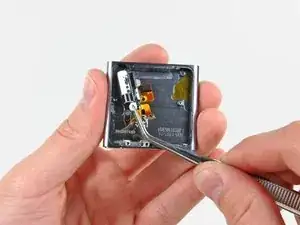
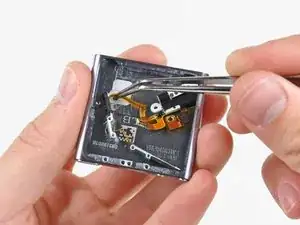
    • Usa un par de pinzas para tirar con cuidado del conector de los auriculares hacia el centro del Nano.

    • Evita tirar del cable, ya que es muy fino y delicado. La oreja de montaje de plástico es un área más segura para tirar.

    hello all.!!

    i replaced the whole assembly (power, volume and headphones). Now my ipod is not getting ON. i followed the whole procedure as mentioned. Can anyone suggest me anymore.

    Sofia Bhaskar -

  15. LGGQnDSCXLHx5nYR
    LGGQnDSCXLHx5nYR
    LjrNAFRcQWhZeS3Z
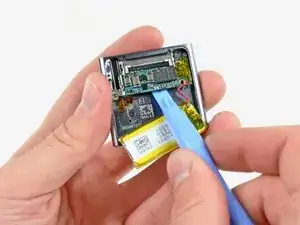
    • Con mucho cuidado, tira del cable plano del ensamblaje del conector de los auriculares hacia el conector de la base para separar los botones de suspensión y volumen de la carcasa exterior.

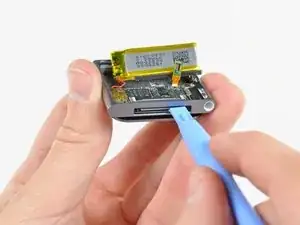
    • Retira el conjunto del conector de auriculares.

    Note that on the two-button sub-frame (the left-hand piece secured by two of the four screws in Step 13) there are two tiny locating studs which must be aligned on the replacement wire ribbon.

    dave -

    Thank for providing the notice. It was perfect.

    To make the way back, it is better to skew first the power button before the +/- volume buttons.

    Didier -

Conclusión

Para volver a armar tu dispositivo, sigue estas instrucciones en orden inverso.

Andrew Bookholt

578639 Reputación

13 comentarios

Be aware, When replacing the on/off button, it is extremely difficult to get the rubber mould to fit correctly behind the power button. It will in all likelihood take you a good few times before the power button works properly, so make sure you test it first before reassembling!

Dave -

My problem was that there was a small plastic bit missing from the on/off-switch. I just glued it back on and now the device works again.

Here is a picture of the plastic bit and the switch where it belongs to:

http://i49.tinypic.com/14t62x4.jpg

And here is a video that helped me to find the issue:

http://www.youtube.com/watch?v=oHrLLfMXk...

Mart Kroon -

if your problem is that your player is pausing randomly - maybe just try using some WD-40 or similar to clean the contacts will fix that. you can just spray some WD-40 into the headphone-jack without dismantling it.

don't use to much WD-40, and hold your player with the headphone-jack pointing down. otherwise it may happen that the display gets damaged(happend to me - my display now discoloroud because of the liquid / but is functional anyway).

hagl -

maybe just try using some ~~WD-40 or similar to clean the contacts will fix that. you can just spray some WD-40 into the headphone-jack

..that's because WD-40 is not supposed to be used to clean contact points on electronics. If you already damaged your own device why on earth would you tell someone to ruin their own?

Don't ever use WD-40 to clean any electronic device especially the audio contact points in the headphone jack.

There is plenty of audio contact cleaner available for electronics that is safe for your device to clean and lubricate the jack. I prefer Caig Deoxit for audio contacts particularly as they specialize in a number of contact restoring solutions for everything electronic whether it be mechanical metal structure or plastic surface circuits. www.deoxit.com

David Lucio -

I thank you guys so much. Especially the Tips from Dave and Mart Kroon!

This tiny plastic piece is in my opinion a deliberate bad choice for it's function, it can very easily fall out of place and leave a completely functional device useless.

I simply glued it back on with some standard glue which i aplied with the cut-of end of an q-tip. Be sure to use only a tiny amount, since the button can get glued tight and is not movable anymore.

During the disassembly, the plastic piece from my "Decrease-Volume" Button got lost, so i replaced it with a tiny piece of plastic i cut of the q-tip. Be careful not to make it to big. If it is to big and already glued on, you can leave away some or all of the 4 screws holding the buttons in place and just put a piece of plastic between the battery and the cable so the buttons stay in place but can get pressed further in.

Le Big Z -

A bit of a pedantic point, but the guide calls for a PH00 Phillips screwdriver, and I found that the PH000 fit the screws better.

Also, has this site ever carried the headphone assembly? I have a feeling my power button repair won't last very long and I'll eventually have to replace the entire assembly.

DarkCloud -

Does anyone know where to get the tiny metal frames that hold the headphone jack assembly?

Squeck -

Any advice on how to get the rubber mould behind the power button seated correctly (besides "it's extremely difficult" -- yes, it is.)

kfin63 -

Hi, how are you? I have a question regarding the replacement of the entire headhphone jack flex cable on the ipod nano 6th generation.

Basically I disassembled the old jack and I was ready to put in the new one.

Suddenly I noticed that the "screw holders" (the grey metal/pseudometal things that you use to secure the cable with the screws in the top part and that are glued to the volume and power on buttons)

were not present on the new cable. I tried to unglue them from the old cable, but they were very well glued that I ended up in breaking them.

Is there any way to put inside the new jack without this parts, or to buy new ones (I noticed nobody sell them).

All the videos abd forums I've seen so far don't talk about this aspect and nowhere is shown the reassemble process.

The part I was talking about is this one; as you can see it still has the buttons glued on it and it seems impossible to :

http://s29.postimg.org/r7ywb7g47/2016032...

Please let me know if there is a solution, thank you very much!

Michele -

@ michele: heating with a hairdryer did the trick for me to recover the small metal parts from the old assembly.

mahieujohan -

I accidently ran my ipod through the wash cycle after running. I did a long bake out at 60°C. It works fine except that the volume is limited to about half and there is an occasional crackling, fuzzy tone to it with a slightly increased volume for the output. It seems to be associated with the position or pressure applied to the headphone jack.

Can this be fixed by replacing the headphone jack?

Jobab -

Thank you all so much, for the guide and for all the comments. I was able to: disassemble my Nano, diagnose the problem (the tiny black dot from the power button had gotten loose, accidentally tear the headphone jack ribbon cable, order a new part, install the new part, and put the whole thing back together again. (Now I just need some adhesive to get my screen to seal back up.) This is my first repair, and set-backs and all, I am so happy with how it went. It worked out and was a great learning experience. Thank you again!

Chexala -

Does anyone know who can repair my headphone jack? The volume control on the earplug cord is not functioning.

Bryan Hargis -