Introducción

Utiliza esta guía para instalar un disco duro en tu iMac Intel 20" EMC 2133 o 2210.

  1. LjDLTLrgcTN6NZH2
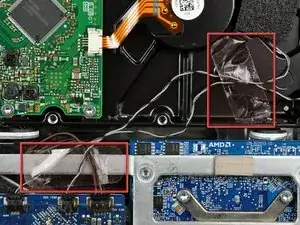
    • Si es necesario, retira los trozos de cinta que sujetan los cables del sensor térmico del disco duro/unidad óptica a tu iMac.

    Pull the temperature sensor cable for the optical drive well out of the way so you don't trap it when inserting the new hard drive.

    kevinp -

  2. 5tyrG1RUmZlBOdry
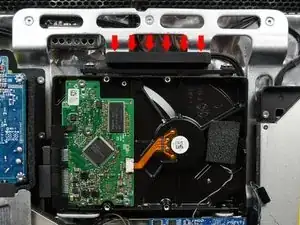
    • Desconecta el sensor térmico del disco duro tirando de su conector hacia la parte superior de tu iMac.

    • Al retirar este conector, es útil usar las miniaturas para empujar las orejas a cada lado del conector hacia la parte superior de tu iMac.

    I didn't do this on my 2133; just pushed wires out of the way.

    robgendreau -

    Rather than disconnect this cable, you might as well jump ahead to steps 19-21 and remove the sensor from the drive.

    kevinp -

  3. XARgcgviC4XvCMAa
    XARgcgviC4XvCMAa
    gbSjwbdKZQRXIZCI
    • Presionar la parte superior del soporte del disco duro hacia abajo para liberarlo de la carcasa trasera requiere una gran cantidad de fuerza. Recomendamos colocar tu iMac boca abajo sobre una mesa para evitar que se caiga.

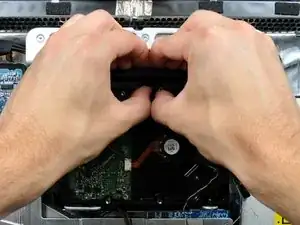
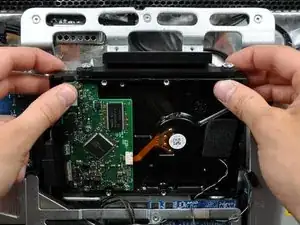
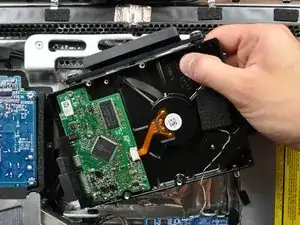
    • Presiona el soporte del disco duro hacia el borde inferior de tu iMac para liberarlo de la carcasa trasera, luego gira la parte superior del disco hacia ti.

    At first it looked like it needed extra force, rather stand the computer in its stand press the bracket firmly it will come out.

    Great set of instructions altogether!

    Jim Laredo -

    I just braced the foot/stand against my thigh and found there wasn't much force needed. Had to do it twice as I missed the foam pad on the drive I was replacing.

    The whole process was simpler than I expected.

    I seem to have missed something somewhere as I now have a lot more fan activity than before. A missed sensor connection maybe. Not looking forward to tracking it down.

    paul beard -

    I worked with the top of the screen facing me. It was very easy to brace my fingers and press with my thumbs to release the drive. I recommend doing it that way if you can.

    marcintosh -

    I just used pliers….. Easy!

    Dennis Postma -

  4. VMitQPmVMd4qFbyA
    VMitQPmVMd4qFbyA
    42RQbCnZhAmVhvFi
    • Gira el disco duro hacia ti y luego levántalo de sus clavijas de montaje.

    • El disco duro todavía está conectado a través de los cables SATA.

    • Al reinstalar tu disco duro, ten cuidado de no empujar las arandelas de goma a través de las aberturas en el chasis con las clavijas inferiores del disco duro, ya que recuperarlas puede requerir la extracción de la placa lógica.

    During reassembly make sure not to trap the cable for the temperature sensor on the superdrive -- it goes on top of the new hard drive.

    kevinp -

  5. J2JseEWMkmZ2IWZR
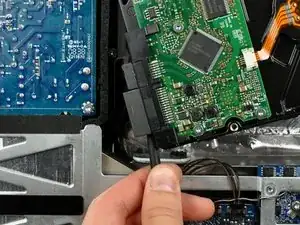
    • Inserta el extremo plano de un spudger entre el conector del cable de alimentación SATA y el borde del disco duro.

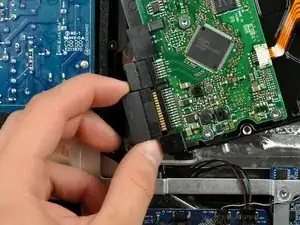
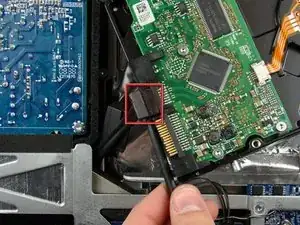
    • Gira el spudger para separar el conector del disco duro.

  6. cmr5VJFpvLHAoe2W
    • Saca el conector de alimentación SATA del disco duro.

  7. HrqNAt5KIAqbaXQb
    • Desconecta el cable de datos SATA tirando de su conector para sacarlo del disco duro.

Conclusión

Para volver a armar tu dispositivo, sigue estas instrucciones en orden inverso.

Walter Galan

685928 Reputación

Un comentario

Walter, I was working on a mid-2007 IMac (2133) and found your instructions helpful but not always complete or right. I have added some comments in some of the steps to clarify.

Pablo Guerrero -