Introducción

Sigue los pasos de esta guía para actualizar o reemplazar el disco duro SATA en un iMac Retina 4K 2019 de 21,5". Ten en cuenta que si estás actualizando su unidad, deberás clonar tu disco duro existente en el reemplazo antes de realizar esta actualización para mantener sus archivos y sistema operativo.

Algunas imágenes de esta guía usan una iMac más antiguo, que tiene pequeñas diferencias visuales. Estas diferencias no afectan el procedimiento de reparación.

  1. xew1BWp2BZwFMbWh
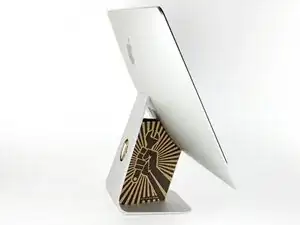
    • Con la bisagra libre para moverse, la iMac estará desequilibrada y será difícil trabajar en ella. Coloca una cuña de servicio en el soporte para estabilizar la iMac.

    • Si estás utilizando una cuña de cartón de servicio de iFixit, sigue estas direcciones de ensamblaje para armarla.

    • Antes de empezar a trabajar en el iMac: Desenchufa la computadora y mantén presionado el botón de encendido durante diez segundos para descargar los condensadores de la fuente de alimentación.

    • Ten mucho cuidado de no tocar los cables de los condensadores ni las soldaduras expuestas en la parte posterior de la fuente de alimentación. Sólo manipule la placa por los bordes.

    Maybe your directions should suggest fixers to buy RAM cards in pairs. I wanted 32 Gig of RAM, and I bought and installed one 32 G RAM and while it seems fine, one source told me it would be 5-10% faster if I had put in two 16 RAM cards. Is that accurate?

    BRUCE CLARKE -

    it would at least be that much faster, in theory some applications should run twice as fast

    blakebest -

  2. M42hmSlBUbk6PbHC
    M42hmSlBUbk6PbHC
    YmEFhp4dqiXysxIN
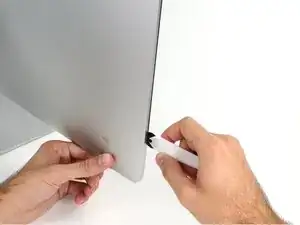
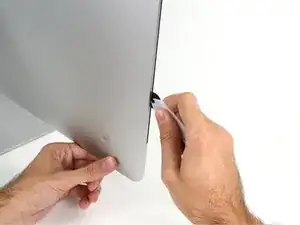
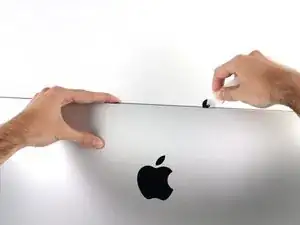
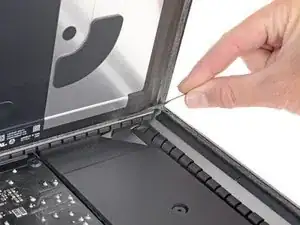
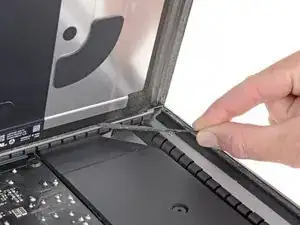
    • Comenzando por el lado izquierdo de la pantalla, cerca del botón de encendido, inserta la herramienta de apertura de la iMac en el hueco entre el panel de vidrio y la carcasa posterior.

    • El eje de la herramienta de apertura de la iMac evitará que empujes la rueda demasiado lejos. Si utilizas otra herramienta, no insertas más de 3/8" en la pantalla. De lo contrario, corres el riesgo de cortar los cables de la antena y causar daños graves.

  3. cOVEfbnXgUttrW2b
    cOVEfbnXgUttrW2b
    FlMUC3pRXZOFhcoB
    tKQWoCGakrogQTPD
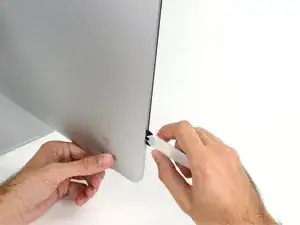
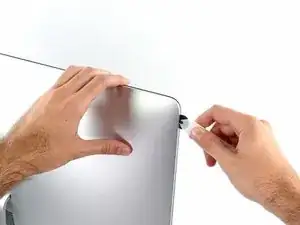
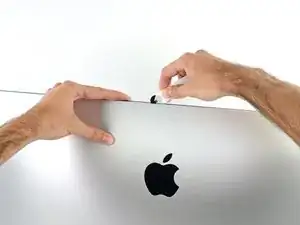
    • Usa la herramienta como un cortador de pizza, enróllala a lo largo del hueco, cortando el adhesivo de espuma entre el marco y la pantalla.

    • Asegúrate de empujar siempre con la rueda de corte hacia adelante. Si tiras, la rueda podría salirse del mango.

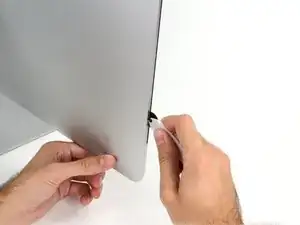
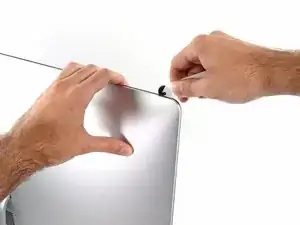
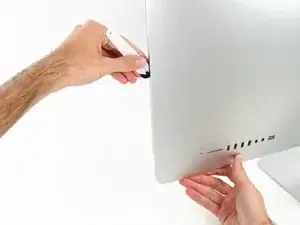
    • Pasa la herramienta por el lado izquierdo de la pantalla.

  4. tSAS3Jn3qghgZJDe
    tSAS3Jn3qghgZJDe
    KCyqluPop5fjDYAE
    IqxfhhMDuT5ibx1P
    • Continúa deslizando la herramienta alrededor de la esquina izquierda superior.

  5. Gr5frklRP5SSCfcs
    Gr5frklRP5SSCfcs
    ja4mM4JMGPU2UVrV
    • Corta el adhesivo a lo largo del borde superior de la pantalla.

  6. NZSSQT4P2YuyMtAf
    NZSSQT4P2YuyMtAf
    BudRMK2UCrSCEYOO
    • Continúa a lo largo de la parte superior de la pantalla.

    • Puede que quieras pasar la herramienta de un lado a otro unas cuantas veces para asegurarte de que cortaste completamente el adhesivo.

  7. AFpWIRNam5smLYMl
    AFpWIRNam5smLYMl
    RXhs3VgToDNZiJpM
    gxF3JYbbkAp4VTJN
    • Empuja la herramienta por la esquina superior derecha de la pantalla.

  8. RZ6ybv2fcA12MLAL
    RZ6ybv2fcA12MLAL
    yfJAyWOQtfxUkTCE
    • Empuja la herramienta a lo largo del dorde derecho de la pantalla.

  9. MbfslBJoWVDXS5kR
    MbfslBJoWVDXS5kR
    NoNsLWkB1JuDpsvo
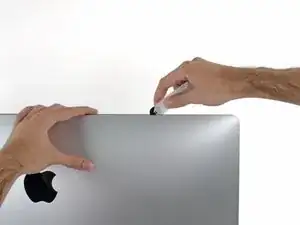
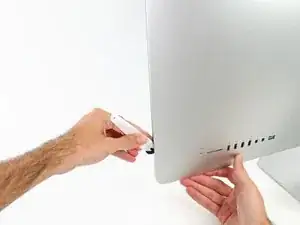
    • Termina de empujar la herramienta de apertura a la parte inferior del lado derecho de la pantalla.

    • En este punto, querrás volver a pasar la herramienta por toda la pantalla, para asegurarte de que cortas la mayor cantidad de adhesivo posible.

  10. 1OOl3uQ3SUHBD5XD
    1OOl3uQ3SUHBD5XD
    65vvKRUNKxVKGOwY
    lPpjVUkv1sMMaSav
    • Si bien la herramienta de apertura corta la mayor parte del adhesivo, la pantalla seguirá estando ligeramente adherida a la caja. Será necesaria una tarjeta de plástico para liberar lo que queda de este adhesivo.

    • Coloca la iMac boca arriba sobre una mesa.

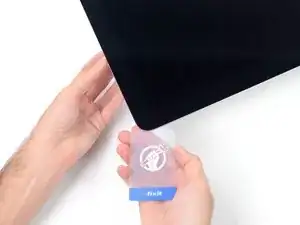
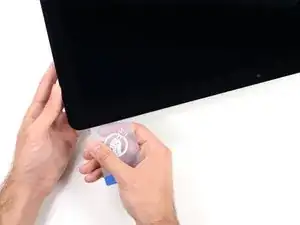
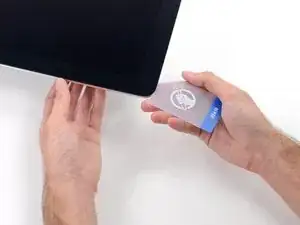
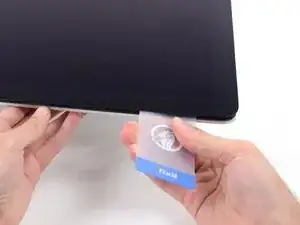
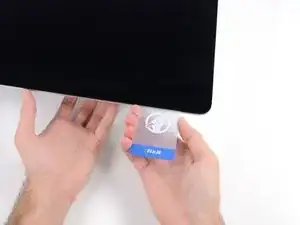
    • Empezando por la esquina superior derecha de la iMac, acuña una tarjeta de plástico entre la pantalla y el marco.

    • Ten cuidado de no insertar la tarjeta de plástico más de 3/8", o podrías dañar los componentes internos.

    9.5mm in the rest of the world

    Tal Glazer -

  11. TwUkxBqp3WUU5SQM
    TwUkxBqp3WUU5SQM
    nMscaGHNZwiXWGTU
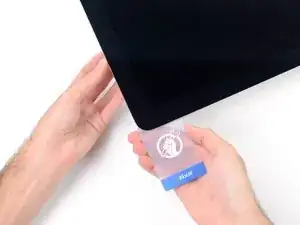
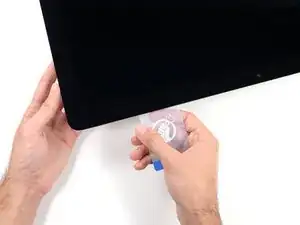
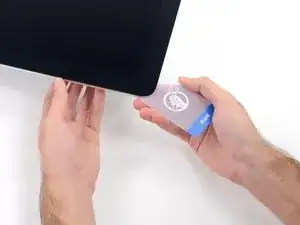
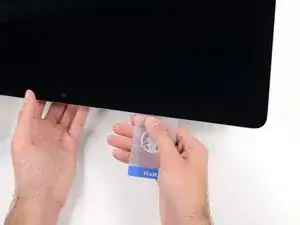
    • Gira suavemente la tarjeta de plástico hacia los lados para crear un hueco entre la pantalla y el marco.

    • Muévete lentamente y ten cuidado de no estresar demasiado el vidrio de la pantalla, sólo necesitas hacer un hueco de aproximadamente 1/4".

    Which is around 6.5mm

    Tal Glazer -

  12. 5H2mrXvL1GqHCbMH
    5H2mrXvL1GqHCbMH
    JAkiWZj5Ho4yNTYo
    EskKkKR4VOrJcuhl
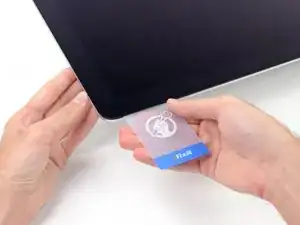
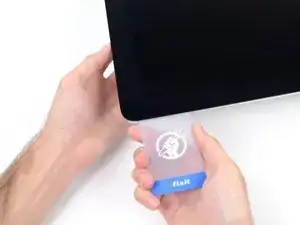
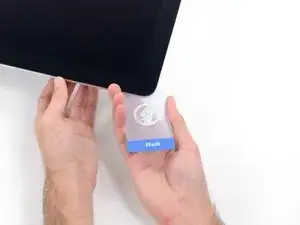
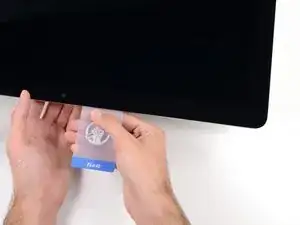
    • Desliza la tarjeta hacia el centro de la pantalla para cortar el adhesivo que quede en la esquina superior derecha de la iMac.

    • Asegúrate de detenerte antes de la cámara iSight, o podrías dañarla.

  13. QVKUQYp4K6pmbyjX
    QVKUQYp4K6pmbyjX
    OgKJPO6IXFXkEDtt
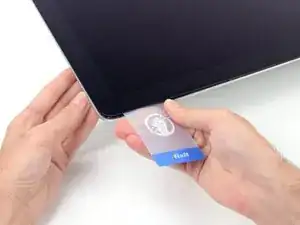
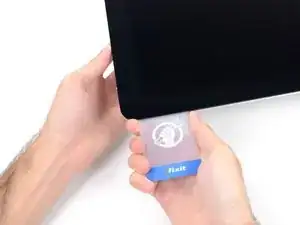
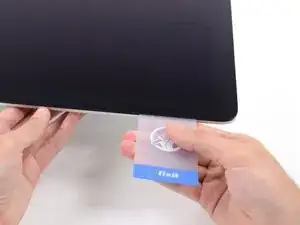
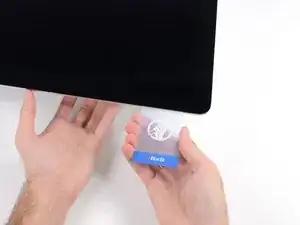
    • Pon la tarjeta plástica en la esquina superior derecha una vez más, y déjala ahí para evitar que el adhesivo se vuelva a pegar.

  14. YLlxXZGUiVKXEPX1
    YLlxXZGUiVKXEPX1
    d2mHEVkqOtcoxt62
    aybCLgwrfPOFlWjR
    • Inserta una segunda tarjeta de plástico en el hueco entre la pantalla y el marco, cerca de la esquina superior izquierda de la iMac.

  15. WfyVK51oSKrP4Zmm
    WfyVK51oSKrP4Zmm
    Hcaw4qZgJJXva4Ls
    • Gira suavemente la tarjeta hacia arriba, aumentando ligeramente el espacio entre la pantalla y el marco.

    • Al igual que con el otro lado, gira lentamente para permitir que el adhesivo se separe, y ten cuidado de no sobrecargar el cristal de la pantalla.

  16. yXDZaJkjPkEAcVep
    yXDZaJkjPkEAcVep
    iGsPuW6mkoqZTeWO
    YFQAcDZXTypgc4kn
    • Desliza la tarjeta de plástico hacia el centro.

    • Deja de deslizar justo antes de la cámara iSight para evitar dañar la cámara.

  17. 6eIbW1PCSMq6Bers
    6eIbW1PCSMq6Bers
    pd3AFHwUgYpc4dtt
    • Pon la tarjeta de plástico en la esquina superior izquierda.

  18. GOUrhY1NeK1fcLaC
    GOUrhY1NeK1fcLaC
    QRPTMuatYNuyUKMD
    NfjmyRMmXDIgiVec
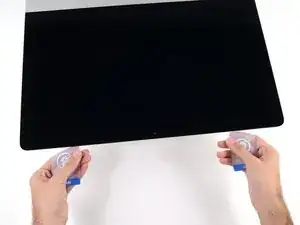
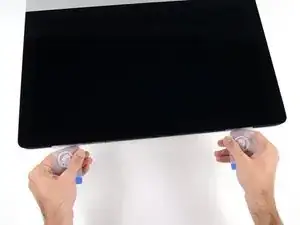
    • Con ambas tarjetas de plástico insertadas como se muestra en las esquinas, gire suavemente las tarjetas hacia los lados para aumentar el espacio entre la pantalla y la caja.

    • Si hay alguna sección que parece pegarse y no se separa, deja de retorcer y usa una de las tarjetas para cortar el adhesivo restante.

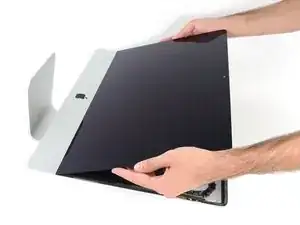
    • Comienza a levantar la parte superior de la pantalla del marco.

    • Sólo levanta la pantalla unos pocos centímetros: los cables de datos y de alimentación de la pantalla siguen conectados a la placa lógica.

  19. 2CYaRvZMKD1MHJWF
    2CYaRvZMKD1MHJWF
    fHCLPYQIpP4EVOLZ
    • Levanta la pantalla lo suficiente para tener un acceso fácil al conector, pero no demasiado, ya que estirarías los cables y forzarías sus conexiones (levántalo menos de 20 cm.)

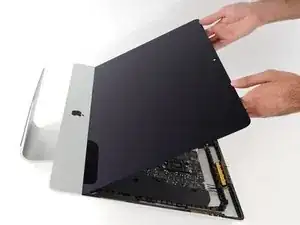
    • Sostén la pantalla con una mano, mientras usas la otra para desconectar el cable de energía de la pantalla.

    It was difficult to remove this connection. I ended up having to gently pull-up vertically a little on the wire side to unsnap it about 1mm and then horizontally wiggle it out.

    delacrj2 -

    I had a difficult time removing this connection. I had to lift the wire-side about 1mm before it unsnapped and then carefully wiggle it out horizontally.

    delacrj2 -

    Can this cable be replaced? I am worried mine is damaged. I have no display after the screen fell and stressed the display flex cables following an SSD upgrade.

    Jeremy Brainard -

    This step should be done with extreme caution and care, as this step 19 is not described in great detail (sorry, author).

    The first (most outward) cable will slide out by gently pulling it by its tabs. The second (inner) cable is more tricky, as the locking lever must be moved backward first, before gently pulling backward on the cable connector. The angled tweezers are useful here, to help lift that locking lever, because fingers are too big for this.

    Ernst -

    be VERY careful and SLOW...take your time. These displays crack VERY easily when removing and they'll spider web on you. I've done probably 20 or so of these and cracked 3 being super careful.....ugh.

    Faslane -

    I found the best way to unplug this display power cable was to use my right hand, and the fingernails of my index finger and thumb to grab the ends of the tabs on either side of the connector, squeeze, and pull the connector out gently.

    Phil McInnis -

  20. Zh56FQPLtH1qJkBF
    Zh56FQPLtH1qJkBF
    RuoSZ5iXxQqvKfcF
    MuEuntgC4FjFNuDJ
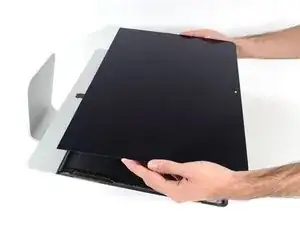
    • Continúa sosteniendo la pantalla con una mano, mientras muevas hacia arriba el soporte de metal en el cable de datos de la pantalla.

    • Con cuidado tira el cable de datos de su zócalo en la placa lógica.

    • Asegúrate de quitar el conector del cable hacia arriba, manteniéndolo paralelo a la placa base, para evitar dañarlo.

    Cannot seem to find a replacement cable for this, as I suspect mine is damaged. Can’t even find a part number. Anyone know what it might be?

    Jeremy Brainard -

    https://www.amazon.com/gp/product/B08TTL...

    That's the part I ordered for mine and it seems to work ok. I did make a point of contacting the seller and advising them of my requirement and they ensured I got the right part and it matches the description of the link. Bear in mind I bear no responsibility if yours does not work since I am just sharing what I did and what I ordered. Thanks.

    Jim Stanford -

    I also need that cable.

    cameronjpu -

    It's a little difficult to tell... but looking at the connection to the logic board on the video data cable, are the pins faced up or down?

    On the display, same question since it appears you have to "twist" the cable during the reconnection step.

    Jim Stanford -

    For this particular cable, take a good look before pulling on anything. Plug is locked on its socket with a bracket. You can lift this bracket by holding the small, flat black plastic handle that is attached to it. If you're struggling to grab it, use the end of the pizza roller handle to lift it, or the tweezers. Cable then comes off by pulling parallel to the main board.

    Froggy Manny -

  21. m3V4TQFe6DgIXYuF
    m3V4TQFe6DgIXYuF
    yZM3Md1BCHXDXXZn
    • Levanta la pantalla a una posición casi vertical .

    • En este punto todavía hay una tira de adhesivo a lo largo de la parte inferior de la pantalla que mantendrá la pantalla al marco como una bisagra. Puedes aflojar este adhesivo trabajando la pantalla hacia arriba y hacia abajo unas cuantas veces.

  22. NXHcDMt52ENK4HPi
    NXHcDMt52ENK4HPi
    b6qImCFu2OHQHfip
    xMgGXmp4o3Pik4Y1
    • Si es necesario, se puede utilizar una tarjeta de plástico para cortar las secciones restantes de la tira adhesiva inferior.

    The bottom adhesive strips have small tags at a 90 degree angle that can be used as handles to strip them out at this point. https://d3nevzfk7ii3be.cloudfront.net/ig...

    Dom -

  23. V4PqOetM2FuNQDNf
    V4PqOetM2FuNQDNf
    5GW2KD3C4FYXniog
    FuOZoIpxcQjjpXrW
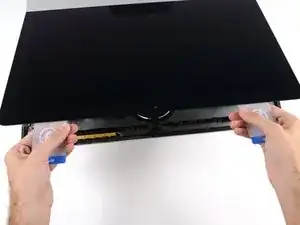
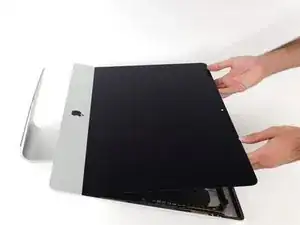
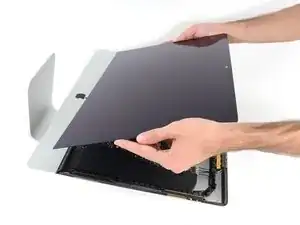
    • Levanta la pantalla del marco y sácala del iMac.

    • Puede que sea necesario levantarla lentamente por un lado para despegar el adhesivo restante.

    • Ten mucho cuidado al manipular la pantalla, es grande, pesada y está hecha de vidrio.

    • Después de cortar el adhesivo, no se puede usar para volver a sellar la pantalla en su lugar. Sigue esta guía para reemplazar las tiras adhesivas que aseguran la pantalla a la carcasa trasera.

  24. vnCZOVJAfQMkCXVO
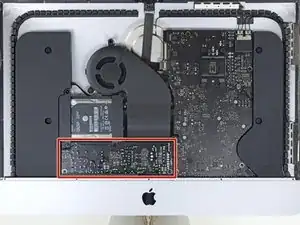
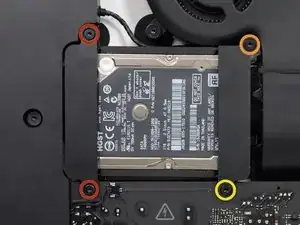
    • Retira los siguientes tornillos Torx T10 que aseguran los soportes del disco duro al iMac:

    • Dos tornillos de 21 mm.

    • Un tornillo de 9 mm.

    • Un tornillo de 27 mm.

    At step 26, when reassembling, it's super easy to over-tighten the 9mm screw and strip the brass ferrule out of its hole in the plastic bracket (%#*@).

    roberttrevellyan -

    Mine has 4 different length screws, the two red colored 21mm screws in this guide are actually two differ lengths

    anonymous 523 -

    Mi imac does not have a HDrive whats the steps to follow?

    Charlie -

    buongiorno, l'imac del 2019, non monta alcuna ssd, ma monta una m2 direttamente sulla scheda madre!

    pertanto nella guida andrebbe aggiunto il cavo sata con sensore temperatura da aggiungere sulla scheda madre, per poter collegare un nuovo hd ssd altrimenti rimarrete come me bloccati con un imac aperto e non assemblato, in attesa di ricevere il cavo acquistato su internet da amazon o terze parti.

    vi consiglio inoltre di aggiungere una foto reale del ò'imac 2019 nella guida in cui manca l'ssd, renderà subito la problematica che avranno in molti!

    Donato Altomare -

  25. MFEFhp6PYNe1LMei
    MFEFhp6PYNe1LMei
    YOZ6AmbKs2AlGURG
    • Retira los soportes izquierdo y derecho del disco duro del iMac.

  26. EGSkL6kXHVGCmtmj
    EGSkL6kXHVGCmtmj
    snVMiOLDfgjXKECJ
    lSpidPoWASusAqki
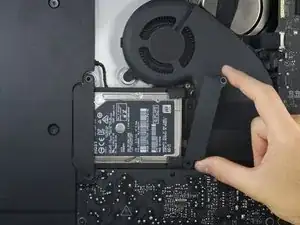
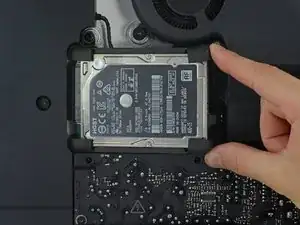
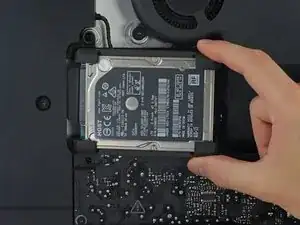
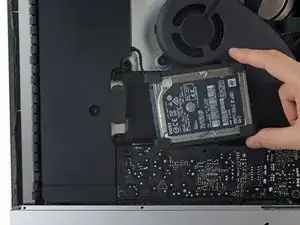
    • Levante el disco duro del borde más cercano a la placa y extráigalo ligeramente de su alojamiento.

    • El disco duro todavía estará conectado por su cable SATA; No intente extraerlo completamente todavía.

  27. lPTZWiOAYX4DCip2
    lPTZWiOAYX4DCip2
    WWAqU5y5tyeOXye2
    Ze5CkUIkcEpVNERw
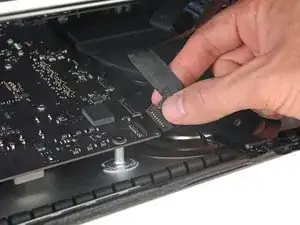
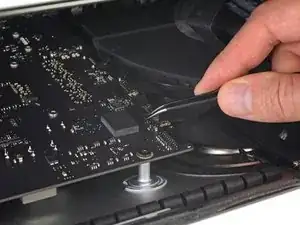
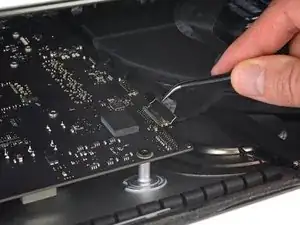
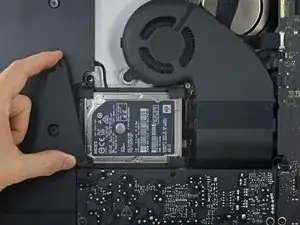
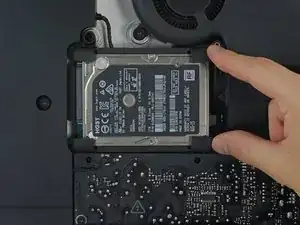
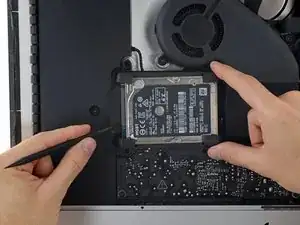
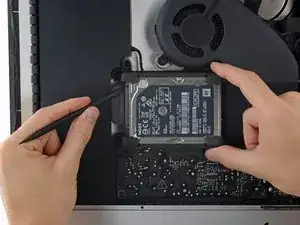
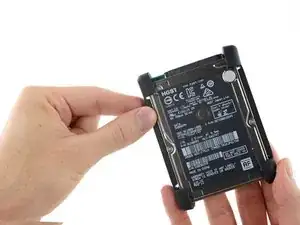
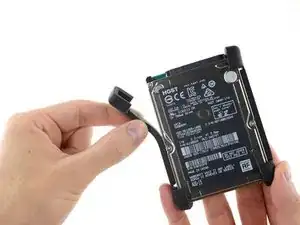
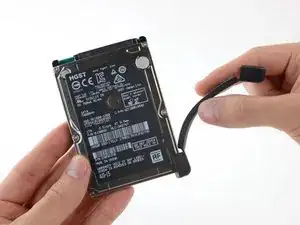
    • Use una punta plana para desconectar el cable SATA individual y sepárelo con cuidado del disco duro.

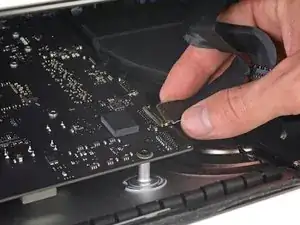
    • Extrae el disco duro del iMac.

    I’ve found that loosening the T10 screws on the enclosure to the left helps give some room to remove and reinstall the drive. Otherwise reattaching the SATA cable can be a hassle.

    rothgar -

    Not only is it useful to loosen up the speaker next to the SATA connector I found it helpful to use a pen to mark the exact location of the edges of the SATA connector on top of the new drive, so I could guide the connector in place. It also helps to put the bumpers in after you get this SATA connector in place.

    bsmith1 -

  28. OhYEhqf5cHYCQQIr
    OhYEhqf5cHYCQQIr
    UGpGbsieey3Yi44v
    wQTUmAvYnOUYUKKM
    • Despega el tope de goma de un lado del disco duro.

    • Repite para el otro lado.

    • Cuando instales una nueva unidad, es de ayuda usar cinta de doble faz para pegar los topes a tu nueva unidad.

    reconnecting the new drive can be a little tricky as the sata connector in the Mac is hard to align. I found that it helps to move the end of the bumpers out of the way, then push them back into position once the drive is connected.

    Gareth Jones -

    thats what it did as well, thx for the hint. also i used a plastic spudger to reconnect the plug unto the new drive and leveled it against the speaker casing thats so close to the drive bay

    Stef999 -

    Can I install a Samsung 850 EVO 500GB to replace my 1TB 5400rpm disk? and is a seperate thermal sensor/cable needed to prohibit the fan to run at 100% all the time?

    Maurits K -

    Yes you can install ANY SATA SSD.

    And no … there is no thermal sensor on the drive. You don’t need them on these models.

    robert Seith -

    Can I install a Seagate FireCuda 2TB to replace my 1TB 5400rpm disk? and is a seperate thermal sensor/cable needed to prohibit the fan to run at 100% all the time?

    andrew mudd -

    Did you ever find out if you could replace your 500 GB with that Firecuda? I’m looking at doing that. I need more storage for my 500 GB photos library and don’t want to pay so a ton for the SSD that is big enough.

    shippster -

    where is the guide for the follow up ?

    installing a new hard disk and closing the screen back up.

    yog1389 -

    The SSD was a HUGE performance boost over the 5400rpm drive my iMac came with. If you’re pulling your hair out because Lightroom has become excruciatingly slow, upgrade your hard drive to SSD. You will not be disappointed.

    The kit has everything you need. Follow these instructions carefully and you’ll be fine.

    Mike Mullis -

    Huge improvement! It’s like a new machine. Highly recommended upgrade.

    Take care with the adhesive strips, and don’t forget to set new SSD as the boot disk (System Preferences, Startup Disk) after you’ve tested its bootable.

    Stephen Babbage -

    I previously had a fusion drive and installed a SSD. Will there be any issues with the ssd portion of the fusion drive? I still see it there in disc utility. Also, I’m showing two SSDs, along with the 32 gig one. Is that correct or did I create something that shouldn’t be there?

    rossmueller -

    I have this same question. I’m showing 2 drives but 1 is grayed out on the computer screen when I click on it nothing happens.

    Frank -

    A fusion drive combines two physical disks via software to act as one. It it something that has to be done manually and expressly. When you first got the computer, your fusion drive combined disks A (SSD) and B (HDD). If you replaced B, then you probably have an unused 32 GB blade SSD along with your new SSD. It possible to create another Fusion drive, but you’d have to start from zero, because creating a fusion drive erases the individual disks completely.

    also, not 100%, but I tried for several hours the other day and I’ve come to the conclusion that my version of Big Sur (11.1) doesn’t support Fusion Drives. Correct me if I’m wrong. Or maybe it’s because I’m running Big Sur on an unsupported iMac.

    David -

    It is also possible install the bumpers after getting the drive cable attached. This gives you more room to work with the cable and drive.

    Sean Kane -

    The hardest part was to plug the connector into the new SSD. I loose the two screws of the adjacent (left) speaker and move it just enough to have sufficient space to introduce my fingers to push the conector into the SSD. Left the replace of the rubber bumpers after reconnect the SSD, is easy to handle without it.

    Dennis Salas -

    I bought Samsung QVO 1TB SSD and now the fan is blasting fast and loud. So if these don’t use the thermal cables then what seems to be triggering the high temp? Obviously it’s the hard drive but could it be that the drive was cloned? I’m kinda stumped, I know I can control with software but some of you are saying it should run normal after install. Thanks for the info.

    MonoFrio -

    Is there a PCIe slot for an SSD instead of the SATA 3.0 2.5”?

    thank you,

    deejaysurfer -

    Not unless your iMac shipped with a Fusion drive or SSD.

    roberttrevellyan -

    The step-by-step guide was awesome and easy to follow. As others have commented, getting the SATA connector onto the SSD is tricky but not impossible. Just pull back the rubber bumpers long enough to reach the connector, then flip them back into place before seating the drive. One comment for my machine (late 2015 21.5”): There is no mic hole for my model, so while I was a little confused at the instructions on reinstalling the adhesive, the drive replacement went like a dream. And I saved myself the $120 labor the local Mac shop wanted to charge me.

    Glenn Pettit -

    Hat alles prima funktioniert. Leider läuft der Lüfter jetzt auf 100% und kernel_task Prozess ist bei über 300%. Was habe ich falsch gemacht. Diagnose meldet jetzt einen SMC Fehler und CPU-Proximity liefert keinen Wert.

    Kann jemand helfen?

    Michael Schmitz -

    This is the least accurately described step (sorry, author). While removal is easy, inserting the new drive in its place is a bit tricky. The key here, is to insert the new drive with its rubber bumpers back in its space, so that it is fully seated down in its place *before* the connector can be re-attached. Once it is seated in place, use the flat end of the spudger to gently manoeuver the connector back into place until it is firmly connected to the drive.

    Ernst -

    Reassembling the iMac is not simply following these instructions in reverse order (sorry, author).

    Before embarking on the home stretch, it is very important to carefully study the guide about the Adhesive Strips Replacement (iMac Intel 21.5" Retina 4K Display (2017) Adhesive Strips Replacement - iFixit Repair Guide), as this a tedious and time consuming process. Perfect alignment of those adhesive strips takes some concentration, because you will want to have your display panel back nice and tight and fully aligned with the case. Once all strips are in place, the 2 display connectors need to be gently reattached to the motherboard, before closing up the panel. I took my sweet time for that step, and thankfully have a perfectly aligned display panel back in place looking no different from the factory fit.

    Ernst -

    Here’s the rest of the information you need.

    https://www.youtube.com/watch?v=2xDJ28Oe...

    John Smith -

    I got a 4 TB Seagate Barracuda HDD as a replacement for a client. (Going for capacity over speed.) Does anyone know if it will fit? It’s definitely fatter than the other HDD/SSDs I’ve installed before.

    David -

    There needs to be more added to cover the first part of re-assembly. To connect up my SSD, I needed to remove screws that held in place the black plastic to the left of the drive bay. This was only way to get the added space needed to connect the SSD to the drive cable. I also connected the SSD first, then attached the rubber bumpers, simply to give me more room to maneuver the drive next to the connector. All in all, yes, a person well familiar with tearing down iMacs could do it in an hour or so. But frankly, the design of this iMac is a total horror show when it comes to repair or replacement of parts, especially given its reliance on glue and adhesives. Gee, just like other Apple products.

    Ben Myers -

    Ben, after you replaced the HDD with SSD, did you have any fan issues on the A1418 model iMac? Thinking of doing this but I’ve been reading for hours and seeing mixed reports about thermal sensors.

    Christopher Henley -

    This iFixit tool (iFixit Opening Tool) will be your best friend when it's time to install your new 2.5" hard drive. Simply hook the tool to the back top corner of the iMac SATA adapter, connect your hard drive loosely to the SATA ports and use the tool to pull the SATA adapter forward into the hard drive.

    iannai29 -

    After replacing the hard drive. All went well BUT -now my mic does not work. It's the single hole on the bottom. Any ideas anybody?

    Paolo Alberto -

    Did you notice step 14 in the guide to replacing the adhesive strips?

    roberttrevellyan -

    Please update the end of this guide, pointing the customer to the guide for replacing the display adhesive strips. You provide a single kit for this procedure, and the customer has to figure out that they must follow two independent guides, in order to successfully complete the installation.

    Lewis -

Conclusión

Compara tu nueva pieza de repuesto con la pieza original; es posible que debas transferir los componentes restantes o quitar los respaldos adhesivos de la nueva pieza antes de instalarla.

Para volver a armar tu dispositivo, sigue los pasos anteriores en orden inverso.

Lleva tus desechos electrónicos a un centro de reciclaje certificado

¿La reparación no salió según lo planeado? Consulta nuestra Comunidad de respuestas para obtener ayuda para solucionar problemas.

Adam O'Camb

Miembro Desde 11/04/15

179525 Reputación

7 comentarios

Great guide! I had a failing fusion drive and upgraded to an SSD and got the 64gb RAM maxxer kit while I was in there. everything went really smoothly and my computer is so much faster. My only mistake was that I didn’t clone the HDD before taking the imac apart. I had to put it all back together with the old drive, clone to the SSD, take it all apart again, replace the SSD, put it back together to verify that it was even gonna work, then take it all apart again to finish up the RAM upgrade. But… it’s all good. Thanks for the great guide!

Mark Pruett -

You cannot replace a conventional “Hard drive” in this model iMac.

DO NOT attempt this upgrade until you understand two important facts:

1) The drive in your iMac MUST BE a ‘SSD’ or a ‘Fusion drive’. If it is a conventional HDD, stop. There is NO PCIe CONNECTOR inside to connect a new blade drive.

2) Click on the link in this iFixit for "clone your existing hard drive". All the more recent Apple CPU's are now classified as 'T2 secure chips'. Cloning is no longer straightforward, e.g. "Hold down Opt key during restart, etc." You have to bypass/disable certain security features on your iMac, and this is somewhat of a lengthy process. If you do not, when you try to boot from an external drive you will see nothing but a black screen.

Excellent step by step guide, thank you. I will definitely refer to this when I upgrade my 250G SSD which, BTW, is WAY too small. There's only 100G left, and only apps are Logic Pro X, Numbers/Keynote/Pages, iTunes & a few utilities... hardly any actual work

Anti Spam -

Thanks for the information given. One follow-up question having a SSD-only 2019 iMac: Is the 2.5" harddrive enclosure and Sata-Cable included in this one? I would like to a) upgrade the PCIe-SSD but also put in a slightly bigger 2.5" SSD in place of the - currently non-existent - harddrive. Knowing Apple I am pretty sure that they did not include the Harddrive enclosure in SSD-only 2019 iMacs - plus using proprietary Sata connectors probably >.<

Joachim Schneider -

The guide here mentions nothing of upgrading a blade ssd. If I open my imac and see a HDD can't I just swap it with a 2.5'SSD?

Mosheh Herdsman -

Your message is not clear. This guide is for a conventional drive upgrade for a Pre T2 2019 iMac.

This guide is also for an iMac that is Pre-T2, so your second point is not relevant either.

Sure, do not follow this guide if you wish to upgrade your SSD equiped iMac, or a 2020 iMac or iMac Pro.

Charlie Nancarrow -

You absolutely can replace a traditional drive in this model iMac.

Charlie Nancarrow -

Bit of a tip!, Make sure to absolutely sever all of the adhesive by running the tool up and down all sides - be particularly careful around the camera.

Harry Bradstreet -