Introducción

Los modelos más antiguos de Xbox 360 tenían problemas importantes con el disipador de calor. Reemplaza tu disipador de calor en el caso (con suerte poco probable) de que veas el "círculo rojo de la muerte" (RROD).

  1. IP1JWNMLJmRX1vhD
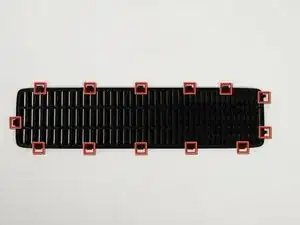
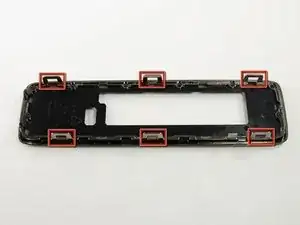
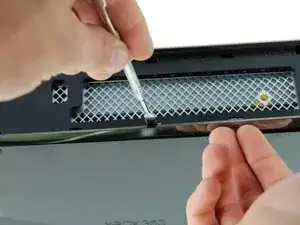
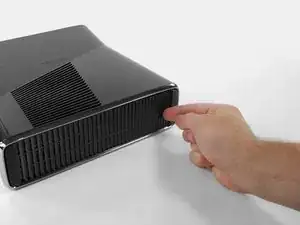
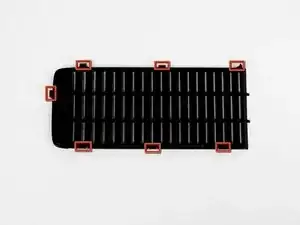
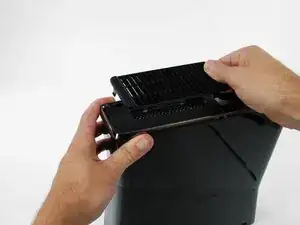
    • En los siguientes pasos, removerás la ventila superior, asegurada al panel superior por los trece clips mostrados a continuación

    • Al remover la ventila ten cuidado de no romper ninguno de los clips de plástico

  2. Z1ToCNbfyZH3YZWM
    Z1ToCNbfyZH3YZWM
    dnRmFvs5GGiATnRo
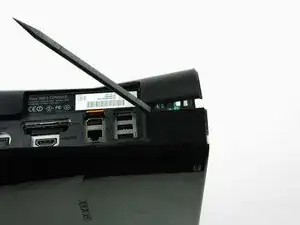
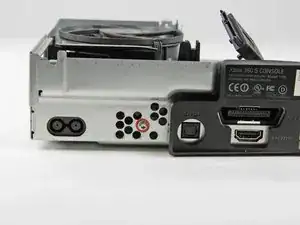
    • Orienta la consola de modo que las palabras "XBOX 360" de los lados miren hacia la derecha y estén orientadas hacia arriba, y la placa frontal mire hacia la izquierda

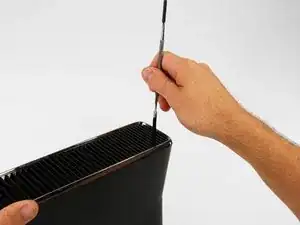
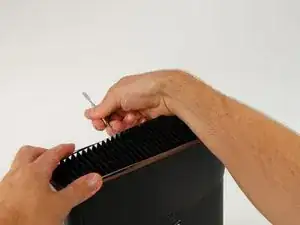
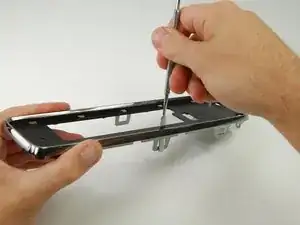
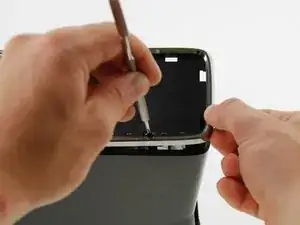
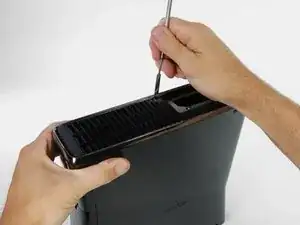
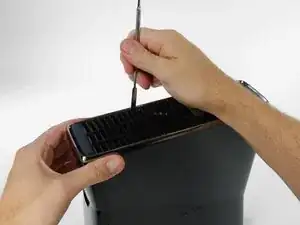
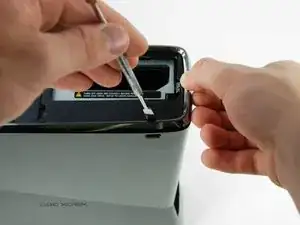
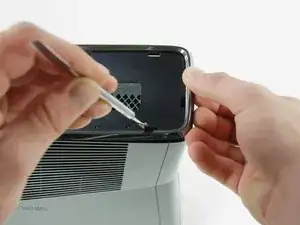
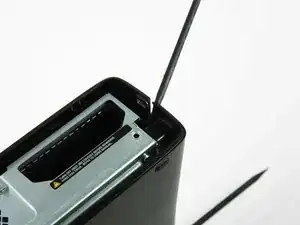
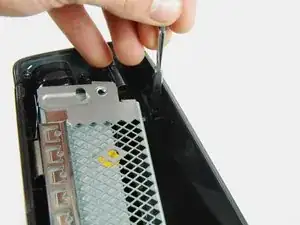
    • Inserta un spudger metálico entre la ventila superior y el bisel superior cerca de la parte trasera de la Xbox

    • Rota el spudger hacia afuera de la consola, haciendo palanca hacia arriba en el borde de la ventila hasta que se liberen los clips de plástico

    • Asegúrate de rotar el spudger lo suficiente para que los clips de plástico logren separarse del bisel superior

    Whoever gave that tool the name “spudger” needs to be shot in the face.

    Richard -

    This step is and the others following are to rough and not needed, simply put smth in between the lamellar and push it up with littlebit pressure thats better for the plastic parts.

    TheSupport -

  3. mBFIp6mJFDfEoqLh
    mBFIp6mJFDfEoqLh
    Yj1ySdjcOd1en4nx
    yWsBHYJDO3QEB5ea
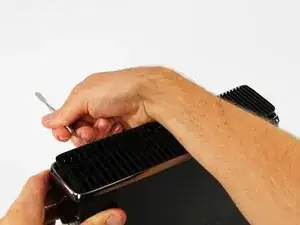
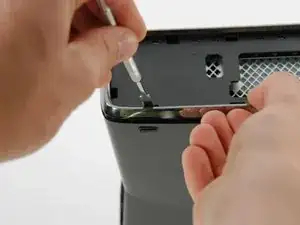
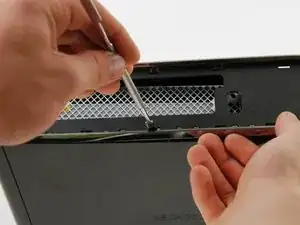
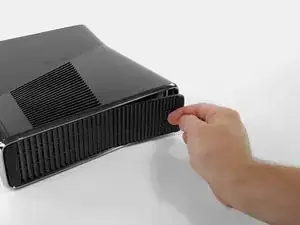
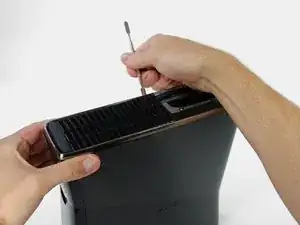
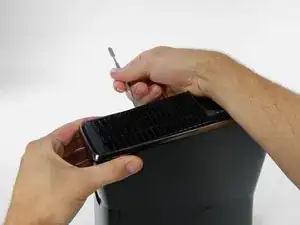
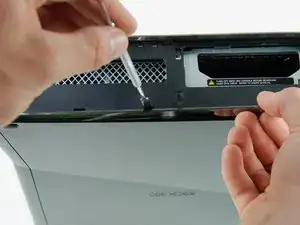
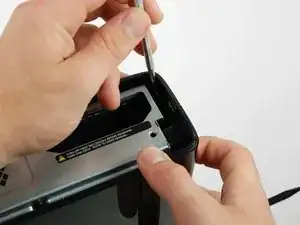
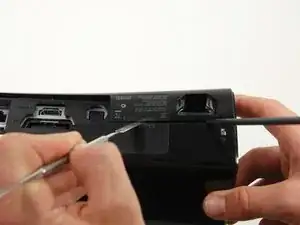
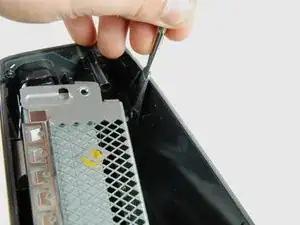
    • Inserta un spudger metálico entre la ventila y el bisel superior a lo largo del lado izquierdo de la consola

    • Del mismo modo descrito arriba, empieza a hacer palanca hacia afuera del bisel superior en el lado izquierdo de la ventila superior

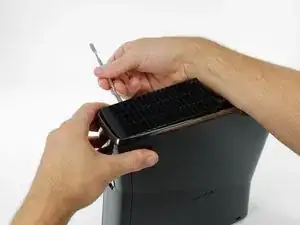
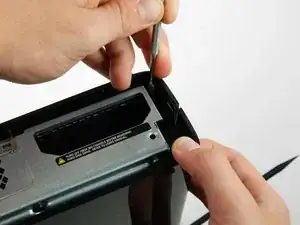
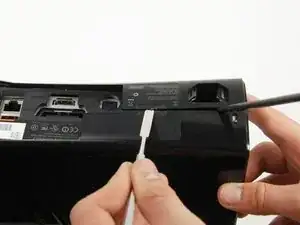
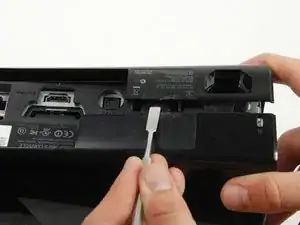
    • Continúa haciendo palanca a lo largo del lado izquierdo del dispositivo, liberando todos los clips de ese lado

  4. TVHuVBEALfZ4x6hj
    TVHuVBEALfZ4x6hj
    5iBGhLfuGoGRExFu
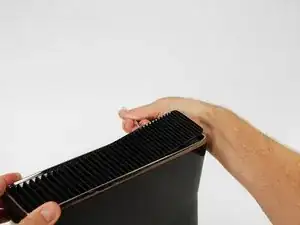
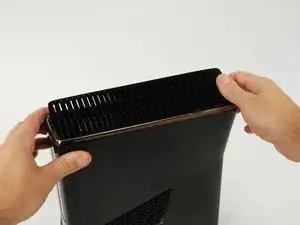
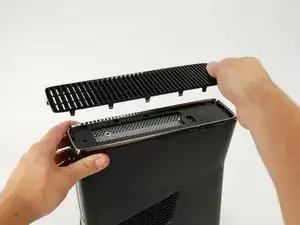
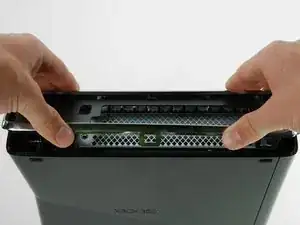
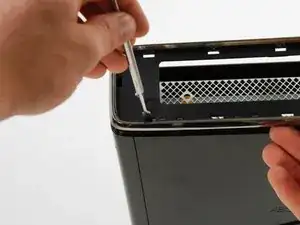
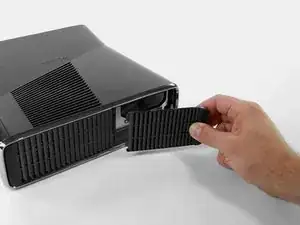
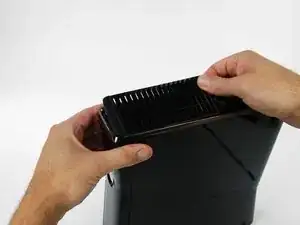
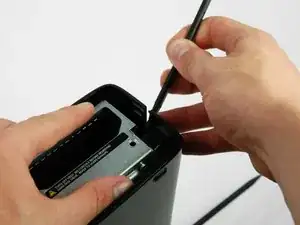
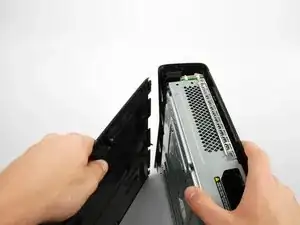
    • Levanta la ventila desde el lado izquierdo liberado para liberar los clips a lo largo del lado derecho (vaya la redundancia)

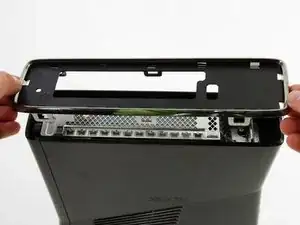
    • Retira la ventila completa

  5. VfMXKLNipiIQwSOZ
    VfMXKLNipiIQwSOZ
    ndwunoEYEXhaYQZW
    • En los siguientes pasos liberarás los seis clips mostrados en rojo

    • Cada clip puede soltarse al insertar un spudger metálico debajo del borde inferior del clip. Una vez debajo del borde inferior, el clip se liberará al simplemente hacer palanca hacia afuera de la consola

    see the red boxes specially in image

    Restrict -

  6. pwvHElYKyPEJG3U2
    pwvHElYKyPEJG3U2
    D54fVYlVZ1PtoeEv
    • Orienta la consola de modo que la carcasa izquierda esté mirando hacia ti y la placa frontal mire hacia la derecha

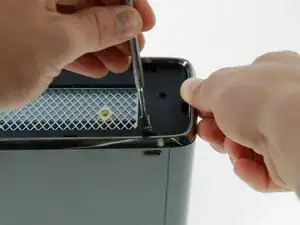
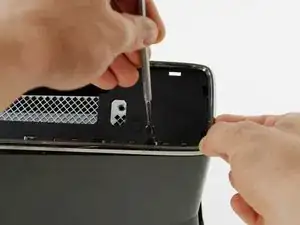
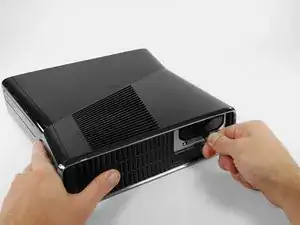
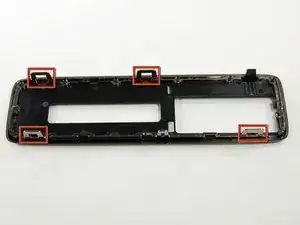
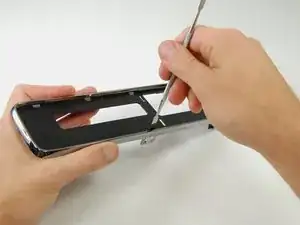
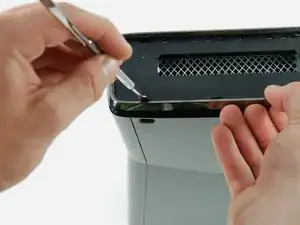
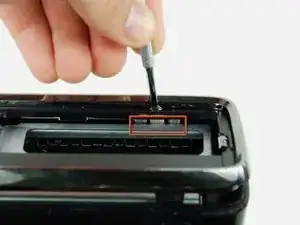
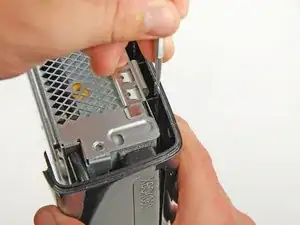
    • Inserta un spudger metálico a través de la ranura en el borde izquierdo del borde superior ubicada más al frente y entre el borde inferior del clip y la carcasa izquierda como se muestra arriba

    • Simultáneamente rota el spudger metálico hacia afuera de la consola tira hacia arriba en el bisel superior para liberar el clip

    • Escucharás un "pop" que significa que el clip salió de su sostén

  7. y23YoKaSekhbIQwo
    y23YoKaSekhbIQwo
    iB5KUbZcmo2MWtSB
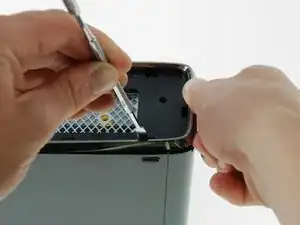
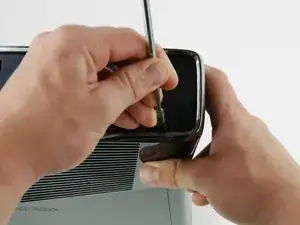
    • Usando el mismo método descrito arriba, libera los dos clips restantes a lo largo del borde izquierdo del bisel superior

  8. XtehstcyHWNWTouD
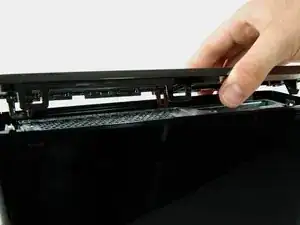
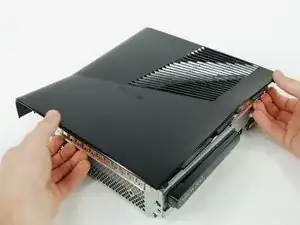
    • Agarra todo el panel superior con tus manos, levanta lo suficiente el borde izquierdo de modo que los clips separados se apoyen encima del panel izquierdo

    • Tal vez tengas que volver a separar algunos clips que se hayan unido nuevamente con un spudger

    • Todavía no se ha liberado el panel superior de la consola

  9. y3cLdtOmcKjkT6EN
    y3cLdtOmcKjkT6EN
    1HETFB4Ug3KnjM4w
    • Rota la consola de modo que la parte trasera de la Xbox 360 S mire hacia la derecha, y la carcasa derecha mire hacia ti

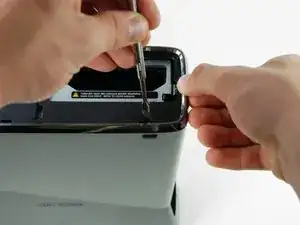
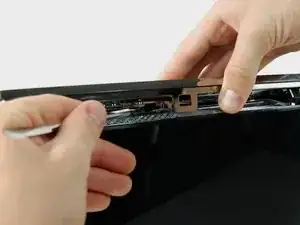
    • Inserta un spudger metálico a través de la ranura del borde derecho del bisel superior ubicada más hacia atrás, y entre el borde inferior del clip y la carcasa derecha

    • Rota el spudger hacia afuera de la consola mientras levantas el bisel superior con tus dedos para liberar el clip

  10. MJFlhZQRDQSV2QMs
    MJFlhZQRDQSV2QMs
    IAYOJc14CChWtHMU
    • Del mismo modo descrito en los pasos anteriores libera los clips central y frontal que están a lo largo del borde derecho del panel superior

  11. SVCdXtDqKEZW5MHX
    • Levanta el panel superior del dispositivo

    • Recuerda: Tal vez tengas que soltar nuevamente algunos clips que se hayan vuelto a unir a la consola con un spudger

  12. cXP361EtBaAjGJZB
    cXP361EtBaAjGJZB
    ksjfRhRUilKgu1kc
    sXUNWd5icHUfKXks
    • Orienta la consola Xbox 360 S de modo que el fondo de la consola mire hacia tí

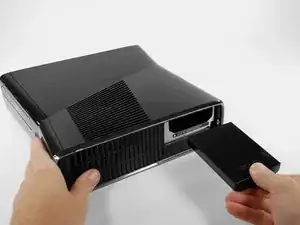
    • Empuja hacia la izquierda el pestillo que sostiene la cubierta del disco duro

    • Tira la cubierta del disco duro hacia afuera de la consola

  13. dRnspOOs2hdPYjJL
    dRnspOOs2hdPYjJL
    yixceNkF4cdwcFYI
    veFpNDlsHOIvkOZM
    • Agarra firmemente la etiqueta de tela que dice 250 GB, esta etiqueta está unida al disco duro

    • Tira el disco duro hacia afuera de la consola

    • La etiqueta de tela está unida a un pestillo que se encuentra más adentro de la cubierta del disco duro. Se necesitará algo de fuerza para jalar hacia afuera el disco duro

    If i buy a new xbox 360 and replace the hardrive inside with my own, will i have my account and saves? or will i have to recover my account and start over?

    yamboboy -

    You will still have your saves and account if you replace your hard drive in the new xbox

    Robert Miller -

    hola tengo un disco de laptop y quiero ponerle 100 juegos como puedo hacer la xbox me reconose el disco y todo lo configuro pero cuando conecto a mi pc para pasar los juejosel emulador no me deja

    Cesar Tourreilles -

    My fabric was accidentally ripped off years ago. What do I do?

    org 2026 -

    Stick another bit on there

    Josh Cool -

  14. JdeURU5d2WNK2NIW
    • En los siguientes pasos retirarás la ventila inferior

    • Está unida al panel inferior por los siete clips mostrados

  15. DkxXqSfqI1ERCOZc
    DkxXqSfqI1ERCOZc
    gD5ReDMv1MWgACNr
    • Orienta la Xbox 360 S de modo que el puerto del disco duro esté mirando hacia arriba y el panel frontal esté viendo a la izquierda

    • Inserta un spudger metálico entre la ventila inferior negra y el borde plateado/negro del bisel inferior, en la esquina inferior derecha de la ventila.

    • Rota el spudger hacia afuera de la consola, haciendo palanca en la ventila desde el bisel inferior

    • Asegúrate de rotal el spudger lo suficiente para que los clips en la ventila se levanten más allá del borde plateado/negro del bisel inferior

  16. YiNRR43xJaGjaMKC
    YiNRR43xJaGjaMKC
    uBPCHkeRyTOBVjp3
    6byKJwvsYIPolHlX
    • Del mismo modo descrito arriba, haz palanca en los dos clips restantes en el borde inferior derecho

    • Todos los clips a lo largo de los bordes derecho y frontal deberían estar sueltos. Si otros clips también se soltaron, está bien

  17. IahXZbmBH1IeCXJE
    IahXZbmBH1IeCXJE
    lvmhHM1AxcLEEuQW
    • Retira la ventila inferior levantándola del bisel inferior

  18. KCDQaD6xFdnDjSou
    KCDQaD6xFdnDjSou
    MxgTGMMNrYJYxoCU
    • En los siguientes pasos retirarás el bisel inferior, que está unido al resto de la consola por los seis clips mostrados

    • Los clips mostrados en rojo pueden separarse insertando un spudger metálico debajo del borde inferior del clip. Una vez abajo del borde inferior, el clip se liberará al simplemente hacer palanca hacia fuera de la consola

  19. Z1y23DAjLEl4UKDo
    Z1y23DAjLEl4UKDo
    bAYCknYslmUGlfRo
    • Inserta un spudger metálico a través de la abertura cerca la esquina inferior izquierda del bisel inferior

    • Rota el spudger hacia afuera del dispositivo mientras levantas el bisel inferior hacia arriba (valga la redundancia) con tu otra mano

    • Podrías escuchar un pop, lo que significa que el clip fue liberado

    These are pretty awkward to remove, but once you understand how they work its easy enough. The goal here is to slot the spudger THROUGH the gap of the silver tabs (visible in previous steps image, circled) and then pry. Put pressure against the wall of the Xbox case and push downwards, once you feel the spudger slot in, then apply force away from the Xbox and pull up a little with your free hand.

    Spaced Invader -

  20. oCYbsitAfTRRourw
    oCYbsitAfTRRourw
    YpSSYNkOyMbjtXB5
    • Inserta un spudger metálico a través de la abertura izquierda en medio del bisel inferior, y entre el borde inferior del clip y la carcasa izquierda

    • Jala hacia arriba el bisel inferior y rota el spudger hacia afuera de la consola simultáneamente para liberar el clip

    • Libera el clip al frente del borde izquierdo del bisel inferior del mismo modo

    • Ahora todo el lado izquierdo del bisel inferior debería haber sido liberado

  21. aQyChrSntWEdEbwS
    aQyChrSntWEdEbwS
    lkvca1xDnnKV1rP2
    • Gira la consola de modo que el panel frontal mire hacia la derecha y el panel derecho de la carcasa mire hacia ti

    • Inserta el spudger en la abertura trasera en el borde derecho del bisel inferior, y presiona el spudger hacia abajo mientras presionas la punta del spudger contra el panel derecho de la carcasa para calzarlo

    • Libera el clip y tira el bisel hacia arriba simultáneamente

    • Este clip es especialmente difícil de remover. Se requerirá algo de fuerza para insertar el spudger correctamente

  22. RfPl2wCnjJEJNYGq
    • Este clip no tiene una abertura en el bisel para guiarte. Puedes localizar el clip mirando bajo el bisel cerca de la ranura de disco duro

    • Inserta un spudger entre el borde plateado/negro directamente sobre el clip mostrado

    • Libera el clip mientras tiras del bisel inferior hacia arriba

  23. A4SnSxnfFIWSaSKW
    A4SnSxnfFIWSaSKW
    uVViKRQGsuU2EkQk
    • Este clip es más pequeño que los otros y no debe retirarse desde arriba como los otros

    • Levanta lo suficiente el borde izquierdo del bisel inferior para hacer espacio

    • Inserta un spudger metálico entre el borde izquierdo del último clip, y empuja el clip hacia afuera del panel derecho de la carcasa

  24. QVyGsMkdmQgx5h1w
    • Abrir tu Xbox 360 requerirá que rompas o remuevas el sticker de la garantía en el panel exterior. Tu garantía de Microsoft por cualquiera de los componentes que no estén directamente adjuntados al tablero lógico va a ser cancelada al remover el sticker.

    Does not void the warranty in the United States according to the FTC that sent a cease and desist letter directly to Microsoft about this exact issue.

    Jeff -

  25. ESX6RXFxWtVvvNhn
    ESX6RXFxWtVvvNhn
    2WuPWkorjbZcyoEy
    • Orienta la consola hacia arriba del lado derecho, con el panel frontal enfrentándote.

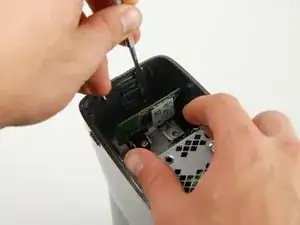
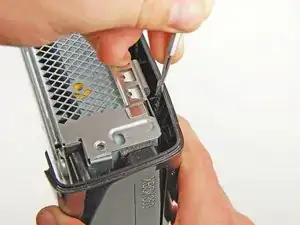
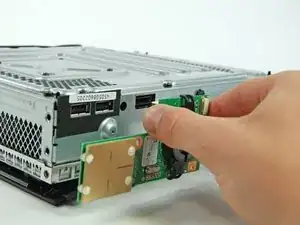
    • Localiza los dos clips que conectan el panel izquierdo y el derecho junto al borde de la parte de arriba de la consola, detrás de la carta del Wi-Fi.

    • Mientras empujas el panel izquierdo y el derecho lejos de cada uno con una mano, saca los clips del panel con una espátula de metal.

  26. GgXwlPbZEqkQi3Xw
    GgXwlPbZEqkQi3Xw
    FmMLqlUQYISFDhKO
    • Continúa sosteniendo las dos cajas separadas para evitar que los clips se vuelvan a unir.

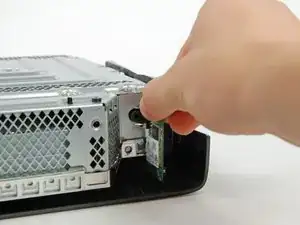
    • Inserta un spudger entre las cajas derecha e izquierda para mantenerlas separadas mientras trabajas en otro lugar.

  27. v5Ou1r5ibOOgOWGN
    v5Ou1r5ibOOgOWGN
    ZLNLrvyDjIHuBEL3
    • Voltea la Xbox de modo que la placa frontal quede hacia la izquierda y la carcasa izquierda hacia ti.

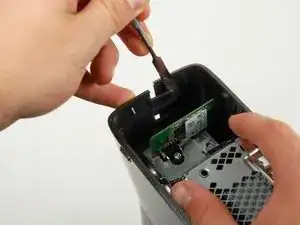
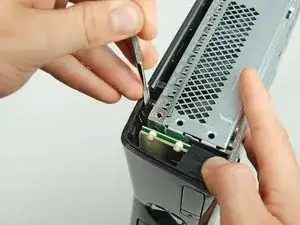
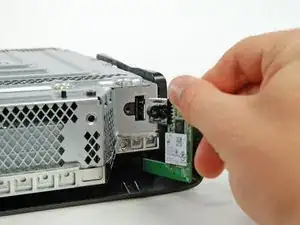
    • Mientras separas las carcasas izquierda y derecha con una mano, libera un clip ubicado al lado de la ranura del disco duro.

  28. ktIt4eAnklKnBZin
    ktIt4eAnklKnBZin
    TdTkALSdmfeMsNKh
    • Continúa manteniendo las cajas separadas para evitar que los clips se vuelvan a unir.

    • Coloca otro spudger entre los casos izquierdo y derecho directamente debajo del clip.

  29. SLSUre1Bn6cYRJsv
    SLSUre1Bn6cYRJsv
    hGtF2XCu6vUhUeXP
    HF62yVZoNofBJCpP
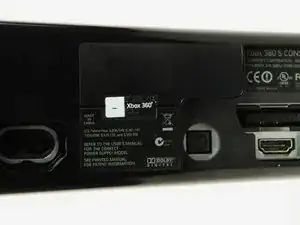
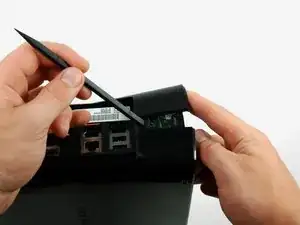
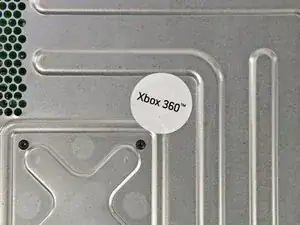
    • Inserta el borde plano de un spudger de metal entre las cajas izquierda y derecha donde solía estar la etiqueta de garantía.

    • Haz palanca en la caja izquierda hacia arriba para formar un espacio entre las dos cajas y desliza el spudger hacia la caja izquierda.

    • Gira el spudger hacia arriba para liberar el último clip.

    • Se pueden quitar los spudgers que mantienen separados los clips superior e inferior.

    if you make a hole right here like the link`s picture you can boot the lock

    https://scontent-mia.xx.fbcdn.net/hphoto...

    Midguet Garcia -

    As the user above me said, please avoid doing it like shown in the guide. It just didn’t work on my Xbox (unless your goal is to destroy the plastic case). Instead, pick some small needle like object (the spudger was too short for this, I used the SIM bit of my iFixit driver kit) and find the right spot on the big sticker which is on the left in the pictures shown in the guide. That spot is just between the text and the column of logos (Dolby Digital, etc.) (https://team-xecuter.com/slim/slim_secre..., picture not mine). Poke it (don’t be too gentle, you have to apply some force) and you will hear the clip release.

    Davide Volta -

  30. wkhik1QvnILABGrl
    wkhik1QvnILABGrl
    ho6d4RyHQuarpTE4
    • Suelta un clip en la esquina frontal izquierda del borde superior que sujeta la carcasa izquierda a la placa frontal.

  31. uqDRBkXBeITNybcX
    uqDRBkXBeITNybcX
    ctnwtblbsGfByuen
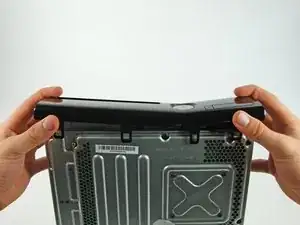
    • Voltea la consola de modo que la parte inferior quede hacia arriba.

    • Suelta un clip en la esquina frontal izquierda del borde inferior que sujeta la carcasa izquierda a la placa frontal.

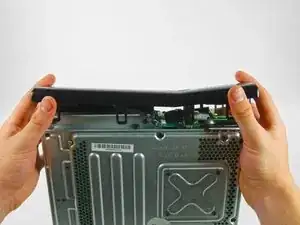
    • Gira la carcasa izquierda lejos del dispositivo para liberar los dos últimos clips internos.

    • Retira la carcasa izquierda.

  32. CwYswTVQIAgNYmoW
    CwYswTVQIAgNYmoW
    x4WNLccaiZo2XTfR
    • Orienta la consola con el lado derecho hacia arriba, con la placa frontal mirando hacia adelante.

    • Suelta el clip cerca de la esquina frontal derecha del borde superior que sujeta la carcasa derecha a la placa frontal.

    There are 4 black screw that has to be removed before you can detach the other cover. Please note

    emmoski4real -

    Sorry, there 5screws, one in the middle and 4 at the edges

    emmoski4real -

  33. JDunIig6mInAJ1Yu
    • Voltea la consola, de modo que la parte inferior quede hacia arriba y la placa frontal hacia adelante.

    • Suelta el clip en la esquina inferior derecha del borde superior que sujeta la carcasa derecha a la carcasa frontal.

  34. OvWcYdIAANTu1vTA
    OvWcYdIAANTu1vTA
    6er2YbKEL35TJx52
    • Levanta el borde izquierdo de la placa frontal hacia arriba para soltar los dos últimos clips que sujetan la placa frontal a la caja derecha.

    • Separa la placa frontal del resto del dispositivo.

    • La placa frontal aún está unida a la consola mediante un cable plano delgado. No intentes quitar completamente la placa frontal todavía.

    It is easier to perform step 40 before 34 (unscrew the long torx screws to make the right case flexible)

    Peter -

  35. agv1KMslsls1DUa2
    agv1KMslsls1DUa2
    dbBdFQv5PpNXIKNq
    FtQwGWVDAdwKEcVO
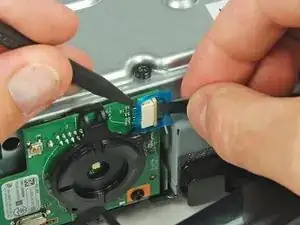
    • Usando un spudger o una uña, levanta la pestaña azul transparente del conector.

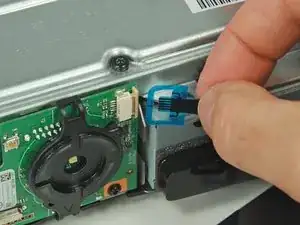
    • Desliza la lengüeta de bloqueo del conector del cable de la placa del interruptor de alimentación hacia la parte superior de la consola.

    • La lengüeta de bloqueo solo se moverá unos 2 mm.

    • Saca el cable del interruptor de alimentación directamente del conector.

    • La placa frontal ahora está libre del resto de la consola.

  36. TKuV531xUkoWfhW6
    • Retira los dos tornillos Torx T8 de 5,6 mm que sujetan el módulo de RF a la caja de metal.

    On my disassembly during this part, I found the T9 Torx to be too big and had to use the T8 Torx instead.

    weitmeyerj -

    The correct size is T8!

    thomasforster -

    I guess you need to check for your own size : I used the TR9 as the TR8 was a little too loose.

    sirmyself -

  37. Wfr45SDpPMnQCVuL
    Wfr45SDpPMnQCVuL
    cC4iFhV1FcgkgoUh
    • El módulo RF todavía está conectado a la Xbox mediante un conector grande de tipo USB.

    • Tira de la placa directamente lejos de la Xbox para quitarla.

    This step is not needed.

    Wade -

    It may not be required but recommended. As you move the xbox around you could break this part. Removing it and placing it in a safe place keeps that from happening.

    junkyardjojo -

    Is the rf module married to the mother board? Im trying to replace the piece but dont want to start if it is not compatible.

    jake -

  38. JfTWCTW2qcgQw2nZ
    JfTWCTW2qcgQw2nZ
    AGhJqu6IxhIrhXqx
    pi1N4OBnrEOCLSUP
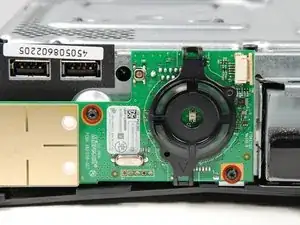
    • Retira el único tornillo Torx T10 que sujeta la tarjeta inalámbrica.

    • Extrae la placa Wi-Fi de la consola.

  39. WteVSXxxFAA3LIYt
    • Este es el punto final si alguna vez desea enviar su Xbox a Microsoft para su reparación.

    • Retira la etiqueta de garantía blanca grande del marco de metal para exponer un tornillo.

  40. c2A3Rjjd5Yifr4fC
    • Retira los cinco tornillos Torx T10 de 55,5 mm que sujetan la carcasa derecha al marco de metal.

  41. eKDVBEYHVOe1tF4t
    • Voltea la Xbox de modo que la carcasa derecha quede hacia arriba.

    • Levanta la caja derecha por su marco de metal.

  42. EVJTyjuf6XVDAZNW
    EVJTyjuf6XVDAZNW
    YwnGBLBIJvYZbKhJ
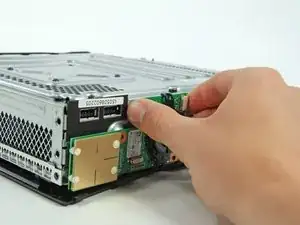
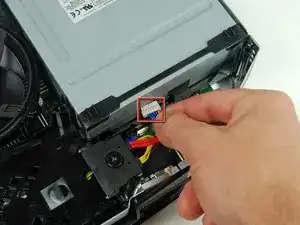
    • Desconecta el cable de datos de la unidad óptica de la parte posterior de la unidad óptica.

    • Desconecta el cable de alimentación de la parte posterior de la unidad óptica.

  43. PxXDmGPDKYDXBt5D
    • Levanta la unidad óptica de la Xbox.

    Is there a specific Optical Drive that Microsoft uses in these or can I upgrade my drive?

    whitemare0 -

    i took my drive out but when installed my replacement it would not work

    davidgardner301 -

    WAS thinking of possibly trying to repair my son's Xbox 360S, by replacing the optical drive, but after looking at all the spudger steps to get to the drive and then your comment that the replacement might not actually work... forget about it! I ain't going to all that work for possibly nothing... t'ain't worth it!

    Anyone want a perfectly working Xbox 360S with a drive the spins game discs upon ejection? We've already bought a replacement, so this unit is for sale... name your price.

    Luposian -

    In regards to davidgardner301 comment there is a extra step they. Didn't show on this replacement guide in order for your new disk drive to work you will need to remove the origional board connected to thje origional drive that came with the system and soler that onto the new one its a tricky process however its a step most people over look

    Without the origional board the xbox will not accept the replacement drive only because each disk drive is coded to work with tat soecific xbox only so your out of luck if you already. Tossed out your old disk drive

    Eric Liu -

    So I installed the drive but the thing keeps reading the games as dvds, hence; wont play them, why?

    BigD29853 -

    The DVD drives are coded to the Motherboard. If you buy the same exact drive to replace the broken one. You will still need to either 1) transfer the DVD circuit board OR 2) get the Firmware from the old DVD drive using a PC and then transfer it to the New DVD. There are website regarding this procedure if you want to look it up.

    Lawrence -

  44. xq2Cqnx4UNgHkrem
    • Voltea la consola para que la caja de metal quede hacia arriba.

    • Retira el único tornillo Torx T10 dorado de 11,3 mm del orificio marcado con "G".

    Could be preferable to do this step along with step #47 since the screws fasten the same plastic part.

    sirmyself -

  45. AgQKFheitrSX11SD
    AgQKFheitrSX11SD
    mfyCSLLQMhvIbOlE
    • Levanta el conducto del ventilador del ventilador.

    • Hay una clavija de localización debajo del conducto del ventilador (esquina superior derecha del conducto del ventilador como se ve en las imágenes). Al volver a instalar, mira hacia abajo en el orificio del tornillo para facilitar la alineación.

  46. EDje3FeMUkIiMnZH
    EDje3FeMUkIiMnZH
    WAiNWPMask5A2khI
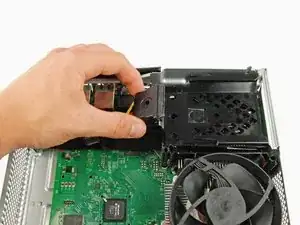
    • Retira el único tornillo Torx T10 de 9,2 mm que sujeta el conector del cable del disco duro al soporte de plástico.

    • Levanta el conector del cable del disco duro del soporte del disco duro.

  47. oieysBIUYXTxBVJc
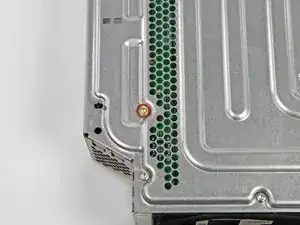
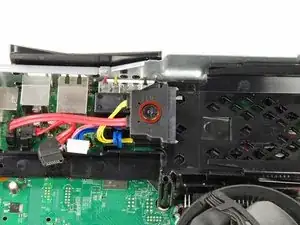
    • Retira el tornillo Torx T10 de 11,3 mm que sujeta el soporte del disco duro al marco de metal, cerca del puerto de entrada de CC.

  48. pJFQChmxmeqSlDbd
    • Levanta el soporte del disco duro para sacarlo del marco de metal.

    I have a 4GB Xbox 360 slim and I bought a 500GB hard drive for it. I pushed the hard drive in its place and after I heard that click, I pushed it a little bit more to be shure that it's in place. I noticed that the hard drive bracket (the slide that holds the hard drive) it's elastic: after the hard drive is inserted, it wobbles (maybe to prevent hdd damage when the xbox is moved).

    My question is: how does the hard drive bracket work? is there a metal spring in its mechanism that allows it to wobble? Did I make any damage to it because I pushed the hard drive to be sure that it is in place? I don't want to teardwon my console to find that out.

    Thank you!

    atitus87 -

  49. CLBtoZid3ZgZZN56
    • Desconecta el cable del ventilador tirando de su conector de la placa lógica.

    What is the size and name if the connector in the fan?

    Fernando Salazar -

  50. jYHvIOHBXyEQBQa6
    jYHvIOHBXyEQBQa6
    fbx1KyxEljjR6LVH
    eaeQqBQSWochmuOc
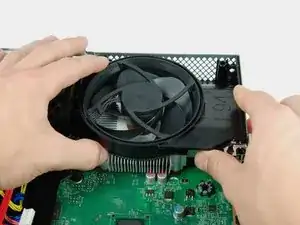
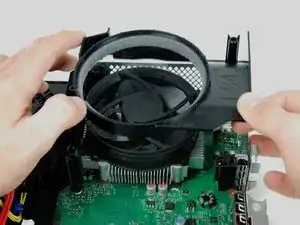
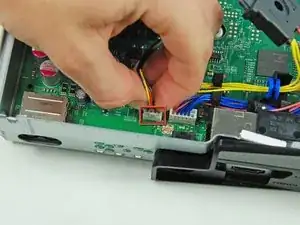
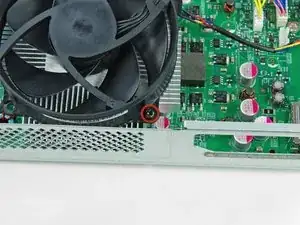
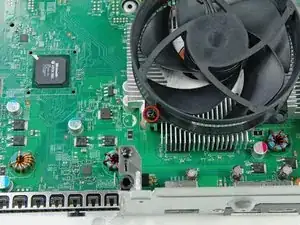
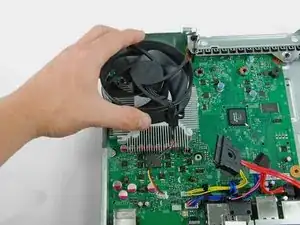
    • Desatornilla los dos tornillos Phillips de 11,7 mm que sujetan el ventilador al disipador de calor en las esquinas inferior derecha y superior izquierda del ventilador.

    • Retira el ventilador del ensamblaje de la placa lógica.

  51. 3TaTdM6dJGfKYm1b
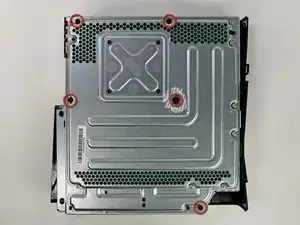
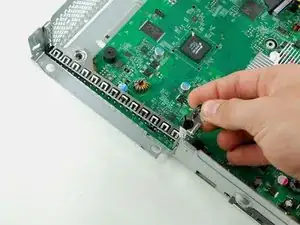
    • Hay un total de 10 tornillos que sujetan el ensamblaje de la placa lógica a la caja de metal:

    • Cinco tornillos Torx T10 plateados de 11,3 mm, en los agujeros marcados con "M", "N", "P", "R" y "T".

    • Cuatro tornillos Torx T9 negros de 5,6 mm en los orificios marcados con "D", "E", "J" y "K".

    • Un solo tornillo Torx T10 dorado de 11,3 mm en el orificio marcado con "A".

    Correct size for the orange screws is T8!

    thomasforster -

    I confirm what the user above me said, they were T8, at least on my Xbox.

    Davide Volta -

    T8 works for me as well

    Nicholas -

    I don't have the gold one. Is it normal?

    aklardon amarcanda -

  52. pA6sBBRvmlk5bsP1
    pA6sBBRvmlk5bsP1
    IStXGTULrhGwQNSE
    • Levanta el soporte de retención de la unidad óptica de la placa lógica.

  53. Ksmjw1TmpqqdPD5S
    Ksmjw1TmpqqdPD5S
    CyNT4Li4WomhBWaJ
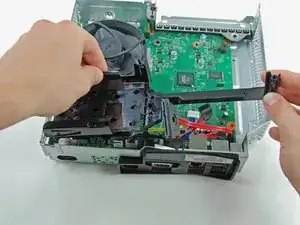
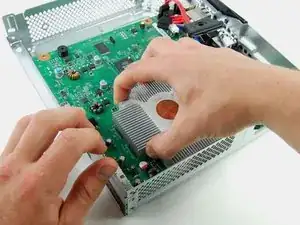
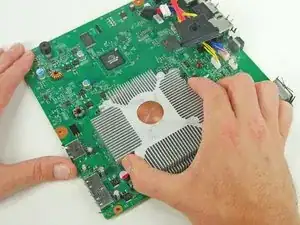
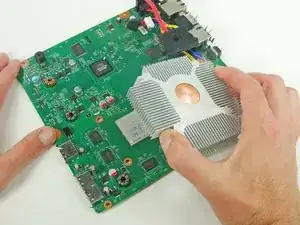
    • Toma el disipador de calor con una mano y sostén el marco de metal con la otra.

    • Levanta el ensamblaje de la placa lógica para sacarlo del marco de metal.

    • Retira el ensamblaje de la placa lógica requerirá un poco de fuerza.

  54. 1ukGCO6gfLpGBTkt
    1ukGCO6gfLpGBTkt
    UDEepNKhWFjQPVy3
    • Voltea el ensamblaje de la placa lógica para acceder a la abrazadera en X del disipador de calor.

    • Para evitar daños por ESD, asegúrate de colocar su placa lógica sobre una superficie suave y libre de estática durante el servicio.

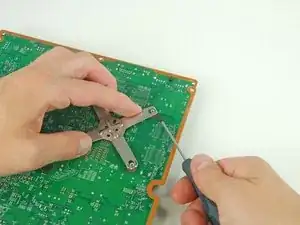
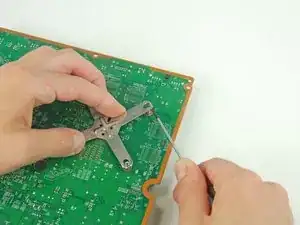
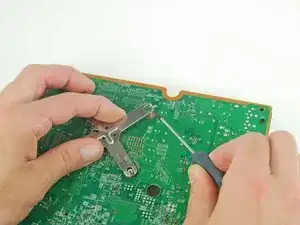
    • Comenzando en la esquina frontal izquierda de la abrazadera en X, inserta un destornillador de cabeza plana de 1,5 mm entre la clavija del disipador de calor y el gancho de la abrazadera en X.

    • Gira suavemente el destornillador en sentido contrario a las agujas del reloj, liberando el gancho de la abrazadera en X de la clavija.

    • La placa lógica es muy sensible al impacto y al rayado. Asegúrate de no dejar que el destornillador se deslice y dañe la placa lógica.

    Uggghhhh, Microsoft is still using X-Clamps. Didn't they learn anything from the original 360?

    Chris Green -

    Hopefully having the smaller CPU and GPU on the same die, as well as an "improved fan cooling system" will keep those old issues from rearing their ugly heads. The Red Ring of Death technically doesn't exist anymore, either.

    David Hodson -

    I've been reading that people are ruining their boards on this step when they slip and the tool slices the main board while trying to remove the x-clamp. Use a metal spudger and slip it between the post and the x-clamp from ABOVE... not along the bottom where the board is. The whole clamp came off in 30 seconds and the spudger was nowhere near the pcb.

    tfreeman075 -

  55. SVLTXVdkHKtqUQsr
    SVLTXVdkHKtqUQsr
    sQdguprLRSLZrA5d
    • Gira la placa lógica 90 grados en el sentido de las agujas del reloj.

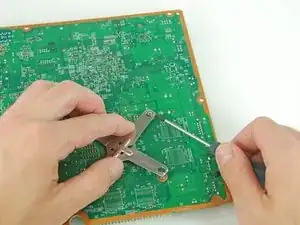
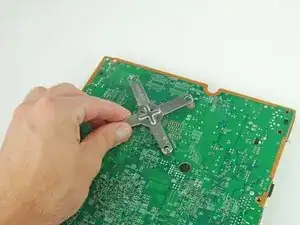
    • De la misma manera descrita anteriormente, suelta el gancho trasero derecho de la abrazadera en X.

  56. 2yfWGCQGdUlEoIO2
    2yfWGCQGdUlEoIO2
    BfyELAd6O5tiWTeT
    • Gira la placa lógica 180 grados en sentido contrario a las agujas del reloj.

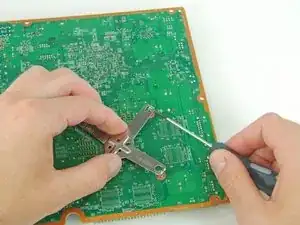
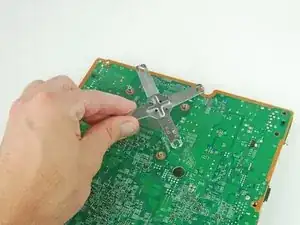
    • De la misma manera descrita anteriormente, suelta el gancho trasero izquierdo de la abrazadera en X.

  57. toKRJZ2BPCJPyZwW
    toKRJZ2BPCJPyZwW
    IyfvAVFxleeOL3xo
    • Levanta la abrazadera X de la parte posterior de la placa lógica.

  58. GvTLo5dZVrDFOtG5
    GvTLo5dZVrDFOtG5
    BXJBLOsYEkx4MG5O
    • Usando una mano para sostener el disipador de calor en su lugar, voltea cuidadosamente la placa lógica.

    • Levanta el disipador de calor de la placa lógica.

    • Antes de la reinstalación, sigue nuestra guía de pasta térmica para reemplazar el compuesto térmico entre el disipador de calor y el procesador.

Conclusión

Para volver a armar tu dispositivo, sigue estas instrucciones en orden inverso.

David Hodson

Miembro Desde 14/04/10

148383 Reputación

15 comentarios

This is a great guide. Thank you for taking the time to make it.

Brian Douglas -

Intercooler guys, purchase an intercooler and save yourself from this hassle

haywirestudent7 -

I had problems getting the x-bracket off the back (step 54-57).

I found this video using a pair of needle nose pliers that helped me immensely with this step:

https://www.youtube.com/watch?v=dDAW_tRi...

Matt Bailey -

I think we all ended up finding that video...

rasskipper -

Thank you for taking the time to make this very instructional guide

Michael Wiley -

I bought the single kit with tools and the multi fix kit. The kits come with mini heat sinks, pads, washers and screws. Nothing in this set of directions tells me where to use them.? Are there other directions somewhere that I have as yet not found?

David Hoppe -

This is an awesome guide that I only found after getting stuck trying to remove the heat sink - wish I had found it before I started. Once removed I found an odd pattern of thermal paste, the circle of copper on the heat sink and beneath it on the chip only had a few spattering’s of thermal paste - is it possible that heat pushed the thermal paste out to the boundaries of the chip?

I’m going to go look for a recommendation of what type of thermal paste I should put back down.

Glenn Compton -

Why didn’t u show us how to reinstall the X clamp bracket. Its not as easy as just sticking it on so maybe don’t forget that.

The Realist -

Hey guys I figured out how to put the bracket back on with out killing the mobo. Here follow this:

So first off u need to look back at the part where u take off the bracket. That way u know what way the bracket came off as. This might not matter but I couldn’t get mine with out lining it up correctly from when I removed it so do that first.

Then put new thermal paste on the CPU>put heatsink threw mobo and flip the mobo over.

Now align the bracket as u did before u took it off, then hook the bracket on one end of the heatsink screw holes. Now push firmly down on the opposite screw hole from the one u are notched on right now. If u do it right u should have those 2 brackets parts notched on the screw holes. If not take off the brackets and try again. Once done with the first set simply do the same thing to the last set.

Hope this helps for those like me who got confused when there wasn’t a section showing how to put the bracket back on.

The Realist -

Is the Heatsink on this model your showing have the old, original, upgraded or newest one? My daughter's Slim was very dirty dusty & clogged cooling intake and I cleaned it. She has an external fan also that plug into USB port and it is obvious why overheating but I want to know if heatsink should be replaced it has that same circle copper center core heatsink. I have looked at a couple of heatsink sites online showing progression of changing of sinks xbox went through but not this one. I'm hoping it is the newer or better yet the newest style. I have artic silver 5 thermal paste I use on video cards & processors on my computer builds & repairs. I don't know what paste the xbox360 slim uses and I have seen the crappy thermal pads used in some Compaq Laptops for the video processor which I switch out for a copper plate thermal pasted and the heat immediately goes away. If you know which sink this is should I switch it or just take it off and replace the paste? Thanks

James Hamicksburg

יעקב המיקסברג

J. Hamicksburg -

I starred this guide because I like long guides, as well as well-organized ones. Yours is both! You’re welcome!

Michael Deitz -

It is great! Do you any of you guys have any information what is the space (its like a cpu socket on pc’s) between the cpu holding holes. I’m asking because i’d like to put on a aio watercooilng kit into it. :) Thanks.

Peter Kvcs Tlk -

What is that metal embedded in the heatsink? Is it copper?

geraldcherney -

two scratches because of how hard the heatsink is hard to take off and one stab to the mobo because of how hard it was to screw the fan back, and the thing still works. 10/10 would accidentally damage my xbox again

Idris Anwar -

haywirestudent7 - that is like putting a band-aid on something. It might work but it isn’t proper or recommended whatsoever. TIM doesn’t last forever. Replacing something defective is highly more advisable then doing something unnecessary.

taylor craig -