Introducción

  1. HOyAUdTf4TPkM4C1
    HOyAUdTf4TPkM4C1
    1tFt4heuTLaSCXDo
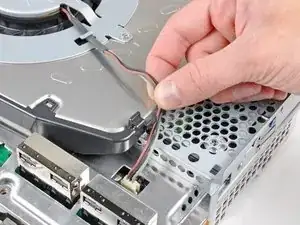
    • Desvía los cables del ventilador del dedo de plástico moldeado en el disipador de calor.

    • Desconecta el ventilador de la placa base.

    • Tira del conector hacia arriba y fuera de su zócalo.

  2. dtMlYNqdVr2ISNBq
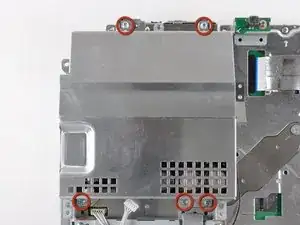
    • Quita los dos tornillos Phillips de 9 mm que sujetan el lector de tarjetas de memoria al chasis.

    Only the very first release of the PS3 used to have the memory card reader. Most recent models do not have it (such as my PS3 model CECHG04). In this case just skip steps 22 and 23.

    markp -

    Also, these screws should be removed in step 5 to prevent breaking the clips that secure the card reader to the top shell.

    screech -

  3. AaMp5W2SDhPLWjON
    AaMp5W2SDhPLWjON
    tTYOxpUaPFQOYGDj
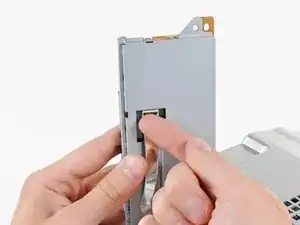
    • Levanta el lector de tarjetas de memoria de la PS3 lo suficiente como para acceder a su cable plano.

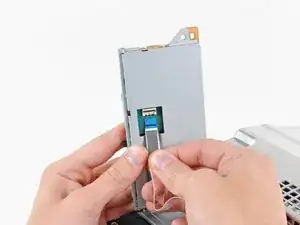
    • Levanta la tapa de retención en el zócalo del cable plano del lector de tarjetas de memoria.

    • Asegúrate de hacer palanca en la aleta de retención, no en el zócalo en sí.

    • Extrae el cable plano de su zócalo y quita el lector de tarjetas de memoria.

    I have a CECHA01 and the card reader is attached to the top cover. Per comments at step 5, the 2 screws mentioned at step 22 are removed at step 5. The ribbon cable mentioned here in step 23 should be removed at step 5.

    Jon Tyre -

    If leaving card reader attached to top shell this step should be part of step 6.

    screech -

  4. OTnnIGdXxhQRIEdZ
    • Desconecta los cables de entrada de CC del frente del disipador de calor.

    • Tira del conector hacia la parte frontal de la PS3.

  5. gPUND35OSiSGrNVe
    • Quita los cinco tornillos Phillips de 9 mm que sujetan la fuente de alimentación al chasis.

  6. EOlHOqPhCdcX4WOM
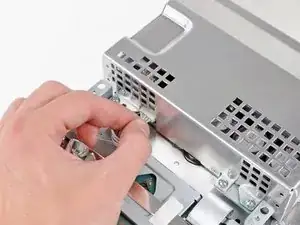
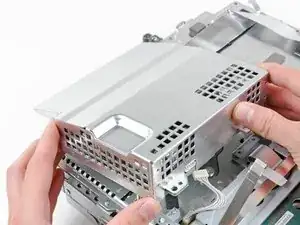
    • Levanta la fuente de alimentación por su borde frontal para despejar los dos postes conectados a la placa base.

    • Quita la fuente de alimentación.

    I had a small black wire taped to the side of my power supply. If you have this - remember to remove the tape, first, or you run the risk of pulling the wire out.

    Oliver Clare -

  7. OLZ2uFatyPysN2qo
    • Quita los cuatro tornillos Phillips de hombro de 16.5 mm que sujetan el disipador de calor a la placa base.

    • Quita los dos soportes sostenidos debajo de los tornillos que acabas de quitar.

  8. RBXS1euymxJTE3sU
    • Levanta el conjunto de la placa base del disipador de calor.

    • El disipador de calor aún puede estar sujeto en su lugar mediante la pasta térmica. Si este es el caso, saca suavemente el disipador de calor de la carcasa de la placa base. Asegúrate de no doblar las tuberías de cobre en el disipador de calor.

    • Asegúrate de aplicar una nueva capa de pasta térmica al volver a colocar el disipador de calor.

    • ¿Nunca has aplicado pasta térmica antes? Nuestra guía de pasta térmica lo hace fácil.

    • Si sigues la guía de reparación de YLOD, estate atento a dónde aplicar la pasta térmica de reemplazo.

    so do we apply arctic silver 5 thermal paste to the heat sink pads that attach to the CPU GPU,Or do we only apply thermal paste to the chips /pads CPU GPU ?

    David -

    In some PS3 versions, such as my PS3 model CECHG04, the heat sink is attached to the lower half of the motherboard shield, so in order to remove the motherboard you have to lift the top cover and detach the motherboard from the heat sink.

    markp -

    Yeah, on mine (which is the very first revision of the PS3), you have to add a SUPER heavy amount of thermal paste, for it to even make contact. Odd.

    Christopher -

    Can someone confirm what material the heatsink is made of for those wanting to apply liquid metal (I'm sure as !&&* not taking the risk) but might be of interest to others…

    Jjj -

Conclusión

Para reensamblar tu dispositivo, sigue estas instrucciones en sentido inverso.

Walter Galan

685928 Reputación

0 comentarios