Introducción

Utiliza esta guía para reemplazar tu disipador de calor. Es imprescindible aplicar una nueva capa de pasta térmica durante el montaje.

  1. sbUCUYRWF5u33DHo
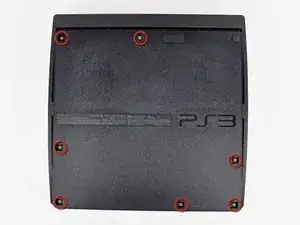
    • Dale la vuelta a tu PS3 y colócala con la parte trasera hacia arriba.

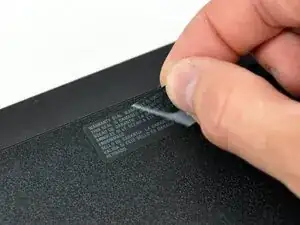
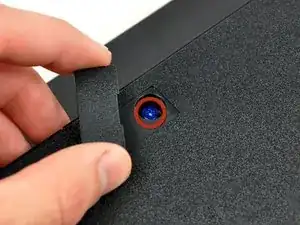
    • Con cuidado, quita la pegatina de la garantía, así podrás acceder al tornillo que se encuentra escondido debajo de ella.

    • Para evitar que la pegatina cree un vacío, calienta la pegatina y quítala con cuidado para poder reemplazarla limpiamente.

    Don’t even need to bother with the sticker anymore since SONY does not care what you do with them anymore.

    Travis Wheeler -

  2. fktNXIVQYKIbefHS
    fktNXIVQYKIbefHS
    Z2lGLuRFjeG6aFvV
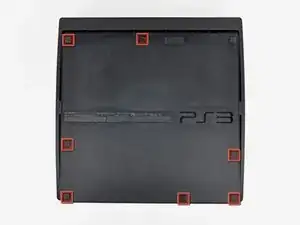
    • Utiliza la parte plana de un "spudger" para hacer palanca en los siete puntos que se encuentran en el borde de la carcasa inferior y que esconden bajo ellos tornillos. Puedes observar en la imagen dónde están localizados.

  3. u6tkxEEWjBggtSMy
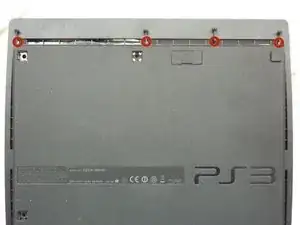
    • Quita los siete tornillos Phillips de 37mm que sujetan la tapa superior de la carcasa inferior.

  4. BuJcUHDpFwOwPFDL
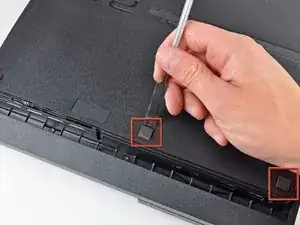
    • Quita los cuatro tornillos de seguridad Torx T8 de 13.3 mm que se encuentran debajo de la apertura del Blu-ray. (Algunos modelos solo cuentan con (3)tres tornillos)

    Its 4 screws beneath the blu-ray

    Manuel -

    Remove the four 13.3 mm T8 security Torx screws beneath the Blu-ray drive opening.

    Daniel Tlapa -

    Can we edit this to say 4 screws?

    revanantwraith -

    I made the change from three to four screws, but you're able to edit the guides as well. If you want to edit something, you can click the Edit link on the right side of any guide step, or the Edit link at the top right of the page (sandwiched in-between View and History).

    Taylor Arnicar -

    Do you guys have a guide for the PS3 Slim Model 3001A. The fan is different than this model.

    emknight04 -

    3001a is basically same motherboard but cheaper plastic bd drive other than that its exactly the same until you get to the new slim line

    Robert -

    Anyone know an online retailer with a competitive price for the replacement fan?

    Jared -

    My PS3 had only three Torx screws. Having four in the diagram was initially confusing. Obviously they made a mid-stream change at some point (mine is several years old now).

    corygbooker -

    I've accidentally removed the ribbon cable from the blu-Ray drive and can not seem to figure out how to reconnect it. Can anyone help?

    OneIfByLand -

    Take the top off the drive, connect the ribbon to the motherboard then replace the drive sliding the ribbon through the slot on the bottom of the drive and reconnect to the laser.

    KcXbox Repair -

    pls help i have to tear down my ps3 slim but the 4 srews are very hard to take it out because there is a needle in the middle pls hep

    Vincent Brabandt -

    If the screw has a pin in the center, that means it is a security Torx meant to prevent tampering. To remove this screw, follow the guide I have linked below...

    http://www.instructables.com/id/Removing...

    Telpack -

    How do u buy the screw driver for these screws

    mistergalacta hoggy -

    Online at the usual suspects?

    Or some hobby stores or places that sell tools will sometimes carry these.

    revanantwraith -

    Anyone else's screws for this step need the T7 bit instead of T8?

    Michael J Cotton -

    What is the name of this screwdriver

    Mohammad Shawa -

  5. LvQrCIDkbymnDdoa
    LvQrCIDkbymnDdoa
    QhXCIUkPgeFEM2N3
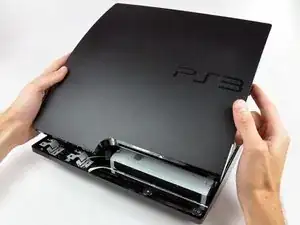
    • Levanta la tapa superior desde el borde trasero y rótala hacia la parte frontal de la PS3.

    • Quita la tapa de la PS3.

    I just want to open the top cover to clean the fan. Do I need to unscrew the four security screws?

    Aryan -

  6. Yh3ZVhhNtHFXftVY
    Yh3ZVhhNtHFXftVY
    UVGVKsylF1blF4VE
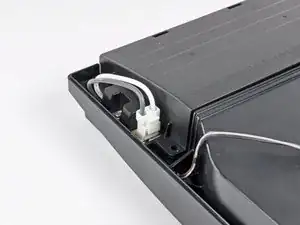
    • Aprieta el mecanismo que bloquea el conector del enchufe AC y tira de él hacia arriba para desconectar la fuente de alimentación.

  7. sFKIG3UmBojsntvO
    • Tira de los cables de salida de DC (corriente continua) hacia arriba para levantar su conector y sacarlo de su zócalo en la fuente de alimentación.

    Those two screws are tight down there what do you recommend I use?

    Megan bronner -

  8. WMrUrCWouVH5QEoM
    • Desatornilla los dos tornillos Phillips de 7.6 mm que sujetan la fuente de alimentación a la carcasa inferior.

    Question: if a screw doesn't come out, what do you recommend, without potentially damaging the system, inside and out?

    kramiz2488 -

    It seems these can be quite tight, but they did come loose with someextra force in my case. They did that thing where it makes cracking sounds, but nothing really breaks. They're just really tight in there. - I just wouldn't recommend taking these out too often.

    Michael Hendriks -

    The screwdrivers on the guide didn't work mine just don't come out any tips model is slim CECH 2001A

    Step 8

    Jose Arrieta -

    These screws work as a ground pass through between the motherboard shields and the power supply. My cousin took his PS3 to a repair shop to replace the power supply, they didn’t put the screws back in after that and the PS was shutting down suddenly (no light green or red), put a couple of new screws and it’s being working fine since

    Mauricio González -

    Sometime ago i took apart my PS3 out of curiosity, When puting it back together, i messed it up, I stripped one of the PSU screws. Now, i can't take it apart for a paste replacement. Any ideas?

    Franco Iván Bello Rojas -

    The screws don't come out how do I fix this without breaking anything

    Suck dick -

    I had the same problem with very tight screws on PS3 power supply. I solved it by purchasing a Screw removal / extractor gripping pliers long nose style , with unique non-slip jaws for quickly extracting damaged / stuck screws. ENGINEER PZ-60 Neji-Saurus,Silver. ( bought mine on Amazon)

    These pliers have special grips on tapered end to hold and turn stripped or rusty screws. It took a lot of effort, but screws finally came out using these pliers. A bit of sewing machine oil and prising under the washers with a flat screwdrvers helps too. Failing that, take it to repair shop as they are VERY TIGHT screws on some models of PS3.

    hubert hanks -

  9. MZMRRdaoxxXMhCEZ
    • Levanta la fuente de alimentación hacia arriba desde su borde izquierdo como se ve en la imagen.

  10. saRFnt5prhQI5NFF
    saRFnt5prhQI5NFF
    Djh4A4Iqy2Zw3Joh
    • Continua levantando el borde izquierdo de la fuente de alimentación hasta que salga de las dos patas metálicas que se ven en la segunda imagen.

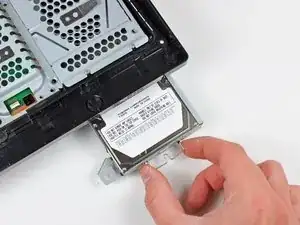
    • Quita la fuente de alimentación de la PS3, ten cuidado de que ningún cable se quede enganchado en el proceso.

    It seems it kind of ends for me here. I can only lift the left side about an inch and then the right side stays down like it’s stuck to something underneath. It feels like I’m bending something. Could something have melted underneath?… It's really stuck, I can't get it to come loose. And I can't see much shining a light into it either. - Any tips?…

    Michael Hendriks -

    Did you undo the screws?

    Phoenix Jameson -

    I had the same issue but was able to get it off. The right side (as per the above picture) has two long column like sections that actually goes into the machine. Took me a bit of wiggling and some brute force.

    Ivan Amaro -

    You just lift the whole power supply up. There’s no need to start from the left? Is it possible to bend the two metal posts if lifting from the left?

    Ken -

    Needs medium flat screw driver as wedge to help to lift the power supply in the right side or exert more force in your right arm provided the front of PS3 is at your front.

    Dasol -

    Um, I translated the guide from French to English and the name of the guide was “Food” and the description said “This guide shows you how to replace your diet” The translation is incorrect just to let you know!

    Liam Kandell -

    Hi! Thanks for you attention! But no worries, the French word “alimentation” means power, food or diet depending the context.

    Claire Miesch -

    Alright, thanks!

    Liam Kandell -

  11. SjTZsMGJ4DG1Ijyn
    SjTZsMGJ4DG1Ijyn
    JWNrZHOwKMxsbxSE
    • En caso de estar presentes, quita la cinta adhesiva que sujetan los cables al lector Blu-ray.

    What does the white and black cable?

    Robert Brown -

  12. eqAyKhYjtWqUhqTJ
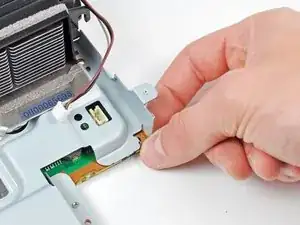
    • Utiliza la punta plana de un "spudger" o tus uñas para levantar la pestaña que retiene el cable plano en su conector.

    • Asegúrate de que estás haciendo palanca en la pestaña y NO en el conector en sí.

  13. lLTEEDyNQhUkXKsI
    • Tira del cable plano hacia arriba para desconectarlo.

  14. Wpqs1UUFQoUqnvIW
    • Tira hacia arriba del cable de alimentación del lector Blu-ray.

  15. FNNWVwaMWMQB2Wu4
    • Quita el tornillo Phillips de 9.5 mm que sujeta el lector Blu-ray a la carcasa inferior.

  16. rIJHTp3K2knmtHuc
    rIJHTp3K2knmtHuc
    uZnZAu15OX3iRnEQ
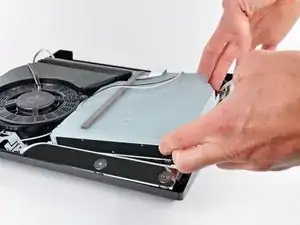
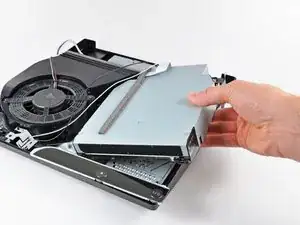
    • Levanta el lector Blu-ray ligeramente por su lado derecho para sacarlo de su hueco.

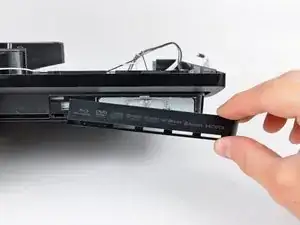
    • Quita el lector Blu-ray de la PS3.

    • Después de que vuelvas a instalar el lector Blu-ray, asegúrate de que la placa de control está correctamente colocada en la carcasa inferior antes de continuar con el procedimiento.

    • SI estás reemplazando el lector Blu-ray por uno nuevo: utiliza este video (ten en cuenta que está en inglés, pero es visualmente bastante descriptivo .

    my cd drive has 3 cables, two by the fan, one right under, i believe i damaged the one on the bottom because it is very difficult to put back in hence the repair. But the photos here dont show the 3 cables, not sure if you have one for this model?

    Eduardo Cutino -

    I followed the steps and I successfully removed my disc drive the guide was helpful but I had issues and the ribbon cables on my replacement disc drive were too short after a soddering attempt failed I now need to rebut a disc drive can someone direct me to a proper replacement with the correct size I need it's a ps3 slim 120G please help

    Nick -

    I popped a friends apart to see if I could put in mine, which won't stay online for more than 1minute 10 seconds. Plays DVDs fine. Anyway, his had 3 cables and mine only has 1. How do I know which DVD player to order?

    ntdoc -

    Completely different drive in my slim. 3 ribbon cables on the back that pull straight up out of their connectors. And one wide ribbon hidden underneath and almost impossible to get to. After disconnecting the 3 visible cables lift the back of the drive about 3/4" and use a plastic spudger to release the clip on the cable before lifting off the drive. Reinstalling is a nightmare. The cable has a black line to indicate how far to insert into the connector. Get it in there somehow then use the spudger to push the clip down. If it's not level release it and try again and again and again until you get it right. Sony must use some awfully small fingers when they build these ;-)

    jurquijo -

    I had the same issue with the ribon feeding beneath the blu ray player. This video provided a much better solution. It requires dissassembling the blu ray: https://youtu.be/Upy2bTev3M0

    Rebel Seven -

    My disk drive needs to be replaced. Your step by step is straight forward and are very helpful. At the end you mentioned “If replacing the Blu-ray drive with a new drive, swap the circuit board from your old drive into the new drive”.

    Which circuit board? Can your please add a picture of the circuit board you are referring to?

    Henry -

    @hh168 There’s now a link in the text of that step, which will take you to a video with detailed instructions for swapping the board.

    Jeff Suovanen -

    First I replaced the drive and it would load a disc and see that it was either a game and which game or a BluRay or DVD and which, but I got error codes when trying to play them.

    The codes seemed to be tamper coding, and swapping the board seemed to be a good idea.

    It went smoothly, but now discs will not feed into the drive.

    Please help.

    Zachary Mannes -

  17. 6DRkH6MBOKG6uiS4
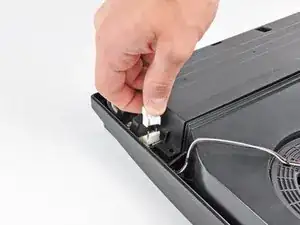
    • Tira de los cables de entrada de CA hacia arriba para quitar la entrada de CA de la carcasa inferior.

  18. NM1iOKVGanuaQFhh
    NM1iOKVGanuaQFhh
    mlEeAtMsZBtOHnXo
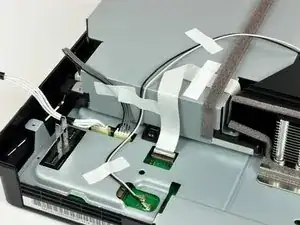
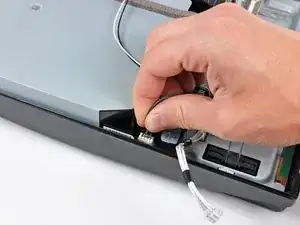
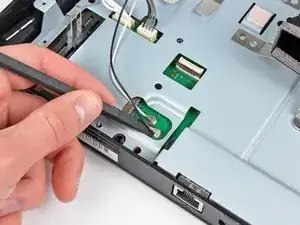
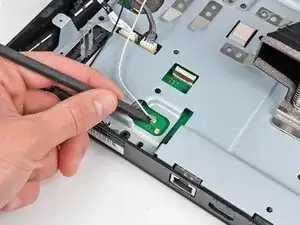
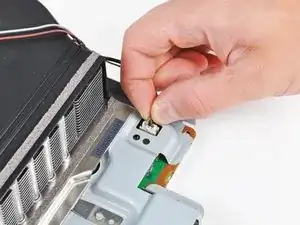
    • Usa el extremo plano de un spudger para sacar ambos conectores de antena de sus zócalos en la placa base.

    Wo kann man das Flachbandkabel kaufen weil meins kaputt

    Mikail Bastas -

  19. U5y1WZURLd6KQ3vB
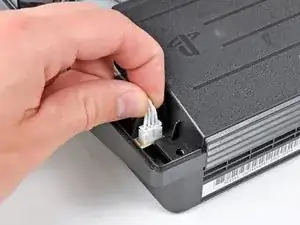
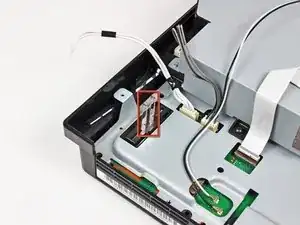
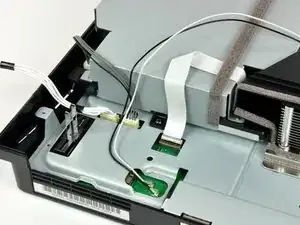
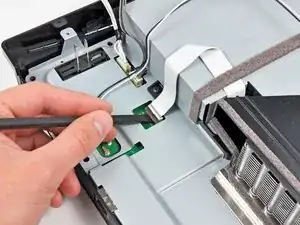
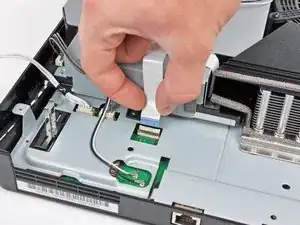
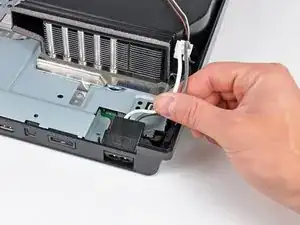
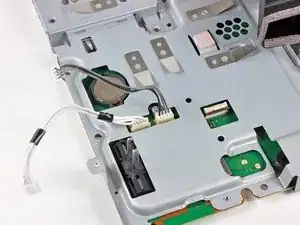
    • Tira del cable plano de la placa de control hacia arriba y hacia fuera de su zócalo en la placa base.

    • Retira el tablero de control.

  20. gNwLpJrtOvFM6fov
    • Da la vuelta a la PS3 y colócala sobre su parte trasera.

    • Usa el borde plano de un spudger de metal para abrir la pequeña puerta de acceso en la cubierta inferior cerca del frente de la PS3.

    • Retira el tornillo Phillips azul escondido debajo de la puerta de acceso.

  21. CbjXrixrUjGEWFEa
    • Desliza la tapa del compartimento del disco duro hacia el lado derecho de la carcasa inferior y, a continuación, tira de ella desde el borde frontal para extraerla de la PS3.

  22. J2hSpNNYYZJfAQ4L
    • Usando su asa de metal adjunta, extrae el disco duro de su puerto.

  23. DVSTWbMqiKn3qZIW
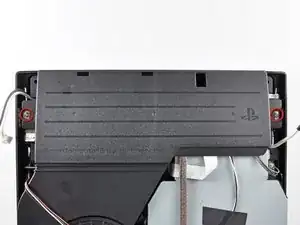
    • Retira los siguientes cinco tornillos que sujetan el conjunto de la placa base a la carcasa inferior:

    • Dos Phillips plateados de 6 mm

    • Tres Phillips negros de 8 mm

  24. Ofq2h5sXAkVSQGqW
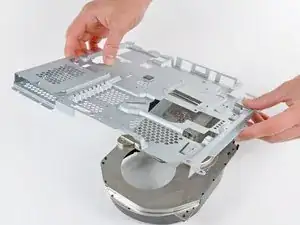
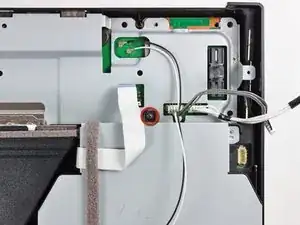
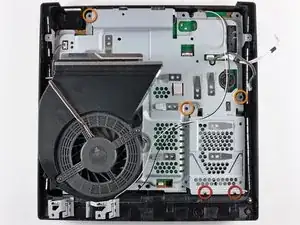
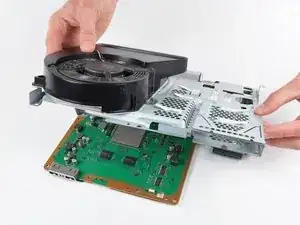
    • Levanta el ensamblaje de la placa base desde su borde frontal y retíralo de la carcasa inferior, teniendo cuidado con el cable de la antena que aún está conectado a la carcasa inferior.

    • Ten cuidado de no doblar los cuerpos metálicos de la antena cuando levantes el conjunto de la placa base.

  25. EvRECjv6qHRK6tBR
    • Desconecta los cables de alimentación de entrada de CC y Blu-ray de la placa base.

    • Tira de los cables hacia arriba para levantar los conectores y sacarlos de sus zócalos en la placa base.

  26. DKCRxFDxdykYjIVB
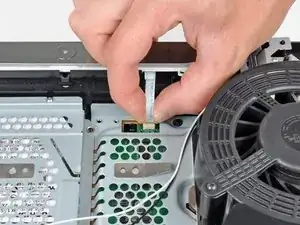
    • Tira de los cables del ventilador hacia arriba para levantar el conector del ventilador y sacarlo de su zócalo en la placa base.

    You have to be very very careful on this step as the connector is very fragile. One wrong move and you can end up with a ripped off connector which wont be repairable.

    Source: Followed this guide and ripped off the connector from my PS3

    Jatinder Singh -

    I’ve broken the solder on the fan conn. Any help?

    Brian DiGiaimo -

    I think I can solder it

    Brian DiGiaimo -

    I have also ripped off the connector and only realized when I wanted to put together.

    Visegradi Istvan -

    ONLY FOR EXPERIENCED ELECTRICIANS!

    It is not impossible to clean the removed connector from the panel parts and then glue the connector back on the panel. It depends how much connection is left on the board (you might able to clean a bit of green carefully to increase connection size) with a bit of experience you can solder it back/together again. The power and ground needs better connection since it needs to able to carry the current. The RPM signal has the least connection size on this side of the board but it needs only a bit of connection.

    Other possibility to bring from the board other side the 3 fan connection points with some tiny cables but that is more labour intensive and you might need to cut a bit from the metal panel to make space of the cables.

    Anyway it is a doable job for an experienced repair person.

    Visegradi Istvan -

  27. 6NsUNbe6Dc3A6JPr
    • Retira los siguientes nueve tornillos que sujetan el ensamblaje de la placa base:

    • Cuatro Phillips con hombros de 14,8 mm

    • Cinco Phillips de 9,5 mm

    jesus chris what screw driver do i use for the 9.5mm phillips i cant find one anywhere

    Capsoul GotTheHits -

    The PH#1 screwdriver from iFixit's "Manta" driver bit set worked fine for me

    Nicholas -

  28. WYO5ZZydIoA3OasP
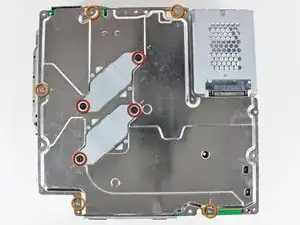
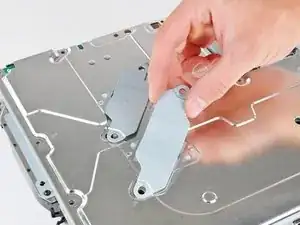
    • Retira las dos abrazaderas del disipador de calor de la parte inferior del ensamblaje de la placa base.

  29. sLwBLGSahXNOwUxv
    • Si es necesario, saca con cuidado la placa base del protector superior cerca del disipador de calor y su cubierta.

  30. JYevVfWoGFthVlDs
    JYevVfWoGFthVlDs
    4EOYDLPSpSbsTNl1
    • Presiona suavemente la placa para alejarla del ensamblaje del protector superior cerca del conector del ventilador y la esquina de la placa cerca de los enchufes inalámbricos.

  31. WhjuJRsbuIjtZGmc
    • Levanta el ensamblaje del protector superior de la placa base desde su borde frontal.

    • Ten cuidado de no dañar los zócalos al girar el conjunto del protector superior para alejarlo de la placa base.

  32. pmqwlRN1iWUbLBPI
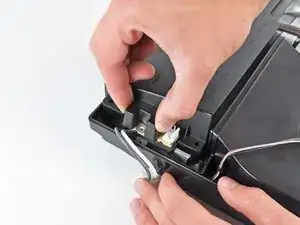
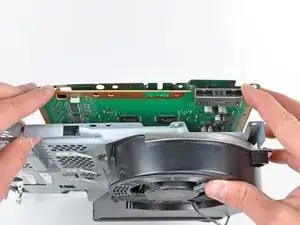
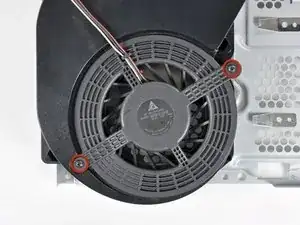
    • Retira los dos tornillos Phillips de 9,5 mm que sujetan el ventilador al disipador de calor.

  33. GoHkC6CBGVcEFcMp
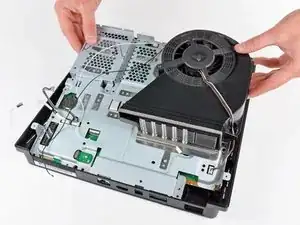
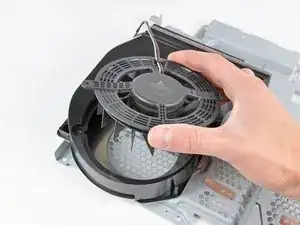
    • Retira el ventilador del disipador de calor, teniendo cuidado con los cables que pueden quedar atrapados en la cubierta del ventilador.

  34. suEHxAJdNb31Vjnr
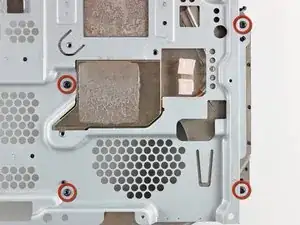
    • Retira los cuatro tornillos Phillips de 9,5 mm que sujetan el disipador de calor al protector superior.

  35. HulBkRUkXUxTnWjZ
    • Levanta el protector superior del disipador de calor.

    • Antes de instalar el disipador de calor en la placa base, es imprescindible aplicar una nueva capa de pasta térmica. Esta guía te mostrará cómo hacerlo.

    Instructions were great. Would recommend printing out on paper and scotch taping the screws for each step to the paper. There are a lot of different screws and they could easily be mistaken for each other.

    Please also include instructions for blu-ray with the ribbon cable underneath the drive. This was very difficult to reattach.

    theodore barrett -

Conclusión

Para volver a armar tu dispositivo, sigue estas instrucciones en orden inverso.

Andrew Bookholt

578639 Reputación

7 comentarios

Hey good day to you. Can the thermal paste be applied with this tutorial?

Anthony -

This is a great guide, I followed it to the letter and my PS3 is now quiet as a mouse. I highly recommend you follow this, and please take your time. There’s no rush! :)

GunnZo -

Thanks, can you extend this list by showing how thermal paste is properly applied? That is the predominate reason for my users who need to get to step 31 in your list.

Thanks

k lewis -

Thanks for this guide

Junior Hinostroza -

Hi, is the heatsink that makes contact with the cpu die aluminium? I think I might have repasted it with liquid metal… Thanks!

Ricardo Oprandi -

If you are referring to this, then yes, if not, then no. https://guide-images.cdn.ifixit.com/igi/...

the bongo guy -

Aluminum or Steel depending on the model it’s better to be safe plus it will eat at the enclosure.

HESH AtSeaLab -