Introducción

Esta guía suministra las instrucciones necesarias para reemplazar una pantalla LCD dañada o rota, incluyendo el digitalizador para el Google Nexus 5.

  1. uEMEGFX5kNL1BUaZ
    uEMEGFX5kNL1BUaZ
    d5aupTQfBHnkY6hN
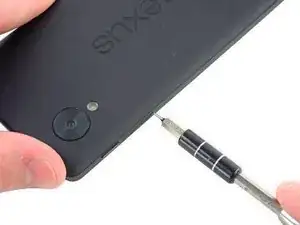
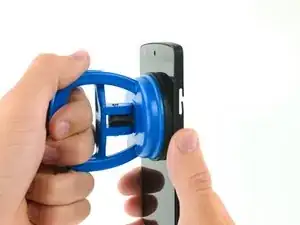
    • Inserta la herramienta de expulsión de tarjeta SIM o un clip en el agujero al lado a la ranura de la tarjeta SIM, la cual está localizada justo debajo del botón de encendido.

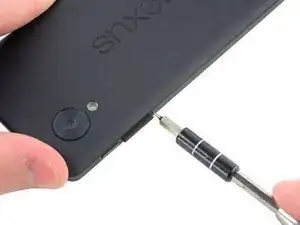
    • Presiona la herramienta dentro del agujero hasta que vea salir la bandeja.

  2. LhjbucVW4KhyyAca
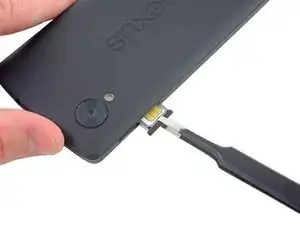
    • Remueve suavemente la tarjeta SIM con los dedos o con una pinza si la bandeja de la tarjeta no fue expulsada completamente.

    • Asegúrate de que el chip este viendo hacia la parte trasera del teléfono al reinsertar la tarjeta SIM.

  3. xEViSRJY4VVHfmOQ
    xEViSRJY4VVHfmOQ
    1Z4SSVIF3RKmHyfE
    cysveXG444Jp4nRI
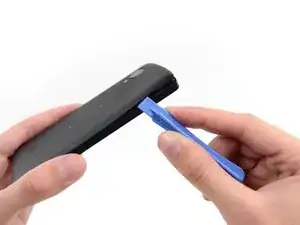
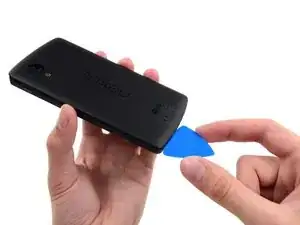
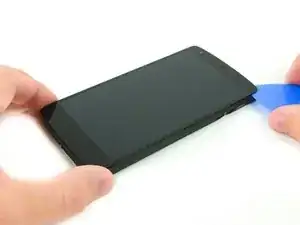
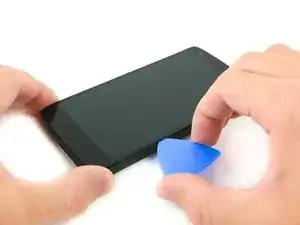
    • Usa una herramienta de apertura de plástico para liberar los clips en la parte superior de cada lado de la tapa trasera.

    • La parte inferior está sujeta con espuma adhesiva. Podrás finalmente liberar la tapa trasera utilizando una púa de apertura.

    • Es mejor evitar hacer palanca alrededor de la ranura de la tarjeta SIM., ya que el plástico aquí es muy delgado y puede romperse al hacer palanca.

    Wireless QI and NFC.

    Once I have put everything together with the new battery in place, I have as last replaced the plastic back cover, snapping all the clips back around the edges of the phone. Alas, I was quick to realise the QI Wireless charging has ceased to work.

    I almost blamed the battery, or worse, me.

    QUICK TIP: there is actually another clip in the middle of the plastic back cover - just press with your thumb just above the 'S' in NEXUS emblem and, voila! Snaps back in.

    Wireless charge and NFC - works, once again.

    cwioro -

    you just saved me like 30 bucks. thank you so much.

    Robert Nolan -

    + 1, had the same issue and pressing just near the S fixed it! Thanks a lot!

    nicco82 -

    Just a me too, I had to press above the S and it was quite a snap

    Erik Karlin -

    There seems to be two contacts that snap into place. One is in line with the led pretty much in the middle of the phone and the second one in line with the camera lens on the opposite side to the lens. The middle one for me snapped pretty lightly, but the side one required a bit more pressure. After that the nfc started working again. Thanks for posting this!

    Dennis Millner -

    Is it hard to remove the battery door? Worried I might damage it.

    Ash -

    When I openend the back cover I damaged two clips. One about 2.5cm (1 inch) below the volume controls and one on the other side about same height. The cover fits good without those two but on one side there is a small gap where the clip broke. But I have a hard cover protector on my phone so it's not that bad.

    simonlwheeler -

    The case around the sim slot is pretty thin and easy to break, best to avoid using the pry tool at this point.

    Aled Morris -

    Excellent tip, should be included in the main guide.

    fprades -

    Hey Author, i need to ur expert advice...i replaced my nexus 5's back cover. since the new one did not have the vibrators battery i had to take it from the old one and connect it to the new one...on removing i noticed that it was stuck to the cover by a glue

    Question: what glue to use to hold the battery to the cover?

    suwaid akbar -

    Any adhesive will do. I used a hot glue gun. You shouldn't need expert advice to figure that out. Use your head.

    tjt263 -

    The case around the volume control is also pretty thin.... I broke mine prying so avoid the pry there too.

    Also my back had glue at the bottom and I haven't seen mentioned

    kornerson -

  4. BTRZoDBr3OKdfuSe
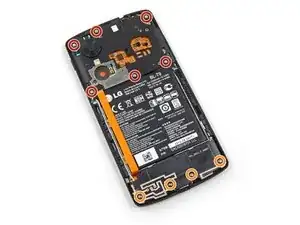
    • Remueve los seis tornillos Phillips #00 de 4.0 mm que sujetan el marco medio al teléfono.

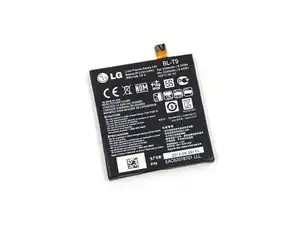
    • Para reemplazar la pantalla LCD y digitalizador, remueve los cuatro tornillos adicionales de 4.00 mm de la tapa de la placa hija con el mismo destornillador.

    I had a bit more success with the Phillips #000.

    Ross Light -

    Step 4 (removing the screws in the protecting plate) needs to happen before Step 2 ( removing the connectors)

    Esteban Valles -

    These were Y0 screws for me.

    Benjamin Hollway -

    Same here, Benjamin

    Ítalo Masserano -

    Me three on the Y-type screw heads.

    Jamoross -

    Same for me. I had more luck with the two screws in the middle with #000.

    Rewarp -

  5. 3BvbgCuAHbWMQxvD
    3BvbgCuAHbWMQxvD
    dFU2GMl6CVK2L61O
    • Remueve el marco medio del teléfono.

    There's also some adhesive holding the motherboard cover plate in place, below the camera. Has to be pulled a little stronger than expected.

    tkatona -

  6. Oyiy1FAMsRBNFsVx
    Oyiy1FAMsRBNFsVx
    Ai1o2JTP6SWHes2S
    • Usa el extremo plano de un nylon spudger para desconectar el conector de la batería.

  7. frVBkaKCOgoPsAYy
    frVBkaKCOgoPsAYy
    cq34GDWnpASPWTSV
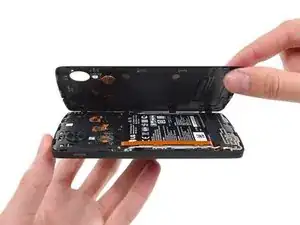
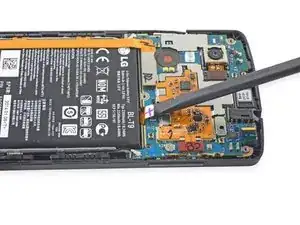
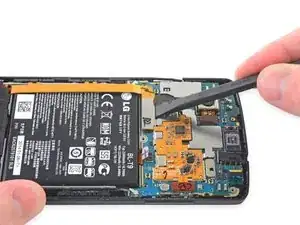
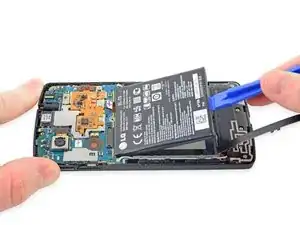
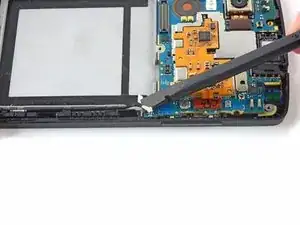
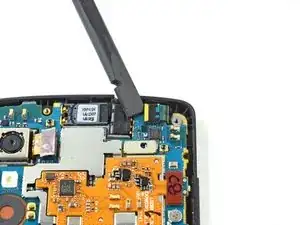
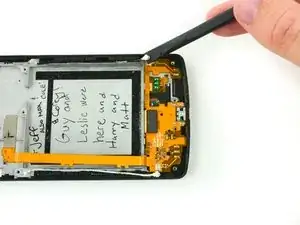
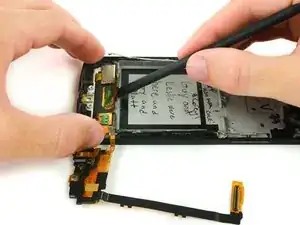
    • Usa el extremo plano de un spudger para desconectar el cable plano de la placa hija y apártalo de la batería.

  8. ZIeQQP3RVRHYx6Q3
    ZIeQQP3RVRHYx6Q3
    ZkXpmOus3fCXKTFm
    tSaGTMZDJD3XFcRO
    • Usa una herramienta de apertura de plástico para sacar la batería de su receptáculo.

    • Podrías necesitar usar una pistola de calor para aplicar una pequeña cantidad de calor para ablandar el adhesivo debajo de la batería.

    • No perfores o dobles la batería.

    This part is very delicate. The adhesive is pretty solid and I did puncture the battery. It is dangerous and the battery should be replaced with a new one.

    Christophe De Wolf -

    Thanks Chris for the notice. I have added a warning on your advise. Do you think about any better way to unglue the battery?

    Gaetan -

    Like another user, I had already taken my cover off plenty of times prior to. The issue of course was removing the battery. I purchased the opening tools and spudger and used them but to no avail. I ended up using a flat tip screwdriver and got the battery out within seconds with no puncturing.

    gnewton16 -

    I'll second the flathead screwdriver. Tried different plastic tools only to damage both the battery and a spring connector on the phone. With the flathead screwdriver battery came out quite easily lifting from the bottom end. There is an adhesive tape holding the battery firmly in place that retains the adhesive surface after removing the battery, so the new battery should attach properly.

    Dennis Millner -

    Why do you need to remove the battery at all? Just replaced my rear camera without removing it. I mean, I realise that removing the power source would have been safer, but would it be enough just to detach the motherboard connector?

    eyusupov -

    This guide is about the REPLACEMENT of the battery, and for that it seems necessary to remove it first. ;-)

    biharikristof -

    Do you need to apply adhesive to the new battery to keep it in place?

    Ross Light -

    no there is generally glue remaining and it stays in place pretty good

    mmoodley10 -

    This was fantastic, thank you! I had never done anything like this before! You just saved me some money and also taught me something :D

    anagarciasebastia -

    to make Qi work, you have to press the cover really everywhere afterwards. The contacts for Qi are between th Nexus "S" and the camera. Sometimes the Qi loading needs some time to work - I assume the battery needs to expand after a few loading cycles...

    Apeiron -

    The first time I tried to replace the battery I ended up breaking off the tab on the new battery. It needs to be bent properly to fit into the socket on the phone. The second time, I connected the tab t the socket BEFORE placing the new battery into the area of the phone where it sits. Then I was able to use the plastic tool to correctly bend the connector.

    John Goldin -

    I have replaced the battery and after doing this there is a flashing red light. does this mean its just charging from empty or have I done something wrong? Do i need to press any buttons to make sure its charging properly? do i need to re open it up to check connections? what do i do? there is no mention of whether it should turn back on or what it should do/how long it will take to be up and running again.

    Bambipeach -

    I had the same "problem", though I had misplugged the battery. Just wait for a couple of minutes and your phone should start to charge. Also, I've been told to fully charge and discharge the battery 2-3 times before using it.

    Steve Simard -

    Be extremely careful while prying out the battery. I had damaged a Nexus 4 battery while trying to do this, and smoke started coming out. If you search youtube you can see how a punctured Li-ion battery can explode in seconds.

    Abhi B -

    Why not remove the battery by pulling on the small ribbon cable at the top?

    Matt Szczublewski -

    When you take out the battery, there are some sort of black tape (adhesive) around the inner circle of the empty battery chassis. I might have been too rough and taken the black tape out completely. Now with the newly replaced battery, Nexus 5 won't charge or power on. Does anyone know what the black tape is for? is it the reason or something else?

    Gracie -

    I found out that the heavy duty suction cup I bought to replace phone screens works quite effectively at removing the battery without bending or damaging it. Of course, this was being used on a battery that was itself a replacement of the original, so the adhesive may have weakened significantly.

    Rewarp -

  9. n2ATayK3owfLiG6U
    n2ATayK3owfLiG6U
    TJxKXUvK3cmasqMI
    • Usa el extremo plano de un spudger para desconectar el cable izquierdo de la antena.

  10. Dmunk4EWt5kUWcpa
    Dmunk4EWt5kUWcpa
    hqx6GJNKrDWUoxHQ
    • Usa el extremo plano de un spudger para desconectar el cable derecho de antena.

    • Estos deben ser sujetados firmemente durante el reensamblaje, ya que si no los sujetas bien, tu recepción y calidad de llamada se verán afectadas.

  11. BtIZECIPuSFBFPPU
    BtIZECIPuSFBFPPU
    sLORMBgZOWOjEN3D
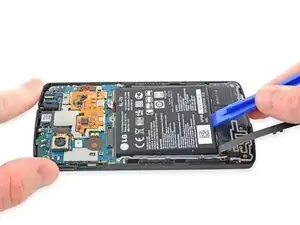
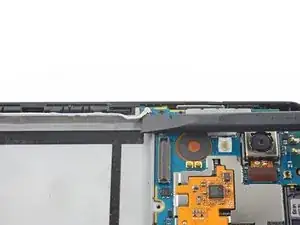
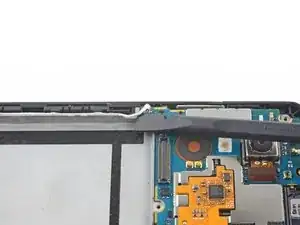
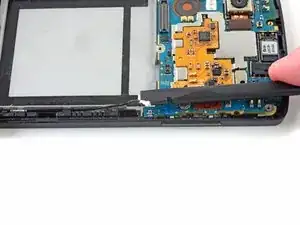
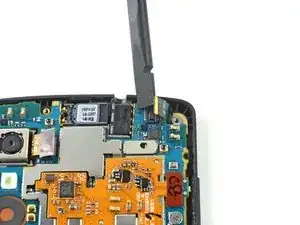
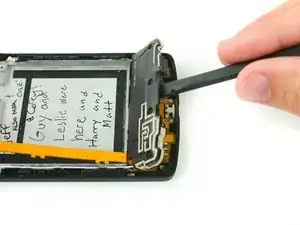
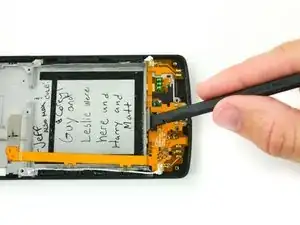
    • Usa el extremo plano de un spudger para desconectar el cable plano que conecta la cámara trasera a la placa madre.

  12. 2vLGDUwYvSSfVU2i
    2vLGDUwYvSSfVU2i
    Cphxbju56EhIW4Ff
    • Usa el extremo plano de un spudger para desconectar el cable plano de la cámara frontal.

  13. 5a2DDouuigCLtDrZ
    5a2DDouuigCLtDrZ
    tJcLaE5ufC3ckwqy
    • Con cuidado levanta la placa madre del dispositivo.

  14. lK1eLPPERuYHgDtP
    lK1eLPPERuYHgDtP
    5PoUaNuP6gS1lVdP
    Aa3mcJiIaslttcOF
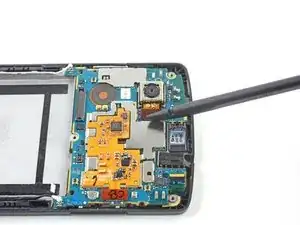
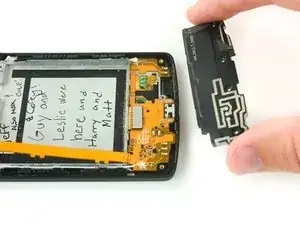
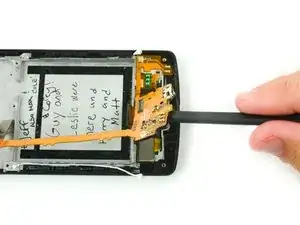
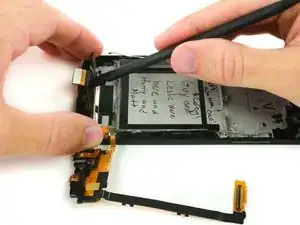
    • Inserta el spudger por cualquier abertura entre la tarjeta hija y la carcasa plástica.

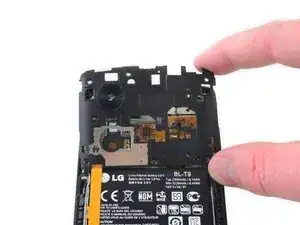
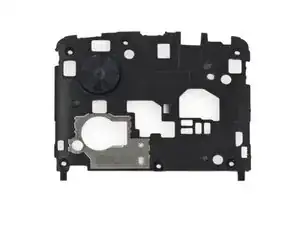
    • Levanta la cubierta de la tarjeta hija y sáquela del marco.

    • Si Jeff, Max, Cole, Corey, Guy, Leslie, Harry, o Matt ya estuviesen aquí, considerarían la búsqueda de dispositivos de vigilancia en su dispositivo.

  15. EEFUKwFdrM4gakV6
    EEFUKwFdrM4gakV6
    ZXljglPQMTTX4OEh
    N5cZBnmthuZFxEeM
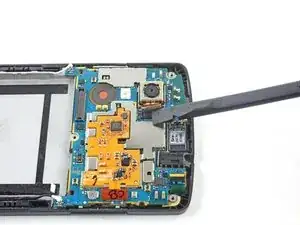
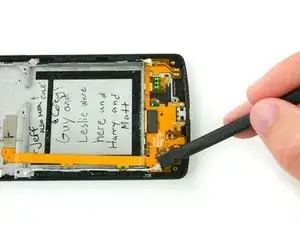
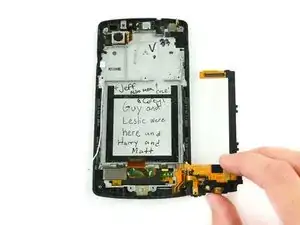
    • Usa el extremo plano del spudger de nylon para desconectar el conector de la antena blanco y negro de la tarjeta hija.

    • Esta debe ser firmemente asegurada durante el re-ensamblado. No conectar y asegurar la antena correctamente, afectará la recepción y la calidad de las llamadas.

  16. wb5bNsBpIqLeDopW
    wb5bNsBpIqLeDopW
    HnerPY6rNSKYXKBN
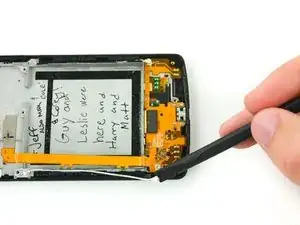
    • Usa el extremo plano del spudger de nylon para desconectar de la tarjeta hija, el conector ZIF del digitalizador.

  17. uWX5FfXk2NSoyxDj
    uWX5FfXk2NSoyxDj
    ClQKvet1XCR5hmNA
    JiOAtcT4lENWC6e4
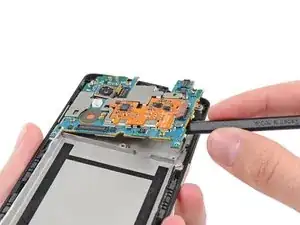
    • Inserta el spudger de nylon en una abertura debajo de la placa hija y haz palanca para liberarlo del marco.

    • El marco alrededor del puerto micro-USB es muy frágil—ten cuidado de no romper este pequeño puente plástico.

    • No desconectes la placa hija por completo. Muévela con cuidado hacia un lado del teléfono.

    I want to remove/replace the daughterboard/charging assembly, completely. The RH side appears to adhere to the chassis. What's the best method for separation?

    tjt263 -

  18. vj6NVxXvkPqFcIOT
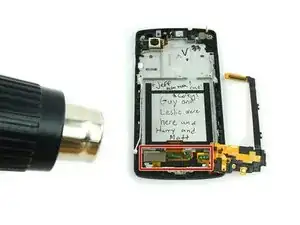
    • Usa una pistola de calor para aplicar calor al panel digitalizador para ablandar el adhesivo que lo asegura en el marco.

    • Mantén la pistola de calor a 20-25 centímetros aproximadamente del dispositivo y aplica el calor con un movimiento suave hacia adelante y hacia atrás.

  19. D2fHR6sSFGlQn3Ra
    D2fHR6sSFGlQn3Ra
    rjVx2ntasvMF6XL4
    • Trabaja con el extremo plano del spudger de nylon por debajo del panel digitalizador. Suavemente levanta el panel para liberarlo del adhesivo.

    • El teléfono podría estar muy caliente para ser tocado debido a la pistola de calor. Tómate un momento para permitir que se enfríe y evitar quemarse los dedos.

  20. sbv3hT5dyjbhDxio
    sbv3hT5dyjbhDxio
    55lTtbNqGMUFfdU3
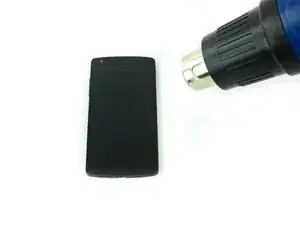
    • Usa una pistola de calor o un iOpener para suavizar el adhesivo alrededor de los bordes de la pantalla.

  21. Ia1UnZhNGknWFmWZ
    Ia1UnZhNGknWFmWZ
    aRUFjIyiWUNLLkfH
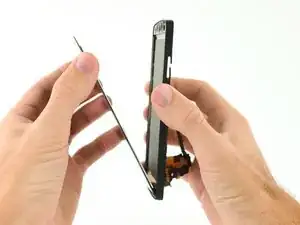
    • Usa un ventosa de servicio pesado y retira firmemente la pantalla del marco por completo, o lo suficiente para crear un espacio pequeño.

    • El Nexus 5 tiene una capa muy delgada de adhesivo. Esto no debería requerir una fuerza excesiva. Aplica calor adicional según sea necesario para ablandar el adhesivo de la pantalla.

  22. 5SKJuyGeJom2YyaA
    5SKJuyGeJom2YyaA
    6CEbtvJFD3eIsFvI
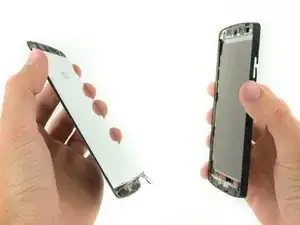
    • Inserta un pico de apertura en el espacio entre la pantalla y el marco.

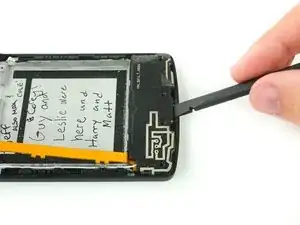
    • Trabaja con un pico de apertura a lo largo de los bordes de la pantalla para romper el adhesivo restante y liberar el ensamblaje de la pantalla.

  23. PKhBwCK3PNKGKPPW
    PKhBwCK3PNKGKPPW
    BNchx6vxvqbkgNYK
    T5M3kQJruiTCTgJW
    • Remueve suavemente la pantalla el conjunto de LCD y digitalizador.

    • Desliza cuidadosamente el cable plano del digitalizador a través del marco.

    The crucial step to glue back the new screen is missing.

    Could you add an equally detailed description of this step ?

    Thanks !

    Anton -

    Thank you. We need this addressed it’s been 3 years.

    Sum Guy -

    I’ll second this request for a detailed description of gluing the new screen.

    Oscar Valdez -

    ^THIS!

    Oscar and Anton are on point.

    I hate your site comment filters and settings too, but just focus on not screwing things up and making pro right to repair people look like jackasses when we have corporate and possibly state sponsored efforts to undermined us already.

    Sum Guy -

    WHAT THE !&&* IS WRONG WITH YOU? Am I just suppose to follow the directions in reverse?!

    Sum Guy -

    I’ll make it easy on the mods, I did a two second google search to find the info and I am linking three videos here, here, and here.

    If you are a mod, make sure the guy in charge of writing these things takes a few minutes out of his day to finish what he started three years ago, and if that is too hard the videos are right here for him to watch and he can just copy what he sees.

    Sum Guy -

    Hello everyone. I proposed some edits to this guide to include the few critical steps consisting of: 1) Cleaning the frame; 2) Applying the screen adhesive; 3) Applying the screen. The remainder of the reassembly can be done quite easily by just following the instructions in reverse. I do not know how quickly my proposed edits will be included in the “Verified Guide”, but you can see browse them in the “unverified version” here. Any feedback over there is of course welcome.

    Patrick Finnerty -

Conclusión

Para volver a ensamblar tu dispositivo, sigue estas instrucciones en orden inverso.

Richard Suovanen

Miembro Desde 07/02/17

27684 Reputación

10 comentarios

This is a nice guide to understand how to disassemble and assemble your Nexus 5. 95% can be done with this guide.

Tip: read the comments!

My own tips are:

1) Search for instructions how to use glue or double sided adhesive tape. It's a must if you want succesfully put everything back together

2) You need to transfer the speaker protection from the inside of the glass to the new glass

3) The same needs to be done with with a white rectangle. It has something to do with your LED-light at the bottom.

Saw these tips in this YouTube video https://youtu.be/jQS618ayL5w

Jeroen Meyer -

Thanks for the extra tips, Jeroen! These two steps can be found at 2:50 of the video for those who want to skip right to it. ;)

We do supply the tape as well: Tesa 61395 Tape

By the way, does the guy in this video remind anyone else of Thrawn from Star Wars Rebels (aka Lars Mikkelsen?)

Richard Suovanen -

Hey, what size do I need for the tape? Is the mm size referring to width or thickness?

I assume it’s width and I need 1mm or 2mm to repair my Nexus 5, but which one?

Carsten Pfeifer -

I need a little help with this tutorial. I’ve bought a second hand N5 where someone replaced the screen, now the display lifts off slightly in the bottom left corner of the device. Pushing it back will only hold it in for a few minutes. Should I slide a tiny piece of double-sided adhesive tape underneath, or rather some modelmaking glue?

Ste Se -

The new screen is not adhered as the old one was.. not sure what I would use for that. Not terribly important for me since it sits 99% flush, and lives in an enclosed case, but the guide should probably mention this.

Kristen McWilliam -

there is no reason to fully disassemble your phone just to replace the screen all you have to do is pull off the back pannel unscrew the speaker/mic housing assembly then take it off, dissconnect the screen connector under that and lift out the little breakout board where all the connections to the phone go at this point pry off the bad screen and put in a new one plug it in and glue it down with something like rubber cement reassemble and done. I have done this about 50 times with my nexus 5. I refuse to be careful with my phone.

Christopher Deming -

note: do not use super glue to glue in your screen, you want something rubber cementy because it will hold your screen good but it can be peeled away, and any excess is easally removed. I personally use Loctite “flexable adhesive” for “ vinyl fabric & plastic”.

I like to put it under some slightly heavy books wile it drys

Christopher Deming -

oh and don’t forget your speaker grill for the phone speaker

Christopher Deming -

Is it possible to replace the digitizer and re-use the factory screen? The screen on my phone is perfect with no scratches or cracks and I would hate to replace it with some knock-off glass. My phone just randomly stopped responding to touches but is otherwise pretty mint for being so old.

Michael Guy -

Do NOT use the ifixit display adhesive to attempt this repair, not only are there no instructions, it is really easy to remove the aluminum foil which is responsible for the backlight. I nearly destroyed my new display digitizer trying to attempt this repair. Get some epoxy from home depot, don’t waste your time

Wes -