Introducción

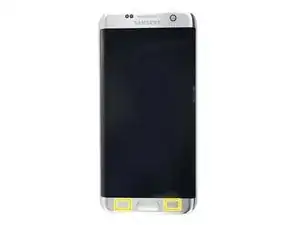
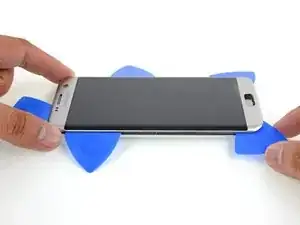
Sigue esta guía para reemplazar el ensamblaje de pantalla de Samsung Galaxy S7 Edge.

Esta guía te enseña a reemplazar solo la pantalla mientras dejas el marco y la batería original en su lugar.

La esquina curveada y el adhesivo fuerte hacen el procedimiento difícil. Se paciente, repita la aplicación de calor y los jalones, y el adhesivo se aflojará eventualmente.

'Nota' : Algunas pantallas de reemplazo para este teléfono vienen preinstaladas en un nuevo marco (a.k. un chasis), que requiere un procedimiento muy diferente: trasplantar las partes internas de tu teléfono e instalar una batería nueva. Asegúrate de tener la pieza correcta antes de comenzar esta guía.

Si el marco está dañado o doblado, es importante reemplazarlo, de lo contrario, la nueva pantalla podría no montarse correctamente y sufrir daños por la presión desigual.

El proceso de separar la pantalla del marco generalmente destruye la pantalla, por lo tanto, no sigas esta guía a menos que tengas la intención de reemplazar la pantalla.

Si tu pantalla está hecha añicos, usa protección para tus ojos y aplica un protector de pantalla o cinta a la pantalla para contener los vidrios rotos.

  1. yXHrRJ2WaPeXHiMr
    yXHrRJ2WaPeXHiMr
    2XLsKVP1DHSJtXwF
    ht12NoJva5PkIESE
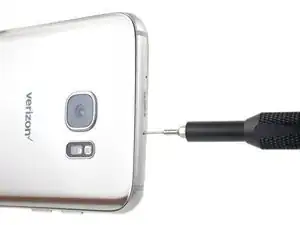
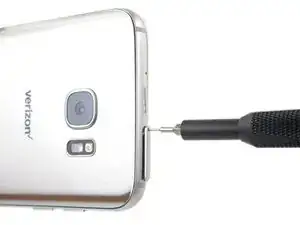
    • Inserta una herramienta de apertura de tarjeta SIM, una punta de eyección de SIM, o un clip para papel en el pequeño orificio en el borde superior del teléfono.

    • Hay dos orificios en el borde superior. El orificio correcto estrá dentro de un recorte largo rectangular.

    • Presiona la herramienta de apertura para expulsar la bandeja.

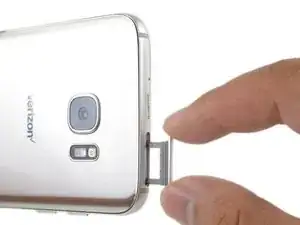
    • Remueve la bandeja del combo de tarjeta SIM/SD del teléfono.

  2. yjsAxqeAZCPdMoHe
    • Abrir el dispositivo pondrá en riesgo su sellado impermeable. Ten preparado adhesivo de repuesto antes de proceder, o trata de evitar exposición a líquidos si vuelves a montar el dispositivo sin sustituir el adhesivo.

    • Calienta un iOpener y aplícalo a lo largo del borde del teléfono durante dos minutos.

    • Necesitarás volver a calentar y aplicar el iOpener varias veces para alcanzar la temperatura suficiente. Consulta las instrucciones del iOpener para evitar sobrecalentamiento del dispositivo.

    • También se puede utilizar un secador de pelo, pistola de calor, o lámina caliente, pero ten cuidado de no sobre calentar el móvil -la pantalla OLED y la batería interna son susceptibles a daño por calor.

  3. FHHqQpe5TjxgECRI
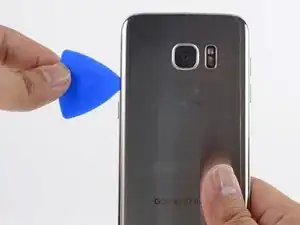
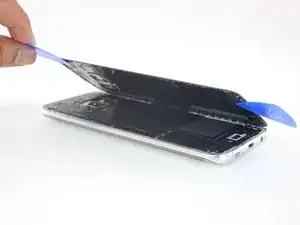
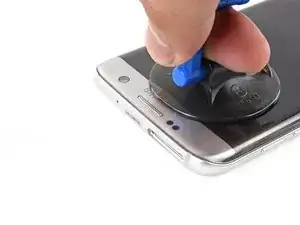
    • Una vez que el panel esté lo suficientemente caliente al tacto, coloca una ventosa lo más cerca posible del borde calentado, evitando la parte curvada.

    • La ventosa no aplica una buena sujeción en la parte curvada del cristal.

    • Si la tapa trasera del teléfono está rasgada, la ventosa no podrá adherirse. Intenta levantarla con una cinta resistente o pega con adhesivo instantáneo la ventosa y permite que se pega así puedes proceder.

    • Levanta de la ventosa e inserta un spudger Haldberd o púa de apertura debajo del cristal trasero.

    • Debido a la curva del cristal, deberás tirar hacia arriba con la ventosa e introducir la herramienta plástica de forma paralela al plano del teléfono.

    • Si tienes problemas, aplica más calor para ablandar más el adhesivo e intenta nuevamente. El adhesivo se enfría muy rápido, así que quizá deberás calentarlo repetidamente.

    Suction cup does not seem to work.

    Wincess Gentius -

    Makes it sound ridiculously easy, when in reality you have to be pulling with tons of force while also holding the phone down and on top of that you have to insert the pick in a relatively small amount of time.

    Rodrigo Morgado -

    I was getting no where with the iOpener and picks alone, so I followed a YouTube video and used the iOpener as well as a hairdryer. I had to make the first cut in the ahesive with a utility/razor knife, then as soon as I was through the first part I inserted the plastic picks. The back of the phone has to be too hot to touch, ideally all around, so the iOpener alone is not enough.

    Mark Frost -

    Thanks for the above comments. I was also getting nowhere with the iOpener then used a hairdryer on the non-camera end until it was hot to the touch and managed to get a Stanley knife into the gap and lifted enough to get a pick in. Plain sailing from there with patient heating and working the picks in to cut the glue. Eventually success and the back came off.

    Alastair -

  4. bNeaXFpywjbKdsNU
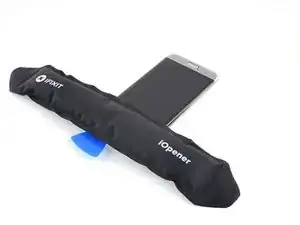
    • Una vez que esté firmemente introducida la púa vuelve a calentar y aplicar el iOpener para ablandar el adhesivo.

  5. 3MMgFNEMPC2HMMtJ
    3MMgFNEMPC2HMMtJ
    xVvZFCFlmHaJyHQ2
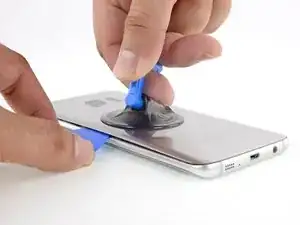
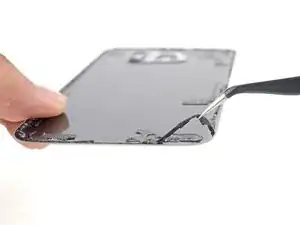
    • Desliza la púa de apertura a lo largo del borde del teléfono separando el adhesivo.

    • Hazlo despacio, debes evitar salirte de la hendidura. Si se te dificulta, vuelve a calentar y aplicar el iOpener.

    • Deja la púa en su lugar y toma una segunda púa mientras continúas con el próximo paso. Si dejas la púa insertada previenes que el pegamento que has separado se vuelva a adherir.

  6. Y4LDCRmHgnoSIsJD
    Y4LDCRmHgnoSIsJD
    KHcnbVQvoTJ5S1aI
    f4NGhygd3DgkPpNZ
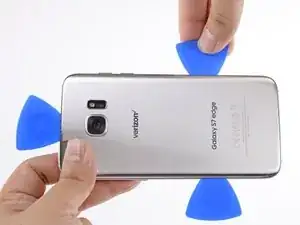
    • Repite el paso previo de calentado y corte del adhesivo en los tres bordes restantes.

    • Deja una púa de apertura en cada borde del dispositivo mientras continúas para evitar que se vuelva a unir con el adhesivo.

  7. oMUWlQsL6NDPav6r
    oMUWlQsL6NDPav6r
    ba3VLFbnETGJcxMW
    • Levanta el cristal y remuévelo del teléfono.

  8. YZtMUpEto3WfwtEC
    YZtMUpEto3WfwtEC
    XcSQlD54SaYWpQXj
    • Para reinstalar la tapa trasera:

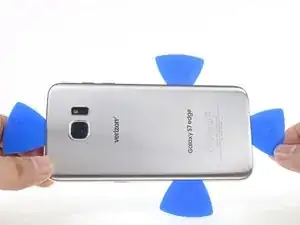
    • Usa pinzas para despegar cualquier resto de adhesivo del chasis del teléfono. Luego limpia las áreas de adhesión con alcohol isopropílico de alta concentración (al menos 90 %) y un paño sin pelusa para preparar la superficie para el nuevo adhesivo.

    • Despega el adhesivo del nuevo vidrio trasero, alinea con cuidado un borde del vidrio contra el chasis del teléfono y presiona firmemente el vidrio sobre el teléfono.

    • Si estás reinstalando la tapa trasera anterior o estás usando una tapa trasera sin adhesivo preinstalado, sigue esta guía.

    • Asegúrate de encender tu teléfono y probar tu reparación antes de instalar adhesivo nuevo y volver a sellar el teléfono.

    • Si lo deseas, puedes reinstalar la tapa sin sustituir el adhesivo. Retira cualquier gran acumulación de adhesivo que pueda impedir que la cubierta esté nivelada. Después de la instalación, calienta la tapa y aplica presión para asegurarla. No resistirá el agua, pero el adhesivo normalmente es lo suficientemente fuerte como para aguantar

  9. Rc3MEdW4COvtZ2LS
    • Remueve los 12 tornillos Phillips de 3.5mm

  10. 6QxK5orukfoHwYIl
    6QxK5orukfoHwYIl
    I4IDW3itZjNhWPGF
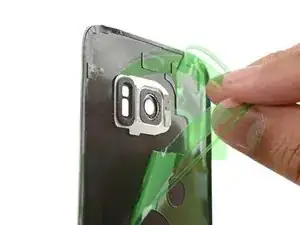
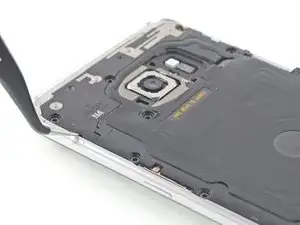
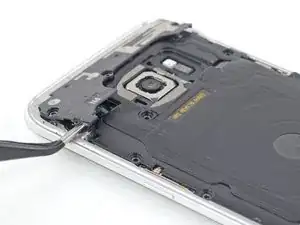
    • Usa la muesca pequeña en la parte inferior izquierda de la antena superior para sacarla del teléfono.

    • Retira la antena superior.

  11. MMvRtGIJZrxUgSrq
    • Levanta y retira la bobina de carga inalámbrica del teléfono.

  12. yaknSxqZmJBqqLmq
    • Levanta y remueve el altavoz del teléfono.

  13. YGONxdBQq6nBMgDY
    YGONxdBQq6nBMgDY
    QhHA2dtUQQxnNPwR
    • Usa el extremo plano de un spudger para desconectar el conector de batería.

  14. mHO3rt5EX4AAJUTi
    mHO3rt5EX4AAJUTi
    vmUJKAwa5cGQcHsB
    • Usa el extremo plano de un spudger para desconectar el cable de pantalla.

  15. vLJZvGaZRufIcIbn
    vLJZvGaZRufIcIbn
    iOlaPfqYBL1IOvh4
    • Usa el extremo puntiagudo del spudger para desconectar el cable de botón de encendido.

  16. hVPiALCNaNZqyofE
    hVPiALCNaNZqyofE
    nfOSMFdxPhORcAU1
    CCewYoUi2H3M55Qj
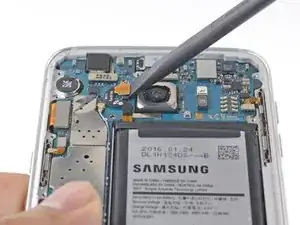
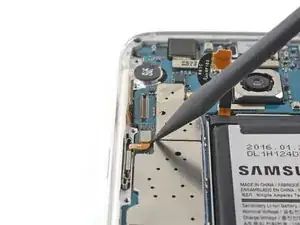
    • Usa el extremo puntiagudo de un spudger para desconectar el cable rojo y el blanco de antena.

  17. jgAk3MbBlvPdLPiq
    jgAk3MbBlvPdLPiq
    wOldrQwQmWfCZZBG
    • Usa el extremo plano de un spudger para desconectar el conector de botón de inicio.

  18. WXUSoWGYFJQRsheN
    WXUSoWGYFJQRsheN
    OIfORVRmFgkj35WT
    GHhMNtrddByTqsdy
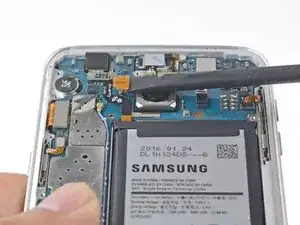
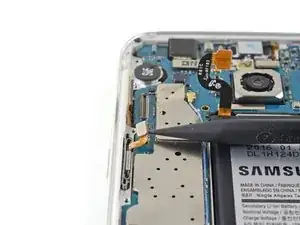
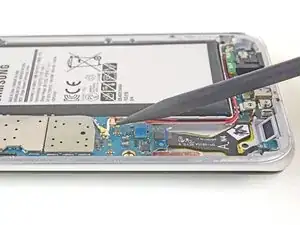
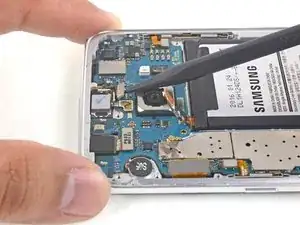
    • Usa el extremo puntiagudo de un spudger para desconectar los cables del sistema sensorial frontal.

  19. BVLfCoIhRqKT3F6I
    BVLfCoIhRqKT3F6I
    oCVxgN5BiwVoQtNt
    • Usa el extremo puntiagudo de un spudger para desconectar el cable de botón de volumen.

  20. lSrLfsT2PqtVwuP2
    lSrLfsT2PqtVwuP2
    RrHlfVUUXsARl2MY
    dSD1V3p4KOjZjfp6
    • No levantes la placa madre por completo; está todavía conectada a la placa hija por un cable.

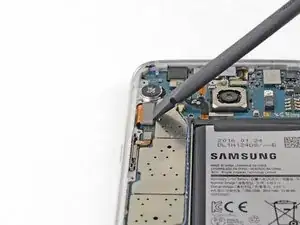
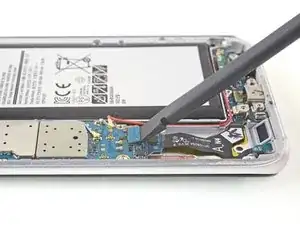
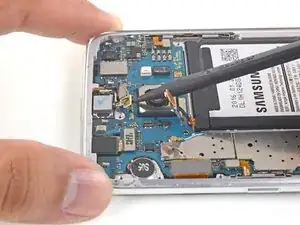
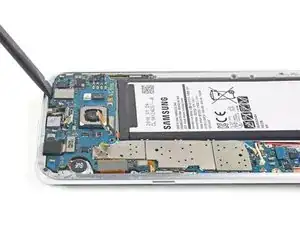
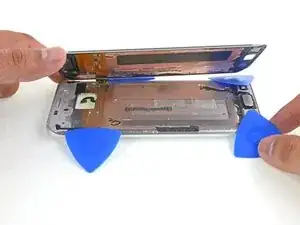
    • Usa el extremo plano de un spudger para hacer palanca y levantar la placa madre.

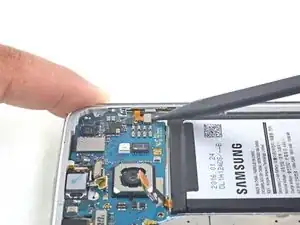
    • Toma los bordes de la placa madre y levántala lentamente utilizando el spudger para hacer los cables a un lado.

  21. HEwRaQZvr1tMDQXp
    HEwRaQZvr1tMDQXp
    UvgoJU3ZOwTPGYON
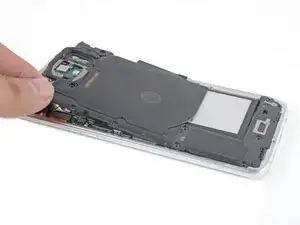
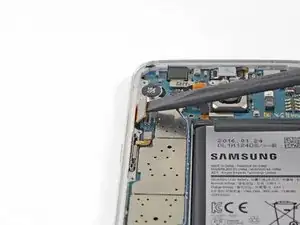
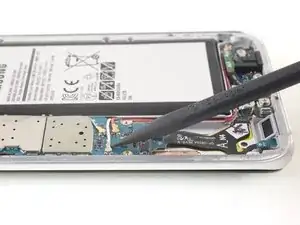
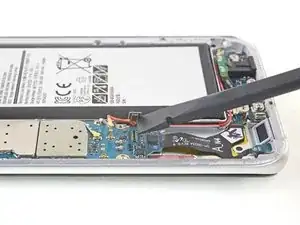
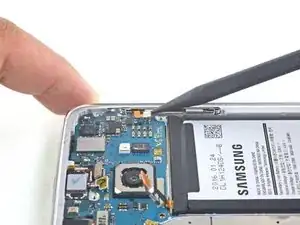
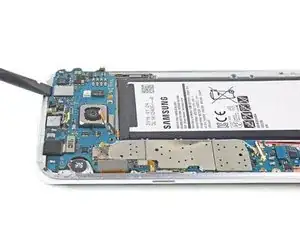
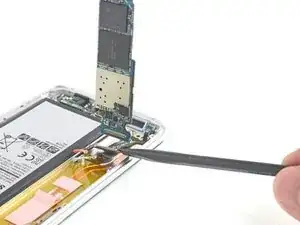
    • Usa el extremo plano de un spudger para desconectar el cable plano de la placa hija de la parte inferior de la placa madre.

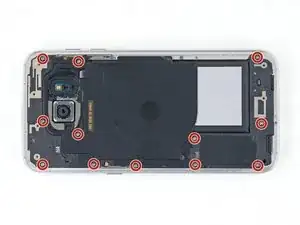
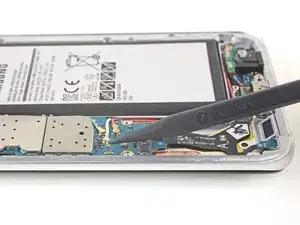
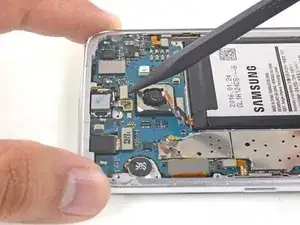
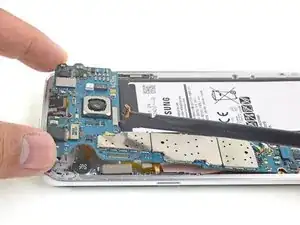
    • Remueve la placa madre.

  22. LPEsGiTbaILaxMhZ
    • Calienta un iOpener y aplícalo en el borde superior de la pantalla.

    • Quizá tendrás que volver a calentar y aplicar el iOpener varias veces para que el móvil se caliente lo suficiente. Sigue las instrucciones del iOpener para evitar sobrecalentamiento.

    • Se puede usar un secador de pelo, una pistola de calor o una placa caliente, pero ten cuidad de no calentar el teléfono demasiado—la pantalla OLED y la batería interna son susceptibles al daño por calor.

    • Mientras esperas que el adhesivo se ablande, lee el próximo paso para hacerte una idea dónde hacer palanca.

  23. 5Qb6KFMnMxnAp1JT
    5Qb6KFMnMxnAp1JT
    3XrfKd3E3QRTo3no
    vvoiCaetM3V2cdAO
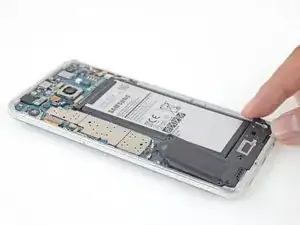
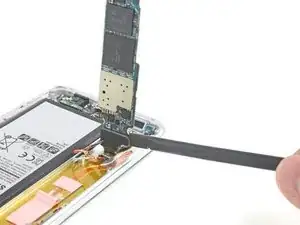
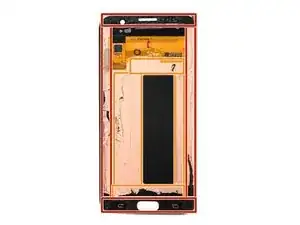
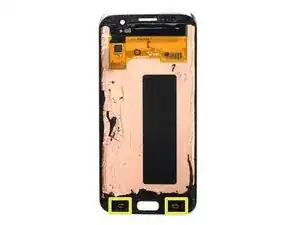
    • Los bordes del ensamblaje de pantalla están sujetos por tiras de adhesivo de espuma muy resistente.

    • Toda la superficie de cobre está cubierta por cinta de doble lado resistente.

    • En los siguientes pasos se necesita precaución extra en ciertas áreas para evitar daño al teléfono:

    • Los botones capacitivos están adheridos a la pantalla y son muy fáciles de romper. Deben ser reutilizados para la reparación.

    • Si bien el panel OLED y el cable de pantalla serán reemplazado por la nueva pantalla, los botones capacitivos deben ser reutilizados, así que ten extremo cuidado de no dañarlos.

    • Si rompes alguno de los botones capacitivos o cables planos, puedes reemplazar el ensamblaje de placa hija, que incluye botones capacitivos nuevos.

  24. Lw2UfYZshW3rENxG
    Lw2UfYZshW3rENxG
    UfBWuevMq2UgXIlm
    B1vslRMPkwABi3VM
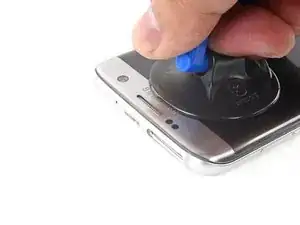
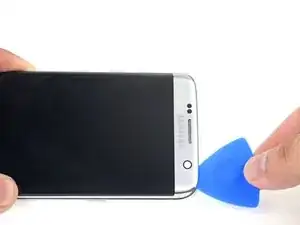
    • Una vez que el borde esté caliente, aplica una ventosa tan cerca como sea posible de borde superior sin superponerse sobre la rejilla de altavoz.

    • Si tu pantalla está muy rota, coloca una capa de cinta en la pantalla e intenta levantar la pantalla con una cinta resistente.

    • Levanta desde la ventosa para crear un pequeño espacio por debajo del borde superior de la pantalla.

    • Esto podría requerir una gran cantidad de fuerza, pero solo necesitas abrir un espacio muy pequeño con la ventosa para insertar tu herramienta.

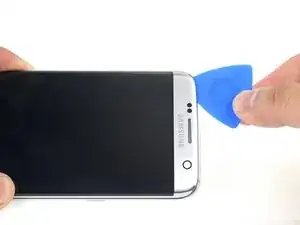
    • Introduce una púa de apertura en el espacio. Ten cuidado de no introducir más de 6 mm en el espacio.

    • Debido al adhesivo resistente, esto podría requerir varios intentos. Sigue las instrucciones de calentamiento del iOpener y repite el procedimiento de calor-ventosa- levantar hasta que puedes ingresar una púa.

  25. ZOejgfQBsKTnhPTg
    • Con la púa de apertura en su lugar, aplica un iOpener caliente al borde superior una vez más para ablandar el adhesivo.

  26. iMEVTpvVQgNnyb3i
    iMEVTpvVQgNnyb3i
    2LcxRYMSAV1txKPv
    • Desliza la púa de apertura a lo largo del borde superior de la pantalla teniendo cuidado de no empujar más de 6 mm hacia adentro.

    • Introducir la púa demasiado podría dañar la cámara frontal o el altavoz de auricular.

    • Deja la púa en el borde superior para prevenir que el adhesivo se vuelva a sellar.

  27. yPnACkgHBQIQkuuR
    yPnACkgHBQIQkuuR
    BN34Jj1ycvUM4IxP
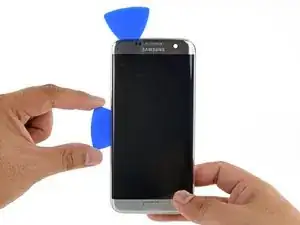
    • Repite el procedimiento previo de calentamiento y corte para los bordes largo del teléfono. No cortes el borde inferior todavía.

    • Hay grandes áreas del adhesivo que sujetan la pantalla al marco. Trabaja despacio y metódicamente para cortar todo el adhesivo que sea posible.

    • Deja una púa de apertura en cada borde mientras continúas con el próximo para prevenir que el adhesivo se vuelva a sellar.

    • El cable de pantalla está ubicado justo sobre el punto medio en el lado derecho y podría interferir con tu púa si haces palanca muy profundamente.

  28. s3bPFdfvHQRYFdVZ
    s3bPFdfvHQRYFdVZ
    gIvKPmL3pS1ZODmg
    • Introduce una púa de apertura en la esquina derecha inferior.

    • Empuja la púa despacio. Trata de hacer palanca con el borde de corte de la púa hacia arriba así se desliza contra la parte trasera de la pantalla.

    • Esto permite que la púa se deslice entre la pantalla y el botón capacitivo sin dañar el cable de botón.

    • Una vez que la púa ha cortado el adhesivo en la esquina derecha, déjala en el lugar para prevenir que el adhesivo se vuelva a sellar.

  29. xHPLAAspehSUEs1Q
    xHPLAAspehSUEs1Q
    YC1R1cq5rMotjjEb
    • Introduce una púa de apertura en la esquina inferior izquierda.

    • Empuja la púa despacio. Trata de hacer palanca con el borde de corte de la púa hacia arriba así se desliza contra la parte trasera de la pantalla.

    • Una vez que la púa ha cortado el adhesivo en la esquina izquierda, déjala en el lugar para prevenir que el adhesivo se vuelva a sellar.

  30. 3XfmZsADAN11OeHR
    3XfmZsADAN11OeHR
    kYvJgRHaJfCXZbZ1
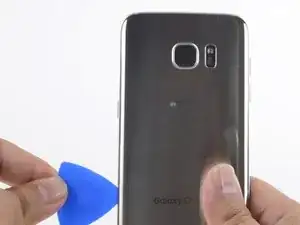
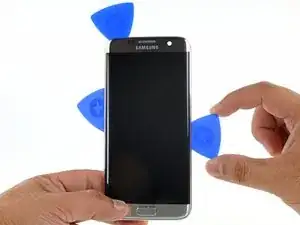
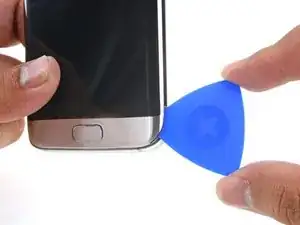
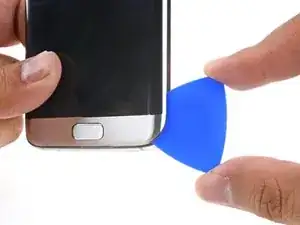
    • Usa las púas de aperturas para cortar el adhesivo alrededor del botón de inicio y cualquier adhesivo restante.

    • Abre el teléfono ligeramente comenzando con el borde opuesto al cable de pantalla.

    • No remuevas el ensamblaje de pantalla. Hay un cable de pantalla que pasa por el marco medio que está conectado a la pantalla.

  31. H1ETrPpcKGMDa6na
    H1ETrPpcKGMDa6na
    OSpQQ2vN1Nol4P4v
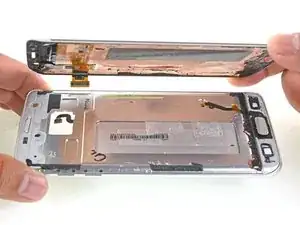
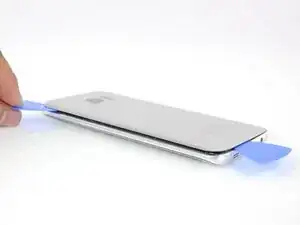
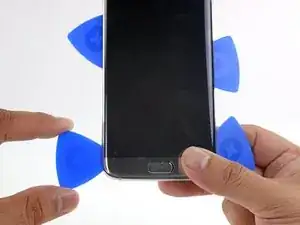
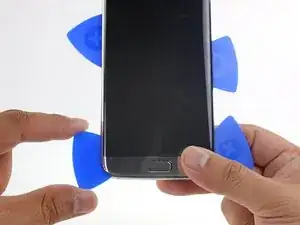
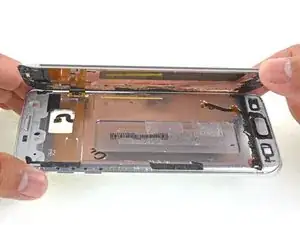
    • Levanta el ensamblaje de pantalla del marco medio con cuidado pasando el cable de pantalla a través del orificio del marco medio.

    • Remueve el ensamblaje de pantalla.

  32. tr36gjxA2ImXsmPD
    • Sigue este enlace para una guía detallada de aplicación de adhesivo para pantallas.

    • Antes de instalar la nueva pantalla, es muy importante remover todas las huellas del antiguo adhesivo del marco y tener especial cuidado de remover cualquier fragmento pequeño de cristal.

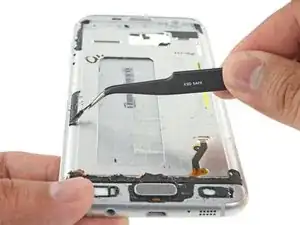
    • Luego de remover todas las huellas de adhesivo y cristal del marco, limpia las áreas de adhesión con alcohol propílico 90% (o más) y un paño anti-pelusa o filtro de cafe. Desliza en una dirección solamente, no hacia atrás y adelante.

    • Esto ayuda a remover cualquier resto de adhesivo y prepara la superficie para la nueva pantalla.

    • Si el marco está doblado o si algo de restos de pegamento de de cristal , la pantalla nueva no se montará correctamente y podría dañarse.

    • La mejor manera de sujetar la pantalla nueva es con un lámina de cinta adhesiva de doble lado con corte personalizado. Aplica toda la cinta en la parte trasera de la pantalla, luego con cuidado pasa el cable de pantalla a través del marco. Alinea la pantalla y presiónala en su lugar.

Conclusión

Para volver a ensamblar tu dispositivo, sigue estas instrucciones en orden inverso.

Arthur Shi

Miembro Desde 03/01/18

219093 Reputación

38 comentarios

Excellent guide, really enjoyed following the instructions. A job well done :-D

Craig Naidoo -

How do you get the glass backing off without it shattering at all?

Simeon -

There is no fool proof method. Apply liberal amounts of heat. Be careful when slicing near the corners. If your back has micro-fractures already, chances are your back will crack along the fracture.

Arthur Shi -

No matter how long I try to heat the back panel with an iOpener, I cannot seem to get the glue warm enough… Any advice on how to better unglue this thing?

Jérémie Corbier -

Hi Jérémie,

The glue is pretty strong on this phone. You can try using a heat gun if you have one, or a hair dryer. You can also try the bottom edge instead of the long edge- sometimes the glue is not as strong there.

Arthur Shi -

You should buy a hot plate with digital temperature adjustment which they use to separate LCD from glass.

The hot plate gives even heat to the surface of the phone incomparison to using a heat gun you cannot check how much heat it gives and you get uneven hot and cold spots.

Recommended temp around 85 degrees centigrade and use an i opener to create an opening and get a plastic pry card and coat it with alot of isopropyl alcohol and slide around the edges whilst adding more alcohol to the card

Aminur Rouf -

I only use a head gun with samsung phones because they have an impressive amount of stick to them. Just be careful not to over heat the back or front because then the glass will start to actually separate from the back plate and then it gets odd bubbles that are melted plastic and paint

Tom -

Force…. And tlc…lol

Michael Howard -

Hi Arthur, thanks for your feedback. I’ll give the iOpener another shot and if it doesn’t work I’ll use a hair dryer.

Jérémie Corbier -

I’d like to see a picture and/or more detail about the capacitive buttons and how to detach them. I assume this was done in step29?

Susan Nelson -

To clarify the question above… Step27 refers to “the button”. I assume that means “the right capacitive button”. Then in step28, the left capacitive button is separated from the display and perhaps in step29 the home button and the button cable are separated from the display? Or do you wait until step29 to do all of the buttons with the two corner picks in place?

Susan Nelson -

Hi Susan,

You are correct: step 27 refers to the right capacitive button, 28 refers to the left, and 29 refers to the home. Take a close look at the two images in step 30. They show what you are cutting through in terms of capacitive buttons.

Arthur Shi -

Thanks. Last question. If I just want to replace the display LCD and glass, do I really need to take the back off (steps 1-20)? It doesn’t seem like that would be necessary.

Susan Nelson -

Unfortunately, yes. The display connector must be disconnected in order for the LCD to be removed, and that can only be done on the back side. Note the dangling connector in the second picture of step 30.

Arthur Shi -

Hi ! I just want to replace my digitiser. Is that possible?

Varad Narvekar -

Very detailed explanation, I'm very impressed, now if you could include all of this in the Australian site that would be amazing!

Duane Johnston -

thanks for sharing, really nice and complete…

by,,,yudionline

diva rey -

Hi,

I have a circular crack in the centre of the glass which has slowly expanded due to the frictional force of operating the phone with my finger (finger inadvertently dragging small bits of glass from the edge) , leaving the screen below exposed.

I intend to replace the screen using this comprehensive and detailed guide. Does anyone have any recommendations for cleaning the exposed screen? The screen itself does not have the smoothness of the glass collects dirt easily.

I have isopropyl alcohol, but is this too harsh for the touch sensitive screen?

fearthespork1 -

This is a well written guide up to a point, but seems very redundant at the end. You are advising removing an extremely strong foam adhesive and then replacing it with double sided tape?

How about a guide to reapplying a new coat of foam adhesive? Including a guide to what foam adhesive is used, and where a quality replacement could be found.

This is a premium engineered product, so a guide that can restore it to near factory quality including the waterproofing would be very useful.

It would also be very helpful to have a guide to what kind of screen replacements are available, and where to find a proper ‘aftermarket’ replacement and not a cheap variant.

Shamsung -

Hello Shamsung,

While quality adhesives are very important in sealing the phone, there is unfortunately no reliable way for users to “waterproof” their repairs (other than using a waterproof case). Repair shops may be able to improve the resistance by sealing the phone using special pressure and temperature presses, but even then, they would not guarantee water resistance.

There are links to adhesive guides in the steps, which will show how to apply the proper adhesives to the phone.

In general, I would suggest not to trust in the water resistance rating. The phones are tested when they are brand new, and adhesives break down due to wear and tear. There is a reason why companies will not cover water-damaged phones in their warranties.

Arthur Shi -

Hi,

Is it possible to connect a S7 Edge screen on a S7 (G930F) just a moment in order to recover data to my computer ?

I do not want to assemble it, but connect the screen somme minutes.

Thanks.

Bonjour

Est-ce possible de brancher l’écran d’un Galaxy S7 Edge sur un Galaxy S7 en ne branchant que la nappe, sans essayer d’assembler le tout. L’idée étant juste de faire la manipulation une heure, le temps de récupérer les données.

Merci :)

Benrie -

Can you remove the display assembly without breaking it?

I need to access the digitizer flex but i dont know if the display is reuseable if you remove it.

stoneheart 21 -

You can theoretically remove it without breaking it, but there is a significant chance of damage. The curved OLED display is very prone to damage as you try to pry it off the frame.

Arthur Shi -

Can you do this to a working display without it breaking in the process?

Markus Norstrøm -

You can theoretically remove it without breaking it, but there is a significant chance of damage. The curved OLED display is very prone to damage as you try to pry it off the frame.

Arthur Shi -

I need new back and front screens how do I know which one to buy

Barry -

Nice Guide can can we remove line from screen i got pink link in set

packages plan -

Hello,

I can no longer charge my S7 Edge with the cable.

This problem suddenly appeared.

Perhaps this is due to a failure of the charging connector.

Do you think wireless charging would be a solution?

Because the wireless charging coil is connected to the motherboard, not directly to the charging connector.

In this case, the charging connector would be useless for charging (it is also almost impossible to be replaced due to the display glue).

Thanks

Vigneron -

You are right! Your connector is most likely worn out, so wireless charging is definitely a good workaround.

Arthur Shi -

Hey (Thanks for a very good guide)

I tried replacing the screen assembly on my s7 edge. I got a midframe with the screen already installed, so all i had to do was to move the board, batteri and so on. The problem is, when i turn on the phone, the LCD doesn’t work.

Any idea what is wrong?

(i tried whit to new screens with the same result)

nicown -

try check again all the connections

Daniele Carminati -

Daniele Carminati - 4 hours ago

I think i have tried that already :) but thanks for your advice.

nicown -

is the LCD the only thing not working? I mean, does the phone makes sounds and/or vibrates?

Daniele Carminati -

Yes.. It seems to be the LCD that is not working. I vibrates when its powered op, and the back and recent buttons lights up. Sorry for my slow reply.

nicown -

I think you may have got a defective replacement screen… Try to get it changed with a new one contacting the seller

Daniele Carminati -

I already got another one that i tried :( Do you think i have damaged the connector? (Thanks for your help so far :) )

nicown -

Or you are very unlucky, or you might have a damaged socked on the motherboard… It is still fixable, but you have to do some microsoldering (or bring it to someeone who does it)

Daniele Carminati -

Thank you, excellent guide and toolkit (essentials)! New display, new battery, new home button (finally working after 4.5+ years)… feels like a new phone!

Daniel Fueger -