Introducción

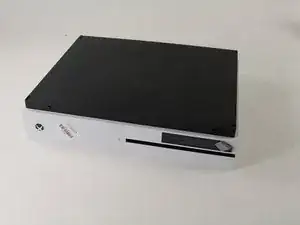
Esta guía te mostrará cómo retirar la unidad de discos ópticos de la tarjeta base de Xbox One S. Al quitar la unidad de discos, asegúrate de desconectar suave y firmemente los conectores

  1. AQtIBB1ZGqHTvNg4
    • Voltea la Xbox One S de manera que el fondo de la cubierta mire hacia arriba

  2. cI432T5plYCpwsEg
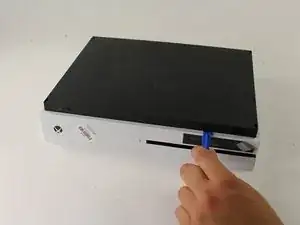
    • Empieza a trabajar en la carcasa en la parte trasera (donde se ubica el sticker de garantía). Inserta el abridor de plástico en el espacio entre el fondo de la carcasa y el lado superior rallado. Luego busca en medio los clips que sostienen la carcasa.

    • Usa el abridor para abrir los clips (valga la redundancia). El mejor método es hacer palanca para separar la cubierta negra del fondo.

    • Escucharás clics cuando estés abriendo la carcasa. Podría ser bastante difícil quitar la cubierta del fondo.

    • Es posible que los clips se rompan cuando quites la cubierta del fondo

    • Recomendamos empezar en una esquina y deslizar el abridor a lo largo de los ejes de la Xbox One S. Una vez que los clips se abran puedes levantar la cubierta para buscar los clips que faltan.

    Be careful not to damage the pairing button on this part

    David -

    Important!!

    You've to start from the back corner where is the information label, because there is a main clip behind a warranty sticker

    Cristian Ramirez -

    They should add this to the guide! I didnt know that, and did some minor damage to the bottom piece where that main clip is.

    I dont mind because it's my own Xbox, but what if it belonged to a customer?

    Charles Jackson -

    They should add this to the guide! I didnt know that, and did some minor damage to the bottom piece where that main clip is.

    I dont mind because it's my own Xbox, but what if it belonged to a customer?

    💯% same opinion!

    profnussecke42o -

    This was hard! I tried using plastic pry tools, but they did not work. A metal tool did, but make sure to watch a video or two, to see what you actually are dealing with. After the videos it went quite smoothly.

    Peterdk -

    I legitimately cannot open the case where the warranty sticker is, ive tried everything, im resorting to a fork to try and open this

    Sohail ツShah -

  3. DGFtVxEdoZKRdLMd
    • Una vez que todos los clips estén abiertos, retira el fondo de la carcasa

  4. GeIOPswgPOYsuGeJ
    GeIOPswgPOYsuGeJ
    uITOYPJDbxUgf4Lc
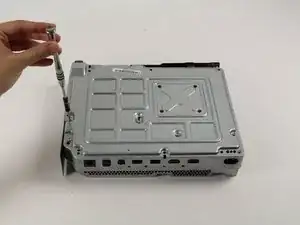
    • Usa un destornillador Torx T10 de seguridad para retirar los seis tornillos de 50 mm de largo etiquetados de F1 a F6 de la carcasa metálica

    My F3 isn't coming out. The screwdriver isn't sitting tight like it is for the other ones. Any idea on how to fix that?

    ben mccord -

  5. 3AbSAfsoTxUrMeTi
    3AbSAfsoTxUrMeTi
    wudY36aHJeyT6WjV
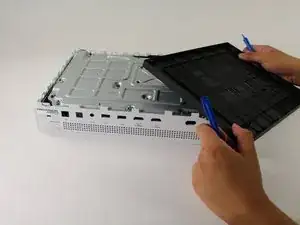
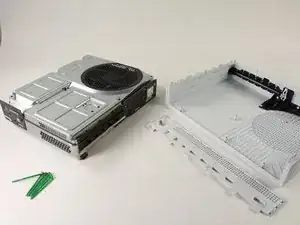
    • Usa el método adecuado para separar suavemente la carcasa interior de la cubierta exterior blanca

    • Haz palanca en los lados de plástico blanco hacia afuera en la parte trasera para separarlos del protector de E/S de plástico

    Essential tip: be sure to slide the metal housing backward, away from the from of the case as pictured above, rather than upward. If not, you can easily break off the teeny momentary switches on the IR blaster board!

    Mark Ross -

    “appropriate method is not descriptive like Mr. Ross’s comment. The original poster should edit the description to ensure people do in fact remove the box from the case appropriately. I would also add arrows to the picture.

    Ryan A -

    ____________⬆️

    ↖️Yes! I see it the same way!↗️

    ⬅️Arrows are always a good thing!➡️

    ↙️Can't do anything wrong with them! ↘️

    ____________⬇️

    😅😅

    profnussecke42o -

  6. IIrck1QmH5CfYc1k
    • Voltea la carcasa interior de modo que el ventilador mire hacia arriba

  7. 4PBmHOYGGLW51Ecb
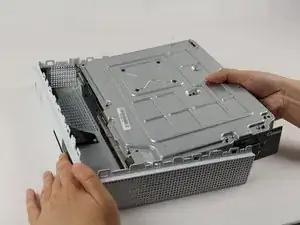
    • Para acceder al hardware dentro de la carcasa, puedes levantar el panel superior de la carcasa. Debería salir fácilmente.

  8. EFLSsRhhXsAEZnYh
    EFLSsRhhXsAEZnYh
    OjVWJsD26pdrus24
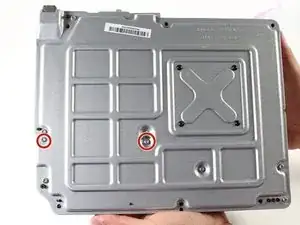
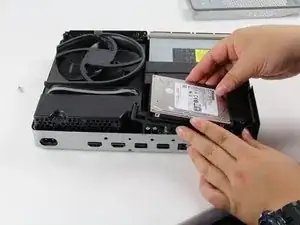
    • Para reemplazar el disco duro, voltea la consola y retira los dos tornillos T10 Torx de 10mm (C3 y C4) de la parte trasera de la Xbox One S

    • Esto permitirá que la cubierta de plástico que rodea al disco duro se separe del resto de la consola

    Some of my silver were gold screws, so just letting people know to look out for that!

    jovialkitten -

    The Torx screw circled on the left is actually C5

    Jaryn Wickman -

    I found the same. On my Xbox One S, it's C3 and C5 that hold in the hard drive caddy. C4 holds in the optical disk caddy.

    jamesr -

  9. X2IJJg3NqtsnAcbY
    X2IJJg3NqtsnAcbY
    NAHJXCj1SgvQNjOx
    3fEHBmUuTGRL3omb
    • Desconecta suavemente el disco duro de la tarjeta madre (en los dos cuerpos conectores de plástico

    Do not disconnect the connector in the second image! There are tiny prongs that bend easily and if bent just a tad bit they will break off. I had first hand experience with this and I ended up breaking my Xbox because I could not put that cable back on.

    [deleted] -

    Do not remove the cable!!!! You can change while the cables are plugged. It took 2 hours trying to put mm precisely all the little pins because of the removal of the cables.

    Please update the post, I could easily end up as the Aaron, breaking the XBOX completly.

    Botond Kopacz -

    Yes, this has also happened to me the connectors had broken and the pins bent and snapped off.

    Samuel Garbutt -

  10. VxZkFMZbQAxM2dKL
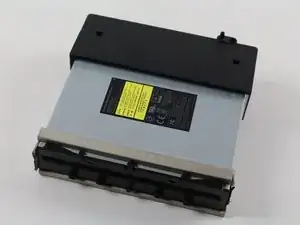
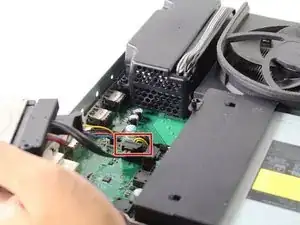
    • Para retirar la unidad de discos ópticos, retira el tornillo Torx T10 plateado de 10mm etiquetado como "C4"

    The image shows screw 'C4' witch is the correct screw. 'C5' is for the HDD.

    GoJoel -

  11. IL5gf22gGXMcJsTw
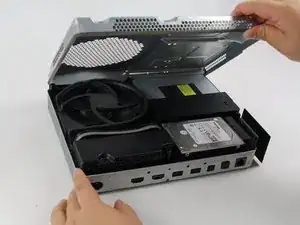
    • Jala ligeramente la unidad de discos de la tarjeta base y desconecta los conectores de plástico de la tarjeta base

Conclusión

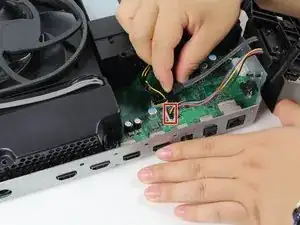
Para reensamblar tu dispositivo sigue estas instrucciones en sentido inverso

Victoria Law

Miembro Desde 26/04/17

895 Reputación

2 comentarios

alles schwachsinn: habe an meiner xbox one s dfas optische Laufwerk ausgetauscht ,da beim alten die spiele immer einfrohren .Alles nach Anleitung wie hier beschrieben . nun geht Garnichts mehr , kein bild kein ton geschweige noch ein spiel neu zu installiren .

siegfrieheide -

Das Problem ist, dass Microsoft das Laufwerk und die Hauptplatine “verheiratet" hat. Man kann also nur ein Laufwerk mitsamt der zugehörigen Hauptplatine austauschen.

VauWeh -