Introducción

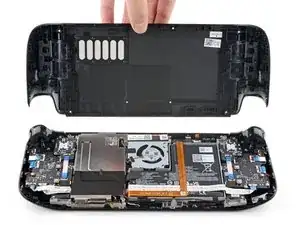
Utiliza esta guía para sustituir el gatillo analógico izquierdo de tu Steam Deck. El stick forma parte de un módulo completo y debe ser sustituido como una unidad. Aunque es casi idéntico, el procedimiento para el gatillo derecho se puede encontrar aquí.

Recuerda: seguir los procedimientos de seguridad contra descargas electrostáticas (ESD) generales mientras reparas tu dispositivo.

Las palancas de repuesto requieren calibración para funcionar como se espera. Lee sobre cómo hacerlo aquí.

Nota: Cada Steam Deck se envía con uno de los dos modelos diferentes de joysticks, tipo A o tipo B. Aunque son casi idénticos, la capacidad táctil capacitiva depende del tipo correcto que se instale. Para identificar qué joysticks de reemplazo necesitas, naveguar a Configuración  Sistema y verificar la ID del controlador Steam Deck: si la ID del controlador comienza con "MEDA", ese dispositivo usa los joysticks tipo A; si la ID del controlador comienza con "MHDA", ese dispositivo usa controles analógicos tipo B.

  1. vQyR3PAE4HOMSLAZ
    vQyR3PAE4HOMSLAZ
    aIKAs5r3P3bY2iTE
    hD1USYJCkAbkluud
    • Enciende tu Steam Deck y deja que la batería se descargue por debajo del 25 % antes de comenzar las reparaciones, ya que una batería de polímero de iones de litio cargada puede ser peligrosa si se perfora accidentalmente.

    • Como precaución adicional, Valve recomienda poner tu Steam Deck en modo de almacenamiento de batería dentro de la BIOS antes de comenzar cualquier reparación interna. Lee cómo hacerlo aquí.

    • Apaga tu Steam Deck y desconecta todos los cables.

    • Si tienes una tarjeta microSD instalada, asegúrate de quitarla antes de abrir Steam Deck. Si intentas quitar la cubierta posterior con ella aún instalada, podría romperse por la mitad.

    • Durante la reparación, a veces puede ser útil colocar el Steam Deck boca abajo en tu estuche para proteger las palancas de control y evitar que se tambalee.

  2. bpUGGPG32OkLXnC4
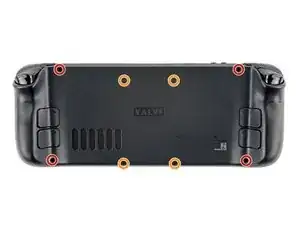
    • Utiliza un destornillador Phillips para retirar los ocho tornillos que sujetan la tapa trasera:

    • Cuatro tornillos de 9,5 mm

    • Cuatro tornillos de 5,8 mm

    • A pesar de los estándares, los destornilladores Phillips pueden variar en tamaño y forma: dos destornilladores etiquetados como del mismo tamaño pueden encajar de manera diferente en el mismo tornillo. Utiliza el tamaño que se ajuste mejor a la cabeza del tornillo.

    • A lo largo de esta reparación, realice un seguimiento de cada tornillo y asegúrese de que vuelva exactamente al lugar de donde vino para evitar dañar su Steam Deck.

    there should be a picture of the SD card slot at the start of every Steam Deck teardown. i know the note is there but i generally use the pictures to guide me and forgetting to remove the SD card is a very critical step

    Nathan Barrow -

    I agree, I just broke mine...

    Camille B -

    What is the the #1 philips used for? Only the #0 is mentioned in the instructions.

    Christopher Martin -

    I wish they would specify which size to use for which screws.

    Mark D -

    I found it easiest to use a PH1 for the red screws, and PH0 for the rest (including the internals.)

    Chris Clawson -

    Be careful you can strip the screws take your time

    I use PH00 bit

    jaybush74 -

    I used the PH1 bit for this. You can use smaller bits but ideally there should be no play of the bit in the screw head.

    Charles Semple -

    are there playstation replacements (circle,square,cross,triangle)

    Deór -

    I used the ifixit tools and used the 00 size for the screws on the back.

    Luis B -

    I've completed the guide and found it very helpful!

    I think somewhere in this part it would be helpful to name the size of the correct Phillips driver to use:

    Use a Phillips driver to remove the eight screws securing the back cover:

    Four 9.5 mm screws

    Four 5.8 mm screws

    Maynard -

    I used the PH1 for the 9.5mm screws and PH00 for the 5.8mm screws. The PH0 wanted to strip one of the small ones.

    Pol Llovet -

  3. 6jtVcFtMGa5ZMqcF
    6jtVcFtMGa5ZMqcF
    Ux5LEj3JfJlkmQMQ
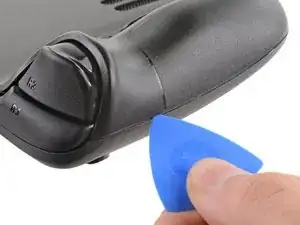
    • Inserta una púa de apertura en el delgado hueco entre la tapa trasera y la carcasa delantera, a lo largo del borde de la empuñadura derecha.

    • Si tienes problemas para insertar la púa en la costura de la empuñadura, intenta comenzar primero por los bordes largos superior o inferior y luego desliza la púa hacia la empuñadura.

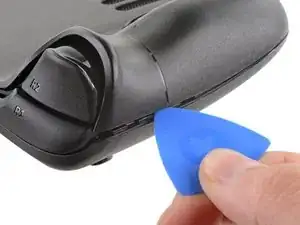
    • Haz palanca en la tapa trasera para liberarla de los clips de bloqueo.

    I found it easiest to start this process at the top of the device near the fan exit.

    Peter Lindberg -

    second that and inserting the pick in the bottom middle and sliding the pick to each side

    Sub -

    I also found the top near the fan exit to be easier

    Travis Patton -

    Thank you for this tip, it definitely was easy starting at the top instead of by the bumper/triggers. After I opened the top I did the bottom and then it was way easier to gently open the sides. be very careful and go slowly to make sure that none of the clips are damaged

    Luis B -

    this as suggested above:

    1. open the top

    2. open the bottom

    3.gently open the sides

    austrasier -

    same; i pried from the top of the screen area. I was unable to find an opening on the side

    Dennis Wu -

    I also started from the middle of the deck and worked my way out since I couldn't get a grip with the pick on the deck's side grips. Since this is a common step for pretty much all guides for opening the deck I think it's also worth noting that you should be careful not to bend the trims/seams where the front and back covers meet with the pick. When I first opened my deck you can definitely see where I nudged the pick in between the covers since I was probably using too much force on the pick itself.

    Kaleb McKone -

    It would be useful to note here that if you want to insert the little blue triangular iFixit opening picks into the right side along the edge, there isn't actually a gap as the directions say, at least not on newer Decks. You'll be making the initial gap using the pick. Brace it on something because you will need to use enough downward force that you're flexing the pick a bit and it'll probably be digging into the skin of a bare hand. With enough force suddenly it will make a click and go in just a bit, and then you're in business.

    CaptFrost -

    plastic picks didnt work for me but finger males did the job on prying this open

    jacobbagsic -

    I found it easiest to open starting with R1 or L1 buttons and proceeding to the center of the top edge

    Karol Gro -

  4. 6IvIWWqEXPTqW1XB
    6IvIWWqEXPTqW1XB
    1FxwYDjIGOAOCZT2
    KpIx4YIAZrDH1b5T
    • Una vez desconectados los clips de un borde, el resto se desconecta fácilmente.

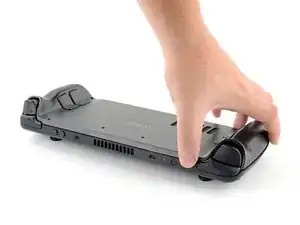
    • Agarra la tapa trasera por la abertura que acabas de crear y tira de ella hacia arriba y lejos del dispositivo para desenganchar los bordes largos.

    • Retira la tapa trasera.

    If you have an SD card, you will want to take it out. I followed the guide and didn't think about the SD card I had inside. When I went to snap the case back on it clapped shut on the exposed SD card, shearing it in half and leaving the bottom half stuck in the SD card slot. I am still endeavoring to get it out.

    Novice -

  5. WuMbLgtJF5JwQtjF
    WuMbLgtJF5JwQtjF
    I6pEKNGEKEDbNymT
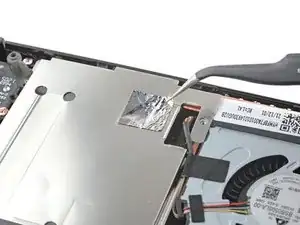
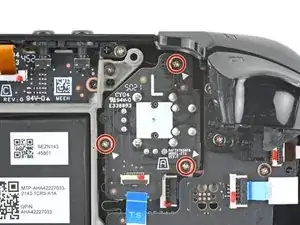
    • Utiliza unas pinzas para retirar el trozo de cinta adhesiva que cubre el tornillo oculto del escudo de la placa.

    • Si es posible, trata de no rasgar o romper esta pegatina (sticker) para poder reutilizarla.

    Use some heat here from a hairdryer to make this part easier.

    If you screw up here you can replace the little aluminium square with some aluminium tape from Amazon. No less than 50 microns thick, slightly thicker is fine. and the square is 13mm both ways.

    Matt S -

  6. fpjCmGxopRvFvGbm
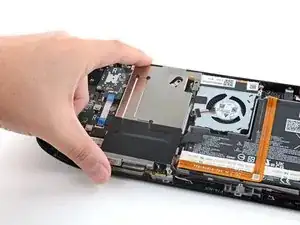
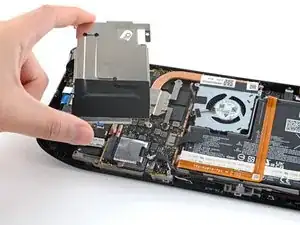
    • Usa el destornillador Phillips para retirar los tres tornillos que sujetan el escudo de la placa.

    • Un tornillo de 3.4 mm

    • Dos tornillos de 3.7 mm

    The procedure ended here for me, used an ifixit PH 00 bit on the screw behind the aluminium tape, bit wouldnt bite too great, one wrong twist and the screw was stripped. Not sure who or what initially screwed in that particular screw as the rest of the screws on the shield were fine, but boy is it in there tight. So now i have a stripped screw and a botched ssd replacement, don't think valve will let me RMA for this, but i'll give it a try and update accordingly.

    Y. van S -

    Any updates? Did they let you RMA?

    Emanuel Gjoni -

    I found one screw to be ridiculously tight too, managed to undo it without stripping thanks to reading your comment beforehand and going extra careful. Not going to lie, it was a tense moment :D

    Andy HL -

    I think the tendency is to go too small on the screwdriver bits because you're working on small electronics.

    I used the PH1 bit on the screw under the foil and the PH0 bit for the two remaining screws without any problems.

    Charles Semple -

    What does this shield actually do? Some kind of magnetic protection?

    Corey Cleric -

    if I had to replace the key (R2) and that's it, can I directly remove it or do I have to act here on the motherboard too?

    pujattidanny -

    have you gotten an answer yet? trying to change mines as well but dont wanna do too much to the deck

    briaNN -

    button Not key, i’m sorry

    pujattidanny -

    I used the ifixit tools and used the 00 PH for these screws with no issue

    Luis B -

    If only swapping the SSD, it is not necessary to remove the top left 3.7mm screw. The heat shield is flexible enough that you can move it out of the way to access the SSD screw. For me this was necessary as the 3.7mm screw was completely unmovable and quickly stripped.

    Scott A -

    FYI there is a little pin on the cover that slots into the board. It is located near the top screw. I needed that to be inserted for the cover to go back down properly.

    Seth Robinson -

    For anyone who may have stripped a 3.7mm screw, Steam Support states it's M1.6 diameter with a 0.35 thread pitch and a 3mm length. Hopefully that'll help anyone trying to locate a replacement screw. Hoping iFixIt can make an internal screws kit as they're kinda hard to find the right one online.

    Michael Dyer -

  7. JXePTdtVUbrOvVJT
    JXePTdtVUbrOvVJT
    QqjInaZugM3yJK1q

    When putting back on, run a pick along the edge of the shield between the wires to make sure nothing is pinching and the wires are clear of the shield before screwing down.

    Matt S -

  8. XjI1homB4a5VNhbV
    XjI1homB4a5VNhbV
    qvcjxPUTxawsUUMB
    qa3R33nVHlO1SOpy
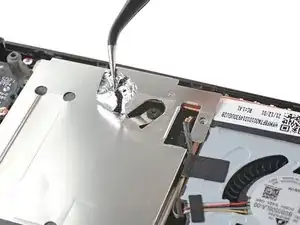
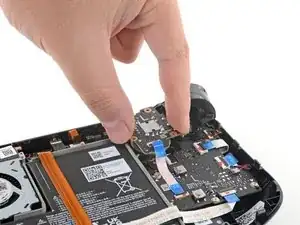
    • Agarra el cable de la batería por su lengüeta y tira de él directamente hacia fuera de la placa madre para desconectarlo.

    • Alternativamente, usa la punta de una spudger o una uña para empujar gentilmente el conector fuera de su socket, luego desconéctalo completamente a mano.

    After fully reassembling my device I found that my battery was not showing any stats anymore. I couldn't start the device without being plugged in, however if I restarted it would stay on even if my power cable was detached. Battery showed 0%. It turns out I had not fully reinserted the battery cable at this stage during reassembly. MAKE SURE YOU PUSH IT ALL THE WAY BACK IN!

    Michael Hoffmann -

    Awesome thanks for this tip!

    petergeranio -

    It is helpful to lift up gently with a the tapered end of a spudger underneath the tucked-in portion of the battery cable, creating a bit of flex in the cable before pulling on the pull tab. I found that without doing so, the fabric pull-tab simply tore off of the cable under light-to-moderate force (the fabric itself ripped cleanly across, like a paper towel). Careful, gentle pressure with a spudger can be used to remove the plug by prying gently on the rear ridge of the plastic plug (not the wire!) if this happens.

    Gene Eckser -

    This is exactly what happened to me. Maybe it was a pull tab previously, mine was a ribbon cable that tore - captured the image here: https://www.ianwootten.co.uk/2022/11/22/...

    Ian Wootten -

    I found it less scary and easier to remove the battery connection by using a fingernail on the ridge and pushing it off the connector. I felt like pulling on the battery cable was too harsh.

    montgomery mchargue -

    Upon plugging the battery back in, I found it easy to use two spudgers- one on each side- to pull/push the connector back into it's port. Be careful to not put any pressure on the battery wires themselves.

    montgomery mchargue -

    When reconnecting the battery cable, you'll know when it's inserted and power is restored, because the white LED will illuminate at the top of the Deck near the power button. You should be able to see it while you're reconnecting the battery cable

    Michael Davis -

    Why not just let the battery discharge completely and then not have to disconnect it?

    Jeffrey Martin -

    Completely discharging a battery reduces its lifespan. It's completely unnecessary.

    Stefan Camporese (CENTER) -

    Because no lipo battery is ever completely discharged -- you would not be able to recharge it if it was. There will always be enough power left in it to cause damage if shorted even if it isn't charged enough to power up the device it's connected to.

    David Cameron -

    I would personally not recommend pulling the tab. It doesn’t apply force at the correct angle. You should revise these instructions to advise using a combination of pulling on the tab, and careful pressure on the connector towards the right of the mainboard to carefully work it out.

    Using the pull tab alone could cause problems if not done extremely carefully.

    William Winborne -

    This part was wayyyyy easier than I anticipated and I worried for nothing because I used the ifixit spudger to push it out a bit and then I literally used my finger nail and was able to slide it right off. Dont be afraid, its not that difficult and its not that delicate to break if you do it patiently

    Luis B -

    I inserted the cable very firmly with a spunger, being careful not to press down too hard on the cables, and even tried redoing it, but I don't see any LED illumination. I am now unable to boot the deck into the boot manager. Any additional tips?

    junefish -

  9. r5HCQBGD3gGZUp1t
    r5HCQBGD3gGZUp1t
    LYibZRLxkCYM2RIt
    tX1VHF3QwiFeUBQE
    • El gatillo izquierdo estará en tu lado derecho cuando trabajes en el Steam Deck, ya que está colocado al revés.

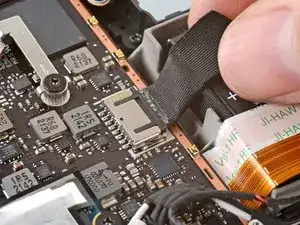
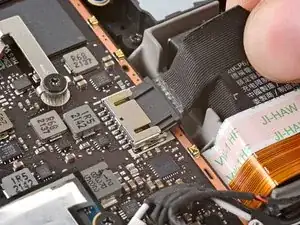
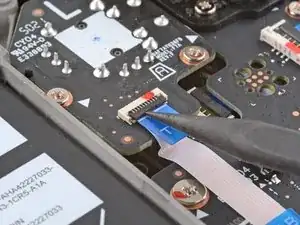
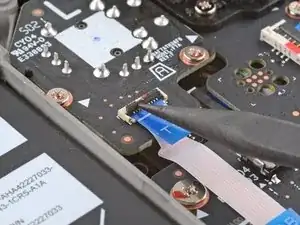
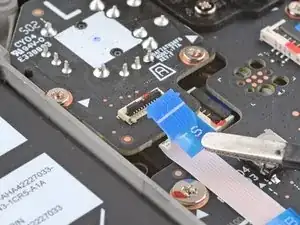
    • Utiliza el extremo puntiagudo de un spudger para levantar la pequeña solapa de bloqueo del conector ZIF del cable del gatillo.

    • Utiliza unas pinzas para sacar el cable de su conector.

    • Sujeta el cable por la lengüeta azul, no por el propio cable.

  10. h3DMlAncuWZ51bZw
    h3DMlAncuWZ51bZw
    XpEAtrukKS6F1ryx
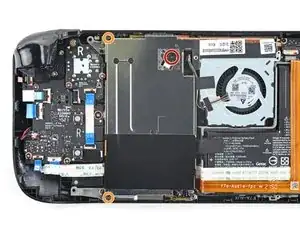
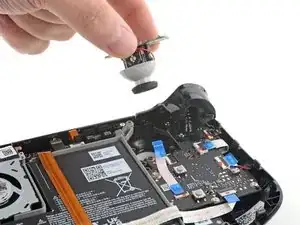
    • Usa un destornillador Phillips para retirar los tres tornillos de 5.2 mm que sujetan el gatillo.

    • Durante el montaje, es posible que tengas que sostener la Steam Deck fuera de la superficie de trabajo para que no se apoye en el nuevo gatillo mientras aprietas los tornillos.

  11. u5H5UVDPPfjHwrru
    u5H5UVDPPfjHwrru
    VujxBjKjWaVfhQsi
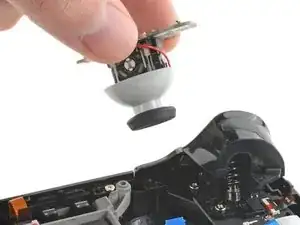
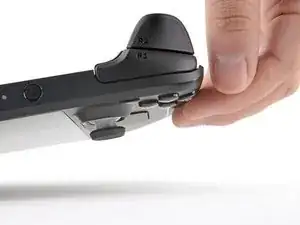
    • Retira el gatillo izquierdo

    • Los gatillos de repuesto requieren calibración para funcionar como se espera. Para calibrar nuevos gatillos, sigue esta guía de calibración.

    • Cada Steam Deck se envía con uno de los dos modelos diferentes de gatillos, Tipo A o Tipo B. Aunque casi idéntica, la capacidad táctil capacitiva depende del tipo correcto que se instalará.

    • Para identificar qué gatillos de repuesto necesitas, navega a Configuración → Sistema y verifica la ID del Controlador Steam Deck.

    • Si la ID del controlador comienza con "MEDA", ese dispositivo necesita controles analógicos tipo A.

    • Si la ID del controlador comienza con "MHDA", ese dispositivo necesita controles analógicos tipo B.

Conclusión

Para volver a montar el dispositivo, sigue estas instrucciones en orden inverso..

Lleva tus residuos electrónicos a un centro de reciclaje certificado.

¿La reparación no ha ido como estaba previsto? Intenta con algunas soluciones de problemas básicos, o pide ayuda a nuestra Comunidad de respuestas de Steam Deck.

Carsten Frauenheim

Miembro Desde 10/03/20

88878 Reputación

5 comentarios

Requires a PH#00 not a #0

NoggleFrap -

#0 worked best on the analog sticks for me. #1 for the external case screws. I've heard to always use the size with the snuggest fit in a screw to prevent striping the heads. Considering I only have these screws and no replacements. I'll opt to use the biggest bit that fits.

Guy_Manley -

You need to start offering the ribbon cables, as they are pretty fragile.

Remy Starshade -

I feel like my steam deck was partially made anti-repair, there was a glue like seal blocking the soldering iron from reaching the solder pad on my left joystick specifically, and the screw hidden by the tape on the shield would not unscrew even though my iFixit screwdriver worker for all the others fine and now I'm pretty sure the head is stripped I even tried a super glue hack a few times and in each case the glue gave before the screw did. I was still able to just barely access the battery connector, but reconnecting it is more work than I'd want.

I wonder if anyone else is seeing odd stuff like this...

CreativityKing -

Someone should ask valve why their sticks are so clicky. I’ve had multiple sticks all click in in the 6 and 8 positions but only on the left side. I’m tired of it so I’m gonna stop replacing it, after going through 5 sticks if you count my RMA for haptic issues, all left sticks have had this issue.

Payne Lindsey -