Introducción

Usa esta guía para remover y reemplazar el marco medio de tu Nexux 5X.

  1. hZuBjDNMirRpxDPW
    hZuBjDNMirRpxDPW
    JWDcUTTe2RHKb3Aw
    CyV6ZtdsOoQKFIlC
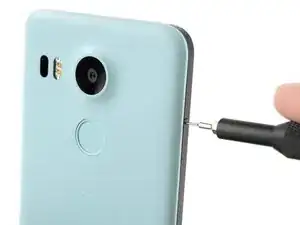
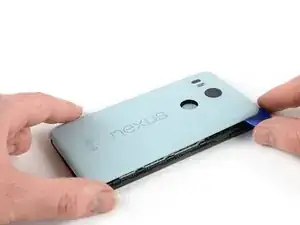
    • Inserta una herramienta de expulsión de la tarjeta SIM en el orificio de la bandeja de la tarjeta SIM, situado en el borde izquierdo del teléfono.

    • Presiona aquí para expulsar la bandeja de la tarjeta SIM.

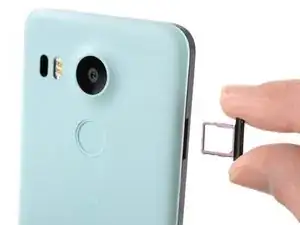
    • Retira la bandeja de la tarjeta SIM.

  2. ICCoMW16jfCrFbcn
    ICCoMW16jfCrFbcn
    sQxCgO3CGWjyHP2m
    MDAUADr5BeVSLDZl
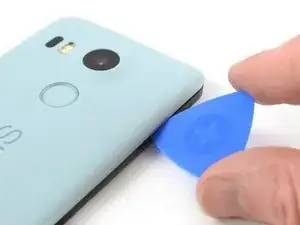
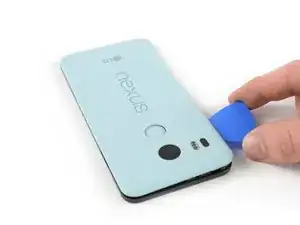
    • Coloca una púa de apertura en la abertura de la ranura de la bandeja de la tarjeta SIM y gírala hacia los lados para soltar el primer clip de plástico que sujeta el panel trasero en su lugar.

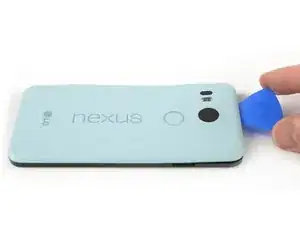
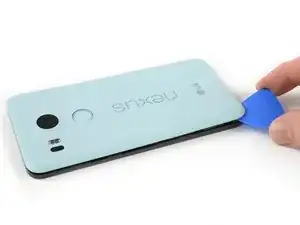
    • Desliza la púa de apertura alrededor del borde superior del teléfono para liberar los clips de plástico que aseguran el panel trasero.

    A guitar pick is a good substitution for the plastic opening tool.

    Sam Sippe -

    Here’s a photo of the location of the 18 tabs that hold the back cover in place

    Steve -

    Twisting sideways didn’t do it for me, but sliding along the edge did. However, at first I didn’t realize that the pick was between the motherboard and midframe, rather than between midframe and back cover like it was supposed to. This led to breaking off a spring-loaded connector on the motherboard, connecting to an antenna (I guess) in the back cover. So far I haven’t noticed any reception issues, but I can’t say for sure.

    In essence: be careful to get the pick towards the back cover, and not “straight in” under the midframe.

    Hampus -

  3. afVYqSRSsfYK5iHi
    afVYqSRSsfYK5iHi
    pIWZAi2MnVlPLqqa
    WCXoRcGIOO46lSW1
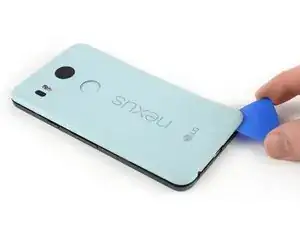
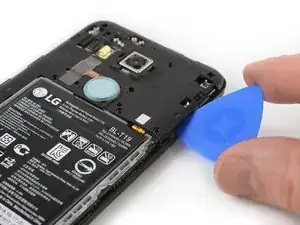
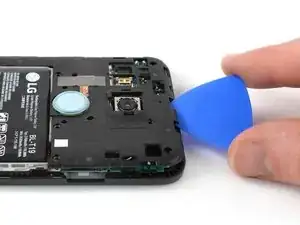
    • Continúa deslizando la púa de apertura alrededor de todos los lados del teléfono para liberar todos los clips que aseguran el panel trasero.

  4. elaUMDhpoLaSyiLC
    elaUMDhpoLaSyiLC
    xC4oPmeXKWyCeJYD
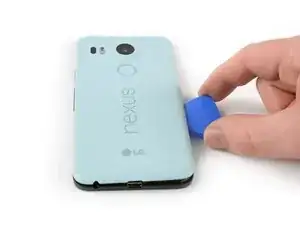
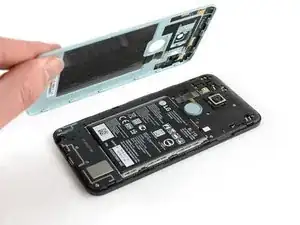
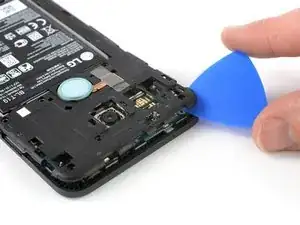
    • Inclina la púa de apertura para levantar un poco el panel trasero.

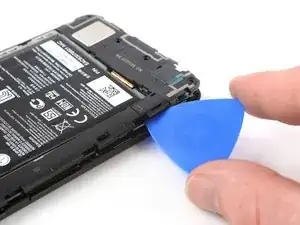
    • Hay dos clips de plástico más junto al sensor de huellas digitales. Suéltalos tirando suavemente del panel trasero.

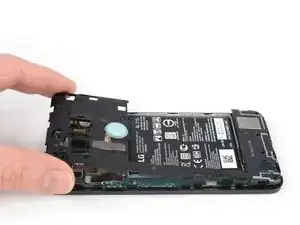
    • Retira el panel trasero.

  5. SLBb5Cl3QMGTDxxc
    • Remueve los diez tornillos Phillips de 3.6 mm que sujetan el marco medio.

    Some models use a Y1 screw head.

    Kyle Wright -

  6. kbJbMKZvCYpi5Ym1
    kbJbMKZvCYpi5Ym1
    SBDl6Qt1OeRUcuOJ
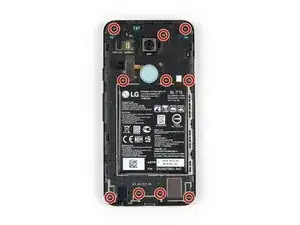
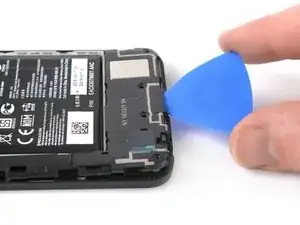
    • Inserta una púa de apertura en la ranura de la bandeja de la tarjeta SIM y gira la púa de apertura hacia un lado para liberar los clips de plástico.

    The photo seems to show that the person is opening from the top, which is the opposite of your advice. So, just want to be clear.

    Robert Konigsberg -

    yes, open from bottom first... the pic above shows the finished product after reaching top of phone. I found it best to actually start close to the right of the usbC connector. Pushing inbetween the 2 tabs and up will release the shell.. then work clockwise.

    Chris Mayberry -

    Chris, your advice to start to the right of the usbC connector was excellent, thank you!

    Robert Konigsberg -

    I found that my middle panel was already broken at the narrowest part just to the left of the 2-D scan code on the battery, perhaps from some ham-fisted previous repair. This seems of little consequence, there do not seem to be any electrical connections running through this part.

    Wiley Sanders -

    After a long amount of prying, I discoved that, if used gently, a jimmy can really help get the plastic off

    Timothy Owens -

    I could not remove the cover with the opening tool but had success with the opening picks (the triangle parts). Just slide them under the cover and gently bend and twist the pick to release the cover from the locks. By the way: it’s perfectly normal for the bottom cover part to come loose from the top cover part. It’s designed that way (they interlock).

    Marco Miltenburg -

    Here’s a photo of the location of the 20 tabs that hold the middle assembly in place, and the pry angle needed.

    Steve -

    This is the scariest part but it is the same process of taking a bike tire off the rim: lift up one part of the cover then put a wedge under the lifted section to hold it up then continue around the frame lifting it up and holding it up with the blue picks. You’ll find that after you life the bottom you can wriggle free the rest by hand.

    The 10 screws came out quickly using the IFIXIT.com magnetic screwdriver.

    mcguinness.david -

  7. MPaVeGZ53Yant1bX
    MPaVeGZ53Yant1bX
    1EYFK4Jmr4ZkYCXc
    • Continúa deslizando la púa de apertura alrededor de la parte superior del marco medio para soltar los clips de plástico.

  8. UnqADRuHrCdSINRZ
    UnqADRuHrCdSINRZ
    LfjUs6JGfUqrEVjA
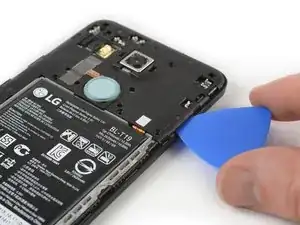
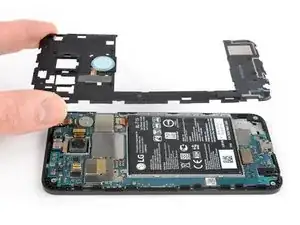
    • Utiliza la púa de plástico para abrir los clips de plástico en el borde largo del marco medio y en el borde inferior.

    • Asegúrate de que los clips en el borde largo estén sueltos. El marco medio es propenso a romperse aquí si no se desconectan correctamente.

  9. A65jPFCZQIiwZlZb
    A65jPFCZQIiwZlZb
    CLJTmiqEsupw21Yg
    • Asegúrate de que todos los clips estén libres.

    • Retira con cuidado el marco medio.

Conclusión

Para volver a ensamblar el dispositivo, sigue estas instrucciones en orden inverso. Si tu panel medio está dañado o roto, instala el nuevo panel en su lugar.

Lleva tus desechos electrónicos a un reciclador certificado.

¿La reparación no salió según lo planeado? Consulta nuestracomunidad de respuestas de Nexus 5X y para obtener ayuda para la resolución de problemas.

Dominik Schnabelrauch

Miembro Desde 23/11/16

168982 Reputación

2 comentarios

Has anyone else run into the different screws holding the midframe? I opened my son's phone today to swap out the battery and found the screws to be tri-wing. Imagine my confusion. I've been into to my wife's Nexus 5x before, and it has phillips-head screws. Weird.

Taylor Says So -

I’m trying to confirm whether or not the antenna for cellular signal resides in the loudspeaker, or the bottom section of the midframe. If I replace the bottom piece of the midframe, am I replacing the cellular antenna?

steve d -