Introducción

Prerequisito interno.

  1. qPO5RcoxsNqVhWVs
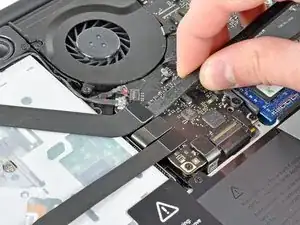
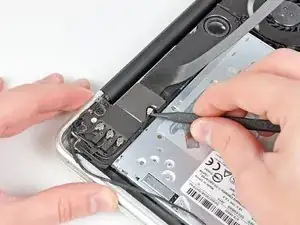
    • Usa el borde de un spudger para levantar el conector del cable de cinta del AirPort/Bluetooth de su zócalo en la placa lógica.

    N.B! Thank you very much all you here on iFixit! Some IMPORTANT notes. Be very careful BEFORE prying the connectors up and down. They are very fragile and the picture could actually be seen as showing a bending loading in their weakest direction, AROUND its slender axis. The connector is slender and inserted on the logic board, so the gentle "walking" up and down should be done ALONG their slender direction and WITHOUT touching the adjacent connectors. If bending is done around its axis the soldering comes apart and the cable is done and gone. Just happened. These flat cables are one of the weakest design spots in my experience. They are a major time, money and geist consuming reason for malfunction like Wi-Fi connection problems, HDD, SSD not found internally but externally from USB issues et al being found on different forums. Thanks again and again.

    Greg -

  2. RNSAPGwXHEELwDLt
    • Con cuidado tira del cable de la camara y sácalo de su zócalo en la placa lógica.

    • Tira del cable paralelamente a la cara de la placa lógica. Tirar hacia arriba puede dañar la placa lógica o el mismo cable.

    Be extremely careful on step 6 with late 2011 model unibody macbooks! The cable is connected very tightly to the board and has a great chance of ripping if you just pull the cable.

    Tim Rauls -

    My cable is broken, have the part number or code to buy?

    VÍCTOR RIFFO -

    I found there was plenty of length in the camera cable (as it goes around two sides of the optical drive) so does not need to be disconnected - just ease it out of the slot alongside the drive and lay it diagonally across.

    Nic Blinston -

  3. VItXMA6sxHqcSEsg
    VItXMA6sxHqcSEsg
    YV4ABQFLBHUlRuTb
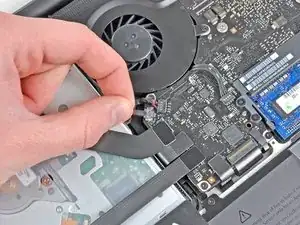
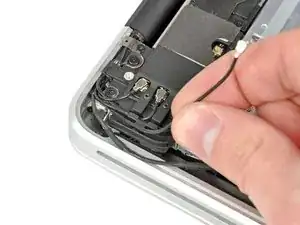
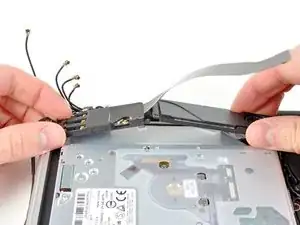
    • Mueve con cuidado el cable de cinta AirPort/Bluetooth fuera del camino cuando despegas el adhesivo que sujeta el cable de la cámara al subwoofer y al soporte del AirPort/Bluetooth.

    • Desvía el cable de la cámara desde debajo del dedo de retención moldeado en el soporte AirPort/Bluetooth.

    Take a few phone close-ups of this corner of your system prior to disassembly. Extra photos really help during reassembly.

    airshack -

  4. HV4RogdQOP6KSkS3
    HV4RogdQOP6KSkS3
    aSYfYlBGraP1HcKb
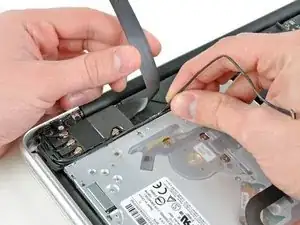
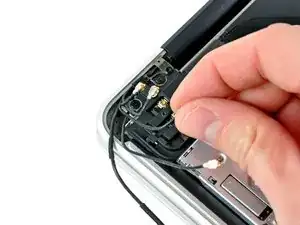
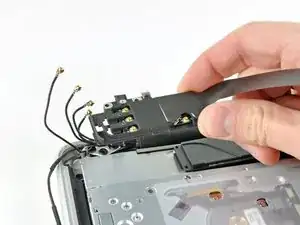
    • Usa la punta de una espátula para levantar y desconectar el cable de la antena de su zócalo en la placa del AirPort/Bluetooth.

    • Deruta el cable de la antena y sácalo de debajo del dedo moldeado en el soporte del AirPort/Bluetooth.

  5. awGG16FAvgw2LrNv
    awGG16FAvgw2LrNv
    mFSPu12XQjbeemTa
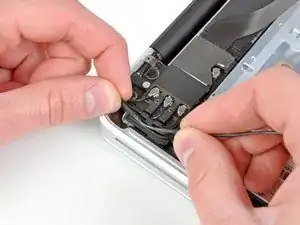
    • Usando el método descrito en el último paso, desconecta los tres conectores restantes de la antena.

    • Desvíe sus cables de las ranuras cortadas en el soporte AirPort/Bluetooth.

    I found re-attaching these antennae connectors the trickiest bit by far as they appear very delicate and seating them correctly was fiddly. In the end lighting them from the side with a small torch helped to check their position before gently pushing them down. The first one made a clicking sound as it connected, the other two went on silently. MBP wifi working perfectly now. I’m fairly sure that was at least £100 of labour had I taken it in for repair so thanks ifixit for saving me money and for the warm glow of accomplishment!

    Andrew -

    Actually, on my repair attempt, one antenna cable broke (on the image the bottom right one in the red square), I’m not sure whether it broke already before or was morbid somehow. Fact is. suddenly I had this cable in my fingers, and was sure I completely broke the macbook and need to find a new display now.

    But as it turned out: the Mac is still fully working, including WIFI, BT, Camera etc. So apart from my huge relief, I want to address that these cables may break easily at their connection with the display. And that one antenna might be not mandatory for WIFI to work.

    huedrant -

  6. DprsKSCNnjnIXE3k
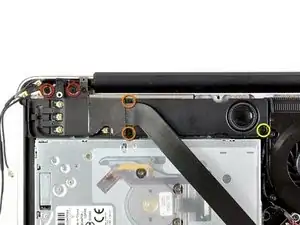
    • Quita los siguientes cinco tornillos:

    • Dos tornillos Philips de 10.3 mm

    • Dos tornillos Philips de 3.1 mm

    • Un tornillo Philips de 5 mm

  7. RmKsQnJUJMvaQVFS
    • Tira del montaje del AirPort/Bluetooth y del Subwoofer hacia arriba cerca del centro del lado de la unidad óptica hasta que ambos se separen.

  8. xFIRI1aKLCYgeDBr
    • Quita el montaje del AirPort/Bluetooth, teniendo en cuenta el frágil contacto de la antena cerca de la esquina de la carcasa superior.

Conclusión

Para volver a ensamblar tu dispositivo, sigue estas instrucciones en orden inverso.

Andrew Bookholt

578639 Reputación

0 comentarios