Introducción

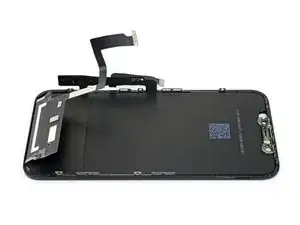
Si tu pantalla del iPhone 11 está agrietado, no responde al tacto o no muestra una imagen cuando está encendido, usa esta guía para que tu iPhone vuelva a funcionar con una nueva pantalla, también conocida como conjunto de pantalla.

Si la parte posterior de tu nueva pantalla ya incluye una placa protectora de LCD de metal delgado, sigue esta guía más corta en su lugar para obtener una reparación más fácil . Pero si falta la placa, sigue leyendo; esta guía te mostrará cómo reemplazar la pantalla y conservar la placa protectora de LCD anterior.

El conjunto combinado de altavoz + sensor de auricular colocado en la parte posterior de la pantalla está emparejado con su iPhone individual de fábrica, por lo que debes usar las instrucciones a continuación para transferirlo de tu pantalla anterior a la nueva. Contiene el iluminador de inundación, que forma parte de la función de seguridad biométrica Face ID. Si está dañado o reemplazado, Face ID no funcionará, así que ten mucho cuidado de no dañar ninguno de estos componentes durante este procedimiento. Si está dañado, solo los técnicos "autorizados" de Apple pueden restaurar la función Face ID.

Nota: la funcionalidad True Tone no funcionará después de un reemplazo de pantalla, incluso cuando se usa una pantalla original de Apple.

  1. T2yIKTYtWTOpeGir
    T2yIKTYtWTOpeGir
    1BRQlG3vB6hGYvKS
    • Antes de empezar, descarga la batería de tu iPhone por debajo del 25%. Una batería de iones de litio cargada puede incendiarse y/o explotar si se perfora accidentalmente.

    • Apaga tu teléfono antes de comenzar el desmontaje.

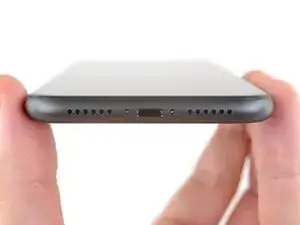
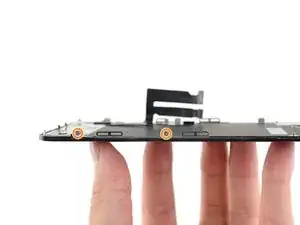
    • Remueve los dos tornillos pentalobe de 6.7 mm en el borde inferior del iPhone.

    • Abrir la pantalla del iPhone comprometerá sus sellos impermeables. Ten preparados los sellos de repuesto antes de seguir adelante con este paso, o ten cuidado de evitar la exposición a los líquidos si vuelves a montar el iPhone sin reemplazar los sellos.

    the right screws wouldn’t come off

    Yusef San Inocencio -

    Hello guys, I still haven't found away to power off the iphone without using the screen. Cheers!

    danielaguirre93 -

    You can try this.

    Quickly Press and release the volume up button.

    then Quickly Press and release the volume down button.

    then press and hold the power button and wait until it turns off.

    worked for me :D

    Benóný Egilson -

  2. voNWTD25eWiGUdu3
    voNWTD25eWiGUdu3
    XTM1CepRnVkDnbfI
    NgVMfmOgJwEalMFF
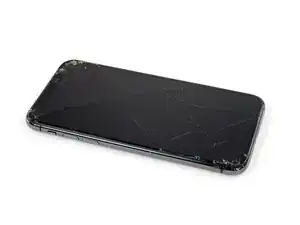
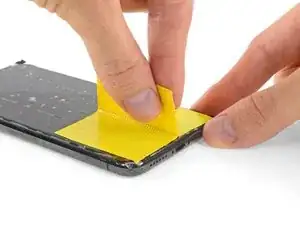
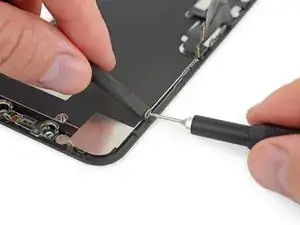
    • Si tu iPhone tiene la pantalla rota, mantén la rotura contenida y evita lastimarte durante la reparación colocando una cinta sobre el vidrio.

    • Coloca tiras superpuestas de cinta de embalaje sobre la pantalla del iPhone hasta cubrir toda la cara.

    • Esto mantendrá los fragmentos de vidrio contenidos y proporcionará integridad estructural al tirar y levantar la pantalla.

    • Usa gafas de seguridad para proteger sus ojos de cualquier vidrio que se pueda soltar durante la reparación.

    • Si los vidrios rotos dificultan que una ventosa se pegue en los siguientes pasos, intenta doblar un trozo de cinta resistente (como una cinta adhesiva) en un asa y levanta la pantalla con eso.

    How to detect my Iphone what screen it is, OLED or LCD?

    sabrihakulii -

    It’s OLED. You can find the specs here, https://support.apple.com/en-us/HT201296

    When you find your phone, at the bottom of the description click on, See the tech specs…

    mcr4u2 -

    The included suction cups were stiff and worthless. They would not lift the screen. Also, I tried every type of tape on the screen to help the suction cups stick without success. Heavy duty suction cups were for my bathroom also failed. However, I had an old GoPro mount with some preapplied double sided 3M VSB tape and stuck that on the screen near the bottom. Magic! This method had the added bonus of being able to use a GoPro attachment as a handle to lift the screen, and propped up the screen like a kickstand in step 12.

    Tawan Khamapirad -

    Very cool! Thanks

    Antonio -

    My screen was pretty stuck… would not budge. Heated, super glued the suction cup, tried gorilla tape. Ended up doing the GoPro mount with 3M VSB tape method mentioned. Worked great. That 3M tape is the bomb.

    Rich Wachtel -

    The included suction cup took a few tries but ended up working for me.

    charlotte -

    If you have flat feeler gauges (for adjusting engine valve tappet clearance, ignition points … old school) the .003 thick goes right in. Work your way up until you can get the pick or supplied pry tool in.

    William Olstad -

    where can I buy 3M VSB plis!!

    gerardo artigas cuellar -

    3M VHB tape is at auto stores and other big box stores, or online.

    nicO Gurney -

    I used the tweezers that came with the replacement screen and jammed one of them into the glass and that eventually worked. Heating with a blow dryer is also important. The suction cup was helpful in loosening the adhesive for sure, but just not enough to get the display to come out.

    J Olin -

  3. yQbwAmoITNyEmrSn
    • Calienta el borde inferior del iPhone ayuda a suavizar el adhesivo que asegura la pantalla, facilitando su apertura.

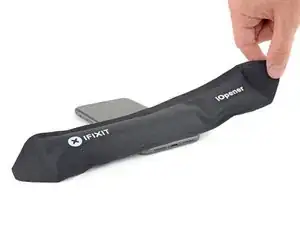
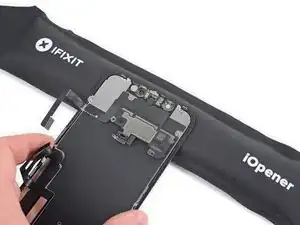
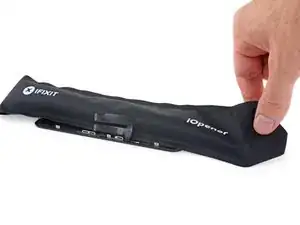
    • Usa un secador de pelo o una pistola de calor o prepara un iOpener y aplícalo en el borde inferior del iPhone durante un minuto.

  4. 4fhdeZSxwgTn4VgI
    4fhdeZSxwgTn4VgI
    xL5ZKLvD5qQwyVQn
    ThubCCcBbhDtLxdi
    • Los siguientes dos pasos demuestran el Anti-Clamp, una herramienta que diseñamos para facilitar el procedimiento de apertura. Si no estás utilizando Anti-Clamp, salta dos pasos hacia abajo para obtener un método alternativo.

    • Para obtener instrucciones completas sobre cómo usar Anti-Clamp, consulta esta guía.

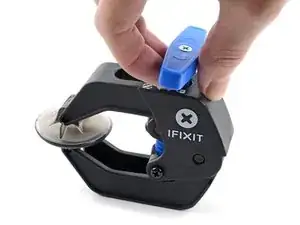
    • Tira de la manija azul hacia la bisagra para desactivar el modo de apertura.

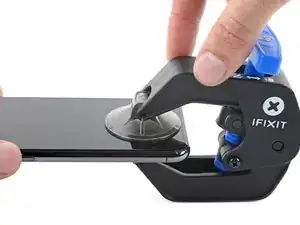
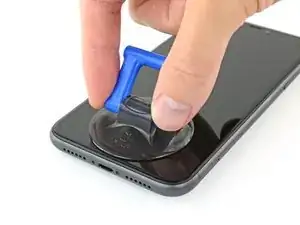
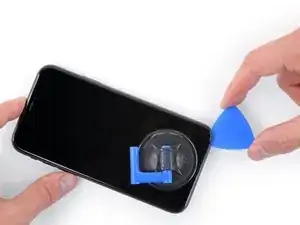
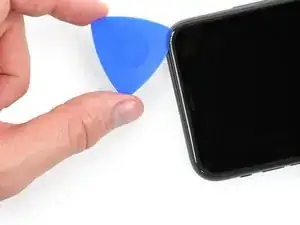
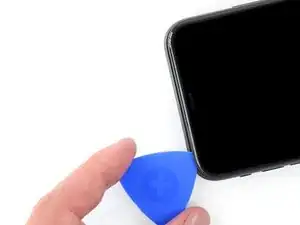
    • Coloca las ventosas justo encima del botón de inicio en la pantalla, una en el frente y otra en la parte posterior.

    • Empuja hacia abajo las copas para aplicar succión en el área deseada.

    • Si encuentras que la superficie de tu dispositivo es demasiado resbaladiza para que el Anti-Clamp la sujete, puedes usar cinta de embalaje para crear una superficie más adherente.

  5. dQr361CqDsneP2OL
    dQr361CqDsneP2OL
    YRnbfQVWclVCYcjs
    Tj3ePN1yQZJM5SO6
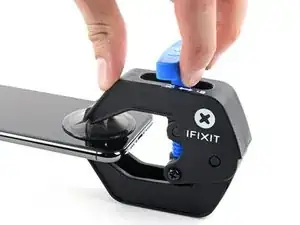
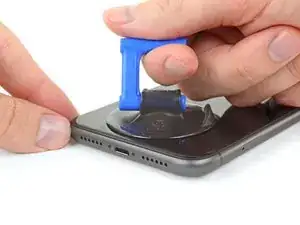
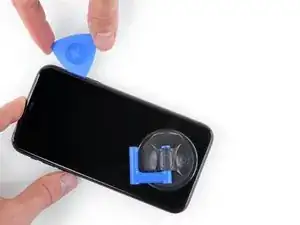
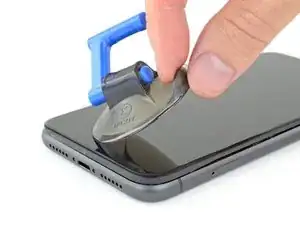
    • Empuja la manija azul lejos de la bisagra para activar el modo de apertura.

    • Gira el mango en el sentido de las agujas del reloj hasta que veas que las copas comienzan a estirarse.

    • Asegúrate de que las ventosas permanezcan alineadas entre sí. Si comienzan a salirse de la alineación, afloje ligeramente las ventosas y vuelve a alinear los brazos.

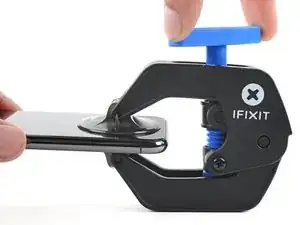
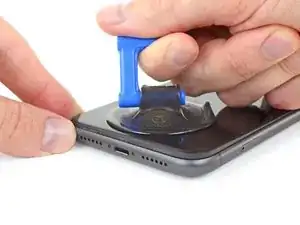
    • Espera un minuto para que el adhesivo se suelte y se abra la parte inferior de la pantalla.

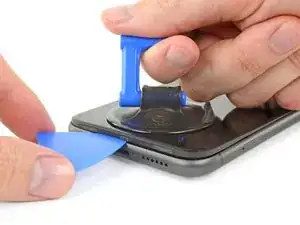
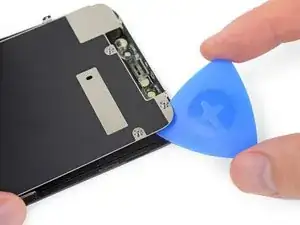
    • Inserta una púa de apertura en el borde inferior cuando Anti-Clamp cree un espacio lo suficientemente grande.

    • Si el Anti-Clamp no crea un espacio suficiente, aplica más calor al área y gira la manija en el sentido de las agujas del reloj media vuelta.

    • No des más de media vuelta a la vez y espera un minuto entre vueltas. Deja que el Anti-Clamp y el tiempo hagan el trabajo por ti.

    • Omite los siguientes dos pasos.

    where do i get this from g

    Sami Pala -

  6. aJCRTiaUBHVMoAUV
    aJCRTiaUBHVMoAUV
    YhJejcEpMhlQpvWX
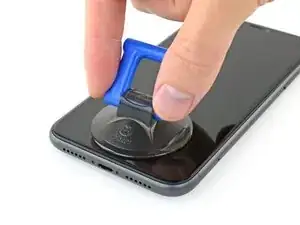
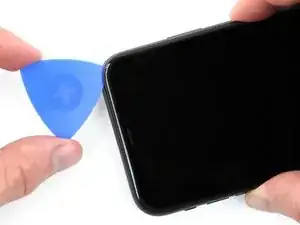
    • Si estás utilizando una sola ventosa, aplícala al borde inferior del teléfono evitando la porción curva del cristal.

    • Si tu pantalla está muy agrietada, cúbrela con una capa de cinta adhesiva transparente puede ayudar a que la ventosa se pegue. Alternativamente, puedes usar cinta muy pegajosa en lugar de la ventosa. O si todo lo demás falla, puedes pegar la ventosa a la pantalla rota.

  7. MKShqPOGkjD2vOPp
    MKShqPOGkjD2vOPp
    dJknkSwVsVBaZabR
    XgeYpSK2b4NpndCh
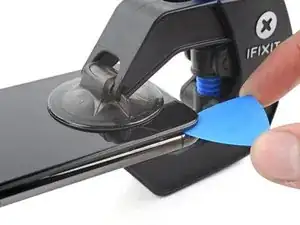
    • Tira de la ventosa con una presión firme y constante para crear un ligero hueco entre el panel frontal y la caja trasera.

    • Inserta una púa de apertura en el hueco.

    • El adhesivo impermeable que mantiene la pantalla en su lugar es muy fuerte; crear este hueco inicial requiere una cantidad significativa de fuerza. Si te cuesta abrir un hueco, aplica más calor y mueve suavemente la pantalla hacia arriba y hacia abajo para debilitar el adhesivo hasta que crees un hueco suficiente para insertar la herramienta.

    This turned out to be the most difficult part for me. My old ifixit suction cup didn't suck hard enough to generate enough force to pry the display from the case. I ended up applying heat at least a dozen times, and I had to pull up on the suction cup forcefully over and over and over while repositioning it several times. I finally had success inserting my pick into the tiny gap after 30 or so rapid tugs on the suction cup.

    matthew r -

  8. BiTGA23MOOmtexSG
    BiTGA23MOOmtexSG
    l5NWMTOshIlqjNtG
    IfJRwFLPwsBL4klh
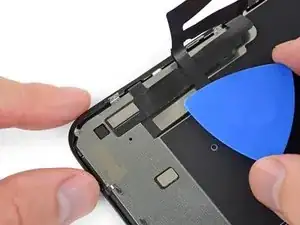
    • Desliza la púa de apertura por la esquina inferior izquierda y por el borde izquierdo del iPhone, cortando el adhesivo que mantiene la pantalla en su lugar.

    • No insertes la púa de apertura demasiado lejos en el iPhone, o podrías causar daños a los componentes internos.

  9. K5iUxKTkELONJBVf
    K5iUxKTkELONJBVf
    ZhlLOMfaksHRxZJV
    yy5WtAu2UqSpCUTX
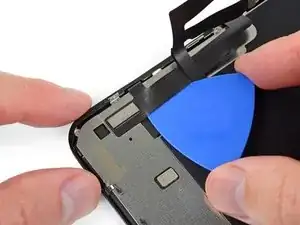
    • Re-inserta tu púa en el borde inferior del iPhone y deslízala a lo largo del lado derecho para continuar separando el adhesivo.

    • No insertes la púa muy lejos, o puedes dañar los cables de la pantalla a lo largo de este lado del iPhone. Insértala sólo unos pocos milímetros, o aproximadamente el ancho del bisel de la pantalla.

  10. J1ZVUrqQ61e4NOZ1
    J1ZVUrqQ61e4NOZ1
    HsxeMCkPLyCeHKpI
    tegZUpHyY4wGd2Ww
    • El borde superior de la pantalla está sujeta con pegamento y clips.

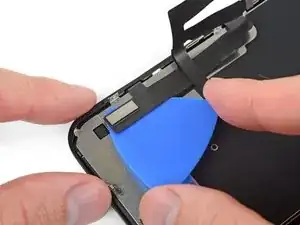
    • Tira suavemente del borde derecho de la pantalla hacia abajo ligeramente (en dirección al puerto de Lightning).

    • Inserta tu púa en la esquina derecha superior del teléfono.

  11. 5mKceYJffKEaQo4L
    5mKceYJffKEaQo4L
    kQQD2XkOMWjrOjMu
    • Continúa tirando de la pantalla hacia abajo (hacia el puerto Lightning) según sea necesario para hacer un hueco lo suficientemente grande para la púa.

    • Desliza la ganzúa hasta la esquina superior izquierda y corta cualquier adhesivo que quede para asegurar la pantalla.

    • Una vez más, no insertes la púa más allá de unos pocos milímetros, aproximadamente el ancho del bisel de la pantalla, ya que podría dañar el conjunto de sensores del Face ID.

  12. 24nVgAyDKPTICLhV
    • Tira del pequeño nudo de la ventosa para separarla del panel frontal.

    azertuiopsdk

    le français -

  13. IDOegN1rKCFFJMBF
    IDOegN1rKCFFJMBF
    QcgYHgKIt6XMTsnK
    xVdpJyR6i213HsJ2
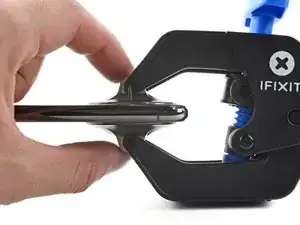
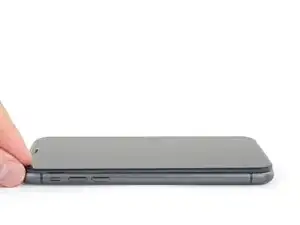
    • Abra el iPhone moviendo la pantalla hacia arriba desde el lado izquierdo, como la tapa trasera de un libro.

    • No intentes separar completamente la pantalla todavía, ya que varios frágiles cables de cinta aún la conectan a la placa lógica del iPhone.

    • Apoya la pantalla contra algo resistente.

    • Durante el reensamblaje, coloca la pantalla en posición, alinea los clips a lo largo del borde superior y presiona cuidadosamente el borde superior en su lugar antes de encajar el resto de la pantalla. Si no encaja fácilmente en su lugar, comprueba el estado de los clips alrededor del perímetro de la pantalla y asegúrate de que no estén doblados.

  14. KxoYscx1ItVaLely
    KxoYscx1ItVaLely
    ZA5AX6xqq3r5qUNN
    • Para acceder los tornillos en el siguiente paso, inclina la pantalla levantando ligeramente su borde inferior.

    • Ten cuidado de no tirar o arrancar los cables de la pantalla.

  15. fPaVWtYy3NJ53YvD
    fPaVWtYy3NJ53YvD
    jFRf1tI5V4hicZKU
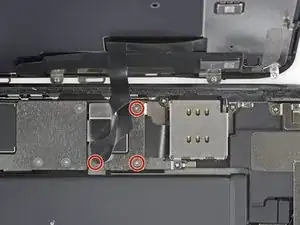
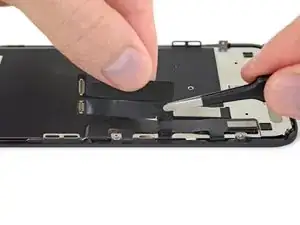
    • Usa un destornillador Y000 para quitar los tres tornillos de 1.1 mm de largo que aseguran el soporte del conector de la batería.

    • A lo largo de esta reparación, haz un seguimiento de cada tornilloy asegúrate de que vuelva exactamente a su lugar de origen.

    • Durante el reensamblado, es un buen punto para encender el iPhone y probar todas las funciones antes de sellar la pantalla en su lugar. Asegúrate de volver a encender tu iPhone completamente antes de seguir trabajando.

    During reassembly, I had to connect my phone to the charger before it would power up.

    Austin Culberson -

  16. HKBUYhWeIUlYLqdG
    • Remueve el soporte.

  17. XN1PHiCYxtERqDgF
    XN1PHiCYxtERqDgF
    XKgOIM6e2mmR1ecq
    • Usa un spudger o una uña limpia para levantar el conector de la batería de su zócalo en la placa lógica.

    • Intenta no dañar el sello de silicona negra que rodea esta y otras conexiones de la placa. Estos sellos proporcionan una protección adicional contra la intrusión de agua y polvo.

    • Dobla el conector ligeramente alejado de la tarjeta lógica para evitar que entre en contacto accidentalmente con la toma.

  18. kMZitLQGk2hTRk6G
    kMZitLQGk2hTRk6G
    Cdvg2fNT2Lf21uEE
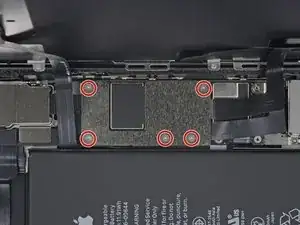
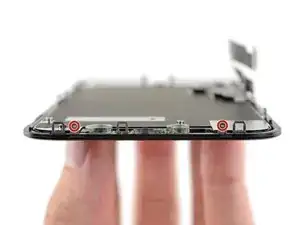
    • Usa un destornillador para remover los cinco tornillos de 1.1 mm que sujetan el soporte de la tapa de la placa lógica.

  19. hwCpiXUDeKoMTWEh
    • Remueve el soporte.

  20. IFoKtCq1UVwNZXJv
    IFoKtCq1UVwNZXJv
    FRZEdrhrUWadPZFT
    iT2xWjWSHH5EdMbq
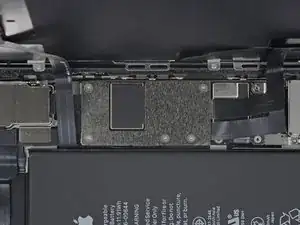
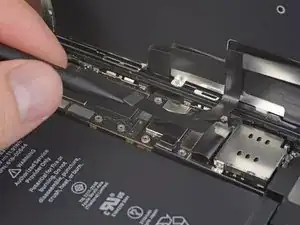
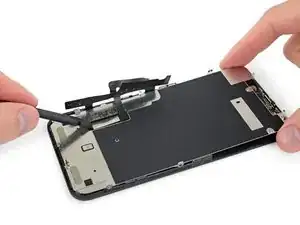
    • Usa un spudger o una uña para desconectar el conector del cable del panel LCD.

    • Desconecta el conector del digitalizador que está a su lado.

    Be mindful when reconnecting LCD panel connector and digitizer connector. It’s looks very similar. These 2 ribbon connectors a slightly different.

    Pay attention.

    Josmaknolavic -

  21. FXVmdXMPZpEU2F5j
    FXVmdXMPZpEU2F5j
    BxKUHpGvITeIEOQL
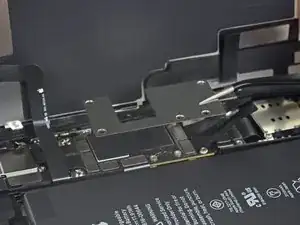
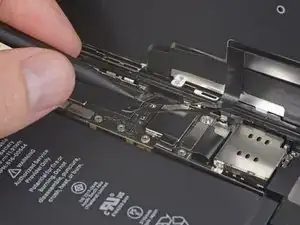
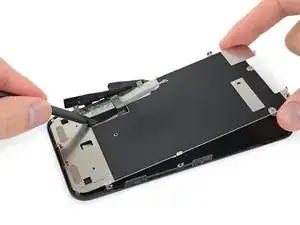
    • Usa la punta de un spudger o una uña para desconectar el conector del ensamblaje del sensor del panel frontal.

  22. VoZNhVF2Va3NVwit

    After this step its probably a good idea to test the new screen (you dont have to plug in the front camera assembly)

    Richard Kraus -

    Not a technician, so correct me if I'm wrong: I think that it's at this step of reassembly (before you reattach the screen) that you apply waterproof glue, if you have it.

    Athanasius Pernath -

  23. c6KLaRqIueRjBTgF
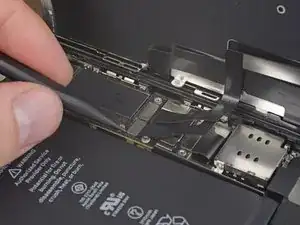
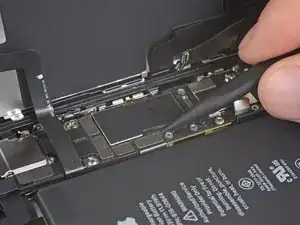
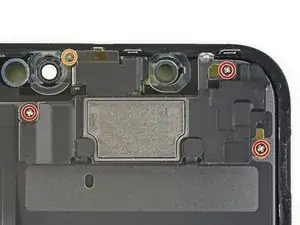
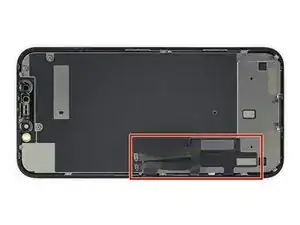
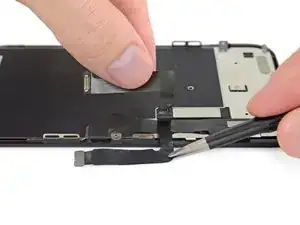
    • Remueve los cuatro tornillos que sujetan el ensamblaje de altavoz /sensor:

    • Tres tornillos Phillips de 1.6 mm

    • Un tornillo Y000 de 1.3 mm

    Correct me if I am wrong but you no longer need to do this as of IOS 15.2 as apple doesnt disable Face ID on 3rd party repairs

    Oliver Pressello -

  24. kYVNaZrgZMhtMCXL
    kYVNaZrgZMhtMCXL
    nwamPbIXeL1OewgJ
    RnjYEKHkwPDfATDD
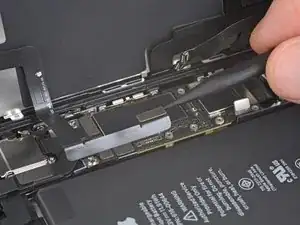
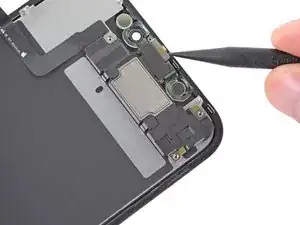
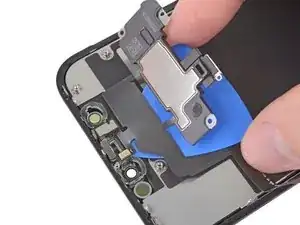
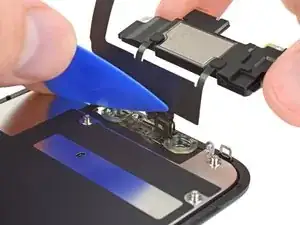
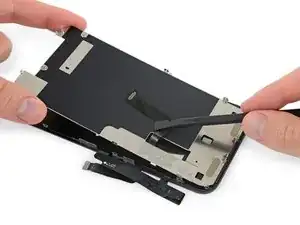
    • Usa la punta de un spudger para levantar el borde superior del altavoz.

    • Voltea el ensamblaje del altavoz hacia abajo y lejos del borde superior de la pantalla.

    • El altavoz permanece unido a través de cables planos muy finos. Ten cuidado de no forzar o dañar el cable

  25. xfUHGAfxC4XQewxL
    • Utiliza un secador de pelo o una pistola de calor o prepara un iOpener y aplícalo en la parte frontal superior de la pantalla durante 1-2 minutos, para suavizar el adhesivo que sujeta los sensores.

  26. bwXuCcEMEB1YeDuI
    bwXuCcEMEB1YeDuI
    4vpEnJnhOv2gDdLV
    YQPQG2yANhuqASYR
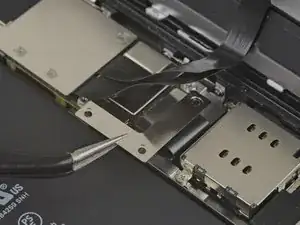
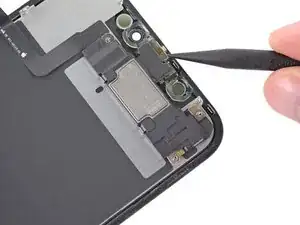
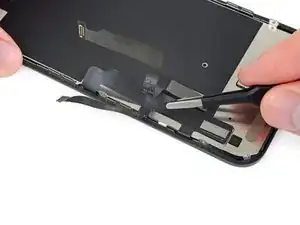
    • Desliza con cuidado el borde de tu pico de apertura debajo del cable flexible debajo del micrófono.

    • Gira suavemente para separar el micrófono, teniendo cuidado de no forzar o dañar el cable flexible.

    • Si es necesario, usa la punta del spudger para terminar de separar el micrófono de su muesca en el panel frontal.

    This step was a little bit confusing. I thought that the entire ribbon assm should be removed once the speaker was detached. The entire assm doesn’t actually come off until Step 30.

    Andre LeBlanc -

    Be careful in the next few steps, as you can easily damage some parts. Make sure that you operate gently, and that you don't pull, twist or apply too much pressure on the components.

    Athanasius Pernath -

  27. dXZ3PHSBGHLEvaLM
    dXZ3PHSBGHLEvaLM
    ENJqTZ4wTQ1X4uUB
    • Usa pinzas para deslizar el soporte pequeño directamente fuera del sensor de luz ambiental.

    As you remove it, familiarise with its position. It will be hard to put it back into place. If you pay close attention to how it comes out, it will be easier to put it back

    Athanasius Pernath -

  28. qyhj5vpN62hd25d5
    qyhj5vpN62hd25d5
    SUHMfqCo2aAR1pSw
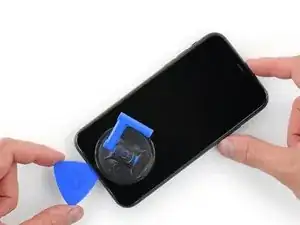
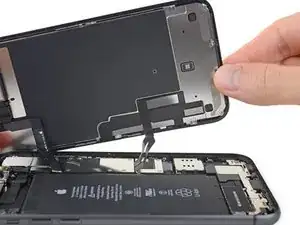
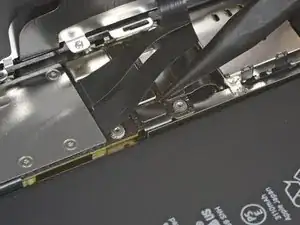
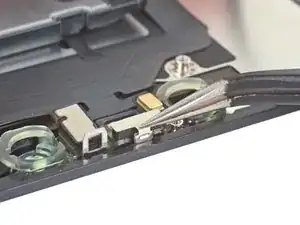
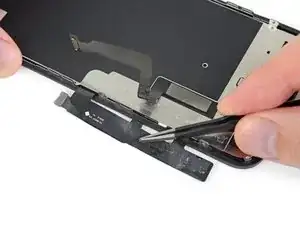
    • Usa pinzas para retorcer el sensor de luz ambiental y levantarlo de su muesca en la pantalla.

    • Si el sensor no se puede liberar luego de algunos segundos, aplica más calor e intenta de nuevo.

    • El sensor permanece unido al resto del conjunto del sensor a través de un cable flexible muy fino. Ten cuidado de no forzar o dañar el cable.

  29. wb6W2SWkoFbmgPjS
    wb6W2SWkoFbmgPjS
    xhy3trMJUKSBPfJo
    sKLITAxVAEeNPLu2
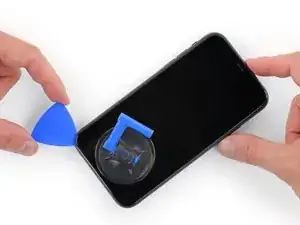
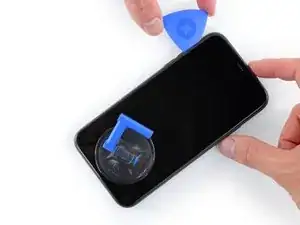
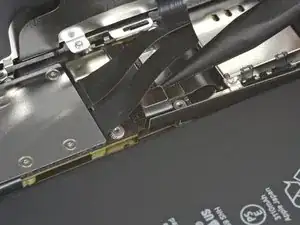
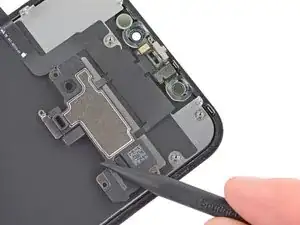
    • Trabajando de izquierda a derecha, desliza una púa de apertura debajo del cable flexible y debajo del módulo de sensor de proximidad + iluminador de inundación.

    • Mueve suavemente y levanta para separar el módulo de su muesca en el panel frontal.

    • Es útil levantar y mantener el altavoz fuera del camino para el acceso. Sólo ten cuidado de no tirar del fino cable flexible mientras trabajas.

  30. sSfLtFMiJbEoBxdc
    sSfLtFMiJbEoBxdc
    GJvrQZVwkH6MoFqI
    6ntOJfMeAsUcrAFv
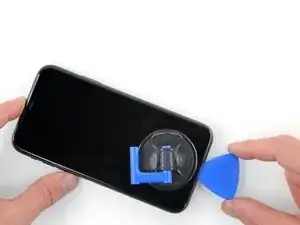
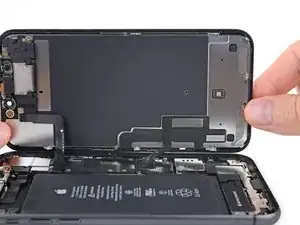
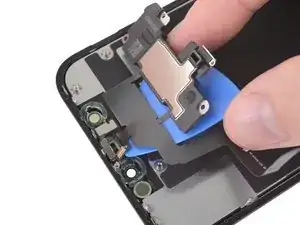
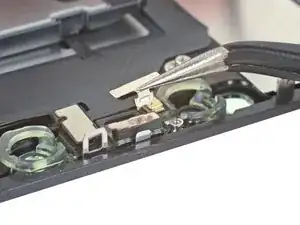
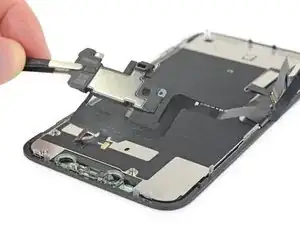
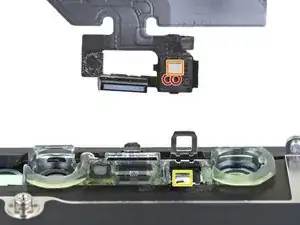
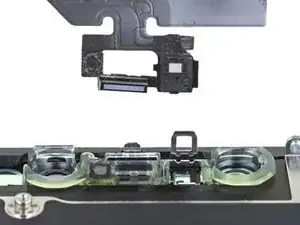
    • Remueve el ensamblaje de altavoz auricular y sensor frontal.

    • Durante el reensamblaje, fíjate en la posición del módulo plástico negro que contienen estos componentes:

    • Sensor de proximidad

    • Iluminador de inundación

    • El módulo debe posicionarse para que estos componentes no están obstruidos por ningún adhesivo.

    Also, your iPhone 11 will now display a notification that the screen on it is not original.

    Rob -

    Also if I‘m using an original Display? Will coping screen data with iCopy help? Or is there any other solution to get rid of this?

    Katrin -

    How about LCD shield plate removal instructions?

    Os Reini -

  31. LErxnWwmQ6AGr2Kj
    LErxnWwmQ6AGr2Kj
    EwUPPqr1142GBaRv
    gFxrnm5vMsYI1CTj
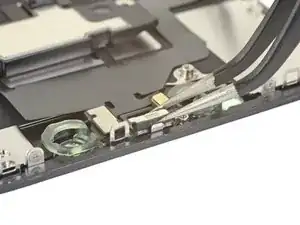
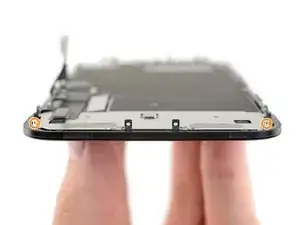
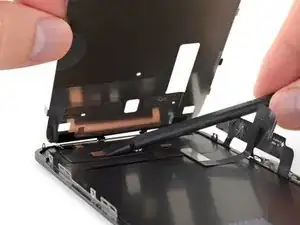
    • Usa un destornillador Y000 para remover los tornillos de 1.1 mm que sujetan el escudo LCD.

    • Tres tornillos en el lado más cerca de los cables de la pantalla.

    • Dos tornillos más en el lado opuesto.

    • Presiona tu destornillador firmemente en el tornillo mientras lo tuerces. Si es necesario, puedes usar tu spudger para apuntalar cada tornillo desde atrás y aplicar más presión a los tornillos sin doblar el escudo.

    There is two more screws at the bottom !

    ubrunner -

    L’appui sur les vis est réellement important, au risque de foirer celles-ci. N’hésitez donc pas à appuyer, en faisant contre-poids du côté opposé bien évidemment.

    Tristan Nans -

    This is the bit that was difficult. The tri'point screwdriver y0000 barely fits this tricky size. It could have been the cheap screwdriver that came with the screen replacement kit. Stripped 2 screws, drilled out with an appropriate size drill bit ' frame still intact. I had more success using a size 0.7mm flathead screwdriver.

    noname -

  32. 1CnhgaMGZO2r5iLf
    1CnhgaMGZO2r5iLf
    vGnGCFRBYSwY1MvE
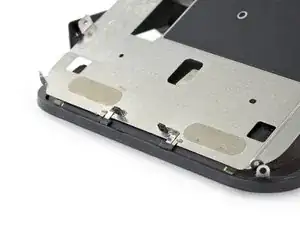
    • Remueve el resto de tornillos Y000 de 1.1 mm desde los bordes de la parte superior hasta los bordes de la parte inferior del escudo LCD.

    • Dos tornillos cerca de los recortes de la cámara.

    • Dos tornillos en las esquinas inferiores

  33. uDReDhFA2bXRCmGY
    uDReDhFA2bXRCmGY
    3OquLX6XiiokcWmj
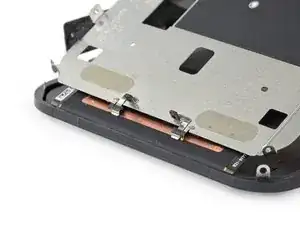
    • Aplica un poco de calor de un iOpener (o secador de pelo/pistola de calor) en la parte posterior de la pantalla, para suavizar el adhesivo que fija los cables de la pantalla a la pantalla LCD.

  34. jUeKbHyLYRvGYJsL
    jUeKbHyLYRvGYJsL
    w1BKSNmonggoONeE
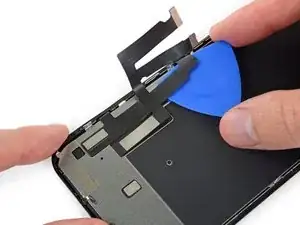
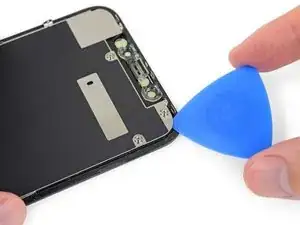
    • Inserta una púa de apertura entre los cables de pantalla y el escudo LCD.

    • Deslízala hacia el borde inferior de la pantalla para comenzar a separar los cables.

    • Deténte cuando llegues al extremo del primer cable.

  35. fcgR2GHWiHSdC13g
    fcgR2GHWiHSdC13g
    T6giiyp3fn63fVkN
    Wl6pGKQ4ARdIfbCB
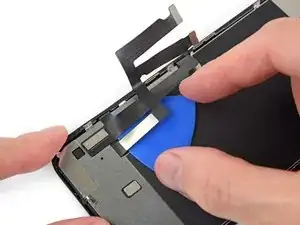
    • Vuelve a insertar tu púa de apertura, esta vez entre dos cables.

    • Desliza la púa al borde inferior de la pantalla para separar los cables.

  36. ebZhaRcBGUTPHBmU
    ebZhaRcBGUTPHBmU
    qqSplMxIQyhShwLp
    • Toma cada cable cerca de su curva de 90° y despégalo.

  37. yUBidA5PHmIuND3A
    yUBidA5PHmIuND3A
    1erlLVnZwKTYFxVF
    • Despega el cable entero del digitalizador del escudo LCD y apártalo a un lado.

    Be very careful of all parts of the ribbon cable connected to the screen, especially the segment close to the top, as it can tear easily at this

    crtrue -

  38. nkFO3PQleSRFUECt
    nkFO3PQleSRFUECt
    UyMn2VyuE4OrTSgM
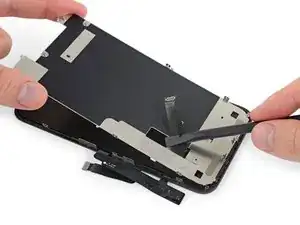
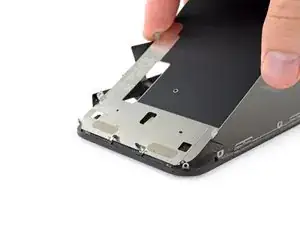
    • Inserta una púa de apertura debajo del borde superior del escudo LCD y dóblala para separarlo de la pantalla.

  39. qSMxGj4yxRj3J5Yh
    qSMxGj4yxRj3J5Yh
    ZpwYy4EgYDZbXFqt
    • Agarra la pantalla LCD por su borde superior y muévala hacia arriba unos grados.

    • Usando tu spudger, presiona suavemente en la parte inferior del cable de la pantalla, empujándolo a través del recorte en el escudo de pantalla LCD.

  40. xAeYRm6WGKRSWj2L
    xAeYRm6WGKRSWj2L
    jXPBpfu5YkGrevZ1
    pLKbrLHHUQvuNTsO
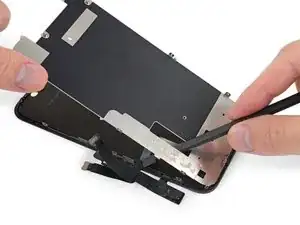
    • Eleva el borde superior del escudo de LCD un poco más y pasa el resto del cable de la pantalla a través del recorte del escudo.

  41. rwMpFGFiGRCyTCAK
    rwMpFGFiGRCyTCAK
    m3qLyiEQORG4VRDH
    2EcKI2U1qeIrwc3P
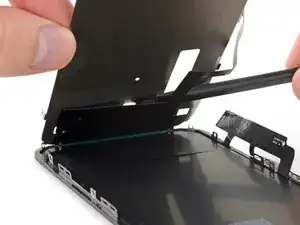
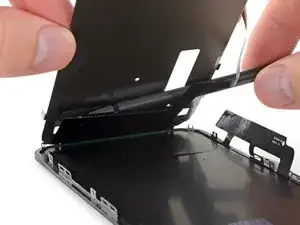
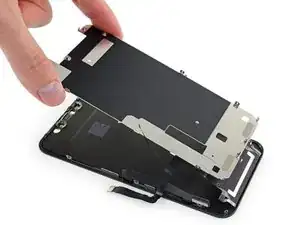
    • Levanta el escudo de LCD en un ángulo mayor, hasta que pueda ver el resto del cable de la pantalla pegado a la parte posterior.

    • Desliza un spudger entre el escudo de LCD y el cable de la pantalla, y sepáralos completamente.

  42. I1CskVXDHR6Tfsux
    I1CskVXDHR6Tfsux
    tDfKre6SyCpPgoMY
    cMPjSNJlHEmNaYUW
    • Al levantar la pantalla LCD, observa las puntas metálicas en el borde inferior.

    • Durante el reensamblaje, asegúrese de que estas puntas (también conocidas como puntas EMI) estén correctamente insertadas en el marco de la pantalla LCD, tal como se muestra.

    hello whaty if one of the golden contact pins ( i guess it is) to be exact right one has freyed up a bit and looks messy. could it cause harm or it is not very important?

    thetroll1401 -

    On reassembly leave the adhesive cover on the digitizer cable so that it doesn’t get caught on the LCD shield while working the other cable in place and positioning the shield on the frame. When you are ready to stick the digitizer cable to the shield remove the protective plastic.

    pgrobin -

  43. ISJKZTNwdCZN3VRM
    • Remueva el escudo LCD.

  44. k1xqLVCC1ZKI46wY
    • Solo quedan el LCD y el digitalizador

    Tech nor working my iphone xr

    Mohammed Chand -

Conclusión

Compara la nueva pieza de repuesto con la original; es posible que tengas que transferir los componentes restantes o quitar los respaldos adhesivos de la nueva pieza antes de instalarla.

Para volver a ensamblar tu dispositivo, sigue los pasos anteriores en orden inverso.

Lleva tus desechos electrónicos a un centro de reciclaje certificado.

¿La reparación no salió según lo planeado? Consulta nuestra amplia biblioteca de Solución de problemas de iPhone, o específicamente nuestra página [iiPhone 11 Will Not Turn On|iPhone 11 no enciende]]. Prueba algunos de nuestros Troubleshooting Problems After a Repair, o también puedes pedir ayuda a nuestra comunidad de respuestas de iPhone 11 .

Jeff Suovanen

Miembro Desde 06/08/13

407920 Reputación

19 comentarios

I am a repair technician from California, and I use your company’s tools and I gotta say that I love them. Very sleek, and the powerful magnetic bits help me get the job done. I did 5 repairs yesterday and each one finished was a good feeling of satisfaction. In the future, if you guys decide to make some sort of in-depth manual for the newer iPhones, that would be great because diagrams are not only a great way for me to sharpen my own skills, but will help make training new techs a breeze.

Cheers all the way from Fresno!

anthony_brletic -

Hi, I replaced the display independently, not in the Apple service, to my disappointment I found a message in the device that warned me that the part is not original, consequently the FaceID was disabled. Can you tell me about ear? Thank you

954kuki -

Getting a message saying not genuine is known issue. there is no workaround yet. as far as face ID not working, you need to check for tear on the flex as you probably damaged it during transfer. If it’s broken, there is no way to fix.

ifixsmartphone -

The Important Display Message can be removed, check here: https://www.youtube.com/watch?v=bLo0_p7O...

Ricky LV -

Great repair guide. My only issues:

1. There are no instructions for removing the metal panel from the back of the old screen (nor how to reinstall it).

2. There are no instructions for removing the old, black adhesive from around the edge of the old case (nor the much needed instructions for reinstalling the new adhesive without damaging it or compromising the purpose of replacing this adhesive). This info is also missing from the adhesive replacement page for the iPhone 11.

I was able to patiently work my way through both of these issues and complete the repair on an iPhone 11. Covering these issues as additional steps of the repair guide would be very helpful for future iFixers.

Ryan R. Smith -

Anyone have the phone randomly reboot after screen replacement? All aspects work on the phone after replacement. It just randomly goes black and then restarts

Cory Schumacher -

Maybe just a bad battery connection or a stained/bent connector

Richard Kraus -

I am a repair tech at a repair shop we do more but thats what we are called and i love you’re tools, they are just perfect for everything and all i can say really is, be super careful with the screen and the prox flex, they can be eaisly ripped and really ruin you’re day because to restore the face id with a new prox requires micro sodering but other then that just be careful

Zach Mentz -

I find the OEM screen looks more yellowish, is it me only?

Victor Santana -

OEM screens tend to have the colors a little bit off, could also be caused by disabled true tone.

Richard Kraus -

Overall a very useful repair guide, there´s just one issue I came across:

Different display manufactors.

Been looking around, due to some issues and so far I´ve seen some different manufactors for the iPhone 11 (and the XR):

Toshiba (the print on the display starts with C11 or F7C, as seen on the last picture)

LG (DTP or C3F)

Sharp (DKH)

someone else stumbled across this?

Günter Scherf -

Apple doesnt offer new displays, however afaik the original apple product manufacturer foxconn refurbishes original screens. Or you could just get a refurbished screen from somewhere else…

Richard Kraus -

For iphone 11, on the flex if there is a square code QRC is DTP and a rectangle is C11

Didier -

Awesome guide, thank you very much! By the way, after the replacement the true tone function will most likely be disabled, which can as far as i know only be fixed by copying the firmware from the old screen over to the new one with a programmer (for example Qianli iCopy Plus). Also, the phone will notify you that the screen is not genuine after every restart and it will always show a notification in the settings. The only way to get around that is to swap the chip on the display cable with a hot air station and solder paste (not worth the hustle in my opinion, i dont mind the one notification in settings). https://www.youtube.com/watch?v=agq2HPK-...

Cheers!

Richard Kraus -

Hi, since replacing my screen my ear speaker has been very muffed/static. Is there any way I can fix this? Thanks

caoife98 -

I’d suggest checking the mesh under the earpiece for dirt and stuff that could be blocking the sound and maybe trying to refit it, maybe it’s not properly seated. Could also be fixed by just reseating the earpiece flex…

Richard Kraus -

completed the guide. thx. my iphone claimed the screen is not original. anyway, seems to work correct

Miguel Cretu -

Hello I was wondering if anyone could help me. I recently replaced the screen of an iphone 11. The phone was good for the first couple of days but now the customer is having some issues. His display is something randomly scrolling up, mainly while watching videos and sometimes the screens just starts to act crazy and press random things. I’ve been doing some research and I found that something i could do is reset the phone to factory settings. However i’m unsure if this is like a software or a hardware issue. Any advice is helpful, thanks!

Andres -

From my experience this sound like a ghost touch issue. Usually caused by a loose/broken/dirty connection or an overly tight screw somewhere. It's unlikely, but if you installed a screen protector afterwards, it may have a fingerprint or dirt between the protector and the phone screen. Same thing happened when we did my sisters phone at our store, a connection was loose and a screw was a little bit tight. Maybe a more experienced tech could offer more in-depth insight.

Teejay R -