Introducción

Usa esta guía para reemplazar el puerto de carga en tu Huawei Mate 10 Pro.

  1. rg3xpGgvKOjMBPWO
    • Apaga tu teléfono.

    • Prepara un iOpener y aplícalo a la parte trasera del teléfono durante alrededor de dos minutos para aflojar el adhesivo por debajo de la tapa trasera.

    Erm… Simply impossible to open the phone this way…

    I used the iOpener for 2 mins as instructed, I’ve used even an hair drier for 30 secs on max power (could barely touch the phone after) and still with the suction tool I was not able to open the phone.

    It simply doesn’t budge!!!

    Miguel Oliveira -

  2. vJVBYc2fWjWoTSNG
    vJVBYc2fWjWoTSNG
    wgXxR6VJO4alrBKR
    illPhNTBeVFxigjt
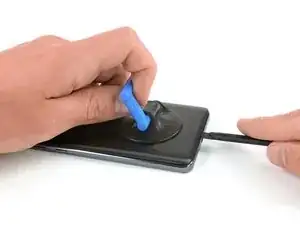
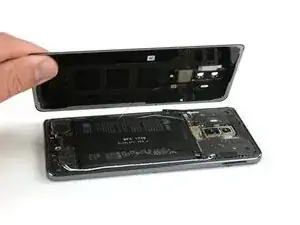
    • Levanta la tapa trasera con una ventosa hasta que puedas insertar el extremo plano de un spudger halberd.

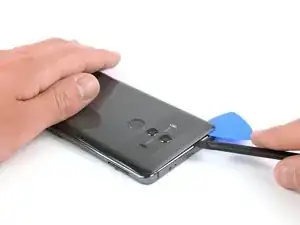
    • Usa un spudger halberd para cortar el adhesivo por debajo de la tapa trasera en todos lados del teléfono.

    • Usa púas de apertura para evitar que el adhesivo se pegue de nuevo en la tapa trasera mientras cortas el adhesivo en todos los lados.

    Faire attention à ne pas enfoncer trop le cutter/spatule hallebarde. Surtout à l’approche des boutons ON/OFF et volume, la nappe ne passe pas loin et se branche à coté de l’empreinte digitale.

    Bilan, j’ai coupé cette nappe et n’ai plus de bouton volume et on/off.

    Plus qu’à chercher la piece de rechange pendant que le telephone est ouvert ;)

    NeoX -

  3. C5QkPmrDkMAECFTO
    C5QkPmrDkMAECFTO
    lV1jdUdq1oorWMA2
    • No remuevas la tapa trasera todavía. El cable del sensor de huellas digitales está todavía conectado a la placa madre.

    • Voltea la tapa trasera hacia un lado.

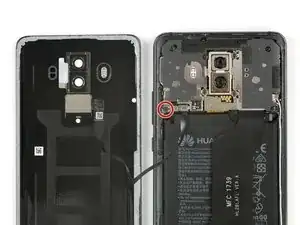
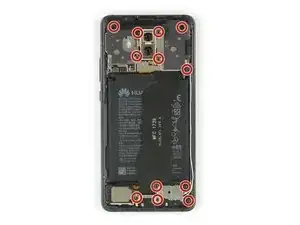
    • Retira el tornillo Phillips #00 que sujeta el escudo metálico, sentado encima de la conexión del cable del sensor de huellas digitales.

  4. VcxMNTBJfNQCqTLN
    VcxMNTBJfNQCqTLN
    Mx42vEmk5nW5QvKv
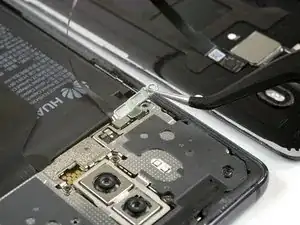
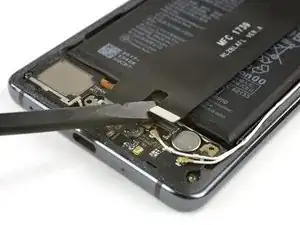
    • Utiliza un par de pinzas para quitar el escudo metálico que cubre el conector del sensor de huellas digitales.

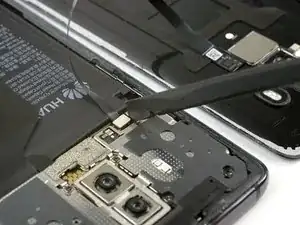
    • Desconecta el cable del sensor de huellas digitales con un spudger.

    • Al volver a ensamblar tu teléfono, aplica adhesivo nuevo donde sea necesario.

  5. tAqccddL4PorxOAC
    tAqccddL4PorxOAC
    SF3upv2yvfqMQaPC
    CNBw4EBW6koEH2Ex
    • Remueve los doce tornillos Phillips #00.

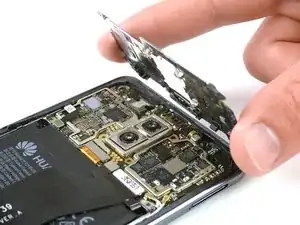
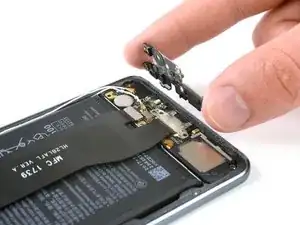
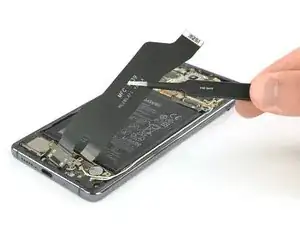
    • Con cuidado remueve los escudos en la parte superior de la placa madre y la placa de carga.

    • En caso de que los escudos no salgan fácilmente por su cuenta después de quitar los tornillos Phillips, puedes utilizar el extremo puntiagudo de un spudger para sacarlos.

  6. AJKvpcjmmVncyGQ2
    AJKvpcjmmVncyGQ2
    GwxgGLrKtEWpWCmO
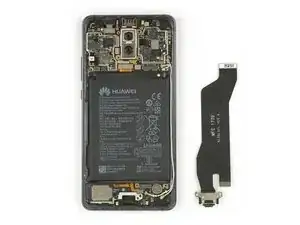
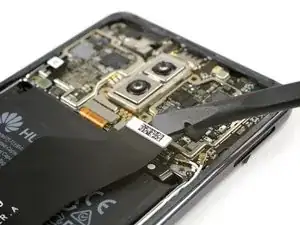
    • Usa un spudger para desconectar el cable flexible del puerto de carga de la placa madre y de la placa hija.

  7. O6QARa6cJ26AKtOX
    O6QARa6cJ26AKtOX
    pv3hObwLtKYKUyhH
    • Usa un par de pinzar para remover con cuidado el puerto de carga con su cable flexible.

    • El puerto de carga se asienta firmemente en su hueco. En caso de que tengas problemas para quitarlo, utiliza el extremo plano de un spudger halberd para sacarlo.

    Do I need to apply a new sealer / adhesive tape in order to assemble the phone back together? If yes, where can this be purchased for Huawei Mate 10 Pro?

    Megan -

    If the adhesive on the back cover is damaged too much and/or doesn’t stick any more it is recommended to remove the old adhesive from the back cover and clean off any residue with isopropyl alcohol (>90%). Then use thin double sided adhesive tape and apply new strips of adhesive.

    Tobias Isakeit -

    hi, after this install it will still will water proof ?

    David Tay -

    Hi David,

    opening the Mate 10 Pro will damage the waterproof sealing on the device. If you do not replace the adhesive seals, your phone will function normally, but will loose its water-protection.

    Dominik Schnabelrauch -

    Hi there, I completed the battery replacement nicely with all your steps, the phone could turn on and function normally, the only issue after the battery replacement is the phone has no sound and vibration. I have ensure all connectors are back to place securely. Does anyone have any clue of the cause of no sound and no vibration?

    Shawn W -

    You do not have to remove the charging port for battery replacement, it does not interfere anywhere. I couldn't get the charging socket out at all. Where is the trick?

    Christian -

Conclusión

Para volver a ensamblar tu dispositivo, sigue estas instrucciones en orden inverso.

Dominik Schnabelrauch

Miembro Desde 23/11/16

169012 Reputación

2 comentarios

Great tutorial! It has been a month without being able to charge my phone, and now it charges 2x as fast with my repair.

Bruce Panagopoulos -

I recommend testing the USB C flex cable assembly before you reassemble the phone. As soon as it’s connected to the upper connector and the battery is plugged in the phone should be charging. Mine was broken from the factory but I went to a great local repair shop and got a new one, the guy said 1 out of 15 is broken from the factory. Great tutorial, successful repair.

Martin Olsson -