Introducción

Usa esta guía para cambiar el sistema de ventilación en una PS4 Slim.

  1. HVTGYelJeUQRNBTL
    HVTGYelJeUQRNBTL
    6Z3td3NoCXXHhZQI
    4ybs2g5RHLPUHZ6a
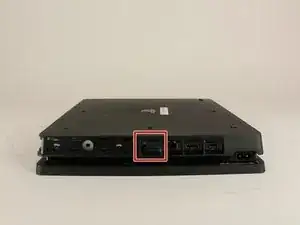
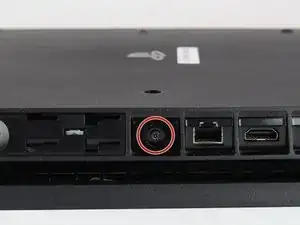
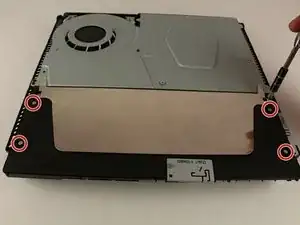
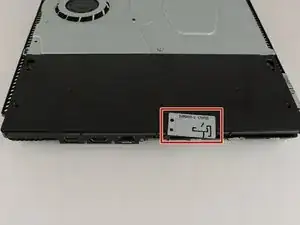
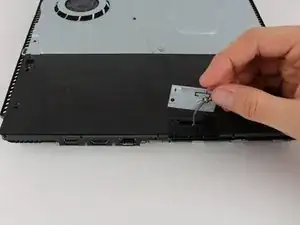
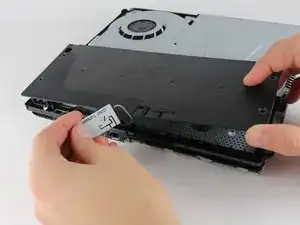
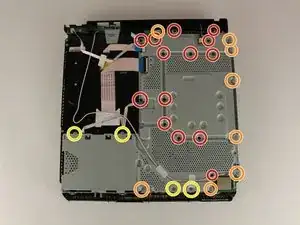
    • Localiza la pegatina de garantía que está al lado de los tres puertos en uno de los lados de la consola.

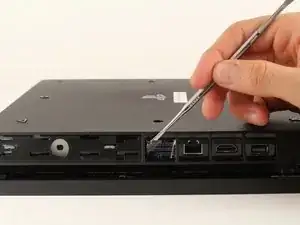
    • Retira la pegatina de garantía levantándola con ayuda de cualquier tipo de espátula de plástico.

    • Quitar la pegatina de garantía NO anula la garantía de ninguna forma.

    Remove the screw directly to the left of that one in the picture as well. Should be silver.

    Elizabeth Johnson -

    ihr seid so ein scheiß haufen das stimmt über haubt nix

    Toaster 95 -

    einfach alles stimmt nicht

    Toaster 95 -

  2. iuwUc5FNjBXlxWDZ
    iuwUc5FNjBXlxWDZ
    NddVVDLyNaEUIPME
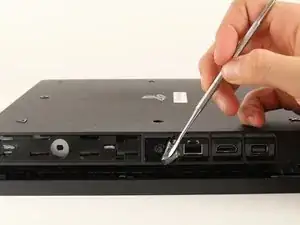
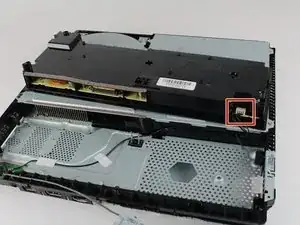
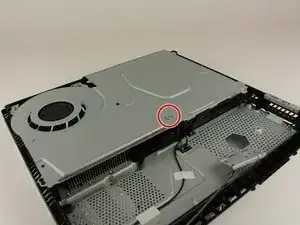
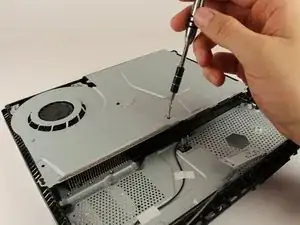
    • Desatornilla y retira el tornillo Torx de 5mm con un destornillador de seguridad Torx T8 girando en contra de las agujas del reloj.

    Are you SURE that it’s counter-clockwise?

    The Stuff -

    Try T9. Fits better.

    Otter -

    T8 fits like a glove for me

    Daniel Henderson -

    Is there anything else you can use

    randomweeb -

    A small flathead screwdriver will work

    shawng6363 -

    There is a small metal rod in the middle of the screw that isn’t allowing my t8 inside. Any insight on this?

    gavinstoutconner@icloud.com -

    Some T8 bits have a hole in the middle that will allow that rod to go through; some do not. If you have a set of multiple bits, check if there are any others labeled T8 or TR8 with that hole in the middle.

    Nicholas -

    There is a metal thing inside of the screw slot any insite on this?

    Tristan York -

  3. SlFEBbB2b3bIl6BX
    SlFEBbB2b3bIl6BX
    oRDOW1Bq6YK4gBJW
    Qs6ybIWcbq4tnNZZ
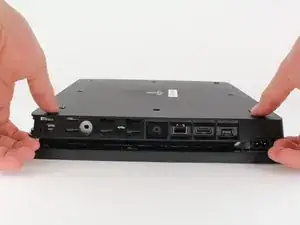
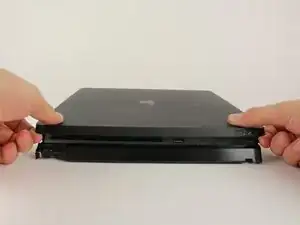
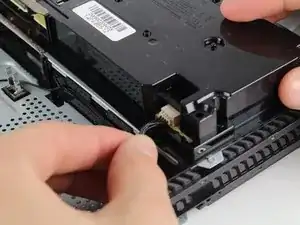
    • Sitúa la PS4 boca abajo con el lado del tornillo que acabas de retirar mirando hacia ti.

    • Haz palanca con las manos hacia arriba (con cuidado)en las dos esquinas mas cercanas a ti.

    • Esto puede requerir hacer un poco de fuerza para abrirlo, pero oirás un click fuerte cuando la tapa se suelte.

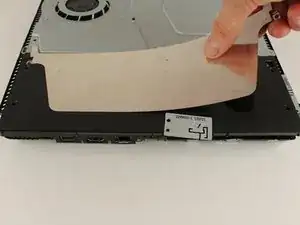
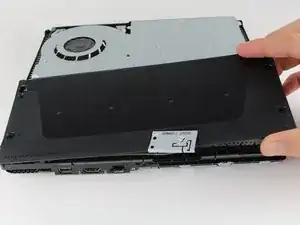
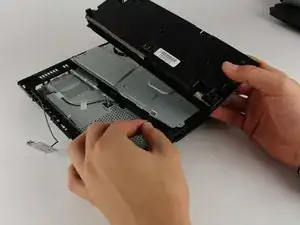
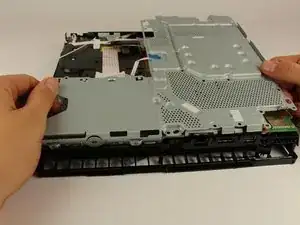
    • Retira la tapa inferior arrastrándola hacia las esquinas inferiores y levantándola.

    It says to place it upside down, but didn't you do so in the previous step? I've been trying to unscrew the screw with my screwdriver that I got from here and if I had to had the system right side up, I'm afraid I might've stripped the screw from all the force I tried to use to get the screw out that will NOT budge. It didn't even move the slightest after removing the warranty sticker.

    Vidal Santos -

    There is a single clip on the left side about 5cms in, and another clip on the right side equidistant to the one on the other side. Jamming a spudger in there first, and lifting those clips helped, and then I had to slide down to lift a total of 4 clips on each side (each about 4cms apart). Then push the cover away from you, if that makes more sense than “sliding it towards the back corners”, since the back corners are technically facing you.

    Emil Fisk -

    It would be easier if you just lifted the top cover of the PS4.

    Poobler -

    The earlier comment by Emil Fisk is spot-on. I found it impossible to remove the cover without first using a spudger to release the four clips on each side.

    midahed -

  4. eG12cRbDuv1GVtZd
    eG12cRbDuv1GVtZd
    IZBxPl2oH5CkN4DP
    2SpqZiosbjQ2HxGj
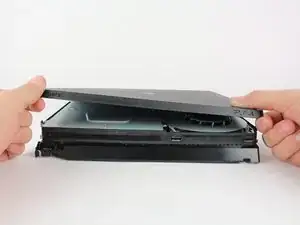
    • Coloca la Playstation 4 Slim con el lado derecho hacia arriba, con el logotipo de PS en la parte superior y el lado con las palabras "SONY" y "PS4" hacia ti.

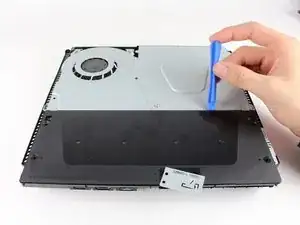
    • Haz palanca con los dedos en las dos esquinas que están orientadas hacia usted.

    • Es posible que haya que hacer un poco de fuerza para abrirlo y se oirá un clic bastante fuerte cuando se separe la tapa superior.

    • Retira la tapa superior deslizándola hacia las esquinas traseras y levantándola.

    Undo 4 clips on each side by using a spudger. And then lift the front corners up and pull towards you to undo them.

    Emil Fisk -

  5. 3AeQgjbtK1pLrGkY
    3AeQgjbtK1pLrGkY
    iSoWBxqGEIukqO2C
    4Vw4unbMo24VFLiR
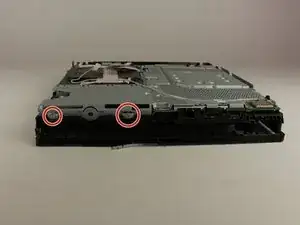
    • Desenrosca y retira los dos tornillos (el izquierdo de 31,0 mm y el derecho de 24,0 mm) utilizando un destornillador T8 con un movimiento en sentido contrario a las agujas del reloj.

    • Desenrosca y retira el tornillo de 3,0 mm utilizando un destornillador Phillips nº 1 con un movimiento en sentido contrario a las agujas del reloj.

    UK model seems to be different here. There's no Philips screw where there is on your image.

    MaFt Morley -

    This regards EU models in general, i think. My danish version is the same.

    William Villadsen -

    The screw on the left was 31mm, and the one on my right side was only 19mm.

    Emil Fisk -

  6. HrP1ICwvSbBshwxh
    • Retira los cuatro tornillos Philips de 16 mm que sujetan la fuente de alimentación.

    Es gibt diese Schrauben bei meiner Ps4 Cuh 2116A nicht und ich bekomme das Teil so nicht raus. Kann mir jmd helfen?

    Julian S. -

    Only 2 Phillips actress here on my UK

    MaFt Morley -

    Only 2 phillips screws on the US one as well.

    Sean Douglas -

  7. IELoveMUpqIKoH5N
    IELoveMUpqIKoH5N
    JfyvhNxHrQeavq3f
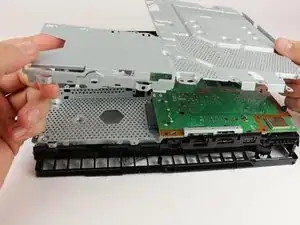
    • Retira la lámina metálica de la parte superior de la fuente de alimentación agarrando y levantando con las manos.

    Is this metal sheet required for the unit to power on?

    AlexT -

    I think the metal sheet protects the rest of the console or something from heating too much.

    BloodSpark22 -

    Kann man diesen Metallblech einzeln kaufen? Finde im Internet nichts

    SoN GoKu -

    A quoi sert la tôle métallique qui recouvre le ventilateur et l’alimentation svp

    Ittady92 -

  8. PNA4otMPJIQOHWDT
    PNA4otMPJIQOHWDT
    gTmbqA3sa4ExOM6K
    • Retira la antena de la parte superior de la fuente de alimentación guiando el cable con los dedos a través de las ranuras situadas debajo del panel metálico.

    What does this mean for part do? This part is not present in my console nor is the space where it's supposed to reside as shown in the picture above.

    The Hondo -

    Me neither, guess they are different models.

    Daniel Henderson -

    There was a longer clip 8mm long on the left side which had to be pulled straight out. However, be careful when pulling out the antenna. My cable was soldered to the metal plate.

    Emil Fisk -

    It is easier to wiggle the cable out from the plastic power supply housing in step 10.

    Emil Fisk -

  9. xoXm3taPYINyFEjd
    xoXm3taPYINyFEjd
    IvVUKwfba1q3oWup
    • Voltea la Playstation 4 Slim sobre su parte trasera.

    • Desenrosca y retira el tornillo de 4,0 mm utilizando un destornillador Phillips nº 1 con un movimiento en sentido contrario a las agujas del reloj.

    Forgot to mention to remove the hard drive.

    The Stuff -

  10. whHYWRP6SIDDsmug
    whHYWRP6SIDDsmug
    qUvGBKWo2LhFsk3m
    4WCDCpkIr6P2lECc
    • Utiliza una herramienta de apertura de plástico para hacer espacio entre la fuente de alimentación y la consola, metiéndola y moviéndola entre los dos.

    • Levanta la fuente de alimentación y colóquela sobre la chapa metálica con las manos.

  11. TNOBblu5PIbOJR4B
    TNOBblu5PIbOJR4B
    GLVgk3vwjAfTVyGM
    PAndD6pDYuGxIrrA
    • Desconecta el cable de conexión de la fuente de alimentación sujetándolo firmemente con los dedos o con unas pinzas y tirando de él.

    • Retira la fuente de alimentación completamente agarrando y levantando con las manos.

    Your guide is good but detail. Could be alot better for a start you forgot to mention the screw on the other side that must also be removed to let the power supply out of ps4 slim

    Chicky Boy3 -

    Could you replace a ps4 slim model CUH-211B with a N16-160P1A power supply

    Aiden Thrash -

    Just because I feel like this needs to be stated clearly, “Do no attempt to pull the plug out by the wires!”

    Pull from the plastic, male end of the plug or you’re going to end up have a very bad day.

    Matthew D. H. -

    Literally no way I can do it by the plastic, the only way is wires. Gotta risk it I guess

    Misha FV -

  12. RHFr5wwVKGmRxmRY
    RHFr5wwVKGmRxmRY
    vxQAKwEZNOY2nGKn
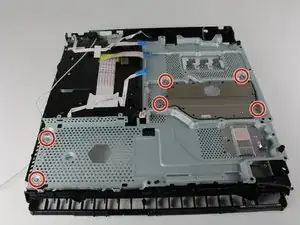
    • Desatornilla y remueve los tornillos de seguridad de 31.0 mm usando un destornillador T8 con movimiento contrario al reloj.

  13. QweEJHBb1rKIAvq2
    QweEJHBb1rKIAvq2
    FFHqyEZPchOvDwl3
    • Localiza los dos cables conectados a la parte de abajo de la placa madre.

    • Remueve los cables agarrando firmemente los conectores de metal con tus dedos o pinzas y tirando hasta que se desconecten.

    Doesn't exist in my

    Daniel Henderson -

    Mine only has 1 wire

    Kyle Cordle -

  14. UoJCEwjuvBDIUb2I
    UoJCEwjuvBDIUb2I
    gUjvZ4vOTDrEhDuf
    • Voltea el dispositivo al lado de atrás.

    • Desatornilla y remueve los 14 tornillos negros de 4.0 usando un destornillador Phillips #1 en un movimiento en contra de las manecillas del reloj.

    • Desatornilla y remueve 8 tornillos plateados de 6.0 mm usando un destornillador Phillips #1 con movimiento en contra de las manecillas del reloj.

    • Desatornilla y remueve 4 tornillos plateados de 3.0 mm usando un destornillador Phillips #1 con movimiento en contra de las manecillas del reloj.

    - There are 14x 4.0mm black screws, but the step only shows 13 of them circled in red. One of the 11 orange circles (near front of unit) is actually the 14th black screw. Photo: http://i.imgur.com/7G64egd.png

    - As for the 6.0mm silver screws, there are only 8x of those. The two silver screws behind the IO ports on the back are 3.0mm fine-threaded screws. Photo: http://i.imgur.com/cQD6KQu.png

    - Source: Have a PS4 Slim (CUH-2015A) right in front of me, doing this exact job. Hope this helps someone else down the road.

    lane anderson -

  15. TZuXlaBqAq1v1PKR
    TZuXlaBqAq1v1PKR
    pPMotqljh6IAAWia
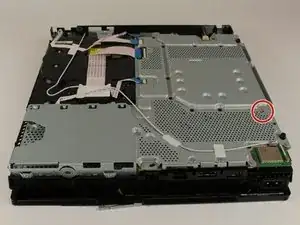
    • Desatornilla y remueve los dos tornillos de 5.0 mm en el lado de la consola usando un destornillador Phillips #1 en un movimiento en contra de las manecillas del reloj.

    These are 3.0mm screws, not 5.0mm. This step could probably be condensed into the previous step.

    lane anderson -

    These screws are not present on the US model

    Sean Douglas -

    Yes, my US model doesn't have it either

    Kyle Cordle -

  16. 2hLjGKE3bapn6Mp6
    2hLjGKE3bapn6Mp6
    mFNIWMZWJhVnCotL
    RuQ6AvAACWsEr5jE
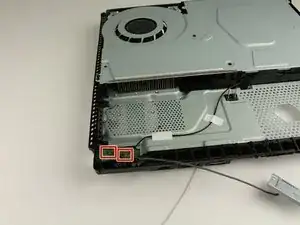
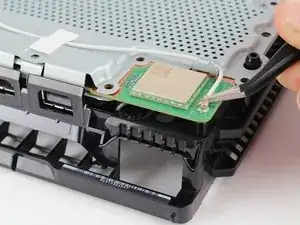
    • Localiza el cable blanco conectado en la esquina superior de la placa madre.

    • Desconecta el cable agarrándolo firmemente la conexión de metal con tus dedos o con pinzas y tirando de el hasta que se desconecte.

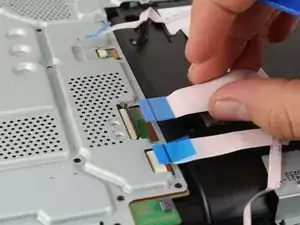
    • Despegue el cable de la cinta y muévelo a un lado usando pinzas o tus dedos.

    This wire is black, not white on the US model

    Sean Douglas -

  17. tHSO6gCoFh2BetYM
    tHSO6gCoFh2BetYM
    sfvwkIjNjLYSW5fK
    EZNt5bm1vJynBYi5
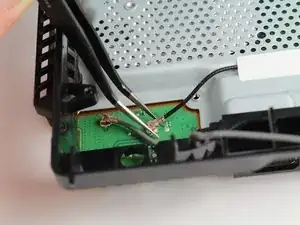
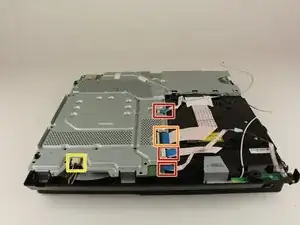
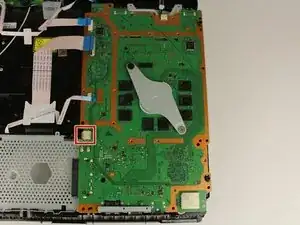
    • Remueve las conexiones tirando de las lengüetas azules con tus dedos.

    • Levanta el clip negro en la lengüeta mas grande con tus dedos antes de removerlo.

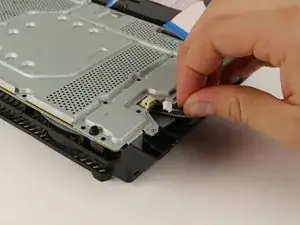
    • Remueve este cable de conexión agarrando el cable firmemente con tus dedos y sacándolo.

  18. K4Rr6GvCDbx6LfwN
    K4Rr6GvCDbx6LfwN
    KjtQ6ePWgRCkOsI5
    • Remueve la placa de metal agarrando dos lados de la placa y levantandola y lejos de ti.

    • Puede que necesites sacudir la placa un poco para soltarla antes de que la levantes.

    • No pierdas ningunas de las almohadillas negras unidas a la placa madre mientras realices este paso.

    This step would benefit from showing a picture of the black pads in question. Pic: http://i.imgur.com/zQnehtA.png

    lane anderson -

    The US model has two black screws under the HDD

    Kyle Cordle -

  19. PTxhB3NvK2ECgnHd
    PTxhB3NvK2ECgnHd
    R2BAVekTyKaqIEtt
    av2foEMxJfQ5kjOi
    • Desatornilla y remueve los dos tornillos de 10.0 mm (uno plateado y otro negro) usando un destornillador Phillips #1 en un movimiento en contra de las manecillas del reloj.

    • Remueve la placa pequeña agarrandola con tus dedos y levantandola.

    Why is one silver and one black? I keep thinking they are different and try to keep track of where they go.

    Reed Deemer -

    What's the name is the part with the two metal screws that is being taken off

    Devon Higgins -

    both screws are black on the US version

    Sean Douglas -

  20. N4GKMqBLNRkrQ5L3
    N4GKMqBLNRkrQ5L3
    g3dZEyK6JVWZZxtt
    fddeLK1R2v2WAECy
    • Remueve este cable de conexión agarrándolo firmemente con pinzas y sacándolo.

    • Esto puede requerir un poco de fuerza para desconectarlo, pero asegura de no romper ninguno de los cables.

    Do not attempt to disconnect the plug by pulling on the wires! If you rip out the wires, you’re gonna have a very bad day. Wiggle the plug using the plastic on the male end of the connector while pulling out.

    Matthew D. H. -

    que pasa si se desolda esa parte como puedo volver a soldarlo o cuanto se cobra por solo soldar

    TheKiller Xtreme1 -

    this is plugged in WAY too hard. I've been wiggling it for 5 minutes. Not budging an inch. i learned that if you follow the cables of that, they are just held in place by a few plastic hooks. You can slide them out of there by flipping the ps4 over and then pull the motherboard out no problem, cable still attached.

    Also, dont forget about the small plug in at the top of the motherboard. That is the fan power cable and needs to be off to remove the mobo as well.

    Zoey Schlemper -

    I broke the cable by accident, where can i find a replacement?

    Daniel Dilley -

  21. DEHv6gWHFGMSYf2Z
    DEHv6gWHFGMSYf2Z
    LTdfbpNEnnLYnFSG
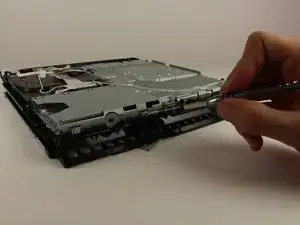
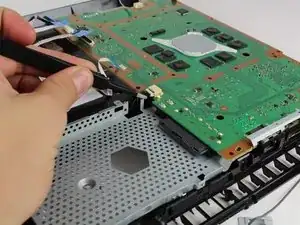
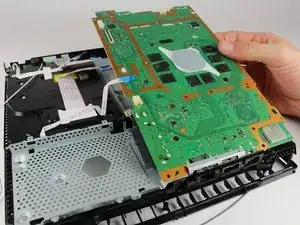
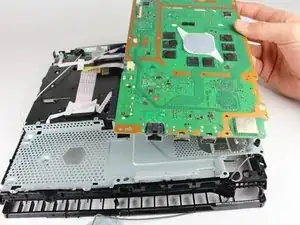
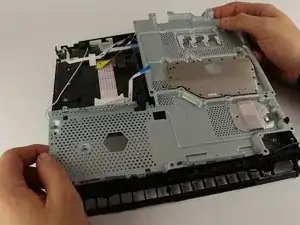
    • Remueve la placa madre agarrando el borde de la placa con una o dos manos y tirando afuera y arriba.

    • Puede que necesites mover un poco la placa para soltarla antes de que la remuevas.

  22. lZulrs4omCxIADPH
    lZulrs4omCxIADPH
    6CKVbJhluPXYGJsP
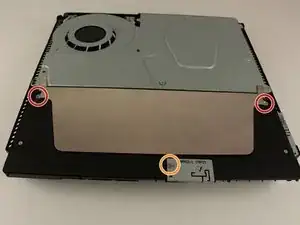
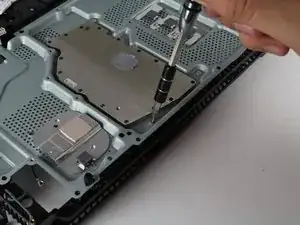
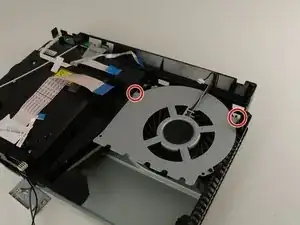
    • Desatornilla y quita los seis tornillos de 4.00mm usando un destornillador PH00 con un movimiento a favor de las agujas de un reloj.

    On my model, there are screws on the opposite side of the PS4 that are long and have their threads facing up into this plate. You have to unscrew them from the opposite side so they come off.

    Also, you DEFINITELY need to reapply thermal paste when doing this step in reverse order after replacing the fan!! How is this not mentioned, its critical otherwise your CPU will overheat.

    Zoey Schlemper -

  23. EiTmGgYvRrKuQmcs
    EiTmGgYvRrKuQmcs
    4Sb1wXIsROkfpS1F
    • Retira la placa de metal sujetándola por los extremos y levantándola con tus manos.

  24. hTxnH13HaFr6C2LH
    hTxnH13HaFr6C2LH
    ypxDIajBbFhXcBWG
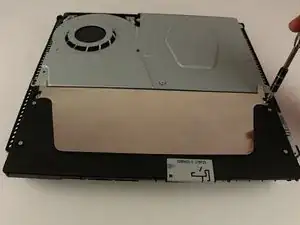
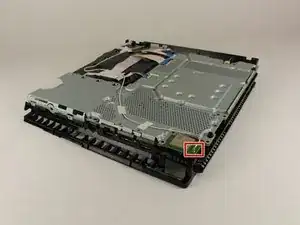
    • Desatornilla y retira los dos tornillos de 40 mm usando un destornillador PH00 con un movimiento en contra de las agujas de un reloj.

  25. b1YHNwYBihv54BLc
    b1YHNwYBihv54BLc
    ZpOmlXKUOsauUwQe
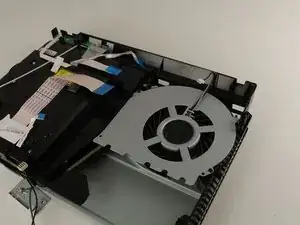
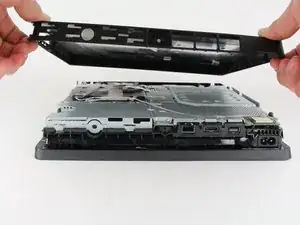
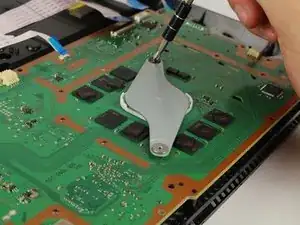
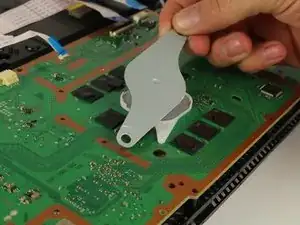
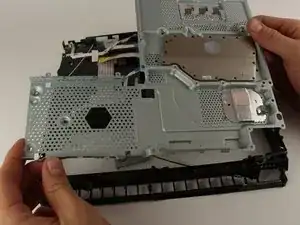
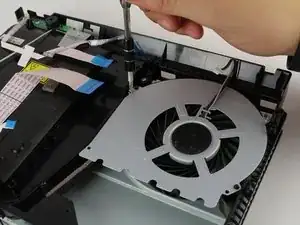
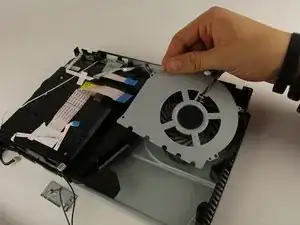
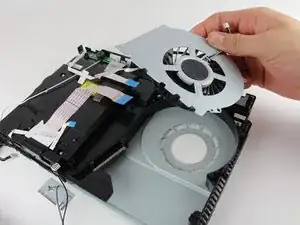
    • Retira el sistema de ventilación sujetando uno de los extremos de la placa de metal superior y levantándola con tus manos.

Conclusión

Para volver a montar el dispositivo, sigue esta guía en orden inverso.

Harry Koos

Miembro Desde 24/01/18

4136 Reputación

5 comentarios

Thank you so much for this guide! It was very helpful!

David Rodriguez -

Deine Schrauben großen machen gar kein Sinn du hast mehr verschiedene Schrauben als es gibt

Andre Hollmann -

My PS4 “Slim” is quite different internally than the one shown. But regardless, this guide is an excellent resource for us diy’ers. And don’t forget any parts when reassembling, like I did. Took four tries to get everything back where it belonged. And man, was it dusty in there! Regular cleaniings are a must.

Patrick Ogren -

My ps4 slim is different it has some extra parts, now I don’t know how to put it back, hahahahahhahaha

Lancelotte Fabros -

This guide gets you 90% of the way there. Some really important pieces are missing though, primarily:

- How you dont need to unplug the power supply cable from the motherboard, you can just unhook it from the plastic clips on the case.

- It never mentions cleaning the old Thermal Paste off the heatsink + cpu and replacing with a new dab.

Both of these are essential for a proper tear-down. If you dont replace the thermal paste, your PS4 is guaranteed to break down irreparably in the future. I had to know or discover them for myself. Please, please update this guide with that info.

Zoey Schlemper -