Introducción
Herramientas
-
-
Coloca la placa base sobre la mesa, como se muestra.
-
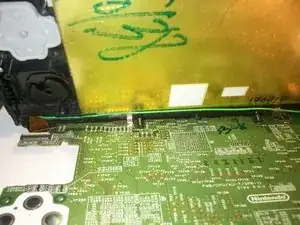
En el chasis, asegúrate de que el cable verde de la antena esté en su ranura y que el cable plano de la pantalla táctil esté colocado correctamente.
-
Coloca el chasis abierto sobre una mesa cerca de la placa base y separa con cuidado los conectores de cinta superior e inferior de la placa base.
-
Todavía manteniéndolos separados, desliza la placa base en esa separación, de modo que solo un conector de cinta quede sobre la placa base y las 2 clavijas de plástico descansen en sus orificios.
-
-
-
Ahora puedes agarrar el conector de cinta superior suavemente con pinzas y guiarlo hacia su zócalo sin tener que luchar también con la placa base y el chasis.
-
Continúa con el montaje de tu 3DS XL.
2 comentarios
Dan, I recently replaced the rubber ABXY pad (user reported XY did not function but the unit otherwise worked fine. Though I thought I was careful during reassembly, it seems I was not: the unit, when turned one ahs the blue LED power light on for a few secs then goes out with the unit not powering up. The is my first 3DS repair so I do not have a huge amount of practical experience here. Are there any common ‘gotchas’ when doing 3DS disassembly ?
I just did the one repair, and managed to recover from one error (a problem with the gold Kapton insulating film on the LCD, I think). I didn’t encounter your problem. Check all the ribbon cable connections and scrutinize your mechanical alignments around the ABXY pad.
And remember to take a break. Maybe sleep on it. We’re all better after we have had some rest. Sorry I can’t help more.
Dan -