Introducción

Usa esta guía para remplazar una pantalla rota o estrellada en tu Samsung Galaxy Watch Active2.

  1. PpZOv4HwIXocgyLa
    PpZOv4HwIXocgyLa
    URGisUyoLxnnOdxd
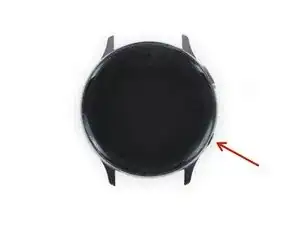
    • Apaga el Galaxy Watch Active2 manteniendo presionado el botón inferior durante aproximadamente 3 segundos. Deberías sentir una vibración corta.

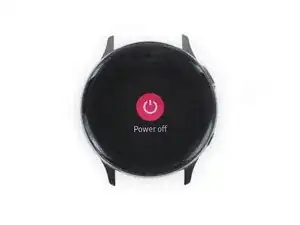
    • Cuando aparezca el símbolo de "Power off", toca el centro de la pantalla para que se apague. Deberías sentir una vibración más larga para confirmar.

  2. uu5BVXM3mPVqtxCV
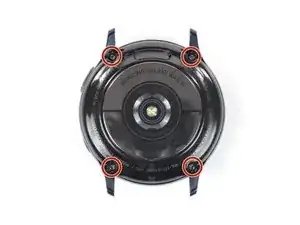
    • Usa un destornillador Tri-point Y00 para quitar los cuatro tornillos de 4 mm de largo en la parte posterior del reloj.

    Y1.5 works just as good

    BRIAN MIRANDA -

  3. gaLLXZL6PtTfeKTr
    gaLLXZL6PtTfeKTr
    R12EOStuFS1gSrnJ
    pEvRLZfPye6TlF5x
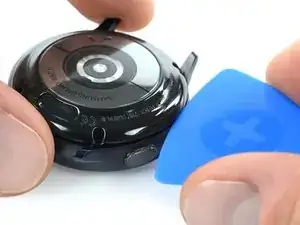
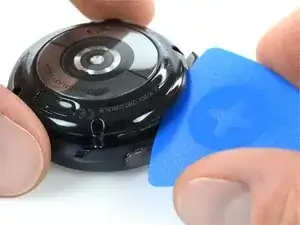
    • Usa una púa de apertura y colócala entre la tapa trasera de plástico y la carcasa de metal cerca de los botones.

    • Empuja la púa de apertura en el espacio para separar la tapa trasera de la carcasa.

    • No quites la tapa trasera del todo todavía. Hay un cable que lo conecta a la placa base.

    There is a glue-ish gasket keeping it closed. I used an exacto knife to start it opening.

    BRIAN MIRANDA -

    This was super helpful thank you! Perfect timing

    this is trash -

    Waarmee kan ik de achterste oplaadplaat weer vast lijmen op de achterste behuizing

    Ilona Smit -

  4. bpWZC4dQSQhyoeRG
    bpWZC4dQSQhyoeRG
    HBeHnBVjm3DQi5vK
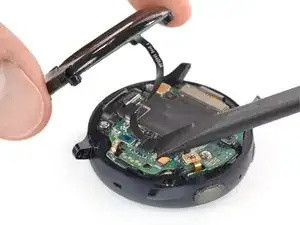
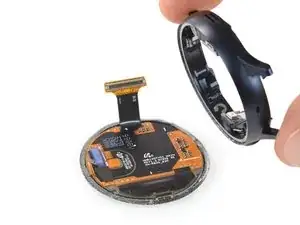
    • Levanta con cuidado la tapa trasera para acceder al conector del conjunto de sensores.

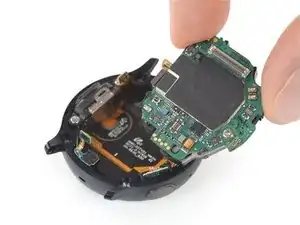
    • Usa un spudger para desconectar la matriz de sensores de la placa base.

    Ou je peu me procurer le tourne vis tri point 000

    grenierlulu -

  5. IgBIqAvjWTgdSyaX
    • Retira la tapa trasera.

  6. hLMRrQcln2F44EQC
    hLMRrQcln2F44EQC
    nO2YThO42whDToCV
    J1U56kAhiy32Q3hP
    • Utiliza un spudger para desconectar la pantalla y el altavoz

  7. ZyS3IXZroO6LiUpm
    ZyS3IXZroO6LiUpm
    vZEaGvB25hI1MnBW
    edFTAGtRlQHABfbw
    • Usa un spudger para desconectar el sensor barométrico, los botones y el micrófono.

  8. 4qX2lhcADWyrkPW6
    4qX2lhcADWyrkPW6
    Ti3ToIYjPAZSBcck
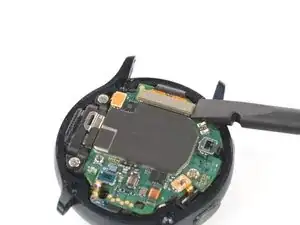
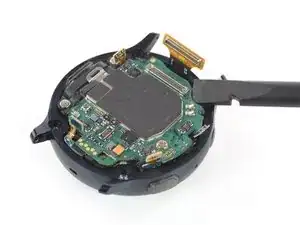
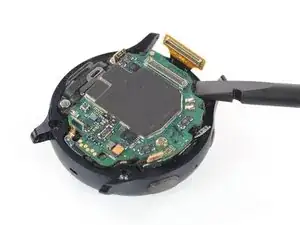
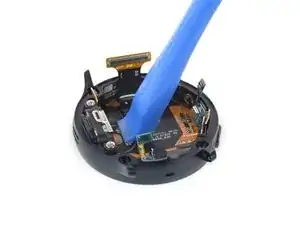
    • Coloca un spudger debajo de la placa base en la parte superior derecha al lado del conector de la pantalla.

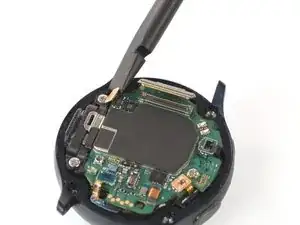
    • Gira ligeramente y haz palanca con el spudger para aflojar el conjunto central.

    • Puede que te ayude revisar también los comentarios debajo de esto y el siguiente paso si tienes dificultades.

    I would not suggest to do so. There are components underneath the motherboard as well. There are none in this specific corner, but the core assembly does not come out that easily and people might try other corners and positions. Rather unscrew the motherboard and remove the battery from the core assembly directly.

    Nicola Tambascia -

  9. yUc2Y4nQihhPqWvT
    yUc2Y4nQihhPqWvT
    QNKTxIJwKFhonAco
    sdqNalvtlsoNgOk3
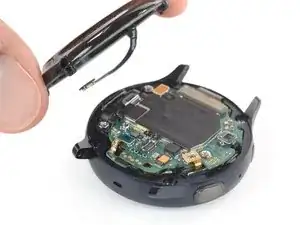
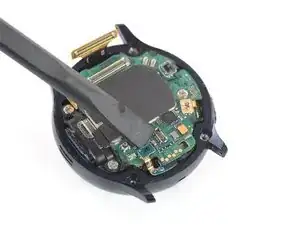
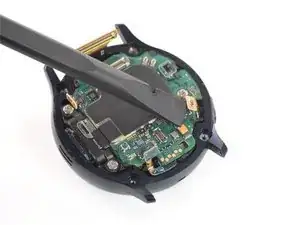
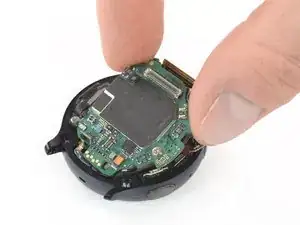
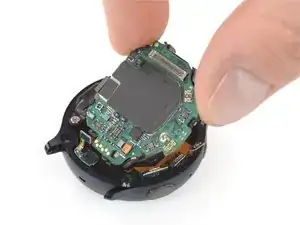
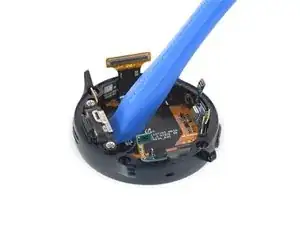
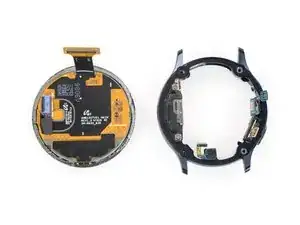
    • Toma el conjunto central y deslízalo con cuidado para sacarlo de debajo de los cables.

    • Retira el conjunto central

    I had to remove that screw on the core assembly using a Phillips 000. When I initially tried lifting, the core assembly started to bend. Mine also has a connector under the core assembly near the thumb in the picture. The connector goes from the underside of the core assembly to the screen/body. It prevents me from removing the core assembly as I'm not sure how it should be removed examining it

    Louis Finney -

    This step is really difficult, and I'm still not sure it was necessary. The core assembly is really packed in there, and it took me several attempts, lifting from various corners. Don't pull by the circuit board. It will bend if you're not careful. You've got to get under the core assembly. I had the most luck starting next to the display connector at the top, then moving to the sensor on the other end of the board (barometric sensor), then moving to the speakers on the left, and finally lifting from multiple points once it was out far enough. In really hoping I didn't damage anything.

    Karl Arp -

    I think the comments here should be added to the step before.

    Nicola Tambascia -

  10. iHZbVYpOq3nDEBAH
    iHZbVYpOq3nDEBAH
    RFpKRMagEIaOorgP
    1D1kHhL5QeSustKL
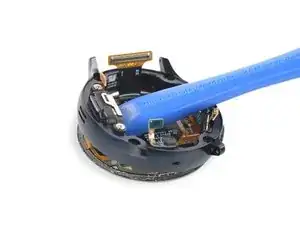
    • Coloca el borde de una herramienta de apertura debajo de la unidad de la bocina.

    • Mueve la herramienta de apertura hacia abajo para separar la pantalla del marco.

    This was super simple to do after putting a bit of heat to the screen first. the adhesive peeled right up. Just be careful not to put too much heat to it or you can damage the screen.

    Mick -

  11. XDCZyBDWS3IZuvUv
    XDCZyBDWS3IZuvUv
    jga2qysRqQJQV1Cd
    • Remueve el marco de la pantalla.

    • Asegura de remover cualquier resto de adhesivo con alcohol isopropilico (>90%) antes de aplicar el adhesivo o instalar la nueva pantalla.

    Bonjour, mon écran c'est d'écolé mais fonctionne toujours. Comment je peux le recoller ou avec quoi ?

    Yannick Babin -

Conclusión

Si es posible, enciende tu dispositivo y prueba tu reparación antes de instalar nuevo adhesivo y resellarlo.

Aplica nuevo adhesivo donde sea necesario después de limpiar las áreas relevantes con alcohol isopropilico (>90%). Puede que necesites remover protectores de adhesivo de tu nueva parte antes de la instalación.

Para re-ensamblar tu dispositivo, sigue estas instrucciones en orden inverso.

Lleva tus desechos electrónicos a un centro de reciclaje certificado.

¿La reparación no salió como planeado? Trata unas resoluciones de problemas básicos, o pregunta nuestra Comunidad de respuestas por ayuda.

Tobias Isakeit

Miembro Desde 31/03/14

108306 Reputación

14 comentarios

Does anyone know where to buy the replacement screen for Active 2? Or what keywords should I search for (SKU or model)?

Angelo Sembrano -

SM-R830 for the 40mm version, SM-R820 for the 44mm one. People on ebay resell them but they cost upwards of $100. I’d look into broken watches of the same type that maybe the battery is dead and they’re selling it for cheap, then do a swap job on the (hopefully) working screen.

Justin Collins -

Seconding the question on where to buy a replacement screen

Arjun Ramakrishnan -

You could be lucky on rounded.com

Tobias Isakeit -

What adhesive would be best to use?

Kelsey Crank -

This E600 adhesive could work for you if carefully applied not spilling it over the back of the display.

Tobias Isakeit -

I broke my 40mm Active1 screen, anyone know if I can put in a 40mm Watch 4 screen in and get the better resolution?

Kevin Vågen -

Is there a way to test the existing display? I made mistake of swimming in watch and it went into a continual reboot loop before it quit doing anything. I've got a replacement battery and installed it pretty easily but even when everything is put together except the back screws, nothing happened on the display when I put it on a known to be working charger. When I compare the appearance of the display connector and the slot on the motherboard to the pictures in the tutorial it looks like there is some corrosion or the likes there that I am working on removing with Deoxit DN5. But I am trying to sort out if the display itself is damaged or if the bit of corrosion there is keeping it from powering up. I have a voltmeter and the battery seems to be putting out the power that it should be.

ehcasey70 -

I just took mine apart due to water damage and it charges fully but no display. I also have some type of corrosion on the display connectors, so it sounds very similar.

Richard Welch -

ma montre ne charge plus, si le problème ne vient pas du socle il vient donc de la montre, si j'achète toute la coque arrière, la charge marchera t elle ?

Wiwi Bobo -

brilliant ! easy and nice to follow thank you

Tómas -

<h1>I DONT CARE LOL LLLLL STUPID WATCH APPLE WATCH BETTER</h1>

fref43wq -

Mi reloj se queda en reboot y no pasa de ahí, alguien sabe como repararlo?

Karen Granados -

I actually used a Tri-point Y0 screwdriver instead of the Y00 to remove the back screws. They both fit, but the Y00 was just too small to get a secure grip and started stripping one of the screws. After I switched to the Y0 I was able to remove the stripped screw and just continued to use that one without switching back.

D Contelmo -