Introducción
Solo prerrequisito
Herramientas
-
-
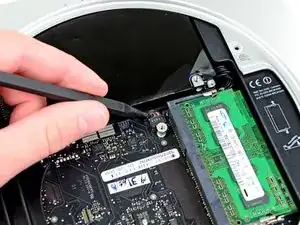
Usa la punta plana de un spudger para levantar el conector del disco duro de su zocalo en la placa lógica.
-
-
-
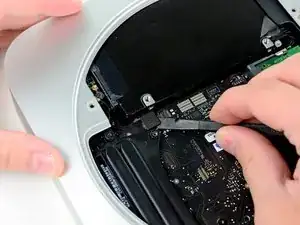
Usa la punta de un spudger para levantar el conector del sensor de infrarrojos y sacarlo de su zócalo en la placa lógica.
-
-
-
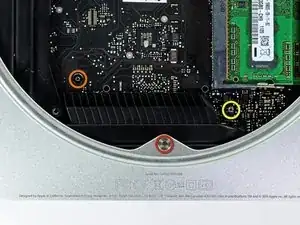
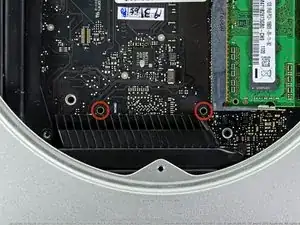
Remueve los siguientes tres tornillos:
-
Un tornillo Torx T8 de 5.0 mm o tornillo Hexagonal de 2.0 mm (los dos destornilladores funcionaran)
-
Un tornillo Torx T6 de 16.2 mm
-
Un tornillo Torx T6 separador de 26 mm
-
-
-
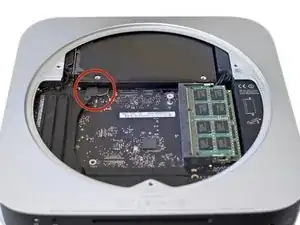
Inserta la Herramienta Removedora de Placa Lógica del Mac mini en los dos hoyos resaltados en rojo. Asegura que haga contacto con la parte superior de la carcasa exterior antes de proceder.
-
Cuidadosamente tira hacia la placa E/S. La placa lógica y el ensamble de la placa E/S debería deslizarse ligeramente de la carcasa exterior.
-
Remueve la Herramienta Removedora de Placa Lógica del Mac mini.
-
-
-
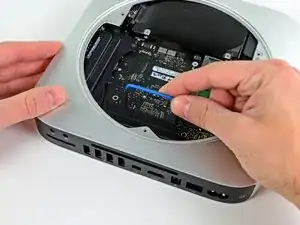
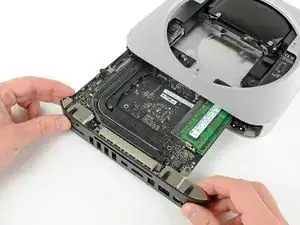
Extraiga el conjunto de la placa de E / S / placa lógica de la carcasa exterior lo suficiente para acceder al conector de alimentación.
-
Use sus dedos para desconectar el cable DC-In de la placa lógica.
-
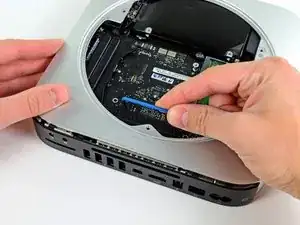
Tire del conector del cable de alimentación hacia el lado frontal del mini.
-
-
-
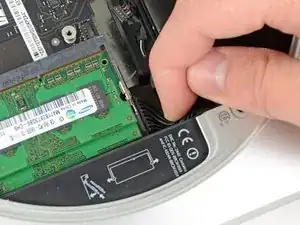
Cuidadosamente desliza el ensamble de la placa lógica afuera del mini, teniendo en cuenta algunas cable que pueda atascarse.
-


It may just be my own experience, but the hard drive connectors appear to be "sensitive" to ANY pressure, even when (re)connected properly. I found that I had to repeatedly re-seat them when re-installing the drive, AirPort antenna, and cowling. I would recommend holding off on putting the screws back for the AirPort antenna and cowling until both are in place, and re-checking the hard drive connectors before installing/tightening those screws.
UNSC Jon 117 -
Note the hard drive connector attaches to the outermost connector on the logic board. On my Mini it attached to the inner connector.
The cable I got in the Dual Drive kit was exactly the same as the one installed in my Mini. I had to fold it to shift it over to snap on the outer connector.
And, no, my hard drive wasn't where the picture shows it to be.
jpmist -
As UNSC Jon 117 says, these connectors are worryingly prone to pop off if there's any movement of the drives. Fortunately they're accessible even after refitting the antenna plate, so I would wait until then for a last-minute check. I've done this job three times now on the same Mac and everything has been fine.
Charles Butcher -
The server version of the MacMini 2011 has three extra two wire cables for temperature sensors: two on the drive directly under the antenna plate, one on the other drive.
The small connectors have to lifted up from the logic board just like the fan connector and the IR sensor connector.
Take care when transferring the sensors to a new drive because two of those three extremely tiny PC board need to be removed of the old drive and are glued in place.
ernstcline -
The "pop off" seems only to happen during reassembly if you press on the harddisk body. The harddisk at this time can be pressed in the direction of the underlying drive (in my case a SSD Drive) . Once the grid with the antenna has been attached (two red screws in step 8) this cannot happen any more.
John Doe 9th -