Introducción
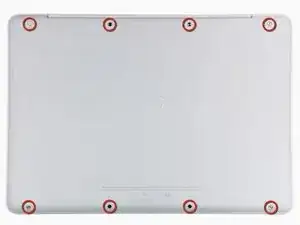
Cuando remplaces tu disco duro, deberas transferir los tornillos Torx del disco duro antiguo al nuevo.
-
-
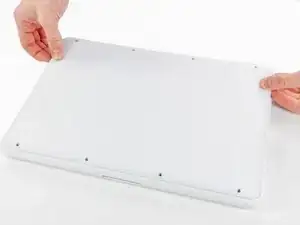
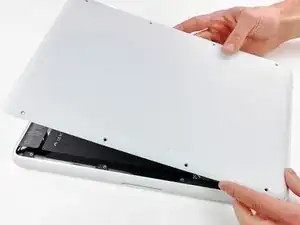
Levante ligeramente la tapa inferior cerca de la abertura de ventilación.
-
Continúa pasando los dedos entre la parte superior e inferior hasta que salgan los clips de retención.
-
-
-
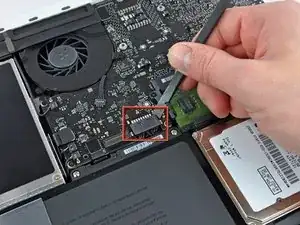
Usar la punta plana de una spudger para levantar el conector de la batería de su enchufe en la placa lógica.
-
-
-
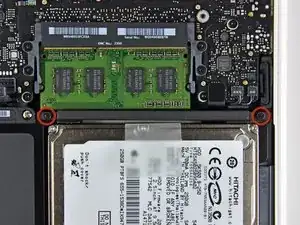
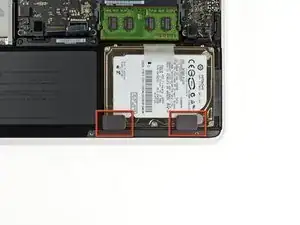
Remueve los dos tornillos Phillips de 11 mm sosteniendo el retenedor del disco duro a la carcasa superior.
-
-
-
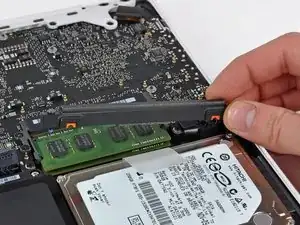
Levanta el retenedor hacia afuera de la carcasa superior.
-
Cuando pongas el retenedor devuelta después de remplazar el disco duro, es fácil de ponerla al revés. Si no esta asentada sin problemas, voltéala y prueba de nuevo.
-
-
-
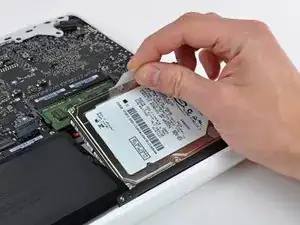
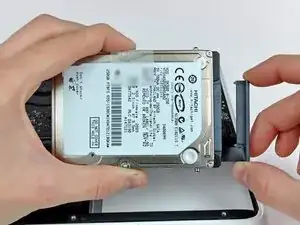
Levanta el disco duro por su lengüeta y tira de el lejos de la carcasa superior, recordando que el cable que lo sigue uniendo a la placa lógica.
-
-
-
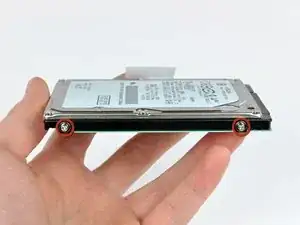
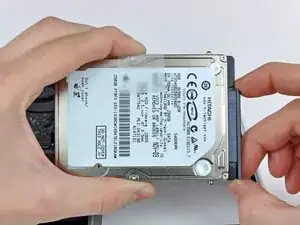
Remueve los dos tornillos Torx T6 de los dos lados del disco duro (cuatro tornillos en total).
-
Para re-ensamblar tu dispositivo, sigue estas instrucciones en orden inverso.

20 comentarios
awesome guide! This really made it so easy to figure out exactly what I was doing. The large, sharp pictures really made me feel confident that I was doing everything properly. Thanks!
dcmcnyy -
can i install an ssd instead of a normal hd?
Yes, absolutely. I switched mine out with a Kingston 120GB SSD.
According to this page http://support.apple.com/kb/HT1651?viewl..., the 8 screws are not identical.
Can anybody tell me where each kind of screw is supposed to go?
Gregoire -
They are all 100% Identical. You were probably looking at a different model, or Apple has entered the wrong information... Hey, It happens...
weeowey weeowey -
The screws on the Late 2009 are identical. The blue lock compound might make tightening some require a little more effort.
svenaustx -
Can I replace it with a SATA 3 cable?
nm -
A1342 macbook does not have the right controller to support sata III
weeowey weeowey -
hi, i just got back from the apple store and they are really keen for me to upgrade to a new laptop since my battery is old and the screen is cracked, so glad i found ifixit i would love to upgrade this puppy! gonna make it a real sleeper! styler hall wrote about sticking 16 gb of ram in his a 1342 ? is this a simply mather of ordering 3 4gb sticks ?aslo i currently have 4 gb and would like to upgrade to 8 ( or indeed 16) does that mean i need to buy all new sticks or can i continue to use the old one and stick a new one next to it ?
thanks again mick van aar, perth western aus.
michelvanaar -
The A1342 will take up to 16 GB of RAM, however, there are only two RAM slots, so use two 8-GB RAM modules. Other World Computing (OWC) is a great reference source for info on exactly which RAM to use with which model; prices are usually much better on EBay though. Add an SSD from OWC and your machine will really scream!
I hope that helps!
gdesbrisay -
Gregoire is right. The 8 screws are absolutely NOT identical, I’m looking at them right now, weeowey weeowey.
John Guzman -
I just wanted to say that, in 2020, i used these instructions to replace the magsafe socket on my A1286, mid-2012, pre-Retina MacBook Pro. The internal layout is not quite the same but close enough for me to do the job. I skipped the steps of fully disconnecting the fans and speakers because of what others had said about breaking the sockets. it just meant I had to be extremely careful when lifting up the main board so that I did not tear and break the connections. I was able to disconnect the old magsafe socket with the board flat and in situ, but there was no where near enough room to be able to aline and press home the new par home. Reluctantly i had to lever up the board. This was difficult as there is a tapped post that holds a screw in the way close to where the USB sockets are, that prevented the board lifting up and out. I had to be quite forceful to manouevre the sockets out from the edge of the case.
Paul Burridge -