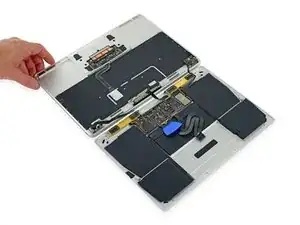
Introducción

Prerequisitos-solo guía para abrir la MacBook sin desconectar la carcasa inferior por completo.

  1. WTpjAPhBML2eX4Z1
    • Antes de continuar, desconecta y apaga tu Macbook. Cierra la pantalla y apoyalo en una superficie suave, con la parte superior hacia abajo.

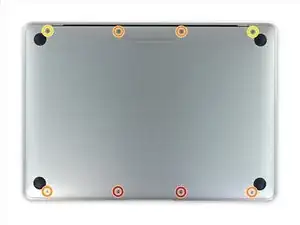
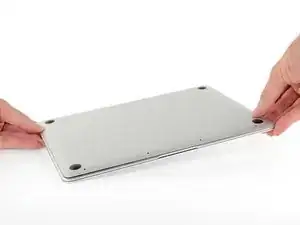
    • Retira los siguientes 8 tornillos que aseguran el carcasa inferior.

    • Dos 1.8 mm P5 tornillos pentalobulado

    • Cuatro 2.9 mm P5 tornillos pentalobulado

    • Dos 6.1 mm P5 tornillos pentalobulado

    • Nota la orientación de los tornillos mientras los retiras - ellos necesitaran reinstalarse con cierto ángulo.

    • Durante esta reparación, manten localizado cada tornillo y asegurate que va de vuelta exactamente en el mismo lugar de donde vino para evitar que se dañe el equipo.

    IMPORTANT. You’re not removing the bottom, yet. This step is solely to separate the panel from its clips, permitting inside access.

    Chris Leeds -

    The screws go in tangent to the curve of the case. If you aren’t used to handling small hardware try turning the screw counterclockwise while you feel for the hole until you feel it drop, that means the threads have aligned. It takes only light finger torque when they are threaded correctly

    abscate -

  2. oFRbloAsCqR4kMZO
    oFRbloAsCqR4kMZO
    o5lecdLOaMSsveUP
    OjOkolyUJbLFruoW
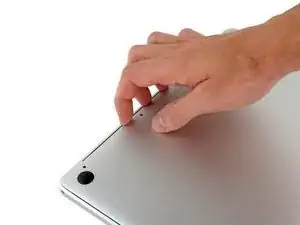
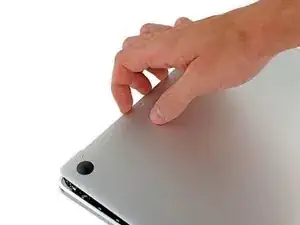
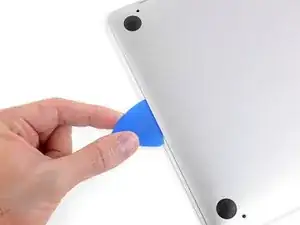
    • Usa tus dedos como palancas entre la carcasa superior e inferior, empezando por la parte de atrás de la MacBook entre las bisagras.

    • Levanta la carcasa inferior un poco nada más para evitar dañar los cables que conectar la carcasa inferior con la superior.

    • Manten un agarre firme, levanta con firmeza hasta que la carcasa inferior se separe levemente de la carcasa superior

    • Puedes experimentar mucha resistencia cuando levante la carcasa inferior. Si es necesario, desliza una púa de apertura o cualquier otra herramienta libre de ESD por los bordes de la carcasa inferior para liberar los 2 clips escondidos

    • Durante el reensamblaje, intenta re-enganchar los clips, presiona firmemente cerca de cada borde de cada lado de la carcasa inferior, (cerca de donde se inserta la púa en la tercera imágen) hasta que escuches los clips encajar en su lugar.

  3. v2ajYWLVaPyfdKBp
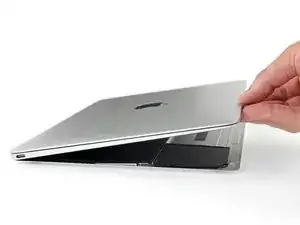
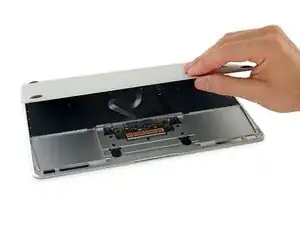
    • Mientras mantienes la carcasa inferior en su lugar, con cuidado voltea la MacBook para que el logo de Apple quede arriba.

  4. pYEJCQSeMGAEyFJM
    pYEJCQSeMGAEyFJM
    VjPKdFrhi2OEvgks
    • Levanta la carcasa superior y la pantalla juntos desde el borde frontal y levanta a unos 45˚ grados aproximadamente.

    • Puede ayudarte apoyar la MacBook abierta en esta posición para el siguiente paso.

    This displays two black pics to prop up the MacBook, but the kit only includes one black pic.

    Kyle Swafford -

  5. EXWTgtXS2vPBhGKP
    EXWTgtXS2vPBhGKP
    1JKIDRDVVFDBjMCr
    rUDUCKRgWBKStQAM
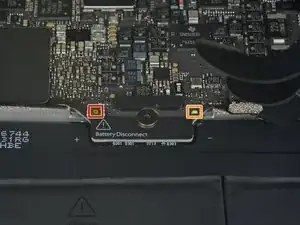
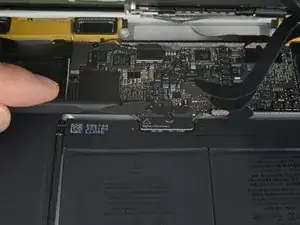
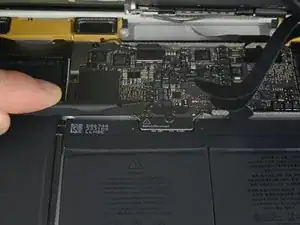
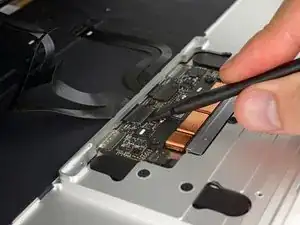
    • Usa la parte plana de la spudger para presionar y mantener el pequeño botón dorado 'desconectar batería'.

    • Si el LED de poder está encendido, continua presionando el botón hasta que el LED se apague por completo, y luego suelta el botón. Esto puede tomar unos 10 segundos.

    • Si el LED no se ilumina, suelta el botón después de 5 a 10 segundos. Presiona y mantén otra vez por 5 a 10 segundos, luego sueltas. Finalmente, presiona y mantén por tercera vez de 5 a 10 segundos, y suelta.

    • Este paso asegura que la MacBook está totalmente apagada y es seguro trabajar en ella.

    cannot turn on the led after replacing the new screen, even after following the turn on instructions upper…

    Laurent Pierre -

    on reassembly, I had to plug my laptop in to reactivate the LED light

    aaron_vandyke2003 -

    Does anyone know how to turn it back on..? I plugged the laptop in and saw the LED Light, but it won’t turn on

    mmcsorley -

    After reassembly I could not restart my MacBook using the power button or after SMC reset (shift-ctrl-option-pwr). I had to connect my MacBook to its charging cable to get the battery LED to re-illuminate. After that it was all normal.

    Richard Lovatt -

    It took a few minutes on the power adapter for my computer to turn on after it was reassembled.

    Luk Chl -

    mine doesnt turn on w anything, i forgot to click the buton to disconnect :_/

    cristian.campuzano -

    Same issue as above peeps. Followed ifixit directions verbatim and wasn't getting anything after screwing everything back in. Plugged in original 45W power block and waited, after few minutes battery LED came on and a min. or two after that, was able to get screen to turn on. Hope this helps somebody else.

    Brandon Elliott -

    May I ask how to get screen to turn on. I cannot get it work..

    Xiubo Zhang -

    For those whose Mac won't turn on.

    See step 16

    To reconnect this cable, first line up the metal bracket over the screw holes, then "PRESS DOWN" on the middle of the bracket.

    There is a connector under the bracket, which you can't see if you don't see under.

    Not having it in mind, you will not PRESS DOWN the middle of the bracket and there is no connect.

    hls2005 -

    There needs to be mention of procedure for getting the repaired MacBook to power up again after the repair is completed.

    I also am running into the issue described by others. MB will not come on again, even after being plugged into power and performing an SMC reset.

    Kinda stuck….

    Carlos Perez -

    Hi, I tried everything and my MacBook will not start up after replacing the bottom case with a battery installed. I decided to put back on the old case with the battery that needs servicing and it still will not power on. I am fairly experienced taking apart laptops I was an Apple service tech for 15 years. this has me baffalled. Any hints BTY the logic board does not show any power coming from the AC charger the power LED is not lit up

    eestern -

    I had trouble with this as well. What worked for me is to plug in power using the stock 29W USB C power brick that originally came with this Macbook. Trying other, lower powered, power adapters did not work. Use this advice with caution as there are multiple (i.e substantiated) comments that indicate that first power up should only be with a 5W adapter! So perhaps try this strict sequence: try with a 5W adapter, then and only then try with the 29W adapter. Or even slightly better, if everything else has completely failed, only then try full power 29W adapter.

    LexxOne -

    How long did you wait to get it power back on? I replaced my logic board and tried to connect the power charger but it doesnt still turn on.

    Herb -

    The easiest error to make when working on this motherboard if applying full voltage after re-assembly. According to the big A, the motherboard on these Macbooks need to be “woken up” with a 5 watt (phone size) charger. Applying the normal 29 watts may render your system unusable.

    Noah - Feb 18, 2021

    Hello Noah,

    It seems your remark is only valid for the 2015 and not the 2016 edition.

    David - Mar 3, 2021

    While it’s true that the internal documentation specifies this for a 2015, after frying 2 motherboards with a normal charger, I spoke with the engineers and they told me that this also applies to 2016 and 2017 macbook main logic boards. I say- It can’t hurt to try to wake them up with a 5 watt charger first! Please take 5 minutes to save your motherboard.

    Noah - Mar 4, 2021

    Noah -

    I plugged in my charger and the LED came on. The computer gets warm but the screen is not turning on. The keyboards doesn’t seem to respond to recovery options. Any suggestions?

    J'Trel Sapp -

    Hello in muy case the power LED does not go dark (off) . Holding more than 10 sec and nothing. Somebody?

    Flavio -

    The led light doesn’t turn off on mine either. Held for 10 sec 3 times and still on. How do I turn it off now? And will it damage the computer if I work on it with the light on?

    sfalba -

    Also, which way should the track pad flex cable face when reinstalling it?

    sfalba -

  6. 1xlLw6pjiuElshkZ
    • Cierra la MacBook y cuidadosamente voltéala boca abajo.

  7. 2GYsPBbAwkEqs2xq
    • Levanta desde el borde delantero, abre la carcasa a un ángulo de 45° aproximadamente.

    • Ten cuidado en no dañar lo cables de cinta que siguen conectados a la carcasa inferior de la MacBook.

  8. lGBQcICtFaslxUHu
    lGBQcICtFaslxUHu
    uhunJJRpxlkLAvhl
    • Usa las pinzas para quitar la cinta que cubre el cable del trackpad con conector ZIF.

    Where can I find a replacement cable?

    John Comix -

    Just worked on one that was missing the tape from the factory, so yours may not have it either.

    maccentric -

    that cable got damaged, and now my macbook won't turn on anymore. Does this cable prevent the macbook from working?

    ITZ CRONOMO -

  9. iImRKXAcEWwgyePw
    iImRKXAcEWwgyePw
    b3YwfdgUUlOCsXSy
    LMjS3bqlbWDB4ieE
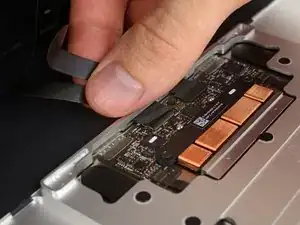
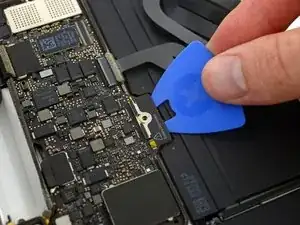
    • Usa el spudger para levantar cuidadosamente la solapa en el cable del trackpad con conector ZIF.

    The small retainer flips up about 90 degrees from locked position

    abscate -

    The keyboard and trackpad don't work after the repair, what can I do? They don't even show up in System Report.

    bredelet -

    I found that the connector was not pushed enough in. Works now.

    bredelet -

  10. WeOX4JZDcQrqklNd
    WeOX4JZDcQrqklNd
    qtXyAcpgiAVCBmVC
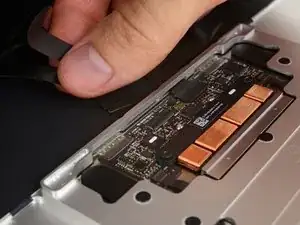
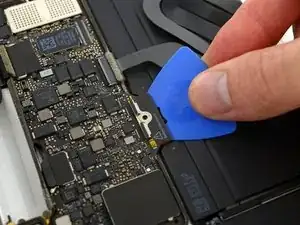
    • Desconecta el cable plano del trackpad tirando levemente a través de la ranura de la estructura.

  11. CDaHMX5h1aFsjtL2
    CDaHMX5h1aFsjtL2
    iLYAVQ2N3yLQFkvC
    XbPR6F5Pfwam2NkO
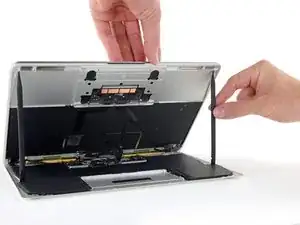
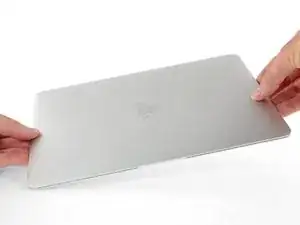
    • Con cuidado cierra la MacBook y voltea una vez más, para que el logo de Apple quede arriba.

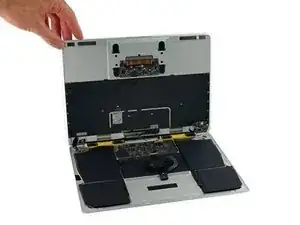
    • Levantando desde el borde delantero, eleva la carcasa superior/pantalla a unos 90° grados de ángulo, y apóyalo contra algo rígido para que no tengas qué sostenerlo.

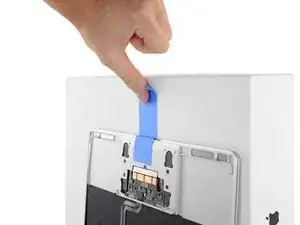
    • Agrega una pieza de cinta cerca del trackpad para asegurar la carcasa superior y prevenir movimiento accidentales.

    • Es posible abrir la MacBook por completo con lo dos lado acostado planos, pero esto puede dañar los cables flex y no es recomendable.

  12. KhNCZTtfaGxFvwMu
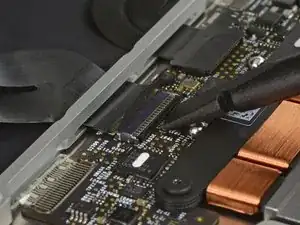
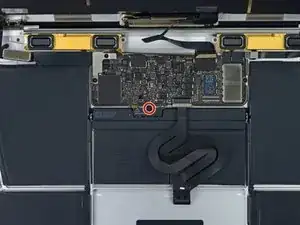
    • Quita el único tornillo de 2.9 mm T5 Torx asegurando el conector de la batería de la tarjeta lógica.

    From my experience it’s important to carefully press and hold the small button above left of the Battery Discharge label. Use a plastic spudger or finger tip. The illuminated yellow LED to the right will go off. I believe this discharges remaining electricity from logic board protecting it during repair.

    * I cannot find any documentation to support this, but I have damaged boards by not including this step.

    Chris Leeds -

    I don't know what guide your on, but step 6 of the guide to replacing the USB-C cable has you press this button (3 times even).

    maccentric -

    What is with the all plastic end of this cable that appears to just be glued right on top of its connector?

    Does the new one just stick back right on top?

    (In this photo it is the bottom side of the cable below the white water indicator sticker)

    Elizabeth Erkelens -

  13. pTJmavEfBv2DXgVU
    pTJmavEfBv2DXgVU
    VUebfHZqvKTpapBB
    • Como una precaución adicional, puedes desconectar físicamente la batería insertando la púa aisladora de batería entre la tarjeta lógica y el conector de la batería.

    What happen if you don’t disconnect the battery? I didn’t and I saw smoke coming out when I connected the pad flex cable and the computer still started up

    DSANTIAGOSOY -

    If you don’t disconnect the battery you might accidentally short something on the logic board since power is still running through everything while you’re working on it. You can complete the repair without disconnecting the battery, but you risk accidentally breaking your logic board. It’s much safer to keep the battery disconnected while you’re working.

    Adam O'Camb -

Conclusión

Para rearmar tu dispositivo, sigue éstas instrucciones en reverso.

Adam O'Camb

Miembro Desde 11/04/15

179519 Reputación

0 comentarios