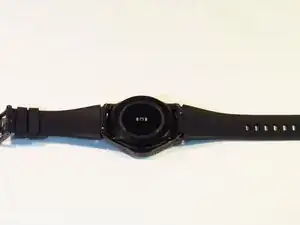
Introducción

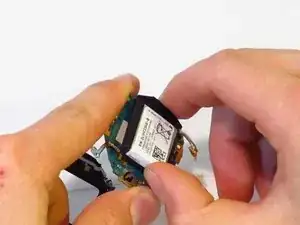
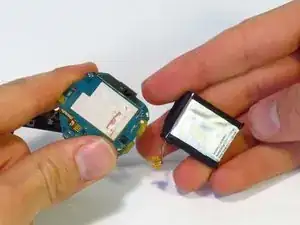
Si tu batería está muerta, dañada o simplemente se agota muy deprisa utiliza esta guía para cambiarla. Se cuidadoso de no dañar el cable plano o de pinchar la batería.

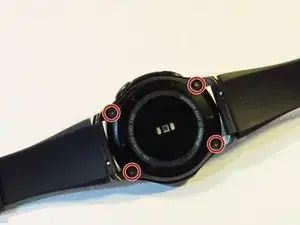
ADVERTENCIA: Seguir esta guía dañará el sello impermeable de su reloj.

NOTA: Desde 2018, ha habido un problema bien conocido con el alto consumo de la batería en algunos dispositivos Gear S3 (https://us.community.samsung.com/t5/Gear...) y seguir esta guía para remplazar su batería "puede no" resolver el problema. Es recomendable que los dueños de un S3 intenten arreglar el software (dejar el dispositivo apagado durante días, realizar actualizaciones, desinstalar aplicaciones, cargar completamente mientras está encendido/apagado, etc.) antes de intentar el remplazo de la batería.

  1. dkjcaDiNdnHRlBNK
    • Coloca el reloj al revés, de forma que puedas ver la tapa trasera.

  2. GGkylvHNgSn44Pgd
    GGkylvHNgSn44Pgd
    UnZkByNqSWRHiYTW
    • Desatornilla los cuatro tornillos de 4.2 milímetros con un destornillador Y00.

    Y0 passte bei mir deutlich besser als Y00

    Alex Fi -

    Did you use iFixit tools? I just checked and I believe Y00 is correct. Y0 slips too easily. My test was with the Y bits from the Pro Tech Toolkit.

    Nicholas Dudde -

    I too had to use an Y0 screwdriver (from Ifixit 64 bit driver kit....). Y00 just don't grip, may be some batches of the watch used different screws??

    regislefeuvre -

    One screw just doesn't want to move, any suggestions/tips how to remove it?

    Slartibartfast -

    Problem solved: after 2 times of careful WD40 application and blunting the Y00 a bit it came of with a lot of patience.

    Slartibartfast -

    I also had a problem with one of the screws and flipping to Y0 worked for that one.

    Jeff Lambert -

    Yo use Y 0.6 y anduvo perfecto!!

    Gustavo Zarate -

    Yo use Y 0.6 y anduvo perfecto!!!

    Gustavo Zarate -

    The tool kit that came with my battery was a Y1.5 and worked perfectly

    jnewsom22 -

  3. SoEQC43VSGULT5ZW
    SoEQC43VSGULT5ZW
    HQQY6ay24yOxZFJc
    mKVCBwkWvxLUNqoj
    • Este paso dañará el sellado a prueba de agua del reloj.

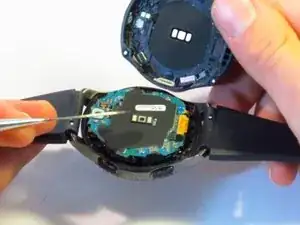
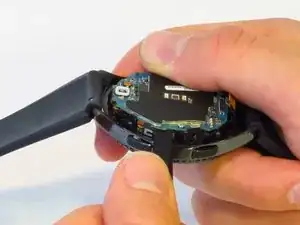
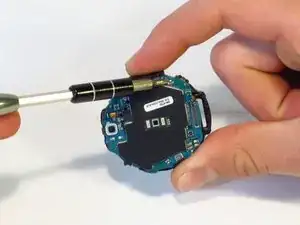
    • Introduce el spudger metálico entre la tapa trasera del reloj y el marco, realiza esto por toda la tapa trasera.

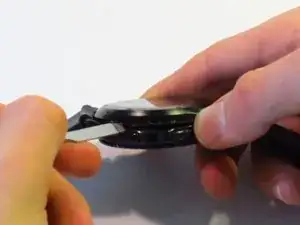
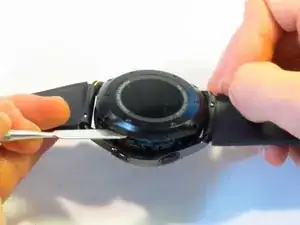
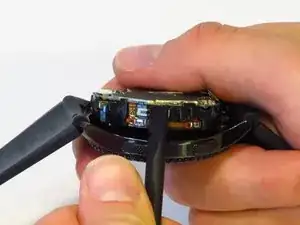
    • Haz fuerza para hacer palanca y separar la tapa trasera del marco del reloj.

    • Este paso requiere mucha fuerza. Puedes utilizar un Jimmy en vez de el spudger metálico para hacerlo de forma más sencilla.

    Il est plus facile et moins domageable pour le joint de commencer par ouvrir le cache de connexion situé à coté de l’axe du bracelet long. On peut alors glisser la broche sans détériorer le joint, qui est plus éloigné du bord à cet endroit.

    Yann Richet -

    I’m pretty sure the seal is equally far away from the edge on all sides.

    Nicholas Dudde -

    This was the hardest part. I did use thin flat head screw to dismantle it. Using the metal spudger felt like impossible due to its thickness.

    Mariusz -

    Did using the screwdriver damage the case in any way? I’d recommend being careful using a tool with smaller surface area as that will apply more pressure at the point of entry. As the guide states, a Jimmy may also be used instead of the spudger.

    Nicholas Dudde -

    Anyone know where to buy the replacement gasket after breaking the seal between back cover and watch? Thanks.

    Jyon -

    Not sure if it's a gasket or some sort of sealant paste/gel. Just took my case off, and the gasket seems intact (fused to back cover of the watch. Quick search for waterproof sealant yielded lots of possibilities - don't know which one to choose. Can anyone with experience provide advice?

    Alan Lawee -

    Ma questa guarnizione impermeabile si puo sostituire ? Come controllare se si è danneggiata? Come evitare che entri acqua dopo averlo aperto ?

    ant.beneduce -

    La photo montre une ouverture coté bouton mais pire coté car l'ouverture abime quand même le couvercle en plastique sur la face la plus visible : essayer plutôt sur les autres cotés

    stoufbook -

  4. P4yRmQMdEi3qS5ll
    P4yRmQMdEi3qS5ll
    DUqw1YGV3hdissjv
    u5YIEsZxZBKXmKyV
    • Desconecta los tres conectores de la placa madre utilizando tus uñas.

    • Estos conectores se desconectan fácil, se requiere un mínimo de fuerza.

  5. hkprJoZEkEp12nS6
    hkprJoZEkEp12nS6
    EFKCNYDYZ1gxf44i
    gSdIOCiEwy1UVTD2
    • Separa la placa madre y la pantalla frontal utilizando un spudger.

    Oui tuto bien clair. Opération réussi !

    Bien qu’adroit de mes mains, et après avoir découvert la “bête à coeur ouvert”, je ne sais pas si je me serais lancé... C’est tout l’interêt de ce Tuto qui invite à le faire (car pas trop de détails), et qui suivit pas à pas permet de s’en sortir. Bravo

    Merci Dan.S

    Dan.S -

    Better replace the 2 bolts from next step first.

    Gabriel Pinho -

    The guide has you remove the screws second because it makes it possible to remove the whole assembly without snapping any cables.

    Nicholas Dudde -

  6. wSKBt1qxRfSYoeCe
    wSKBt1qxRfSYoeCe
    x4uTpqCCSnAtinmu
    • Utilizando un destornillador JIS #00, desatornilla los dos tornillos de 4.5mm.

  7. PpMifwcx6bmXKIlE
    PpMifwcx6bmXKIlE
    xCXNjPtktKVv4F52
    vkiyIMERMrkBV4PS
    • Desconecta el cable plano de la batería del conector.

    • Ten cuidado con el cable plano de la batería y el cable de la placa base (localizado en el lado opuesto al cable de la batería, destacado con la caja naranja), ya que son muy fáciles de romper (el nuestro se rompió al desmontar).

    • Observa como el final del cable plano encaja en el chasis de plástico. Busca el pin en el chasis cuando lo vuelvas a colocar durante el remontaje.

    • Separa el chasis de la placa base.

    What happens if the battery ribbons breaks?

    sarah rus -

    Hi the ribbon has come away from the mother board. How do I stick it back on? What type of adhesive do I use?

    Peter Alderson -

    I broke my ribbon :( ordering a new one. How do I stick it on?

    Justin Lalonde -

    I also broke the ribbon for the motherboard. What adhesive should I use to reattach it

    danieljchoe -

    I'd like to know too please

    Justin Lalonde -

    Be very careful with a ribbon that cannot come off on the opposite side of the red box on the motherboard when preforming this step. I found this and managed to avoid it.

    Andrew Watson -

    You should first detach/separate the buttons ribbon cable from the side of the plastic casing so you don't tear/break it accidentally. (orange box, the cable is soldered onto the motherboard cannot detach it from there)

    István Szikra -

  8. LVnu5n2A26CqULu3
    LVnu5n2A26CqULu3
    OroFXIQEYGMdZIhE
    • Separa la batería de la placa madre.

    • Si la batería y la placa madre están aseguradas con pegamento, requerirás algo de fuerza para separarlas.

    • Las baterías de ión de litio son potencialmente peligrosas. Ten cuidado al manipularlas y no las perfores.

    I just used this guide to do a replacement, the watch works perfect now. Pay attention to whats in your hand vs whats on the guide a couple of the steps are not as straightforward just take your time. Overall good guide though.

    Michael Carlson -

    Replaced the battery successfully with this guide. Take your time to carefully see whats on the watch compared to the guide.

    I removed the battery ribbon cable in step 7 by using a really small flat screwdriver to lift the cable from the housing. It's attached with adhesive tape.

    Eric Mulder -

    Perfect. I just remove the two bolts form step 6. Battery was a little difficult to remove due to a tape that attached it on board.

    Works very well.

    Gabriel Pinho -

    It took an extra tool that isn’t mentioned (very small, thin, straight screw driver), but it took only 20 minutes! Great step by step instructions!

    Walker -

    J'ai suivi tout le processus, au final la montre charge mais ne s'allume plus.

    liotard -

  9. qGEg4qwSrPqsvCjC
    qGEg4qwSrPqsvCjC
    GhBZnfuCCq5knoOD
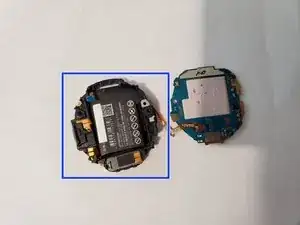
    • Cuando estes re-ensamblando, coloca la batería en el ensamble de plástico primero. No la pegues al adhesivo primero. De esta manera, es fácil de posicionar el cable de la batería.

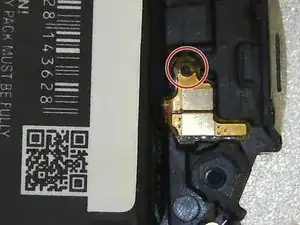
    • Cuando asegures el cable de la batería, asegura que el agujero que atraviesa la clavija es circular. El agujero en el cable de tu bateria de remplazo podría ser malformado. Puede que quieras agrandar el agujero antes de asegurar el cable.

    • Para agrandar el agujero, utiliza la herramienta par la SIM del Pro Tech Toolkit, un clip pequeño o una herramienta con punta fina. La herramienta igual puede ser usada para presionar gentilmente el cable de la bateria en la posición correcta. Has esto cuidadosamente para evitar daños

    • Siga las pasos 8-1 en orden inverso para el re-ensamble

    Notez que la montre ne redémarre pas tant que le boitier n’est pas fermé.

    Yann Richet -

    Formidable demande de l'attention et de la délicatesse a solvé ma montre Frontière.

    Bravo et merci de partager.

    Alain ESCAFFRE chateauneuf le rouge FRANCE

    ESCAFFRE -

Conclusión

Para volver a montar tu reloj, sigue estas instrucciones de forma inversa, desde el final hacia el principio.

William Hurty

Miembro Desde 08/10/18

2481 Reputación

44 comentarios

Is there a way to reseal the watch making it water proof?

David R -

If the seal was damaged during opening the backcover, unfortunately you need a new backcover, cause the seal is integrated in the case.

Frank Mauderer -

where to buy the battery?

popoypoi22 -

https://www.amazon.com/Tesurty-Replaceme...

I bought mine from Amazon. Just replaced the battery after all the tool kit came in. It works like brand new!

Jae Shim -

is there a kit somewhere for the battery/new seal

Adam Seidlitz -

If the seal was damaged during opening the backcover, unfortunately you need a new backcover, cause the seal is integrated in the case.

I bought mine here:

Battery: https://www.schreiber-electronics.de/sam...

Backcover with integrated seal: https://www.schreiber-electronics.de/sam...

Frank Mauderer -

The battery is part number EB-BR760ABE (as seen on picture in step 8). You can find it on Amazon and eBay.

did4 -

Most difficult part is getting that battery connector back in place. Otherwise, it’s a simple process. Just make sure to be careful with the connectors if you’re not used to playing with them.

hawleyst -

this guide is really well done my device works perfectly fine now and was super easy also I believe that there is a gasket and so you don't think have to buy a sealer

Landre Farrell -

i made the mistake of pulling the board too hard…The flex cable didnt break but it came lose from the board. Is there anyway to glue it back?

Kelvin Ventura -

You ever figure this out? Thanks

Honest News Network -

If you do not put the spudger in so deep as to damage the seal you do not need to replace it. Also, you do not need to remove the whole internals to replace the battery, if you disconnect the battery cable after removing the two #00 philips the battery and circuit board pivot open. Here is someone doing this same repair as I describe.

Brent Quick -

The battery in the photo shows the S/N but if your original battery # is Eb-br760, Eb-br760abe then you can find it at www.canadianbatteries.com

https://www.canadianbatteries.com/batter...

Dan Clark -

I need Gear s3 battery

Asmat khan -

I replaced the battery but when I put it on the charger it started flashing red, I read somewhere it means its unable to charge, any advice?

baculpojl -

Screwdriver didn't fix where can I find a 2mm screwdriver?

bowieinc -

I'm using the 64-bit driver kit from ifixit. The Y00 tri-tip bit doesn't grab the screw heads on the back of the watch casing. Is there another bit or driver kit that works better for this application? Note: I've tried the bits Y000 and Y0 and the pitch still doesn't grab properly.

Paxton Powers -

Can the Battery of the Galaxy Watch be used for the Gear S3?

Dzoni Filipovic -

After following these steps, the battery was replaced. The watch charges and reaches 100%, screen shows the percentage, but the watch will not power on. No cables were torn. Would you know what went wrong?

Jerry Castillo -

Mines doing the same thing. Did you ever figure it out. I went back in and made sure everything attached. Shows charged to 100% but won’t power on

Misty scheuerman -

I am also struggling with this. Power button no longer works after replacing battery.

Justin Lalonde -

Replaced battery but still only getting 24 hours (same as battery I replaced). Does it get better over time ?

Thanks in advance

Michael Humble -

I replaced my battery a few days ago, and it lasts (Theorically) about a one day and 22 hours, but it depends on how you use it. So I’m afraid that it won’t get better after a little time.

Anyway, Samsung website says this: “With the Gear S3, you can go for up to four days before putting it down for a charge. Its battery lasts that long.

*Battery life may vary depending on usage and settings.”

I don’t use it with the maximum performance and I still not getting those 4 days. If it changes for you, let us know!

I hope it gets better.

MemoryOverflow -

So I just replaced my battery in my S3 and so far is working just find. Charge is going up no issues so far.

Ricky's Journey -

What can i do if the ribbon cable in the corner becomes unattached? Is there a way to reattach? Thanks

Honest News Network -

I want authorized dealer to replace battery of my S3 gear watch and charge for job and battery at Jaipur

mr.omprakashsharma2006 -

Buon giorno, la batteria sono riuscito a cambiarla, nel riassemblaggio la batteria si carica ma nn si accende l l'orologio, ho provato a rismontarlo, ma a vedere così sembra tutto a posto, nn capisco cosa possa essere

Fabio DALL AGLIO -

Bonjour

après changement de ma batterie, à montre fonctionne en rechargement sur sa base mais l’écran reste éteind dès que je la prend en main..

y a t il quelque chose à faire?

nicomorizot -

Mine updated, and after updated the next time i charged it got hot…i noticed after this it would not accept charge anymore. Charger would just red blinking light after a few seconds. it took a few days and finally died for good, tried a friends charger but no good…I tried everything to make sure it wasn’t software…I think these watch batteries brick immediately if they ever get hot so that they won’t explode…I just wonder if replacing the battery would fix this for me?

RIPing PUMA -

I think samsung is a good company but at the time many other people complained of the same thing that after the update came battery problems…I wonder if samsung didnt test the update thoroughly enough and unintentionally destroyed a lot of watches?

RIPing PUMA -

this was a several months ago

RIPing PUMA -

Need help, I have a Galaxy Gear S3 Frontier model SM-765A. Been having problems with battery drain. I replaced the battery with a compatible EB-BR760ABE battery. Now when I charge it it the display reads (Can't Charge, Battery Needs To Warm Up). I have left it on for hours, still gives me the same result. Any suggestions.

Sal -

Mille Merci pour cette explication.

En moins de 10mn terminé ??

Bravoooo très bien expliqué

Greg neo -

I pulled out the mother board but the ribbon can off. Can it be placed back on?

Cantwell -

i changed the battery.  I fully charged it but it won't turn on

enver anursal -

I have the same issue

Justin Lalonde -

I replaced my battery but it will not turn on now. It charges but will not power on any suggestions?

Joseph Hill -

Same here. Watch won't power on after replacing and charging the new battery. It's like the power button no longer works

Justin Lalonde -

Samsung should be ashamed of the lack of support of this watch.

Allen Martin -

Hello all, i have a problem, 2 of the back cover screws cant be removed, is there a way to resolv this problem ?

Härūmi Stûdïõ -

Excellent tutorial, well done, requires patience, some time and some electronics knowledge, but it was SO helpful for me, and made the job less stressful and I knew it was done correctly, many thanks, Laurie - South Australia

Laurie Day -

I broke the motherboard cableI broke the motherboard cable😭.

Can anyone help me with this?Can anyone help me with this?

majed s -

done! thanks a lot!

vldulloog -

After replacing my battery, I also noticed that my watch was much more responsive, before it had a noticable sluggishness and low framerate. Now it is much more snappy. I'm curious if Samsung made the watches throttle back to preserve the aging battery. Has anyone else noticed this?

John Hinton -