Introducción

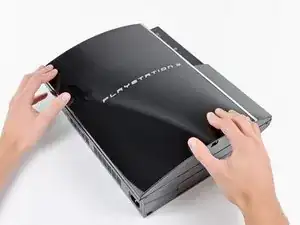
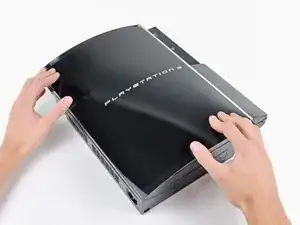
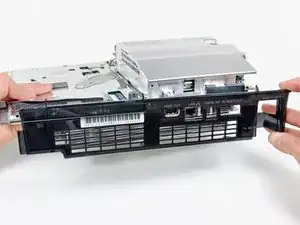
Utiliza esta guía para cambiar la placa madre rota de tu PlayStation 3. Para cambiar la placa madre necesitarás quitar prácticamente todos los componentes de tu PS3.

  1. XC4PojAakGaJAFNl
    XC4PojAakGaJAFNl
    w6MZgkkapHlYZyjY
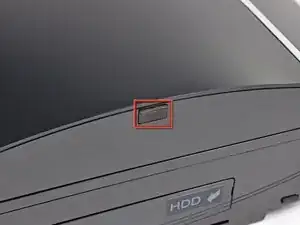
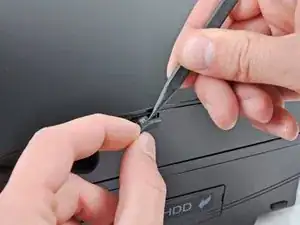
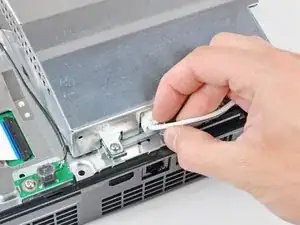
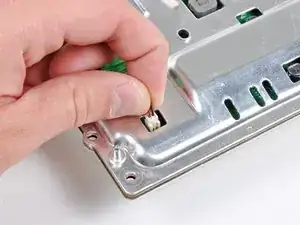
    • Utiliza la punta de una espátula para quitar la pata de goma negra que esconde un tornillo, esta se encuentras en el lado de tu PS3.

    • La pata de goma puede estar debajo de una pegatina de garantía. Si la despegas, esta mostrará "VOID" después de quitarla. (Lo que anulará la garantía).

    Fake repair. Real fault: How to Delid and fix the Yellow Light of Death for good (NEC TOKIN Replacement) https://gbatemp.net/threads/how-to-delid...

    Player -

  2. oshv21lAV45JYI3H
    • Quita el tornillo de 8.5mm T10 Tor de seguridad de la smart plate.

    How to Delid and fix the Yellow Light of Death for good (NEC TOKIN Replacement) https://gbatemp.net/threads/how-to-delid...

    Player -

    I need a tork screw bracket / holder A/E/B/E01- MG and security torx screw for a CECH-AO1 do u guys sell these?

    vuhx -

  3. vT35crSssXRtUiCa
    vT35crSssXRtUiCa
    Hq6BfirJtZsLRxlL
    1HexXRWUkCZGc3fT
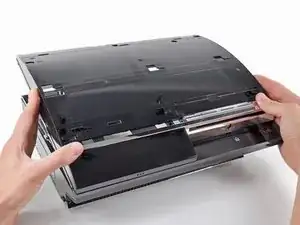
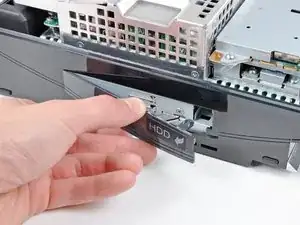
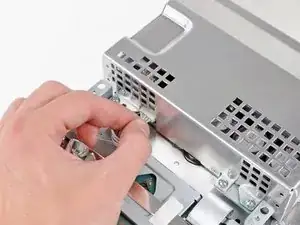
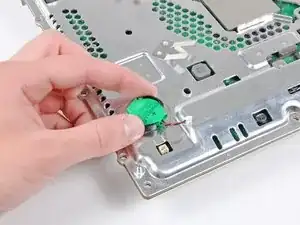
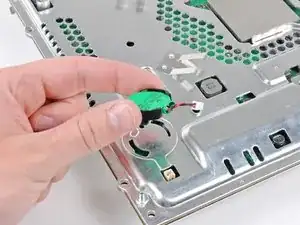
    • Tira de la smart plate hacia la bahía del disco duro, después levántala del cuerpo de la PS3.

    How to Delid and fix the Yellow Light of Death for good (NEC TOKIN Replacement) https://gbatemp.net/threads/how-to-delid...

    Player -

  4. bGm1uV3D5RH6tHdi
    • Asegúrate de no perder de vista el raíl metálico en caso de que esté equipado en la carcasa superior.

    That small metal bracket/socket set up looks completely different in the ps3 I'm working on. Model: CECHK01.

    Any suggestions?

    Marcus -

    different in mine too, Model: CECHP01

    Link Adrian -

    mine does not have one at all

    ian.downard01 -

    1How to Delid and fix the Yellow Light of Death for good (NEC TOKIN Replacement) https://gbatemp.net/threads/how-to-delid...

    Player -

    Did not find in my CECHH01

    Philippe Morin -

  5. XRh3WC3LKEbh42KV
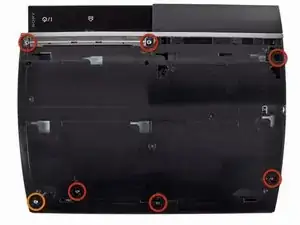
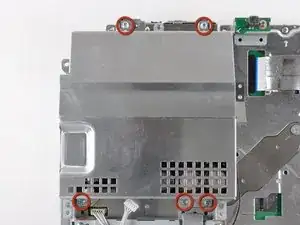
    • Quita los siete tornillos siguientes:

    • Seix tornillos Phillips de 52mm.

    • Un tornillo Phillips de 30mm.

    2 more smaller screws (don't know what size...small) just below the top middle screw and top right screw (in the picture). Look for the arrows...

    E Goo -

    can confirm, might be the backwards compatibles only

    Jordan Giese -

    after you remove the screws, you may have to push a tab to take the cover off if you meet resistance on one side of the cover. Here is a link to a video that explains it, saved me lots of trouble:

    http://youtu.be/jZgekNsRB-A?t=1m54s

    ericksi33 -

    Thanks @ericksi33, this really helped me out.

    hogurt -

    1st attempt, fan loud. Ps3 lasted about 2 wks. 2nd attempt noticed very poor contact between heatsink & cpu,gpu when taking it apart. Research - Found a better way to apply thermal past. I personally disapprove of guide on this. A small bit about the size of a grain of rice in center of cpu is plenty. Clamp the heat sinks back on. Then take it apart & check contact area. Thermal paste should have spread to about the size of a quarter.(more is better. Less then a nickel size is poor contact) possibly weak clamps. Carefully applied pressure onto the cpu & gpu, pressing them into the heatsinks before clamping heatsink clamps on. Achieved greater then quarter sized thermal past spread. Fan silent in comparison & ps3 lasted about a yr. Rarely did I ever hear the fan go to high and get loud after that. About to begin my third fix on this same ps3. One of the first 80g backwards compatible. other then those notes and that this guide was for a different model ps3 (minor differences) I liked this guide. easy to follow.

    brettgomes -

    Although the battery is described as proprietary, it looks like it is the common CR2032 lithium coin battery that is used in calculators and some computers. I haven't had to replace mine but I suspect under the heatshrink cover is a battery holder which will allow the coin battery to be removed and replaced. Then wrap with electrical tape and reinstall.

    RickP -

    I tried this with the heatgun and it ruined my PS3. The CPU and GPU are NOW RUINED!!! It did not work for and made things worst!!! I sent it to a place to get reballed and they said the HEATGUN had overheated my processor and killed them!!! So think twice about doing this. Just because it is already broken, DON'T THINK YOU CAN'T MAKE IT WORST!

    georgehollyoh -

    Why would you try it with a heat gun, no were is it mentioned to do that

    Phillip Pereira -

    There are 2 additional screws to remove , front center and front left , just behind the already marked screws.

    mikentc90 -

    As mentioned and I’ll add so detail too. If you have a model with the card readers there are two more small screws that also need to be removed before moving on to the next step.

    screech -

    2How to Delid and fix the Yellow Light of Death for good (NEC TOKIN Replacement) https://gbatemp.net/threads/how-to-delid...

    Player -

    I felt more comfortable with #2 screwdrivers.

    Philippe Morin -

  6. 6W1JbieOOEwEvj6Y
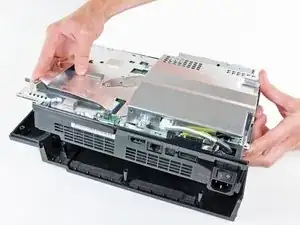
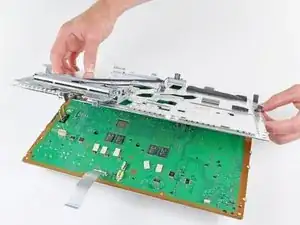
    • Levanta la carcasa superior desde su borde trasero y rótala hacia la parte frontal de la PS3.

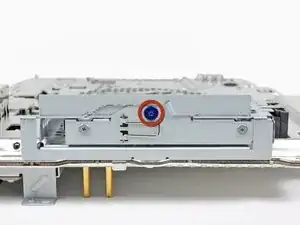
    • Quita la cubierta superior.

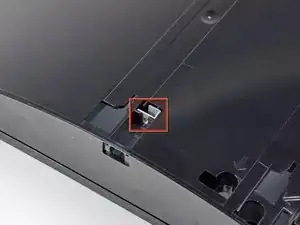
    • Hay un gancho de plástico ubicado en un orificio en la esquina superior trasera derecha. Empuja con cuidado el gancho de plástico un poco desde la parte trasera de la máquina con un spudger para liberar la parte trasera derecha de la carcasa.

    Disconnect the memory card ribbon cable.

    Tobias Stockmann -

    The top would hardly budge on the left back corner and was stuck on the right back corner. There is a plastic hook that needs to be unfastened to lift the top off. It is located in a hole on the top back corner on the right hand side, so the corner straight across the on off button. Just gently push the plastic hook a bit front the rear of the machine with a spudger. It gives easily and the top will be free to lift off after that.

    cornellg -

    I can confirm on CECHH01.

    Philippe Morin -

    Some more details here as well.

    The newer model without SACD support appears to have added that clip to the back right that needs to be pressed to release the top shell.

    If equipped with the card reader you can either have to disconnect the ribbon cable or unclip the reader from the top shell after lifting it up to get finger or tool in there to push clip to side and release reader from top shell. Note: if you failed to remove the card reader screws in the previous step these clips can break.

    screech -

    The original 60GB with the CF card reader on the front has a button protruding out. This will make it difficult to remove the top. You need to unscrew the memory card reader so it can come out easily.

    Brian Caines -

    Wow, this needs more attention. This isn't explained in any disassembly guide I've seen. You also need to be cognizant of the card reader cable when you're lifting off the lid.

    SolidSonicTH -

  7. OdxmYRCnAtAtZTiC
    • Desconecta el cable de alimentación de la unidad Blu-ray de la placa madre.

    • Tira del conector hacia arriba para sacarlo de su zócalo.

    I would add… “Be careful taking these type of connectors apart” …. its easy to pull the entire thing off the motherboard and rip pads !

    The pulled pads can be replaced but its extra work you don’t need :-) and requires equipment and skill to do and cold require jumper wires.

    asears -

    Pull the cables gently, the plug will come out of the socket. The plug is encased by the socket.

    A K -

    That’s also what I did.

    Philippe Morin -

    My PS3 is the CECHL01 and I had to remove the PSU to get to the disk drive ribbon cable.

    Benjamin Burden -

    I mistakenly ripped the whole thing out... I do not know where to begin on repairing it.

    Tom Gillis -

  8. ieKbPALPyOT6aHOM
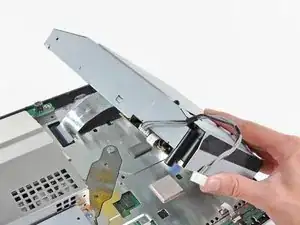
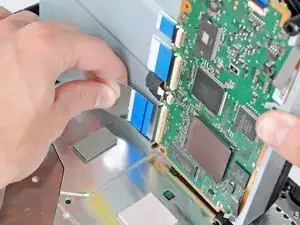
    • Levanta la unidad de Blu-ray desde el borde más cercano a la fuente de alimentación y rótalo alejándolo de la carcasa lo suficiente para poder llegar al cable plano.

  9. JrydZ5XFLxnDoEkA
    JrydZ5XFLxnDoEkA
    NRlknsmmnErk36XY
    Gf6tmmxAdjQaJtwa
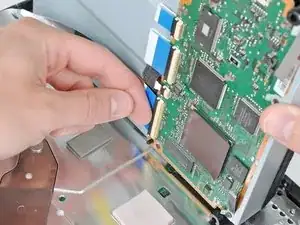
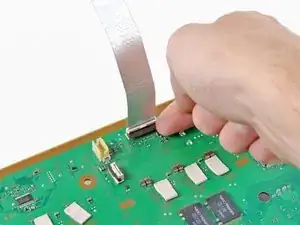
    • Utiliza tus uñas para levantar la pestaña que mantiene el cable plano conectado.

    • Asegúrate de que haces palanca en la pestaña y NO en el zócalo en sí.

    • Tira del cable plano y desconéctalo.

    • Quita la unidad de Blu-ray de tu PS3.

    • Si estás cambiando la unidad de Blu-ray, utiliza el cable de alimentación de la vieja para la nueva.

    Not all systems look like this, some have tape instead of the flap.

    gatewaynomad -

    Every system that I have seen has had the ZIF connector, while some had tape over the connection as well. If your connectors are taped, be sure to remove the tape, then proceed with undoing the ZIF connector.

    Brett Hartt -

    The version 2 systems baseboard PCB started switching to the new narrow 24 pin ZIF header/ribbon and Blu-Ray drive connection.

    You should not attempt to detach the taped ribbon cable from the drive end first as described above for the older wide 60 pin ribbons. You must remove the drive and ribbon as one unit to protect the fragile ZIF sockets.

    The slimmer fragile ribbon is taped to the drive housing to afford a more secure ZIF connection. The opposite base connection is slightly under the PSU.

    continued

    shadetree -

    From continued

    One should firstly remove the PSU: Disconnect the drive power cable as described above. Unscrew the 5 (3-P1 2-P2) PSU mounting screws. Now leaving the power cables attached, lift the PSU off the power baseboard PCB pins and move over slightly to access the baseboard drive cable end ZIF. Release the ZIF latch and slide the entire (drive and ribbon) strait away from the baseboard ZIF to disconnect.

    After the complete drive/ribbon removal, you can carefully remove the restraining tape on the bottom of the drive to release the ribbon ZIF, then remove the 24 pin ribbon from the drive logic PCB.

    Install in reverse order making sure to add new tape to secure the ribbon to the drive.

    shadetree -

    I needed to remove the PSO completely to reach the baseboard drive cable end ZIF. To do that disconnect the power and data (I assume) cables and then pull the unit straight up. To longish prongs are heading straight up into it from the baseboard and it is a bit tight, so gently pull until it's clear.

    cornellg -

    If you are replacing the Blu-ray drive, you must use the same daughterboard that came with your PlayStation 3. The daughterboard is paired to the motherboard, and the Blu-ray drive will not work with a different board. -------------- I understand however my daughterboard is not on the bottom of the blu-ray drive it must be on the inside. Is there any advice out there on how I go about doing this as I am not sure what I am doing???? If someone could post a link or any tips it would be greatly appreciated.

    jimmy -

    When I received my new drive there was a sheet that said you could keep the old boards but you have to 'flash' them with the ps3's digital information. Currently trying to figure out how.....

    Cheffy -

    My CECHH01 has its blu-ray drive encased in a shield plate. Only one ribbon cable is visible. (The one we have to disconnect). Mine had some tape over it.

    Also, I used a spudger instead of my nails.

    Philippe Morin -

  10. srybvbL2FRQyrvc5
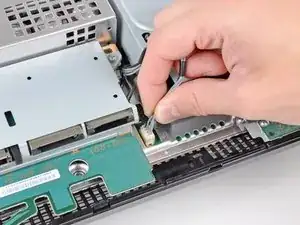
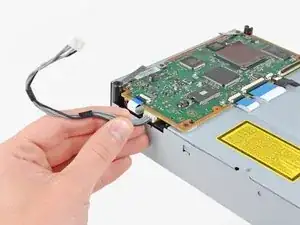
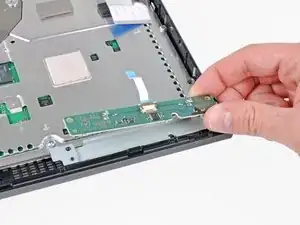
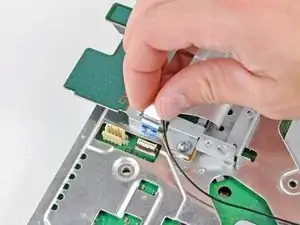
    • Tira del cable de la placa de control hacia arriba para desconectarlo de su zócalo en la placa base.

    Some PS3 versions do not have a separate control board, since the buttons and LEDS are located on the motherboard (for example, in my PS3 model CECHG04). In this case steps 10, 11 and 13 are not applicable.

    markp -

    This is also true for my CECHH01. ?‍♂️

    Philippe Morin -

  11. YwVpEZ3cxJnHpDJB
    YwVpEZ3cxJnHpDJB
    ROIGUjOmDbAubmIA
    • Quita los dos tornillos Phillips de 12mm que sujetan la placa de control a la carasa inferior.

    • Quita de la PS3 la placa de control y su cable.

  12. xaRKXjmUEQmOZKK1
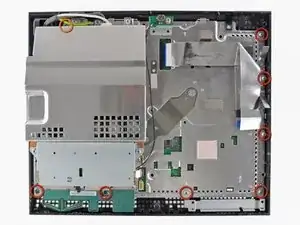
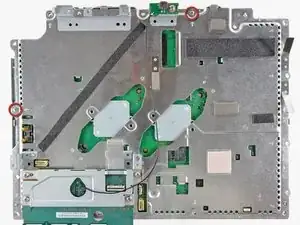
    • Quita los siguientes ocho tornillos que aseguran el conjunto de la placa base a la carcasa inferior:

    • Siete tornillos Phillips (Ph2) de 12 mm.

    • Un tornillo Phillips de 30 mm.

    On my machine (fat PS3 with no card reader and 2 USB ports), there is no upper right screw to remove.

    alansliu -

    That 30mm screw is the one lower down under the power cable, not the higher up one with the embossed arrow pointing at it.

    James Beegle -

    Hey guys, that red and orange you are using are not at all identifiable as separate colors to some of us with colorblindness. I had to get my buddy to tell me which one was orange and which was red. In the future, it would be most helpful if you stuck to contrasting colors. Great guide, thanks for making it!

    Aksel Barnes -

    Step 17 helps with the 30 mm upper left screw

    joshuavivelavida -

    For any further vision impaired people trying to follow along, the single 30mm screw is in the top left of the image.

    James Beegle -

    Voting up the comments about the orange v red colors on the images, I'm surprised that such a simple edit has not been done over the past three+ years.

    Palfrus Wyrmrest -

  13. QtjWjem3O4L2TOUu
    • Quita el soporte de la placa de control.

  14. eypILN1mQVYGMDRO
    eypILN1mQVYGMDRO
    jbeanei2UIcxUDvo
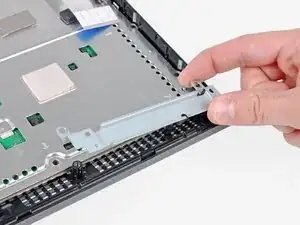
    • Utiliza la punta plana de una espátula para hacer palanca en la tapa bahía del disco duro para así quitarla de la carcasa inferior.

    • Quita la tapa de la bahía del disco duro.

  15. jrPSWIRYp3XOm6O3
    • Levanta el conjunto de la placa base y sácalo de la carcasa inferior.

    My Ps3 was a little different..

    The rear backing plate is connected to the fan shroud beneath the unit that is screwed into the bottom of the case.. And these large chrome pieces attatched to the fan were stuck to the tray that the board is on. Came a part pretty rough, guessing the ps3 got so hot it turned the grease into glue lol

    intotec239 -

    If you already suspect you may have a slightly different PS3 model to the one pictured here STOP RIGHT NOW! Do not try and lift the motherboard off the lower casing if it is not coming easily. On mine, the cooling fan and heat sinks have extra screws directly into the lower plastic case and you will not be able to lift the motherboard out until after you have done Step 27. So skip this step, continue through the guide, skip 18-23 (you probably don't have a memory card reader). After unscrewing the 4 screws in Step 27, pull hard to separate the motherboard from the heat sinks (they will be attached with thermal paste like a glue). Only then will you be able to access the screws to separate the large fan and heat sinks from the plastic lower case.

    Incidentally I totally smashed mine trying to get the lower case off here at step 15 - I broke the screws off, warped the metal on the heat sink and snapped pieces of plastic. But I continued and did the heat gun stuff and it still actually worked!!

    Fat Albert -

  16. xTyFVOwmmMXMJwCY
    • Quita los tornillos Phillips de 7.7 mm que aseguran el cable de tierra al chasis.

    On my PS3 the ground wire(green/yellow) was actually routed under the bolt for the power supply, so I had to remove the power supply before I could removed the AC inlet

    jorgebustos2254 -

  17. q4nQocigEmFQXOxy
    q4nQocigEmFQXOxy
    1dtWtiQIZQJLClNx
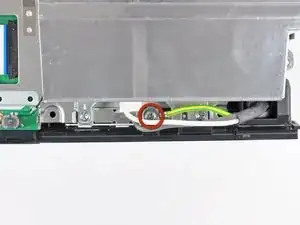
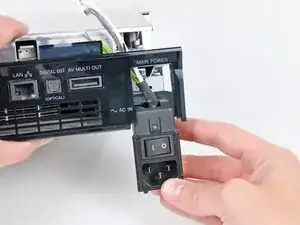
    • Tira de los cables de entrada de AC ligeramente para alejarlos de la carcasa posterior para que quede espacio libre y poder acceder al conector de entrada de AC.

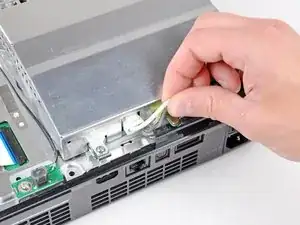
    • Mientras presionas el mecanismo de bloqueo tira del conector AC para sacarlo de su zócalo en la fuente de alimentación.

  18. 4tTsFnti5NTSTEjG
    • Tira del conector AC para sacarlo de la carcasa inferior, ten cuidado ya que los cables pueden quedarse enganchados.

    I had to loosen the two screws on the perforated cover to get the ground wire out.

    asciimo -

    Had to remove 2 screws (the top 2 screws marked in step 25) to get the ground cable out.

    deuxphoria -

    Like @asciimo and @deuxphoria, I had to loosen the same two screws to get the ground wire out. When you're putting the PS3 back together and you're doing the steps in reverse, it helps to leave those two screws unscrewed during Step 25 and wait until you put the AC inlet back in Step 18.

    hogurt -

    You can put the 2 screws back in step 25, just put the AC Outlet before you put in the back plate. (Do Step 18 before step 19 when you are going in reverse)

    xaviertaylor -

  19. BMk4KNKoXZ6YF2GO
    BMk4KNKoXZ6YF2GO
    fX3utQJL1rNCyfP3
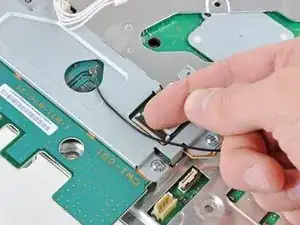
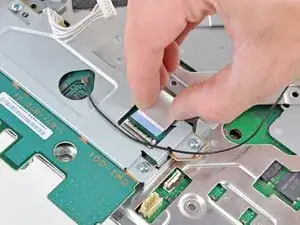
    • Mientras levantas ligeramente la cubierta posterior del conjunto de la placa lógica, usa el extremo plano de un spudger para liberar los clips a lo largo de los bordes superior e inferior de la cubierta posterior.

    If going in reverse do this step after step 18, otherwise you will have hard time getting the earth cable routed.

    xaviertaylor -

  20. YpQbYrWnVeVDcZyc
    • Quita la cubierta posterior del conjunto de la placa lógica.

  21. HOyAUdTf4TPkM4C1
    HOyAUdTf4TPkM4C1
    1tFt4heuTLaSCXDo
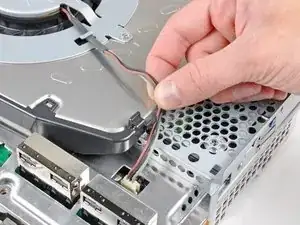
    • Desvía los cables del ventilador del dedo de plástico moldeado en el disipador de calor.

    • Desconecta el ventilador de la placa base.

    • Tira del conector hacia arriba y fuera de su zócalo.

  22. dtMlYNqdVr2ISNBq
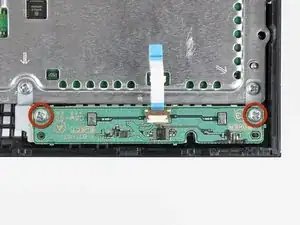
    • Quita los dos tornillos Phillips de 9 mm que sujetan el lector de tarjetas de memoria al chasis.

    Only the very first release of the PS3 used to have the memory card reader. Most recent models do not have it (such as my PS3 model CECHG04). In this case just skip steps 22 and 23.

    markp -

    Also, these screws should be removed in step 5 to prevent breaking the clips that secure the card reader to the top shell.

    screech -

  23. AaMp5W2SDhPLWjON
    AaMp5W2SDhPLWjON
    tTYOxpUaPFQOYGDj
    • Levanta el lector de tarjetas de memoria de la PS3 lo suficiente como para acceder a su cable plano.

    • Levanta la tapa de retención en el zócalo del cable plano del lector de tarjetas de memoria.

    • Asegúrate de hacer palanca en la aleta de retención, no en el zócalo en sí.

    • Extrae el cable plano de su zócalo y quita el lector de tarjetas de memoria.

    I have a CECHA01 and the card reader is attached to the top cover. Per comments at step 5, the 2 screws mentioned at step 22 are removed at step 5. The ribbon cable mentioned here in step 23 should be removed at step 5.

    Jon Tyre -

    If leaving card reader attached to top shell this step should be part of step 6.

    screech -

  24. OTnnIGdXxhQRIEdZ
    • Desconecta los cables de entrada de CC del frente del disipador de calor.

    • Tira del conector hacia la parte frontal de la PS3.

  25. gPUND35OSiSGrNVe
    • Quita los cinco tornillos Phillips de 9 mm que sujetan la fuente de alimentación al chasis.

  26. EOlHOqPhCdcX4WOM
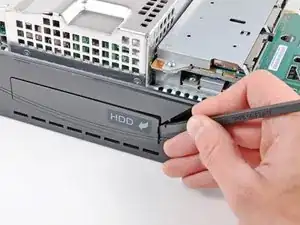
    • Levanta la fuente de alimentación por su borde frontal para despejar los dos postes conectados a la placa base.

    • Quita la fuente de alimentación.

    I had a small black wire taped to the side of my power supply. If you have this - remember to remove the tape, first, or you run the risk of pulling the wire out.

    Oliver Clare -

  27. OLZ2uFatyPysN2qo
    • Quita los cuatro tornillos Phillips de hombro de 16.5 mm que sujetan el disipador de calor a la placa base.

    • Quita los dos soportes sostenidos debajo de los tornillos que acabas de quitar.

  28. RBXS1euymxJTE3sU
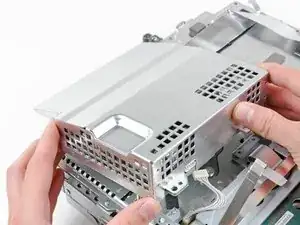
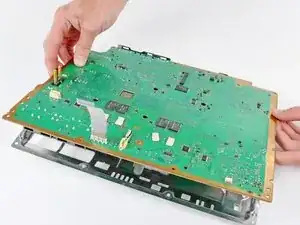
    • Levanta el conjunto de la placa base del disipador de calor.

    • El disipador de calor aún puede estar sujeto en su lugar mediante la pasta térmica. Si este es el caso, saca suavemente el disipador de calor de la carcasa de la placa base. Asegúrate de no doblar las tuberías de cobre en el disipador de calor.

    • Asegúrate de aplicar una nueva capa de pasta térmica al volver a colocar el disipador de calor.

    • ¿Nunca has aplicado pasta térmica antes? Nuestra guía de pasta térmica lo hace fácil.

    • Si sigues la guía de reparación de YLOD, estate atento a dónde aplicar la pasta térmica de reemplazo.

    so do we apply arctic silver 5 thermal paste to the heat sink pads that attach to the CPU GPU,Or do we only apply thermal paste to the chips /pads CPU GPU ?

    David -

    In some PS3 versions, such as my PS3 model CECHG04, the heat sink is attached to the lower half of the motherboard shield, so in order to remove the motherboard you have to lift the top cover and detach the motherboard from the heat sink.

    markp -

    Yeah, on mine (which is the very first revision of the PS3), you have to add a SUPER heavy amount of thermal paste, for it to even make contact. Odd.

    Christopher -

    Can someone confirm what material the heatsink is made of for those wanting to apply liquid metal (I'm sure as !&&* not taking the risk) but might be of interest to others…

    Jjj -

  29. Vdqibftvt2ZeEuaK
    Vdqibftvt2ZeEuaK
    xxPidWRmydTkKaGW
    • Levanta la pestaña que sujeta el cable plano del Blu-ray.

    • Asegúrate de estar levantando la pestaña y no el zócalo en sí.

    • Quita el cable plano.

    On my 60GB model, the Blu-ray ribbon cable was very easy to disconnect, but a real pain to re-connect. It's not as easy as pushing the black fap down to secure the ribbon. This YouTube video helped enormously: https://www.youtube.com/watch?v=Zn1pMLGH....

    hogurt -

    To follow what hogurt said, you have to push down and back a bit with the clip. (Watch the video, it’s good). If the clip bounces right back with resistance, STOP and don’t keep pushing or you will break the clip.

    Steven Vallarian -

  30. E33mwljbCb5Sgyeu
    E33mwljbCb5Sgyeu
    3HtRE4FuHUcy4g4H
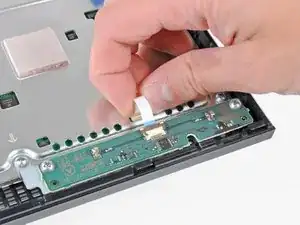
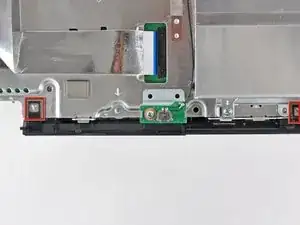
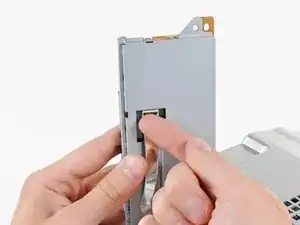
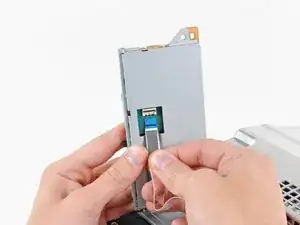
    • Levanta la pestaña del conector del lector de tarjetas de memoria que sujeta el cable plano y desconéctalo.

  31. QUpeOgDX4rDWxkf4
    QUpeOgDX4rDWxkf4
    fwMuTkmvMaHK5lkl
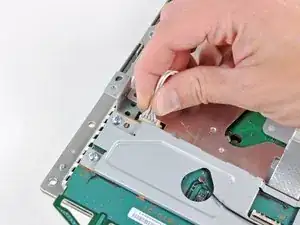
    • Levanta la pestaña que sujeta el cable plano del Wi-Fi/Bluetooth.

    • Tira del cable plano del Wi-Fi/Bluetooth y desconéctalo de su zócalo.

    Missing a step here where you actually remove the cw1-100 board. 4 screws and it comes out.

    Steven Vallarian -

    What does the black cable?

    Robert Brown -

    This cable is the antena cable for WiFi and Bluetooth. This cable is used to conduct electric signal between the antena and the wireless network chip integrated to the device's motherboard.

    Brendan -

  32. WuPAnODLYhmaM3QU
    • Desconécta el cable de entrada de corriente continua (DC) de la placa madre y colócalo a un lado.

    • Tira del conector hacia arriba y sácalo de su zócalo en la placa madre.

  33. 2ZSNnUF5S6XaBEjU
    • Desconecta la batería de la PRAM de la placa madre.

    • El zócalo PRAM es delicado y tiene el potencial para romper la placa madre. Si es posible, sujeta el zócalo mientras tiras del cable.

    In the most recent PS3 versions, the PRAM battery is located on the motherboard: remove it before performing the reflow and don’t forget to put it back before starting the re-assembly.

    markp -

  34. JMMhvyyAnxMrO1YS
    JMMhvyyAnxMrO1YS
    QhiDbxWTPBRv4Enc
    6qJJCFfrgKH2PTQg
    • Rota la batería PRAM al revés de las agujas del reloj y quítala del ensamblaje de la placa madre.

    It is quite hard to rotate counterclockwise, but by rotating it slides out, no pulling up is needed. Hard to do by hand, but much easier if you use some flat nose pliers.

    jerseyzangel -

    Same here. Even with pliers, my PRAM battery was incredibly difficult to remove. When it did finally come loose, part of the black plastic that keeps it secure broke off for me. The whole thing is loose now when I put it back, but still stays in place.

    hogurt -

    Worked. Took 3 hours to complete.

    ****NOTES that weren't mentioned here****

    1. Heat Gun on processors = zigzag from top left to bottom right - then circle back up to the top left. repeat.

    2. No thermal pads available in your area?

    I used the same thermal pads that came with the PS3

    3. No T-10 security screw driver?

    I broke the very first step - I didn't have a t10 security driver and jsut figured I would risk breaking the cover a bit by pulling it straight up - popped right off - then broke the stupid screw right off of it.

    4. took 15 minutes to find things to ensure the motherboard we perfectly level.

    5. I let the Motherboard sit for exactly 17 minutes and then applied Arctic silver.

    6. No Screwtray ?

    I used a piece of duct tape, sorta flipped it around so it was a sticky pad to grab all the screws and not let them get unorganized.

    I hope I remember to report back how long the system runs until it dies again, which I hear happens fairly quickly after this type of operation.

    Good Luck.

    infinitist -

    mine has a small round tab on the PRAM battery housing that locks it in place. i had to slip the flat end of the spudger between the PRAM battery housing and motherboard cover to release the tab. after that it rotated quite easily with no need for pliers or anything.

    jcelkay -

    I didn't handle the motherboard correctly and Mistakenly ripped off the wires off PRAM! How can I fix it?

    Renata Szczech -

    Like jcelkay said, I just needed to use the back end of the spudger on the non-cable side of the PRAM and sort of finesse it a bit. When I did this it became much easier. Getting it back on I had to do the same thing.

    Naomi Young -

  35. xnWxm56LBvNPm2nN
    • Quita el tornillo Phillips azul de 8 mm que sujeta la caja del disco duro al chasis.

  36. RMellgA2sfDabr6D
    RMellgA2sfDabr6D
    3vcbaGSDWkdUuRMC
    q2d4xtQMDQlU6ZYR
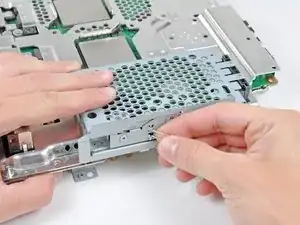
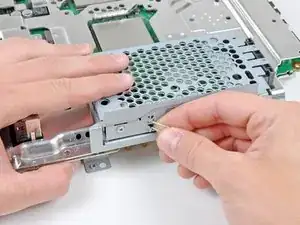
    • Tira de la caja del disco duro hacia la parte frontal del conjunto de la placa madre.

    • Quita el disco duro del conjunto de la placa madre.

  37. EfPNGC6afTnZpWES
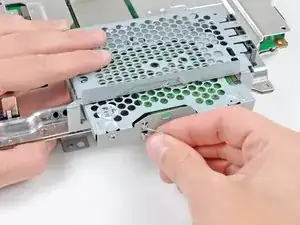
    • Quita los dos tornillos Phillips #0 de 3.7 mm que sujetan el chasis al zócalo del disco duro.

    The fixit kit doesn’t come with a Phillips head small enough?

    William Chance -

  38. VDu2IJH6PrCZD4g3
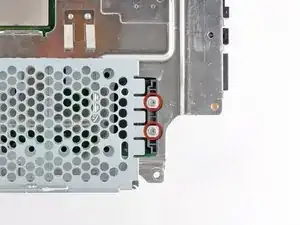
    • Quita los dos tornillos Phillips #0 de 8.3 mm que mantienen juntas las dos mitades de la placa madre.

    On step 38 what is the thread count on the 8.3mm screws? I'm missing and need to know before I go out to the store.

    ericambrose32 -

  39. HppSYQKg5RiOHlNH
    • Con cuidado pasa el cable plano del Wi-Fi/Bluetooth a través del agujero en la parte superior del protector de la placa madre.

    • Quita el protector de la placa madre.

    This step is tricky, because the thermal paste from the chips could act as a ‘semi glue’, so you have to softly try for some minutes…

    Roger Tranchez -

    Also, if I understand correctly, once this step is done, you pretty much NEED to have replacement pads at home, because I the old ones might be wrecked. :P Is it true?

    Philippe Morin -

  40. TTdsFYrPfpmtEv1I
    • Quita la placa madre de su cubierta inferior.

  41. NNWUo1QFA6UwyhKq
    NNWUo1QFA6UwyhKq
    EOdI3PyLfVK4g1ns
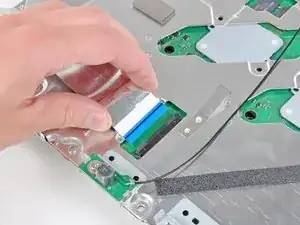
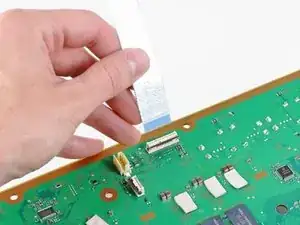
    • Levanta la pestaña que conecta el cable plano del Wi-Fi/Bluetooth.

    • Quita el cable plano del Wi-Fi/Bluetooth de la placa madre.

    • Quedará solo la placa madre.

Conclusión

Para volver a ensamblar tu dispositivo, sigue estas instrucciones en orden inverso.

Walter Galan

685928 Reputación

3 comentarios

Just fixed my YLOD last nite and it works like a charm! best guide on the internet, and it was free! i bought the kit here and it has everything you need minus the gunk off. One thing I'd like to see is how to organize all the screws... I had 2 left over after reassembling the unit. it'll also be nice if the guide showed you how to put certain parts back on (back case, top case units).

It took me a total of 3 hours to do. Not bad considering I don't tear things apart for a living.

other than that, the guide and kit are awesome!

Mike Cha -

Just fixed my PS3 Fat. It's the only one that plays PS2 games so it was hard to part with. Instructions were easy to follow. However, I didn't replace the pads on the chips. PS3 is working beautifully again and the fan is much quieter now. I kept forgetting screws and the WIFI cable so I had to take it apart at least a few more times. Now I can take apart and reassemble the PS3 in my sleep.

Charles -

I need schematics board or service manual ps3 fat CECHGxx

sandy -