Introducción

Usa esta guía para reemplazar el ensamblaje del panel táctil en tu Retina MacBook 2015. Este ensamblaje incluye el panel táctil y el motor háptico.

Es posible que un trackpad que no funcione correctamente simplemente deba calibrarse en lugar de reemplazarse por completo. Lamentablemente, el software de calibración no está disponible fuera de Apple.

Para evitar daños en la placa lógica, cuando la reparación de tu MacBook esté completa pero antes de encenderla, [guía|107711|conéctala a una fuente de alimentación de bajo voltaje] usando un cargador de iPhone de 5 vatios y un Cable USB-C a USB-A. Estos accesorios no están incluidos con tu MacBook, así que asegúrate de tenerlos listos antes de comenzar.

  1. WTpjAPhBML2eX4Z1
    • Antes de proceder, desconecte y apague su MacBook. Cierre la pantalla y póngalo boca abajo.

    • Sólo modelos del 2015: Para evitar daños en la Logic board, cuando la reparación de su MacBook esté acabada, pero antes de encenderla , conéctela a una fuente de bajo voltaje usando un cargador de Iphone de 5W y un cable de USB-C a USB-A.

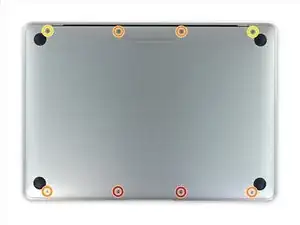
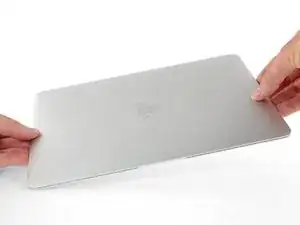
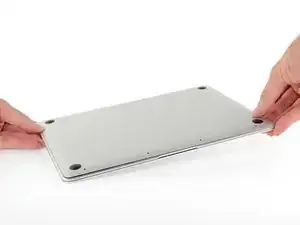
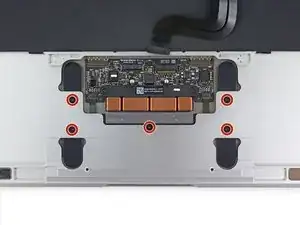
    • Quitar los siguientes ocho tornillos que aseguran la carcasa inferior.

    • Dos tornillos P5 de 1.8 mm

    • Cuatro tornillos P5 de 2.9 mm

    • Dos tornillos P5 de 6.1 mm

    • Tenga en cuenta la orientación de los tornillos al quitarlos - Es necesario reinstalarlos en un ligero ángulo.

    • Mientras hace la reparación, mantenga un seguimiento de cada tornillo y asegúrese de que todo vuelve exactamente a donde procede para evitar dañar su dispositivo.

    If, like me, you didn’t have a P5 Pentalope screwdriver but did have one that fits an iPhone.

    You can sand down the tip until it’s the right size.

    Stuart -

    Thank you Stuart! I would never have thought of this and it worked perfectly.

    R McP -

    Hello,

    where do I plug the USB-C to USB-A cable on MacBook MacBook Pro (Retina, 15-inch, Mid 2015)

    I can’t any port suitable for USB-c !??

    sissi -

    My MacBook had P4 pentalobe screws, notP5

    Greg Lavardera -

    Big thanks to Jeff for such thorough and detailed instructions. This is definitely a more advanced repair so if you're not comfortable with making such repairs, like having experience working on iPhones, computers, etc., you might think twice before attempting. It's very helpful to read all the instructions thoroughly before starting. Plan on 3 to 4 hours—the battery removal along with its adhesive is a real $@$*-show, but totally doable if you followed Jeff's recommendations.

    I'll post a few tips in the comments on each step that I think is worth noting but I will mention here one of the trickier steps. ZIF connectors on the flat cables can be a little tricky, especially if you have never done these. Before attempting to do the first one (step 8) review the others in steps 16, 20, and 25. You'll get a better sense of how these little retaining flaps flip up and what they actually look like when you study each photo in each step—they are very tiny and fragile.

    Steven Gibson -

    Just finished replacing the battery. I followed the directions that came with the battery instead of this guide. In short, Steps 15 to 35 are not necessary. You don't have to completely disassemble the laptop to replace the battery.

    Andrew Mohan -

  2. oFRbloAsCqR4kMZO
    oFRbloAsCqR4kMZO
    o5lecdLOaMSsveUP
    ElEXJd66E6riIMYk
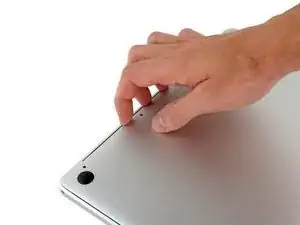
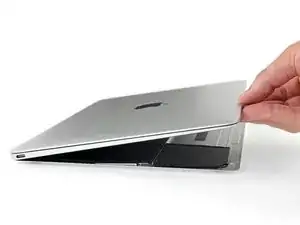
    • Calce sus dedos entre la carcasa superior y la inferior, empezando por la parte trasera del MacBook entre las bisagras.

    • Levante la carcasa inferior solo ligeramente para evitar dañar los cables que conectan la carcasa inferior con la carcasa superior.

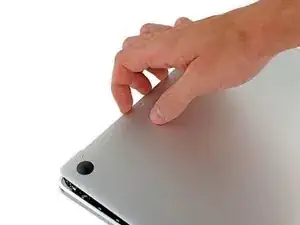
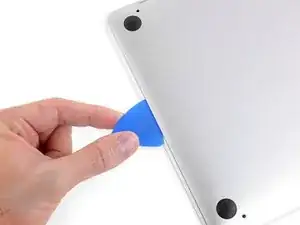
    • Manteniendo un agarre firme, levante sin pausa hasta que la carcasa inferior se separe ligeramente de la carcasa superior.

    • Tal vez experimente bastante resistencia al levantar la carcasa inferior. Si es necesario, deslice una púa o otra herramienta segura EDS debajo de los bordes laterales de la carcasa inferior para solar las dos pestañas ocultas que lo sujetan.

    • Durante el reensamblado, para recolocar las pestañas, presione firmemente cerca de ambos bordes laterales de la carcasa inferior (cerca de donde la púa es insertada en la tercera imagen) hasta que escuche que las pestañas están en su lugar.

  3. WhfqVDXiYnDGnLgT
    • Manteniendo la carcasa inferior en su sitio, dele la vuelta cuidadosamente al MacBook de manera que el logo de Apple esté arriba.

  4. MKqpe3xqSy2LdV36
    MKqpe3xqSy2LdV36
    QxVYS4ypIEZYXcCG
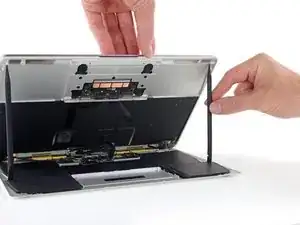
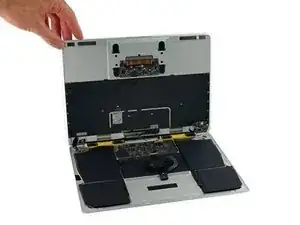
    • Levante la carcasa superior y el display juntos desde el borde frontal y levántelos sobre un ángulo de 45º.

    • Puede ayudar mantener el MacBook abierto en esta posición para el paso siguiente.

    This step at the suggested height tears the ribbon cable. do step 7 first. carefully

    Kiernan -

    If you carefully open the display all the way and then lift the upper case, you can let the display rest on your flat working surface. The upper case will be held in place at an appropriate angle by the display hinge.

    Mike C -

  5. EhZji2KUBnRgJuel
    EhZji2KUBnRgJuel
    qP6MReradWrsRpvL
    rII2VNtEKhVYWyhW
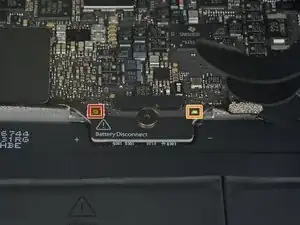
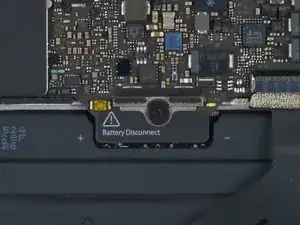
    • Usa el lado plano de un spudger para presionar y sostener los pequeños botones dorados de ‘desconexión de batería’.

    • Si el LED de poder sigue iluminado, continua sosteniendo el botón hasta que el LED se apague, y después suelta. Esto puede tardar hasta 10 segundos.

    • Si el LED no se enciende, suelta el botón después de 5-10 segundos. Presiona y sostiene otra vez por 5-10 segundos, y suelta. Finalmente, presiona y sostiene una tercera vez por 5-10 segundo, y suelta.

    • Esto asegura que el MacBook esté totalmente apagado y que es seguro trabajar en él.

    Wow okay could someone explain why this is necessary? What happens if you skip this step and simply undo the screw to disconnect the power?

    EB Computers -

    Removing the screw does not disconnect the power—power comes from the battery terminals contacting the underside of the logic board, and they’re tricky to separate reliably at this stage of disassembly. This step is the safest and easiest way to kill power; don’t skip it.

    Jeff Suovanen -

    What if I can’t get my LED to power on when reassembling the machine?

    greg2b -

    Update: Realized my USB-C connector (Step 14) wasn’t properly seated.

    greg2b -

    Hi what will happen if i skip this step, coz i did tried to power down the battery by pressing small gold button, but no avail. the LED light still there even after more than 5 times press (5-10secs or more) each press.

    Dimitri Zaborski -

    Did you learn the answer to your question? I'm having the same issue -- I keep pressing the gold button but the battery light stays on.

    R McP -

    Mi laptop doesn’t turn it on doing that ):

    alexisaguinagam26 -

  6. MmsEtQjDTJFLgQTA
    • Cierra el MacBook y cuidadosamente voltéalo al revés.

  7. 2GYsPBbAwkEqs2xq
    • Levantando desde el borde frontal, abre la carcasa inferior hasta un ángulo de unos 45º.

    • Toma cuidado de no dañar los ables planos que siguen uniendo la carcasa inferior al MacBook.

    Before the IPD flex cable can be removed the battery disconnect button has be held down for up to 10 seconds. If the LED near the battery connector is switched on it shows that there is power going through the logic board from the battery, once the button is pressed and this light goes off the machine is safe to be worked on.

    Aaron Dalziel -

  8. lGBQcICtFaslxUHu
    lGBQcICtFaslxUHu
    uhunJJRpxlkLAvhl
    • Usa pinzas para pelar la cinta que cubre el conector ZIF del cable del trackpad.

    Only peel back the first half of the tape covering the trackpad cable ZIF connector—do not completely remove.

    Steven Gibson -

  9. iImRKXAcEWwgyePw
    iImRKXAcEWwgyePw
    KcGgisHdZUr5nacW
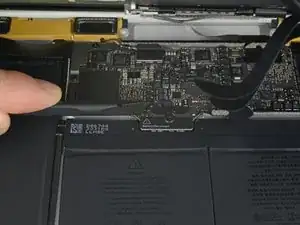
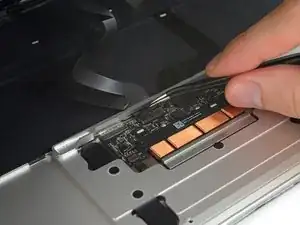
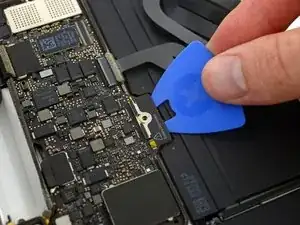
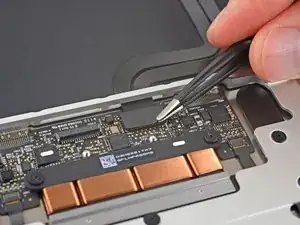
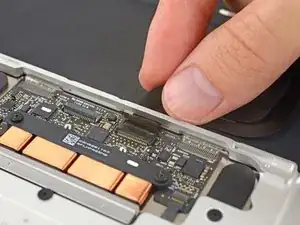
    • Usa una spudger para levantar la solapa de retención del conector ZIF del cable del trackpad.

    This is very tricky indeed - at least on my computer. I failed at this point - having skipped to it as sugested above so as not to stress the ribbons on the other side. The ZIF was not as I expected. They had opened when I pulled up the stick cover and I found I was working on the socket itself. The top edge came adrift after almost no pressure being put on it. The ribon did not come free with gentle pulling though. At that point I put the back on again… waited until the battery recharged a bit and found I had not nroken it after all. I doubt I shall try again. It is much harder to replace than the 15 inch - much…

    Simon Anthony -

    I’ve just found that I have broken it after all. No keyboard. Bluetooth still works so I can use the machine.

    All in all, an expensive mistake. BTW - I did NOT get the kit from IFIXIT - not sold here.

    Simon Anthony -

    I found “Recognizing & Disconnecting Cable Connectors”

    Reconocimiento y desconexión de conectores de cable

    useful, esp. for someone who has not used ZIF connectors and retaining flaps before. There are several retaining flaps that need to be opened. The first time is tricky as you need a sense of how much force to apply. I used the flat end of the provided spudger. Apply progressively firmer upward pressure until the retaining flap pops open. The first time is tricky, but straightforward thereafter.

    Ki Park -

    Mouse back and forth between the two right-side thumbnail photos and you will get a little animation feel showing how these ZIF connectors operate—it's very helpful. Apply light but consistent pressure to pop them up. Helps to go side to side if they're a little stubborn.

    Steven Gibson -

  10. WeOX4JZDcQrqklNd
    WeOX4JZDcQrqklNd
    qtXyAcpgiAVCBmVC
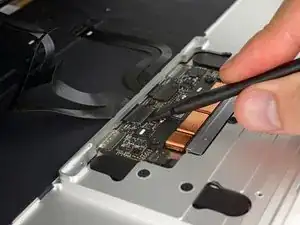
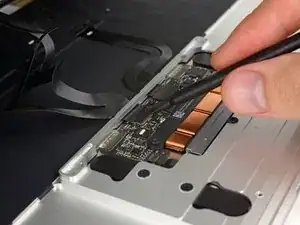
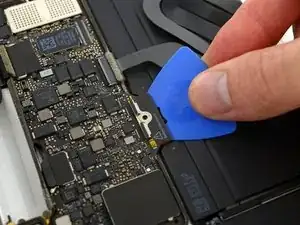
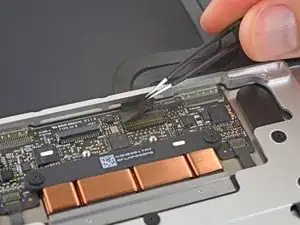
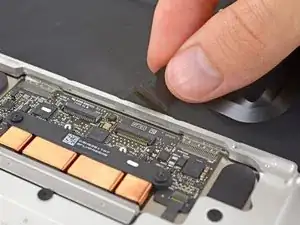
    • Desconecta el cable de cinta del trackpad tirando suavemente de él a través de su ranura en el marco.

  11. iLYAVQ2N3yLQFkvC
    iLYAVQ2N3yLQFkvC
    6yeyROLAT4q2ViBD
    • Cuidadosamente voltea el MacBook, para que la carcasa inferior se mantenga plana.

    • Levanta el ensamble de la carcasa superior/pantalla en un ángulo de 90º, y asientalo en contra de algo fuerte para que no lo tengas que sostener.

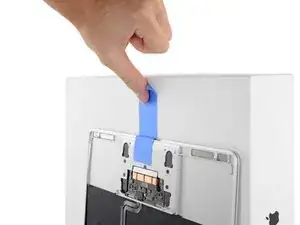
    • Agrega una pieza de cinta cerca del trackpad para asegurar la carcasa superior y prevenir movimientos accidentales.

    • Es posible abrir el MacBook todo el camino y asentar plano los dos lados, pero esto puede dañar los cables flex y no es recomendado.

    You can open the laptop screen all the way open with it flat in the table (screen facing up) and the keyboard should stay up.

    xavierviveros -

  12. AMWf6WIendtSbCD4
    AMWf6WIendtSbCD4
    MwEpxQ3QrEtAHRBE
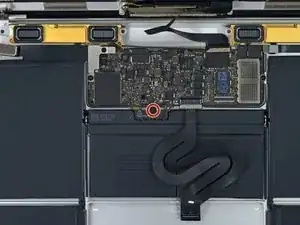
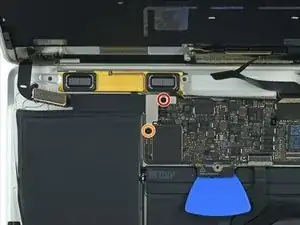
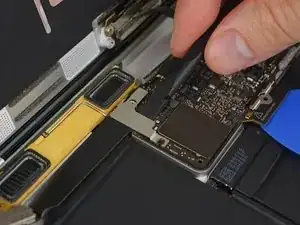
    • Remueve el único tornillo Torx T5 de 2.9 mm asegurando el conector de la batería a la placa lógica.

    • Los modelos de 2015 tienen un clip de tierra plateado con dos almohadillas de espuma directamente debajo de este tornillo, el cual puede soltarse. Asegura de reinstalarlo durante el re-ensamble.

    the moment you opening macbook case and before any tinkering with connections, you MUST press little yellow button on logicboard, located on the right from battery connector - this will disable all power to the board. You can check by looking at the small led on left side of the battery connector - if there is very faint light, it means that power is still there. After pressing button light should go off. Removing screw is not necessary at all, and like I said - you MUST disable power before any touching to connections etc.

    DigiHead -

    Where it says

    “2015 models have a silver grounding clip with two foam pads directly under this screw“

    I have a 2015 MacBook & the grounding clip is not there!

    I’m using this guide to investigate why there are lines on screen or darker screen at certain angles of opening it. Also a background ghosting effect on screen too.

    No obvious damage or loose connectors so wondered if the lack of grounding clip can cause these symptoms?

    Anybody out there know?

    nijafe -

    Either buy the clip and check, or replace the screen (or LB), but the macbook would more likely not start if there is a missing grounded connection, depending on what is being grounded.

    Sean -

  13. pTJmavEfBv2DXgVU
    pTJmavEfBv2DXgVU
    VUebfHZqvKTpapBB
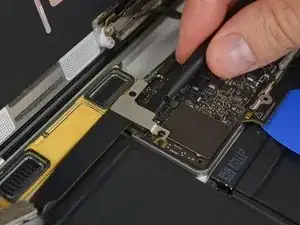
    • Como precaución añadida, puedes desconectar fisicamente la batería insertando una púa de insolación de batería entre la placa lógica y el conector de la batería.

    I HAD TO DO THIS TWICE. After replacing the battery while following this guide to a 'T', the battery was not being recognized by the logic board. Strangely, with the power unplugged it would still light up the screen and tell me the battery was at a critical level, but it would not boot. Resetting the SMC had no effect. I thought I killed my computer or got a bad battery, so as a last ditch effort I re-opened the case, pressed the battery disconnect button, removed the screw and inserted the battery separation tool again to Physically Disconnect the battery from the mainboard. After about 5 minutes I then removed the tool and reassembled everything, plugged in via 5v iphone charger and USBA-C cable again and LO, the battery is now reporting correctly, charging correctly and allowing me to boot on its power .

    Neil Schultz -

  14. NxUtySGy3uWmfBTN
    • Remueve los dos tornillos asegurando el retenedor del cable del puerto USB-C:

    • Tornillo Tri-punta Y00 de 1.1 mm

    • Algunas variaciones de este modelo pueden usar un tornillo Phillips.

    • Tornillo Torx T5 de 3.5 mm

    This was oddly the hardest part. That Tri-Point screw just wouldn’t budge! I had to sand the end of the only Tri-point screwdriver I had in the end to get it to fit.

    Stuart -

    Be sure to get the metal plate under the chip near where the PT5 screw is before tightening

    abscate -

    I should have read the comments before using the provided 1.1 mm Tri-point Y00 bit. I almost stripped the screw but was able to use a small flat head bit to open the screw.

    Ifixit: you may want to update this part in the instructions. Not everyone reads the comment section, esp. when it comes to specification of bits which is basic and must be accurate. This is one of the more critical ones in the procedure that can easily go south. The rest of the instructions are excellent.

    Ki Park -

    early 2015 model here. I’ve used a Y1.5 with cautiously applied down force.

    beaudry.ian -

    My 2015 had a 2.5mm Y screw not a Y000.

    Michael Bonney -

    Adding to the helpful comments above, on replacing the 1.1mm tripoint screw, I found the the magnetism of the nearby speaker coil overcame that of the driver and would draw the screw away or the combo of forces would fling it out of the work area! After fiddling with it for too long, I used some of the battery adhesive removed earlier to attached the screw to the driver. Wax would probably work better if I’d had some.

    jefflyons -

    I used the PH00 head to unscrew what they call the “1.1 mm Tri-point Y00 screw”, NOT the Y00 head, and it unscrewed perfectly fine.

    Grace Escamilla -

    Agreed, my screw was a PH00.

    stephen delaney -

  15. aPJDUSEVa24G5wDu
    aPJDUSEVa24G5wDu
    fQXrJmJDGER4qs1d
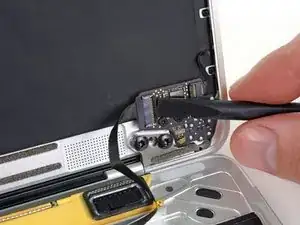
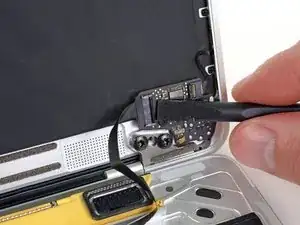
    • Usa el lado plano de un spudger para desconectar el retenedor del cable del puerto USB-C levantandola directamente de la placa lógica.

    • Para recolectar este cable, primero alinea el retenedor de metal arriba de los huecos de los tornillos, luego presiona abajo en el medio del retenedor. Asegura que esta alineado correctamente, o puede que dañes el conector.

    Emphasis on aligning the bracket correctly. What the pictures do not show is that underneath the flat part of the metal bracket (the area between the two screw holes) is a connector that needs to be accurately aligned. Aligning the two screw holes does not imply that the connector is seated correctly.

    After I re-assembled my 2015 MacBook power would not come on. I thought I had damaged the logic board despite being careful and following instructions. Diagnosing the problem took a while. Retracing the steps and focusing on power supply I was able to determine that the metal flap which hides the connector underneath had not made proper contact.

    What I did was to use a finger to get a tactile feel for the connector underneath the metal bracket aligning properly and then press down vertically when it seemed to be aligned. It’s a subtle tactile feel. After re-doing this step, I got power back. Be careful not to damage the connector as noted in the instructions.

    Ki Park -

    Good tip. It’s so easy to damage these fragile connectors by forcing the plug in and reattaching the mounting plate screws

    Peter Newman -

  16. cnkkpqnImOJBKvGP
    cnkkpqnImOJBKvGP
    XcXlAMnXJVFGLOZA
    • Usa un spudger para levantar la solapa revendedora en el conector ZIF de la placa del conector de audio.

  17. gWObarmSQqX4gWjO
    • Desconecta el cable plano de la placa del conector de audio jalándolo afuera del conector ZIF.

    • Durante el re-ensamble, orienta el cable plano para que el lado de las lineas blancas miren hacia ti, como mostrado.

    hey my macbook do not have sound after replacing the topcase, i did connect everything like here you did, also I did the reset of PR and NVRAM. What Can I check more? simply when I open the OS, there is no audio device at all

    dkflu -

    The audio jack cable is a bit of a pain to reinsert. I found if I turned the screen and the bottom on its side, like an open book, I had much better orientation and it was much easier to insert.

    Steven Gibson -

  18. qsq25EnBQxUlVWfC
    qsq25EnBQxUlVWfC
    lOHqLHLS1jBITyjB
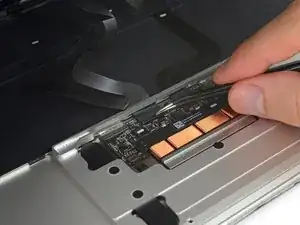
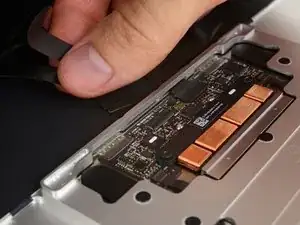
    • Usa un par de pinzas para quitar la cinta que cubre el conector del cable plano del teclado en el panel táctil.

  19. FwPYFEoKV5U5ySgf
    FwPYFEoKV5U5ySgf
    ZRGmScGfTwnoxbCW
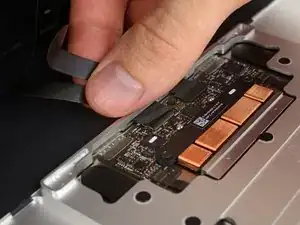
    • Usando un spudger, abre la solapa de retención en el conector ZIF del cable plano del teclado.

  20. uXLmYmnBHY1vIdxm
    uXLmYmnBHY1vIdxm
    ZZPYkcSuVS2TsWxu
    • Tira con cuidado del cable plano del teclado para sacarlo de su ranura en el marco.

  21. EeNhpCYV4BKIrxEj
    • Retira los cinco tornillos Torx T3 de 2,5 mm que sujetan el panel táctil a la carcasa.

    This may require a T4 for the MacBook Retina early 2015. A T3 was too small, but this machine already had a replacement keyboard and body due to Apple recall. Just be aware.

    Neal Abrams -

    I should read this comment. I think my Mac Book have T4 screws. Thanks a lot.

    GOCHI MOTOHIRO -

    2015 here also had t4

    Greg Lavardera -

  22. ccwcmnNKvM1DEhDm
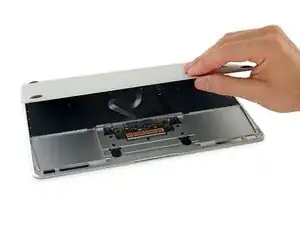
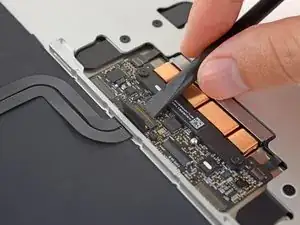
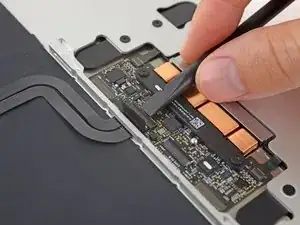
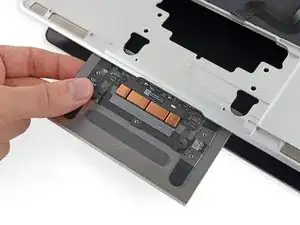
    • Abre la pantalla ligeramente para liberar el ensamblaje del panel táctil de la carcasa superior y retira el ensamblaje del panel táctil.

    • Los soportes de metal a cada lado del panel táctil pueden caerse durante la extracción. Asegúrate de colocarlos como se muestra en la foto durante el montaje.

Conclusión

Para volver a armar tu dispositivo, sigue estas instrucciones en orden inverso. Para evitar daños en la placa lógica, cuando la reparación de tu MacBook esté completa pero antes de encenderla, conéctala a una fuente de alimentación de bajo voltaje usando un cargador de iPhone de 5 vatios y un USB-C a USB- Un cable.

Jeff Suovanen

Miembro Desde 06/08/13

407859 Reputación

Un comentario

Excellent instructions, a big thanks to the author. After completing them the MACBOOK worked OK and then I started to get intermittent problems with the power button and the system bringing the shutdown dialogue without pressing the power button. On closer examination and second removal of the trackpad IPD flex ribbon cable (which also routes keyboard signals to the logic board) the cable came apart at the fold half way along the cable. This cable is very fragile and as mentioned in step 7 you need to be very careful on handling them. In my case I think the cable was fatigued or mechanically damaged where the fold was during manufacture . A replacement cable has been installed and the laptop now works ok.

Mark Timms -