Introducción

Si bien el disipador térmico y el ventilador son dos partes distintas, el proceso para reemplazar uno u otro es exactamente el mismo, ya que están conectados entre sí en la placa base.

  1. AQtIBB1ZGqHTvNg4
    • Voltea la Xbox One S de manera que el fondo de la cubierta mire hacia arriba

  2. cI432T5plYCpwsEg
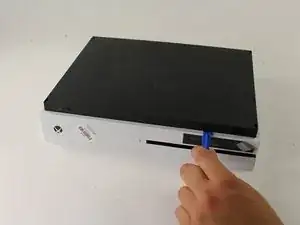
    • Empieza a trabajar en la carcasa en la parte trasera (donde se ubica el sticker de garantía). Inserta el abridor de plástico en el espacio entre el fondo de la carcasa y el lado superior rallado. Luego busca en medio los clips que sostienen la carcasa.

    • Usa el abridor para abrir los clips (valga la redundancia). El mejor método es hacer palanca para separar la cubierta negra del fondo.

    • Escucharás clics cuando estés abriendo la carcasa. Podría ser bastante difícil quitar la cubierta del fondo.

    • Es posible que los clips se rompan cuando quites la cubierta del fondo

    • Recomendamos empezar en una esquina y deslizar el abridor a lo largo de los ejes de la Xbox One S. Una vez que los clips se abran puedes levantar la cubierta para buscar los clips que faltan.

    Be careful not to damage the pairing button on this part

    David -

    Important!!

    You've to start from the back corner where is the information label, because there is a main clip behind a warranty sticker

    Cristian Ramirez -

    They should add this to the guide! I didnt know that, and did some minor damage to the bottom piece where that main clip is.

    I dont mind because it's my own Xbox, but what if it belonged to a customer?

    Charles Jackson -

    They should add this to the guide! I didnt know that, and did some minor damage to the bottom piece where that main clip is.

    I dont mind because it's my own Xbox, but what if it belonged to a customer?

    💯% same opinion!

    profnussecke42o -

    This was hard! I tried using plastic pry tools, but they did not work. A metal tool did, but make sure to watch a video or two, to see what you actually are dealing with. After the videos it went quite smoothly.

    Peterdk -

    I legitimately cannot open the case where the warranty sticker is, ive tried everything, im resorting to a fork to try and open this

    Sohail ツShah -

  3. DGFtVxEdoZKRdLMd
    • Una vez que todos los clips estén abiertos, retira el fondo de la carcasa

  4. GeIOPswgPOYsuGeJ
    GeIOPswgPOYsuGeJ
    uITOYPJDbxUgf4Lc
    • Usa un destornillador Torx T10 de seguridad para retirar los seis tornillos de 50 mm de largo etiquetados de F1 a F6 de la carcasa metálica

    My F3 isn't coming out. The screwdriver isn't sitting tight like it is for the other ones. Any idea on how to fix that?

    ben mccord -

  5. 3AbSAfsoTxUrMeTi
    3AbSAfsoTxUrMeTi
    wudY36aHJeyT6WjV
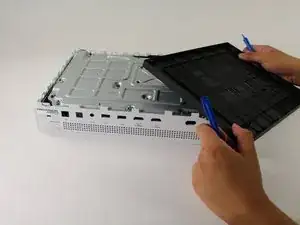
    • Usa el método adecuado para separar suavemente la carcasa interior de la cubierta exterior blanca

    • Haz palanca en los lados de plástico blanco hacia afuera en la parte trasera para separarlos del protector de E/S de plástico

    Essential tip: be sure to slide the metal housing backward, away from the from of the case as pictured above, rather than upward. If not, you can easily break off the teeny momentary switches on the IR blaster board!

    Mark Ross -

    “appropriate method is not descriptive like Mr. Ross’s comment. The original poster should edit the description to ensure people do in fact remove the box from the case appropriately. I would also add arrows to the picture.

    Ryan A -

    ____________⬆️

    ↖️Yes! I see it the same way!↗️

    ⬅️Arrows are always a good thing!➡️

    ↙️Can't do anything wrong with them! ↘️

    ____________⬇️

    😅😅

    profnussecke42o -

  6. EFLSsRhhXsAEZnYh
    EFLSsRhhXsAEZnYh
    OjVWJsD26pdrus24
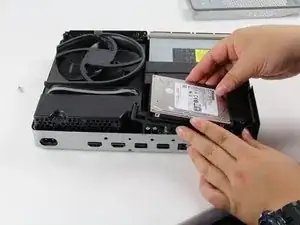
    • Para reemplazar el disco duro, voltea la consola y retira los dos tornillos T10 Torx de 10mm (C3 y C4) de la parte trasera de la Xbox One S

    • Esto permitirá que la cubierta de plástico que rodea al disco duro se separe del resto de la consola

    Some of my silver were gold screws, so just letting people know to look out for that!

    jovialkitten -

    The Torx screw circled on the left is actually C5

    Jaryn Wickman -

    I found the same. On my Xbox One S, it's C3 and C5 that hold in the hard drive caddy. C4 holds in the optical disk caddy.

    jamesr -

  7. X2IJJg3NqtsnAcbY
    X2IJJg3NqtsnAcbY
    NAHJXCj1SgvQNjOx
    3fEHBmUuTGRL3omb
    • Desconecta suavemente el disco duro de la tarjeta madre (en los dos cuerpos conectores de plástico

    Do not disconnect the connector in the second image! There are tiny prongs that bend easily and if bent just a tad bit they will break off. I had first hand experience with this and I ended up breaking my Xbox because I could not put that cable back on.

    [deleted] -

    Do not remove the cable!!!! You can change while the cables are plugged. It took 2 hours trying to put mm precisely all the little pins because of the removal of the cables.

    Please update the post, I could easily end up as the Aaron, breaking the XBOX completly.

    Botond Kopacz -

    Yes, this has also happened to me the connectors had broken and the pins bent and snapped off.

    Samuel Garbutt -

  8. VxZkFMZbQAxM2dKL
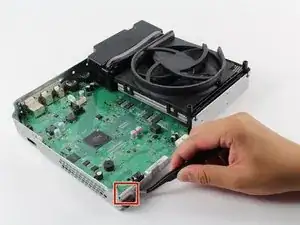
    • Para retirar la unidad de discos ópticos, retira el tornillo Torx T10 plateado de 10mm etiquetado como "C4"

    The image shows screw 'C4' witch is the correct screw. 'C5' is for the HDD.

    GoJoel -

  9. IL5gf22gGXMcJsTw
    • Jala ligeramente la unidad de discos de la tarjeta base y desconecta los conectores de plástico de la tarjeta base

  10. LDNGpA5mc6kvJlfK
    • Para reemplazar la tarjeta base debes retirar los tres tornillos Torx T10 de 10mm etiquetados como "C1", "C2" y "C6"

    • Retira los cuarto tornillos Torx T9 negros de 8mm etiquetados como "A1", "A2", "A3" y "A4"

    The Black screws are T-8 Torx, not T-9!

    Jakub Krzyskow -

    I didnt see this before, so thankfully I was able to use T9 without stripping the screws!

    Charles Jackson -

    IMPORTANT! You also need to remove the two T10 screws labeled B1 and B2 in order to remove the motherboard! I had to figure this out on my own.

    Charles Jackson -

    I hust had to remove the red ones and than i was able to lift the powersupply of the mainboard

    Dennis M -

    I had to remove B1 and B2 as well.

    Seen Bee -

  11. VYVC1GvNKhPpRiky
    • Ubica la abrazadera rectangular plateada en la esquina opuesta a la fuente de poder

  12. HTtOORoftr1aaQ2q
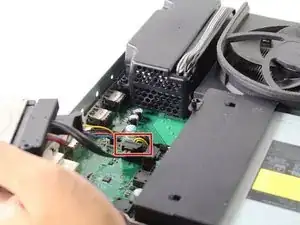
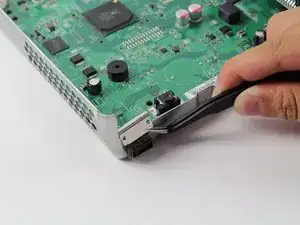
    • Toma la abrazadera con las pinzas de joyero (tweezers). Jala la abrazadera hacia arriba y aléjala de la caja plateada. Muévela de arriba a abajo como un diente si es necesario

    • Aplicar un poco de fuerza aquí para liberar la abrazadera de la caja plateada está bien. El metal es flexible y puede doblarse o sujetarse nuevamente

  13. vHit45sPMfFVLkIo
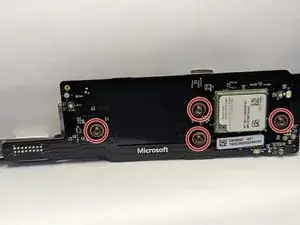
    • Retira los cuatro tornillos Torx T-9 negros de 8 mm etiquetados como "E1", "E2", "E3" y "E4".

  14. HkRCjZl1Gmbk6Z3D
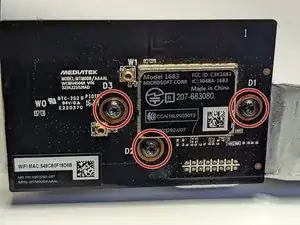
    • Retira los tres tornillos Torx T-9 negros de 8 mm etiquetados como "D1", "D2" y "D3" para quitar la placa Mediatek.

    What bit couldninuse tontake D1-3 screws off

    Amanda Zapata -

  15. agFplIWSUCuRiA26
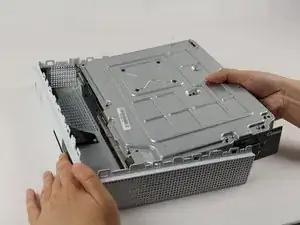
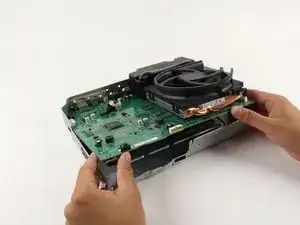
    • Ahora que ya retiraste la abrazadera, levanta suavemente la tarjeta base desde sus bordes para sacarla de la caja metálica. Debería salir fácilmente

    How do you open it?

    johnluxford07@gmail.com -

  16. sMh4CCC5IEHjNbkh
    sMh4CCC5IEHjNbkh
    B1qhnlDAD1dFkJiX
    dBoMB3VUrXfVfEuY
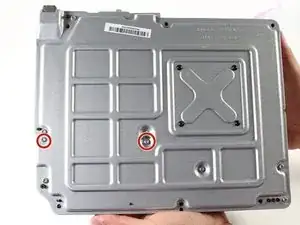
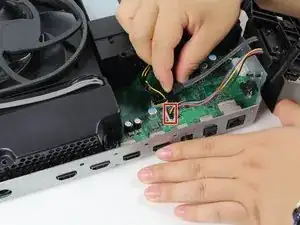
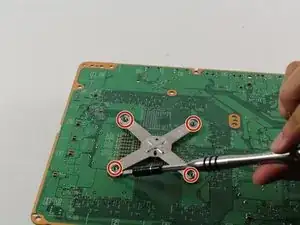
    • Voltea la placa base hacia atrás y encuentra el soporte metálico en forma de x.

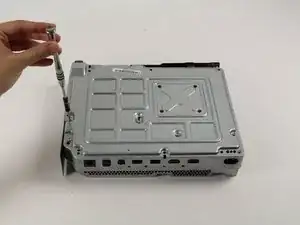
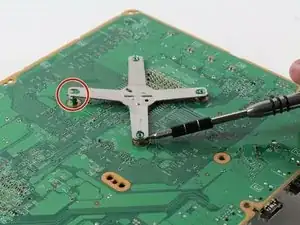
    • Usa un spudger o una herramienta de apertura de plástico para hacer palanca en las esquinas del soporte de los cuatro pequeños soportes verdes.

    • Estas fotos muestran el uso de un destornillador para levantar las esquinas del soporte. Usa un spudger o una herramienta de apertura de plástico para evitar dañar la placa base.

    Wenn der Kühlkörper gelöst wird muss die Wärmeleitpaste erneuert werden !!!

    Rich Martinek -

  17. CsqIKYvcZgHbBJSm
    CsqIKYvcZgHbBJSm
    ReBGNJ5DvHhO4OPY
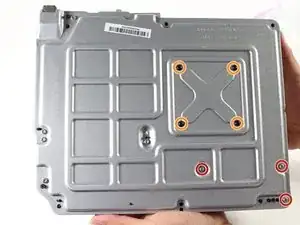
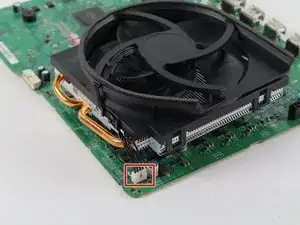
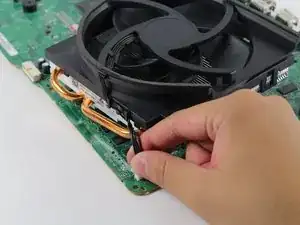
    • Separa el ventilador/disipador de calor de la placa tirando suavemente hacia arriba de los conectores de plástico blanco.

    You don’t have to take the heatsink off the motherboard to take the fan off if that’s what you’re after, just take a flathead and lift the clips and that should let the fan go.

    therealdeimy -

  18. UmpOWPULolRypr3L
    UmpOWPULolRypr3L
    ZogLfptOQXEXGYRB
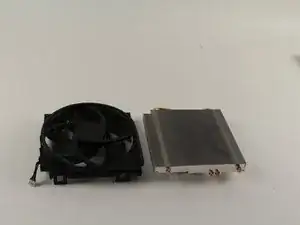
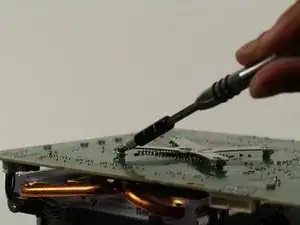
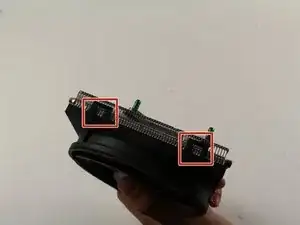
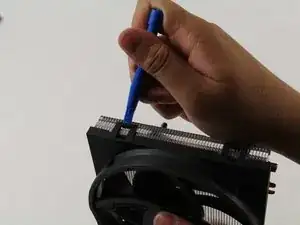
    • Una vez que el disipador de calor/ventilador esté fuera de la placa, usa la herramienta de apertura de plástico para sacar el ventilador de plástico del disipador de calor de metal en los clips rectangulares del ventilador.

    • Puede ser necesario un poco de fuerza para sacar el ventilador del disipador de calor.

    This guide and the visual diagrams provided are great but shouldn’t you at least mention destatic process, work matt grounding and the need to replace thermal compound for the sake of novices doing at home repairs?

    Mikey in a jar -

    I agree with the comments, though I am not the author; I repair stuff like this for a living. Making manuals on IFIXIT.com is a dilemma. The manuals are great if you are the repair guy and need some basic help on a new device. But if then again, if you are the repair guy, and you have much experience, do I really want to give away all my hard-earned experience to the average home DIY guy who thinks they can do everything without paying anybody for it? My .02 on the comment by Mikey is that indeed, a cursory mention of "additional precautions/procedures" should be included, but not with much detail. In fact, I think ALL of the IFIXIT manuals abruptly end and should have a disclaimer to the effect of, "THIS GUIDE MAY BE INCOMPLETE. INEXPERIENCED DIYers MAY PERMANENTLY DAMAGE OR "BRICK" THE DEVICE. WE HIGHLY RECOMMEND CONTACTING AN EXPERIENCED TECHNICIAN."

    B. A. Computer Services -

    "Cannot edit comment after 5 minutes past" is very stupid. What if I wanted to correct a typo or logic error? 5 minutes is way too short. After 24 hours maybe... So now the community knows why we do not post much on this forum. And BTW, the laws in California are very different than the laws in other states, so some of the issues that are pushed do not apply at all in other states.

    B. A. Computer Services -

Conclusión

Para volver a armar tu dispositivo, sigue estas instrucciones en orden inverso.

Erik Ramazzini

Miembro Desde 26/04/17

2535 Reputación

9 comentarios

After researching replacement costs through local "fixit" places and Microsoft and cost ranging from $140 to $175 for fan replacement. Decided to take chance on this fan for Xbox one S. https://www.amazon.com/gp/product/B07HD3... Take time taking the bottom black plastic cover off once it gets started its easy. The corner by MS logo has tab that seems a bit thicker and took some doing to get off. Followed this guide did not have to do port removal. Once I got main white case off I just took hard drive and optical drive screws out. Just lifted enough to get to tab holding fan onto heat sink. popped them off and then replaced with this unit. Be aware when putting optical drive and hard drive back in place there are plastic tabs that match to holes on motherboard and let the two units sit down all the way. Also If I recall the hard drive goes in first and then  optical drive. 15 minutes from start to finish. Worked like a champ right off! thanks for the awesome guide!

Don -

ACHTUNG!!! Schritt 15 ist UNNÖTIG bzw. hat so wie hier beschrieben womöglich FATALE Folgen für Eure Xbox! (Es sei denn Ihr wollt aus irgendeinem mir nicht ersichtlichen Grund den Kühler austauschen und nicht den Lüfter.) Denn was hier unterschlagen wird: Löst man den Kühler wie in den Bildern gezeigt von der Platine wird die Verbindung zwischen Kühleinheit und Prozessor unterbrochen und die Kühlpaste zerbröselt und verliert jegliche Wirkung!

Der Lüfter lässt sich auch OHNE Ablösen des Kühlkörpers relativ einfach von diesem abhebeln. Falls dennoch der Kühlkörper von der Platine abgelöst werden soll/muss (oder so wie in meinem Fall im blinden Vertrauen auf die Richtigkeit obiger Anleitung unnötigerweise entfernt wurde) UNBEDINGT Prozessor und Kühlkörper von der alten Paste befreien und neue Paste auftragen (Anleitungen hierfür finden sich im Netz).

hypokeimenon -

Es rät sich auf jeden Fall an, die Wärmeleitpaste zwischen Kühlkörper und Prozessor zu wechseln (besonders, wenn sie bereits trocken ist und beim Ausbau zerbröselt), wenn man sich schon die Mühe macht und die Xbox komplett demontiert.

Die Anleitung zum Austausch der Wärmeleitpaste gibt es hier:

Cómo aplicar pasta térmica

macminitosh -

Ach ja: außerdem fehlt in der Beschreibung das Lösen der beiden seitlich angebrachten Funkmodule (in neuren Modellen?) und zwei zusätzliche Schrauben (B1 und B2) müssen auch noch entfernt werden, um die Hauptplatine lösen zu können. ;-)

hypokeimenon -

Regulär alles da. Nur separat aufgelistet

Steven Hering -

completely misses steps of the process. screws B1 and B2 are required to be removed to seperate the motherboard, and you didnt mention removing the power supply at all, its just in one step and gone the next. with the help of another barely helpful guide, i managed to figure out enough of it to get the job done. would recommend you use gifs for certain steps.

Typtyr -

noticed this too i might make a guide with improved steps to help future fixers

Hayden -

Excellent detailed description, which I read after, I had figured it out myself, nevertheless spot on, and easy to follow.

james0sn -

what size fan doser it use as i have some leftover 120mm fans but idk if they will fit

lizzie McDonald -